【Kubernetes】创建Pod并分配到指定节点
一、编辑yaml文件###
[root@K8s-Master Tools]# cat hello-world-pod.yaml
apiVersion: v1
kind: Pod
metadata:
name: hello-world
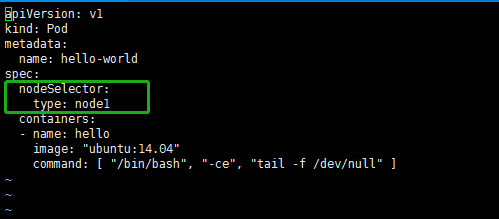
spec:
nodeSelector:
type: node1
containers:
- name: hello
image: "ubuntu:14.04"
command: [ "/bin/bash", "-ce", "tail -f /dev/null" ]
二、创建并查看运行状态###
[root@K8s-Master Tools]# kubectl create -f hello-world-pod.yaml
pod/hello-world created
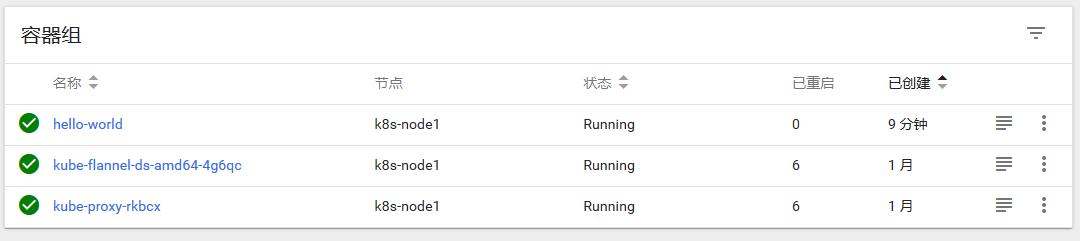
[root@K8s-Master Tools]# kubectl get pod hello-world
NAME READY STATUS RESTARTS AGE
hello-world 1/1 Running 0 8m2s
[root@K8s-Master Tools]# kubectl get pods --all-namespaces
NAMESPACE NAME READY STATUS RESTARTS AGE
default hello-world 1/1 Running 0 3s
kube-system coredns-bccdc95cf-plst5 1/1 Running 13 36d
kube-system coredns-bccdc95cf-vkqzr 1/1 Running 13 36d
kube-system etcd-k8s-master 1/1 Running 15 36d
kube-system kube-apiserver-k8s-master 1/1 Running 15 36d
kube-system kube-controller-manager-k8s-master 1/1 Running 15 36d
kube-system kube-flannel-ds-amd64-4g6qc 1/1 Running 6 36d
kube-system kube-flannel-ds-amd64-ccj8v 1/1 Running 14 36d
kube-system kube-flannel-ds-amd64-fhrfj 1/1 Running 8 36d
kube-system kube-proxy-jp6mp 1/1 Running 13 36d
kube-system kube-proxy-rkbcx 1/1 Running 6 36d
kube-system kube-proxy-rmkqm 1/1 Running 8 36d
kube-system kube-scheduler-k8s-master 1/1 Running 15 36d
kube-system kubernetes-dashboard-6db4897b74-lqfl6 1/1 Running 1 24h
注意点:将pod分配到指定的节点
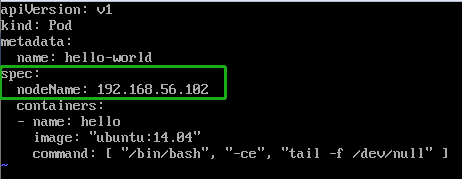
将pod调度到指定节点有2种方式:
方式一:强制约束Pod调度到指定Node节点上
Pod.spec.nodeName
方式二:通过label-selector机制选择节点
Pod.spec.nodeSelector


以下使用第二种方式实现pod调度到指定节点。
①为Node添加label
kubectl label node k8s-node1 type=node1

kubectl get nodes --show-labels
[root@K8s-Master Tools]# kubectl get nodes --show-labels

NAME         STATUS   ROLES    AGE   VERSION   LABELS

k8s-master   Ready    master   37d   v1.15.3   beta.kubernetes.io/arch=amd64,beta.kubernetes.io/os=linux,kubernetes.io/arch=amd64,kubernetes.io/hostname=k8s-master,kubernetes.io/os=linux,node-role.kubernetes.io/master=,type=master

k8s-node1    Ready    <none>   37d   v1.15.3   beta.kubernetes.io/arch=amd64,beta.kubernetes.io/os=linux,kubernetes.io/arch=amd64,kubernetes.io/hostname=k8s-node1,kubernetes.io/os=linux,type=node1

k8s-node2    Ready    <none>   37d   v1.15.3   beta.kubernetes.io/arch=amd64,beta.kubernetes.io/os=linux,kubernetes.io/arch=amd64,kubernetes.io/hostname=k8s-node2,kubernetes.io/os=linux,type=node2
②将pod分配到带有指定label的node
Pod操作:
删除Pod
kubectl delete pod hello
更新Pod
kubctl replace hello-world.yaml
三、可能遇到的问题###
Error:Back-off restarting failed container
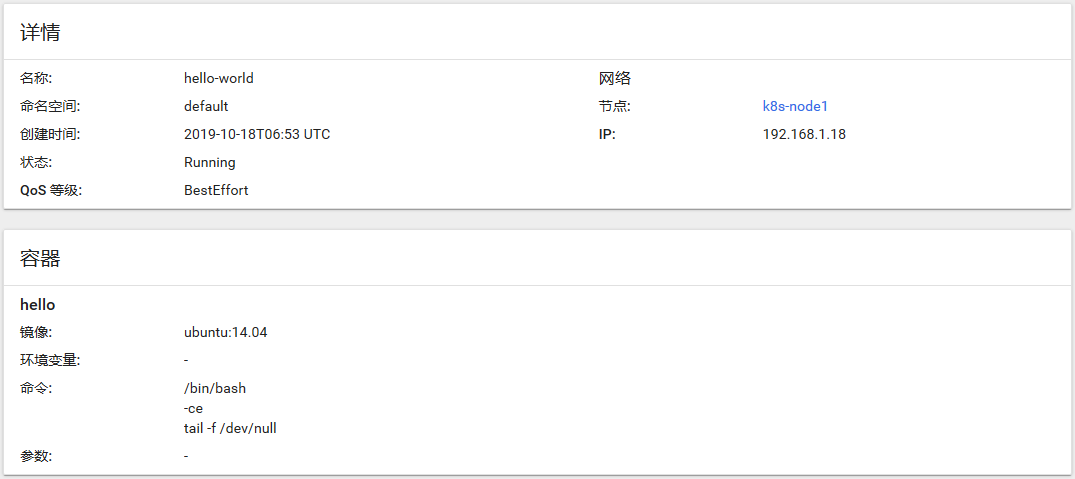
[root@K8s-Master Tools]# kubectl describe pod hello-world

Name:         hello-world

Namespace:    default

Priority:     0

Node:         k8s-node1/10.0.2.15

Start Time:   Fri, 18 Oct 2019 17:16:13 +1100

Labels:       <none>

Annotations:  <none>

Status:       Running

IP:           192.168.1.15

Containers:

  hello:

    Container ID:  docker://ae85d78070dc02a19fed619c6270732cd98bfc1d824262b2935bc2362d7b70e5

    Image:         ubuntu:14.04

    Image ID:      docker-pullable://ubuntu@sha256:2f7c79927b346e436cc14c92bd4e5bd778c3bd7037f35bc639ac1589a7acfa90

    Port:          <none>

    Host Port:     <none>

    Command:

      /bin/echo

      Hello

      world

    State:          Waiting

      Reason:       CrashLoopBackOff

    Last State:     Terminated

      Reason:       Completed

      Exit Code:    0

      Started:      Fri, 18 Oct 2019 17:18:10 +1100

      Finished:     Fri, 18 Oct 2019 17:18:10 +1100

    Ready:          False

    Restart Count:  4

    Environment:    <none>

    Mounts:

      /var/run/secrets/kubernetes.io/serviceaccount from default-token-hctt8 (ro)

Conditions:

  Type              Status

  Initialized       True

  Ready             False

  ContainersReady   False

  PodScheduled      True

Volumes:

  default-token-hctt8:

    Type:        Secret (a volume populated by a Secret)

    SecretName:  default-token-hctt8

    Optional:    false

QoS Class:       BestEffort

Node-Selectors:  type=node1

Tolerations:     node.kubernetes.io/not-ready:NoExecute for 300s

                 node.kubernetes.io/unreachable:NoExecute for 300s

Events:

  Type     Reason     Age                  From                Message

  ----     ------     ----                 ----                -------

  Normal   Scheduled  2m31s                default-scheduler   Successfully assigned default/hello-world to k8s-node1

  Normal   Pulling    2m30s                kubelet, k8s-node1  Pulling image "ubuntu:14.04"

  Normal   Pulled     2m10s                kubelet, k8s-node1  Successfully pulled image "ubuntu:14.04"

  Normal   Created    34s (x5 over 2m10s)  kubelet, k8s-node1  Created container hello

  Normal   Started    34s (x5 over 2m9s)   kubelet, k8s-node1  Started container hello

  Normal   Pulled     34s (x4 over 2m8s)   kubelet, k8s-node1  Container image "ubuntu:14.04" already present on machine

  Warning  BackOff    34s (x9 over 2m7s)   kubelet, k8s-node1  Back-off restarting failed container
解决方法:
As per Describe Pod command listing, your Container inside the Pod has been already completed with exit code 0, which states about successful completion without any errors/problems, but the life cycle for the Pod was very short. To keep Pod running continuously you must specify a task that will never finish.
apiVersion: v1

kind: Pod

metadata:

  name: ubuntu

spec:

  containers:

  - name: ubuntu

    image: ubuntu

    command: [ "/bin/bash", "-ce", "tail -f /dev/null" ]
参考链接:
将pod分配到指定的节点.
Back-off restarting failed container.
【Kubernetes】创建Pod并分配到指定节点的更多相关文章
- [置顶]
kubernetes创建资源yaml文件例子--pod
kubernetes创建pod的yaml文件,参数说明 apiVersion: v1 #指定api版本,此值必须在kubectl apiversion中 kind: Pod #指定创建资源的角色/类型 ...
- pod(一):Kubernetes(k8s)创建pod的两种方式
目录 一.系统环境 二.前言 三.pod 四.创建pod 4.1 环境介绍 4.2 使用命令行的方式创建pod 4.2.1 创建最简单的pod 4.2.2 创建pod,指定镜像下载策略 4.2.3 创 ...
- k8s创建pod流程
kubernetes 创建Pod 的 工作流: step.1 kubectl 向 k8s api server 发起一个create pod 请求(即我们使用Kubectl敲一个create pod命 ...
- K8s创建pod yaml文件详解
kubernetes创建pod的yaml文件,参数说明 apiVersion: v1 #指定api版本,此值必须在kubectl apiversion中 kind: Pod #指定创建资源的角色/类型 ...
- k8s创建pod和service的过程
一.概念介绍 更详细的参见:https://www.kubernetes.org.cn/5335.html 1.K8s K8s 是一种用于在一组主机上运行和协同容器化应用程序的系统,提供应用部署.规划 ...
- Kubernetes集群向指定节点上创建容器
如果需要限制Pod到指定的Node上运行,则可以给Node打标签并给Pod配置NodeSelector. 给节点添加标签 首先查看节点信息 [root@k8s-master ~]# kubectl g ...
- Docker Kubernetes 创建管理 Pod
Docker Kubernetes 容器扩容与缩容 环境: 系统:Centos 7.4 x64 Docker版本:18.09.0 Kubernetes版本:v1.8 管理节点:192.168.1.79 ...
- kubernetes创建资源对象yaml文件例子--pod详解
apiVersion: v1 #指定api版本,此值必须在kubectl apiversion中 kind: Pod #指定创建资源的角色/类型 metadata: #资源的元数据/属性 name: ...
- Kubernetes对Pod调度指定Node以及Node的Taint 和 Toleration
由于博客园不支持markdown,推荐以下url阅读: 原创url:https://blog.csdn.net/weixin_42495873/article/details/103364868 ## ...
随机推荐
- MySQL运算符和函数
运算符 1.算数运算符 加(+):mysql> SELECT 1+1; 减(-):mysql> SELECT 3-2; 乘(*):mysql> SELECT 2*3; 除(/):my ...
- mysql原来是按自然日统计。怎么可以用今天10点到次日10点这样统计???
关于网友提出的" mysql原来是按自然日统计.怎么可以用今天10点到次日10点这样统计???"问题疑问,本网通过在网上对" mysql原来是按自然日统计.怎么可以用今天 ...
- SharpDX初学者教程第3部分:初始化DirectX
原文 http://www.johanfalk.eu/blog/sharpdx-beginners-tutorial-part-3-initializing-directx 在这部分中,我们将初始化D ...
- Gym - 101480D_Digit Division
题意:输入n,m,将n分段,每一段都可以被m整除,有多少种方法. 题解:找到n最多可以分成多少段,1段1中分法,2段2中分法,3段4种分法--计算可知若有x段则2^x-1种分法. 注意:如果n无法被m ...
- Java练习 SDUT-1211_英文金曲大赛
英文金曲大赛 Time Limit: 1000 ms Memory Limit: 65536 KiB Problem Description 我们在"渊子数"的题目中已经了解了渊子 ...
- 看看国外的JavaScript题目
---恢复内容开始--- 题目一 (function(){ return typeof arguments;})(); 答案:“object” arguments是对象,伪数组有两件事要注意这里 ...
- Python深入:01内存管理
在Python中,一切都是指针. 一:对象三特性 所有的Python对象都有三个特性:身份,类型和值. 身份:每一个对象都有一个唯一的身份标识,任何对象 ...
- Twitter 宣布抛弃 Mesos,全面转向Kubernetes
摘要: 从最早Mesos“代言人”到如今的全面转向“Kubernetes Native”,Twitter的举动再一次佐证了‘Kuberentes已经成为容器编排事实标准’这一断言. 本文作者:张磊 阿 ...
- CREATE OR REPLACE FUNCTION
CREATE OR REPLACE FUNCTION SF_Taishou_Ksai_Date(v_receiptNum IN CHAR, ...
- 杂项-Java-百科:war-un
ylbtech-杂项-Java-百科:war-un 1.返回顶部 1. war是一个可以直接运行的web模块,通常用于网站,打成包部署到容器中.以Tomcat来说,将war包放置在其\webapps\ ...