
Ionic3 demo TallyBook 实例2
1.添加插件
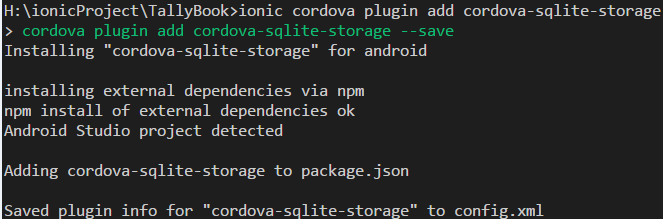
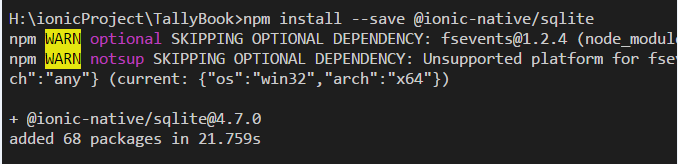
2.相关页面
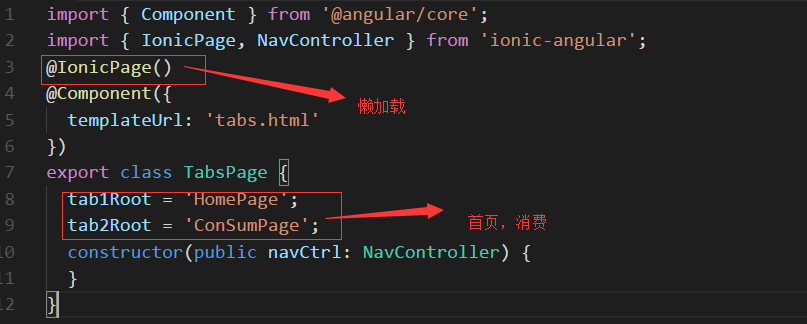
消费页面:
<ion-header>

<ion-navbar>

    <ion-title>

      消费记录

    </ion-title>

   <ion-buttons end>

      <button ion-button icon-only (click)="openModal()">

          <ion-icon name="add"></ion-icon>

        </button>

   </ion-buttons>

  </ion-navbar>

</ion-header>

<ion-content>

  <datepick  (onDaySelect) ="onClick($event)"></datepick>

  <div padding> <h4>{{data.date}} <span class="price">¥{{data.amount}}</span></h4> </div>

      <ion-list>

          <ion-item-sliding *ngFor="let consum of consums; let i=index">

            <ion-item nopadding>

              <h3>{{consum.name}}</h3>

              <p>

                <span>{{consum.type}}</span><br>

                {{consum.description}}

              </p>

              <h3 item-end class="price">

                ¥{{consum.amount}}

              </h3>

            </ion-item>

            <ion-item-options side="right">

              <button ion-button color="primary" >

                <ion-icon name="paper"></ion-icon>

              </button>

              <button ion-button color="danger" >

                <ion-icon name="trash"></ion-icon>

              </button>

            </ion-item-options>

          </ion-item-sliding>

        </ion-list>

</ion-content>
import { Component } from '@angular/core';

import { IonicPage, NavController, NavParams,ModalController  } from 'ionic-angular';

import {SQLiteService} from '../../app/sqlite.service'

import { Toast } from '@ionic-native/toast';

@IonicPage()

@Component({

  selector: 'page-consum',

  templateUrl: 'consum.html'

})

export class ConSumPage {

  consums: any = [];

  data = {date:"", amount:0 };

  constructor(public navCtrl: NavController,

    public modalCtrl: ModalController,

    private sqlite: SQLiteService,

    private toast :Toast

   ) {

  }

  onClick(e){

    //console.log(e);

    let m=parseInt(e.month+1)<10?"0"+parseInt(e.month+1):parseInt(e.month+1).toString();

    let d=parseInt(e.date)<10?"0"+parseInt(e.date):parseInt(e.date).toString();

    let date=e.year+"-"+m+"-"+d;

    this.data.date=date;

    this.sqlite.database.executeSql("select consum.*,consumtype.name typename From   consum  left outer join consumtype on  consum.type=consumtype.id where consum.date=? ORDER BY consum.id DESC",[date]).then(res=>{

      this.consums = [];

      let amount=0;

      for(var i=0; i<res.rows.length; i++) {

        this.consums.push({id:res.rows.item(i).id,

          name:res.rows.item(i).name,

          date:res.rows.item(i).date,

          type:res.rows.item(i).typename,

          description:res.rows.item(i).description,

          amount:res.rows.item(i).amount});

          amount=amount+parseFloat(res.rows.item(i).amount);

      }

      this.data.amount=amount;

    }).catch(e=>{

      this.toast.show(e, '5000', 'center').subscribe(

        toast => {

          console.log(toast);

        }

      );

    });

  }

  openModal(){

    this.navCtrl.push("AddconsumPage");

  }

}
import { NgModule } from '@angular/core';

import { IonicPageModule } from 'ionic-angular';

import { ConSumPage } from './consum';

import { ComponentsModule } from '../../components/components.module'

@NgModule({

  declarations: [

    ConSumPage,

  ],

  imports: [

    IonicPageModule.forChild(ConSumPage),

    ComponentsModule

  ],

})

export class ConSumPageModule {}
添加消费页面:
<ion-header>

  <ion-navbar>

    <ion-title>添加消费</ion-title>

  </ion-navbar>

</ion-header>

<ion-content padding>

    <form (ngSubmit)="saveData()">

        <ion-item>

            <ion-label floating >物品名称</ion-label>

            <ion-input type="text"  [(ngModel)]="data.name" name="name" required="" ></ion-input>

          </ion-item>

        <ion-item>

          <ion-label floating >日期</ion-label>

          <ion-datetime displayFormat="YYYY-MM-DD" [(ngModel)]="data.date" name="date" required=""></ion-datetime>

        </ion-item>

        <ion-item>

          <ion-label floating >类型</ion-label>

          <ion-select [(ngModel)]="data.type" name="type" required=""  cancelText="取消" okText="确定" >

            <ion-option *ngFor="let tp of consumtype" value="{{tp.id}}">{{tp.name}}</ion-option>

          </ion-select>

        </ion-item>

        <ion-item>

          <ion-label floating >描述</ion-label>

          <ion-textarea   [(ngModel)]="data.description" name="description" maxlength="100"  required="" ></ion-textarea>

        </ion-item>

        <ion-item>

          <ion-label floating >金额</ion-label>

          <ion-input type="number" [(ngModel)]="data.amount" name="amount" required="" ></ion-input>

        </ion-item>

        <button ion-button type="submit" block>保存消费</button>

      </form>

</ion-content>
import { Component } from '@angular/core';

import { IonicPage, NavController, NavParams } from 'ionic-angular';

import { Toast } from '@ionic-native/toast';

import {SQLiteService} from '../../app/sqlite.service'

@IonicPage()

@Component({

  selector: 'page-addconsum',

  templateUrl: 'addconsum.html',

})

export class AddconsumPage {

  data = {name:"", date:"", type:"", description:"", amount:0 };

  consumtype : any = [];

  constructor(public navCtrl: NavController,

    public navParams: NavParams,

    private sqlite: SQLiteService,

    private toast: Toast) {

    this.sqlite.database.executeSql("SELECT * FROM consumType ",{}).then(res=>{

      this.consumtype = [];

      for(var i=0; i<res.rows.length; i++) {

        this.consumtype.push({id:res.rows.item(i).id,name:res.rows.item(i).name})

      }

    }).catch(e=>{

      this.toast.show(e, '5000', 'center').subscribe(

        toast => {

          console.log(toast);

        }

      );

    });

  }

  saveData() {

    this.sqlite.database.executeSql('INSERT INTO consum VALUES(NULL,?,?,?,?,?)',

    [ this.data.name,this.data.date,this.data.type,this.data.description,this.data.amount])

    .then(res => {

      this.toast.show('保存成功', '5000', 'center').subscribe(

        toast => {

          this.navCtrl.pop();

        }

      );

    })

    .catch(e => {

      this.toast.show(e, '5000', 'center').subscribe(

        toast => {

          console.log(toast);

        }

      );

    });

  }

  ionViewDidLoad() {

    console.log('ionViewDidLoad AddconsumPage');

  }

}
import { NgModule } from '@angular/core';

import { IonicPageModule } from 'ionic-angular';

import { AddconsumPage } from './addconsum';

@NgModule({

  declarations: [

    AddconsumPage,

  ],

  imports: [

    IonicPageModule.forChild(AddconsumPage),

  ],

})

export class AddconsumPageModule {}
sqlite
import { Platform } from 'ionic-angular';

import { Injectable} from  '@angular/core'

import { SQLite,SQLiteObject} from '@ionic-native/sqlite'

@Injectable()

export class SQLiteService{

    public  database:SQLiteObject;

    private consumtypedata=[

     {id:1,name:"衣着消费支出",description:"包括服装,做衣材料,鞋,袜,帽,及其它零星穿着用品。"}

    ,{id:2,name:"食品消费支出",description:"包括蔬菜,粮油及其制品,在外用餐,肉,禽,蛋及其制品.鲜奶及奶制品,水产品,调味品,豆制品,烟,酒,茶,糖,干鲜瓜果,饮料,糕点等。"}

    ,{id:3,name:"医疗保健服务费支出",description:"包括药品,及各类健身工具。"}

    ,{id:4,name:"交通和通信支出",description:"包括交通费,交通工具购买费,燃料,维修及零部件,通信工具购买费,通信服务费。"}

    ,{id:5,name:"文化和教育费用支出",description:"包括报名费,学杂费,赞助费,租书费,教材,教育软件,家教费,培训班费等。"}

    ,{id:6,name:"非商品及服务性支出",description:"房租,水费,电费,煤气费,物业管理费中介费,旅游支出等。"}

    ,{id:7,name:"日杂消费支出",description:"日常用的东西。"}

    ,{id:8,name:"其它支出",description:"包括理发,洗澡,美容等"}

    ];

    constructor(private platform: Platform,private sqlite: SQLite){

        this.platform.ready().then(() => {

            this.sqlite.create({

                name: 'tally.db',

                location: 'default'

              }).then((db: SQLiteObject) => {

                this.database = db;

                this.createTables();

              });

        });

    }

    createTables(){

        this.database.executeSql("CREATE TABLE IF NOT EXISTS consumType (id INTEGER PRIMARY KEY , name TEXT,description TEXT)",{})

        .then(res=>console.log("consumType success"))

        .catch(e=>console.log(e));

        this.database.executeSql('CREATE TABLE IF NOT EXISTS consum(id INTEGER PRIMARY KEY ,name TEXT, date TEXT, type INTEGER, description TEXT, amount REAL)', {})

        .then(res => {console.log('consum success');})

        .catch(e => {console.log(e);});

        this.consumtypedata.forEach(element => {

            this.database.executeSql("insert into  consumType (id , name, description) values(?,?,?)",[element.id,element.name,element.description])

            .then(res=>console.log("consumType success"))

            .catch(e=>console.log(e));

         });

    }

}
import { NgModule } from  '@angular/core'

import { SQLite} from '@ionic-native/sqlite'

import {SQLiteService} from './sqlite.service'

@NgModule({

    imports:[],

    exports:[],

    declarations:[] ,

    providers:[

        SQLite,

        SQLiteService]

})

export class ServicesModule{}
app.component.ts
import { Component } from '@angular/core';

import { Platform } from 'ionic-angular';

import { StatusBar } from '@ionic-native/status-bar';

import { SplashScreen } from '@ionic-native/splash-screen';

import { SQLiteService} from  './sqlite.service'

@Component({

  templateUrl: 'app.html'

})

export class MyApp {

  rootPage:any = 'TabsPage';

  constructor(platform: Platform, statusBar: StatusBar, splashScreen: SplashScreen,sqliteSerice:SQLiteService) {

    platform.ready().then(() => {

      // Okay, so the platform is ready and our plugins are available.

      // Here you can do any higher level native things you might need.

      statusBar.styleDefault();

      splashScreen.hide();

    });

  }

}
app.module.ts
import { NgModule, ErrorHandler } from '@angular/core';

import { BrowserModule } from '@angular/platform-browser';

import { IonicApp, IonicModule, IonicErrorHandler } from 'ionic-angular';

import { MyApp } from './app.component';

import { StatusBar } from '@ionic-native/status-bar';

import { SplashScreen } from '@ionic-native/splash-screen';

import { Toast } from '@ionic-native/toast';

import {ServicesModule} from './service.module';

import { ComponentsModule} from '../components/components.module'

@NgModule({

  declarations: [

    MyApp

  ],

  imports: [

    BrowserModule,

    ServicesModule,

    ComponentsModule,

    IonicModule.forRoot(MyApp,{

      tabsHideOnSubPages: 'true', //隐藏全部子页面 tabs

    })

  ],

  bootstrap: [IonicApp],

  entryComponents: [

    MyApp

  ],

  providers: [

    StatusBar,

    SplashScreen,

    Toast,

    {provide: ErrorHandler, useClass: IonicErrorHandler}

  ]

})

export class AppModule {}
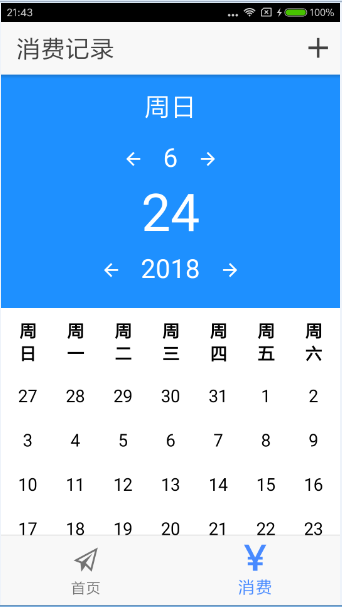
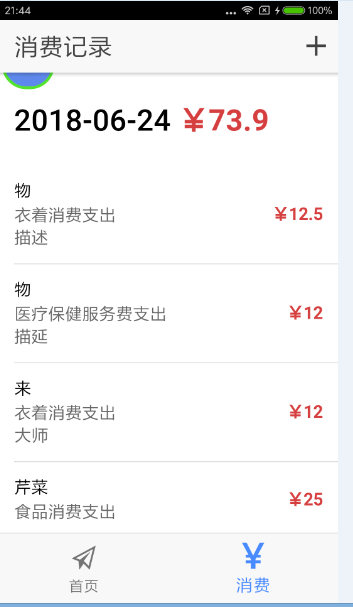
3.展示页面

Ionic3 demo TallyBook 实例2的更多相关文章
- Ionic3 demo TallyBook 实例1
1.创建项目 ionic start TallyBook blank 创建一个空的项目 ionic cordova platform add android 添加andorid平台 io ...
- Ionic3 demo TallyBook 实例3
1.准备应用相关组件 echarts--直接 npm install 安装即可 2.home.ts import { Component,ViewChild,ElementRef } from '@a ...
- appium跑demo简单实例讲解
安装appium,设置 demo.pyfrom appium import webdriver #要装webdriver,方法查看http://www.cnblogs.com/sincoolvip/p ...
- react介绍、环境搭建、demo运行实例
React官网:https://reactjs.org/docs/create-a-new-react-app.html cnpm网址:http://npm.taobao.org/ 1.react介绍 ...
- Ionic3 Demo
本文为原创文章,转载请标明出处 最近又开源了一个小 Demo,基于 Ionic 3.9.2.注册登录功能使用的是 WildDog 野狗通信云,大家可以放心的注册登录玩.电影相关数据来源自"某 ...
- js实现『加载更多』功能实例
DEMO : 滚动加载示例 关于如何实现『加载更多』功能,网上有插件可用,例如比较著名的使用iscroll.js实现的上拉加载更多.下拉刷新功能. 但实际用起来却是很麻烦.由于是第三方插件,要按照对方 ...
- nodejs入门demo
demo的实例引用自:http://www.runoob.com/nodejs/nodejs-event.html, 官方文档:https://nodejs.org/dist/latest-v6.x/ ...
- DWR入门实例(二)
DWR(Direct Web Remoting) DWR is a Java library that enables Java on the server and JavaScript in a b ...
- JDBC连接SqlServer数据库(非默认实例)方法
一般我们在连接数据库的时候都是用的默认实例名,今天遇到了用非默认是实例名:连接代码如下(Java): URL=jdbc:microsoft:sqlserver://192.168.1.85//DEMO ...
随机推荐
- RCC, Reset and Clock Control
- 数据库和java Bean
·1. 数据库和java Bean,字段类型要一致.不一致查询不出来,但不会报错. 字段名称也一样,不一致查询不出来,但不会报错. 2. 数据库和java Bean字段的个数可以不一样,也不会包错 3 ...
- <爬虫实战>糗事百科
1.糗事百科段子.py # 目标:爬取糗事百科段子信息(文字) # 信息包括:作者头像,作者名字,作者等级,段子内容,好笑数目,评论数目 # 解析用学过的几种方法都实验一下①正则表达式.②Beauti ...
- docker集群管理之swarm
一.简介 docker集群管理工具有swarm.k8s.mesos等,我所用到的是swarm和k8s,这篇文章主要介绍swarm:swarm是docker集成的原生 管理工具,只要你安装上docker ...
- jmeter在windows环境下系统参数设置
在windows环境下搭建jmeter的压测实验环境,需要对操作系统默认的一些个参数进行设置,以提高并发能力.特别是作为压力机的时候. Socket 编程时,单机最多可以建立多少个 TCP 连接,受到 ...
- StringBuilder 和 StringBuffer类
通常在涉及到StringBuilder和StringBuffer时中任何一个时,都应该想到另外一个并且在脑海中问自己是否用另外一个更加合适. 为什么这么说,请继续往下看,当然如果你已经对二者烂熟于胸自 ...
- 国行iphone第一次安装APP网络状况
国行手机第一次安装APP,会有请求网络权限的一个弹框出现,在这期间APP是没有任何网络连接的. 想必大部分APP的需求和这个逻辑有冲突. 先推荐一个链接:http://www.cocoachina.c ...
- 【FHQ-Treap】P4146 序列终结者
题意: 给定一个序列,支持区间加,区间反转,区间max询问 裸的平衡树题,这里采用FHQ-Treap 每个节点多记录一个max值和两个lazy_tag,暴力Push_Down即可(大常数选手) 打完这 ...
- JS去重算法
1.遍历数组法 它是最简单的数组去重方法(indexOf方法) 实现思路:新建一个数组,遍历去要重的数组,当值不在新数组的时候(indexOf为-1)就加入该新数组中: var arr=[2,8,5, ...
- mysql Slave 启动失败
报错日志 Slave failed to initialize relay log info structure java程序访问日志显示事物查询失败,排查mysql 发现其中一台slave 启动状态 ...