消息队列系统 -- RabbitMQ
消息队列系统 -- RabbitMQ
RabbitMQ是一个在AMQP基础上完整的,可复用的企业消息系统。他遵循Mozilla Public License开源协议。
MQ全称为Message Queue, 消息队列(MQ)是一种应用程序对应用程序的通信方法。应用程序通过读写出入队列的消息(针对应用程序的数据)来通信,而无需专用连接来链接它们。消 息传递指的是程序之间通过在消息中发送数据进行通信,而不是通过直接调用彼此来通信,直接调用通常是用于诸如远程过程调用的技术。排队指的是应用程序通过 队列来通信。队列的使用除去了接收和发送应用程序同时执行的要求。
RabbitMQ安装
安装配置epel源

   $ rpm -ivh http://dl.fedoraproject.org/pub/epel/6/i386/epel-release-6-8.noarch.rpm

安装erlang

   $ yum -y install erlang

安装RabbitMQ

   $ yum -y install rabbitmq-server
注意:service rabbitmq-server start/stop
安装API
pip install pika

or

easy_install pika

or

源码

https://pypi.python.org/pypi/pika
使用API操作RabbitMQ
基于Queue实现生产者消费者模型
#!/usr/bin/env python

# -*- coding:utf-8 -*-

import Queue

import threading

message = Queue.Queue(10)

def producer(i):

    while True:

        message.put(i)

def consumer(i):

    while True:

        msg = message.get()

for i in range(12):

    t = threading.Thread(target=producer, args=(i,))

    t.start()

for i in range(10):

    t = threading.Thread(target=consumer, args=(i,))

    t.start()
对于RabbitMQ来说,生产和消费不再针对内存里的一个Queue对象,而是某台服务器上的RabbitMQ Server实现的消息队列。
#!/usr/bin/env python

import pika

# ######################### 生产者 #########################

connection = pika.BlockingConnection(pika.ConnectionParameters(

        host='localhost'))

channel = connection.channel()

channel.queue_declare(queue='hello')

channel.basic_publish(exchange='',

                      routing_key='hello',

                      body='Hello World!')

print(" [x] Sent 'Hello World!'")

connection.close()

#!/usr/bin/env python

import pika

# ########################## 消费者 ##########################

connection = pika.BlockingConnection(pika.ConnectionParameters(

        host='localhost'))

channel = connection.channel()

channel.queue_declare(queue='hello')

def callback(ch, method, properties, body):

    print(" [x] Received %r" % body)

channel.basic_consume(callback,

                      queue='hello',

                      no_ack=True)

print(' [*] Waiting for messages. To exit press CTRL+C')

channel.start_consuming()
1、acknowledgment 消息不丢失
no-ack = False,如果消费者遇到情况(its channel is closed, connection is closed, or TCP connection is lost)挂掉了,那么,RabbitMQ会重新将该任务添加到队列中。
消费之:
import pika

connection = pika.BlockingConnection(pika.ConnectionParameters(

        host='10.211.55.4'))

channel = connection.channel()

channel.queue_declare(queue='hello')

def callback(ch, method, properties, body):

    print(" [x] Received %r" % body)

    import time

    time.sleep(10)

    print 'ok'

    ch.basic_ack(delivery_tag = method.delivery_tag)

channel.basic_consume(callback,

                      queue='hello',

                      no_ack=False)

print(' [*] Waiting for messages. To exit press CTRL+C')

channel.start_consuming()
2、durable 消息不丢失
生产者
#!/usr/bin/env python

import pika

connection = pika.BlockingConnection(pika.ConnectionParameters(host='10.211.55.4'))

channel = connection.channel()

# make message persistent

channel.queue_declare(queue='hello', durable=True)

channel.basic_publish(exchange='',

                      routing_key='hello',

                      body='Hello World!',

                      properties=pika.BasicProperties(

                          delivery_mode=2, # make message persistent

                      ))

print(" [x] Sent 'Hello World!'")

connection.close()
消费者
#!/usr/bin/env python

# -*- coding:utf-8 -*-

import pika

connection = pika.BlockingConnection(pika.ConnectionParameters(host='10.211.55.4'))

channel = connection.channel()

# make message persistent

channel.queue_declare(queue='hello', durable=True)

def callback(ch, method, properties, body):

    print(" [x] Received %r" % body)

    import time

    time.sleep(10)

    print 'ok'

    ch.basic_ack(delivery_tag = method.delivery_tag)

channel.basic_consume(callback,

                      queue='hello',

                      no_ack=False)

print(' [*] Waiting for messages. To exit press CTRL+C')

channel.start_consuming()
3、消息获取顺序
默认消息队列里的数据是按照顺序被消费者拿走,例如:消费者1 去队列中获取 奇数 序列的任务,消费者1去队列中获取 偶数 序列的任务。
channel.basic_qos(prefetch_count=1) 表示谁来谁取,不再按照奇偶数排列
#!/usr/bin/env python

# -*- coding:utf-8 -*-

import pika

connection = pika.BlockingConnection(pika.ConnectionParameters(host='10.211.55.4'))

channel = connection.channel()

# make message persistent

channel.queue_declare(queue='hello')

def callback(ch, method, properties, body):

    print(" [x] Received %r" % body)

    import time

    time.sleep(10)

    print 'ok'

    ch.basic_ack(delivery_tag = method.delivery_tag)

channel.basic_qos(prefetch_count=1)

channel.basic_consume(callback,

                      queue='hello',

                      no_ack=False)

print(' [*] Waiting for messages. To exit press CTRL+C')

channel.start_consuming()
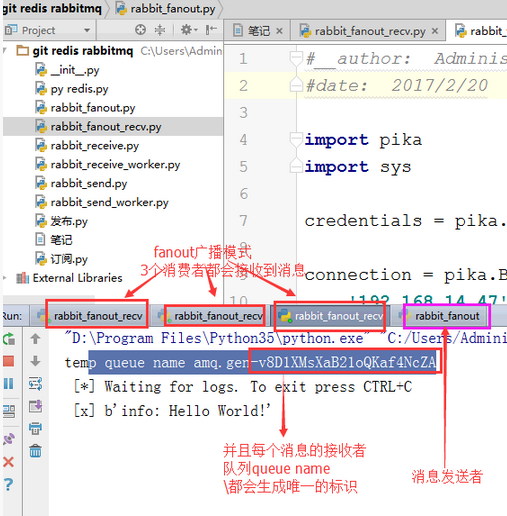
4、发布订阅

发布订阅和简单的消息队列区别在于,发布订阅会将消息发送给所有的订阅者,而消息队列中的数据被消费一次便消失。所以,RabbitMQ实现发布和订阅时,会为每一个订阅者创建一个队列,而发布者发布消息时,会将消息放置在所有相关队列中。
exchange type = fanout
发布者:
#!/usr/bin/env python

import pika

import sys

connection = pika.BlockingConnection(pika.ConnectionParameters(

        host='localhost'))

channel = connection.channel()

channel.exchange_declare(exchange='logs',

                         type='fanout')

message = ' '.join(sys.argv[1:]) or "info: Hello World!"

channel.basic_publish(exchange='logs',

                      routing_key='',

                      body=message)

print(" [x] Sent %r" % message)

connection.close()
订阅者:
#!/usr/bin/env python

import pika

connection = pika.BlockingConnection(pika.ConnectionParameters(

        host='localhost'))

channel = connection.channel()

channel.exchange_declare(exchange='logs',

                         type='fanout')

result = channel.queue_declare(exclusive=True)

queue_name = result.method.queue

channel.queue_bind(exchange='logs',

                   queue=queue_name)

print(' [*] Waiting for logs. To exit press CTRL+C')

def callback(ch, method, properties, body):

    print(" [x] %r" % body)

channel.basic_consume(callback,

                      queue=queue_name,

                      no_ack=True)

channel.start_consuming()
5、关键字发送

exchange type = direct
之前事例,发送消息时明确指定某个队列并向其中发送消息,RabbitMQ还支持根据关键字发送,即:队列绑定关键字,发送者将数据根据关键字发送到消息exchange,exchange根据 关键字 判定应该将数据发送至指定队列。
消费者:
#!/usr/bin/env python

import pika

import sys

connection = pika.BlockingConnection(pika.ConnectionParameters(

        host='localhost'))

channel = connection.channel()

channel.exchange_declare(exchange='direct_logs',

                         type='direct')

result = channel.queue_declare(exclusive=True)

queue_name = result.method.queue

severities = sys.argv[1:]

if not severities:

    sys.stderr.write("Usage: %s [info] [warning] [error]\n" % sys.argv[0])

    sys.exit(1)

for severity in severities:

    channel.queue_bind(exchange='direct_logs',

                       queue=queue_name,

                       routing_key=severity)

print(' [*] Waiting for logs. To exit press CTRL+C')

def callback(ch, method, properties, body):

    print(" [x] %r:%r" % (method.routing_key, body))

channel.basic_consume(callback,

                      queue=queue_name,

                      no_ack=True)

channel.start_consuming()
生产者:
#!/usr/bin/env python

import pika

import sys

connection = pika.BlockingConnection(pika.ConnectionParameters(

        host='localhost'))

channel = connection.channel()

channel.exchange_declare(exchange='direct_logs',

                         type='direct')

severity = sys.argv[1] if len(sys.argv) > 1 else 'info'

message = ' '.join(sys.argv[2:]) or 'Hello World!'

channel.basic_publish(exchange='direct_logs',

                      routing_key=severity,

                      body=message)

print(" [x] Sent %r:%r" % (severity, message))

connection.close()
6、模糊匹配

exchange type = topic
在topic类型下,可以让队列绑定几个模糊的关键字,之后发送者将数据发送到exchange,exchange将传入”路由值“和 ”关键字“进行匹配,匹配成功,则将数据发送到指定队列。
- # 表示可以匹配 0 个 或 多个 单词
- * 表示只能匹配 一个 单词
发送者路由值              队列中

old.boy.python          old.*  -- 不匹配

old.boy.python          old.#  -- 匹配
消费者
#!/usr/bin/env python

import pika

import sys

connection = pika.BlockingConnection(pika.ConnectionParameters(

        host='localhost'))

channel = connection.channel()

channel.exchange_declare(exchange='topic_logs',

                         type='topic')

result = channel.queue_declare(exclusive=True)

queue_name = result.method.queue

binding_keys = sys.argv[1:]

if not binding_keys:

    sys.stderr.write("Usage: %s [binding_key]...\n" % sys.argv[0])

    sys.exit(1)

for binding_key in binding_keys:

    channel.queue_bind(exchange='topic_logs',

                       queue=queue_name,

                       routing_key=binding_key)

print(' [*] Waiting for logs. To exit press CTRL+C')

def callback(ch, method, properties, body):

    print(" [x] %r:%r" % (method.routing_key, body))

channel.basic_consume(callback,

                      queue=queue_name,

                      no_ack=True)

channel.start_consuming()
生产者:
#!/usr/bin/env python

import pika

import sys

connection = pika.BlockingConnection(pika.ConnectionParameters(

        host='localhost'))

channel = connection.channel()

channel.exchange_declare(exchange='topic_logs',

                         type='topic')

routing_key = sys.argv[1] if len(sys.argv) > 1 else 'anonymous.info'

message = ' '.join(sys.argv[2:]) or 'Hello World!'

channel.basic_publish(exchange='topic_logs',

                      routing_key=routing_key,

                      body=message)

print(" [x] Sent %r:%r" % (routing_key, message))

connection.close()
实例测试:
topic 执行过滤

消息队列系统 -- RabbitMQ的更多相关文章
- 【翻译】DotNetMQ: 一个.NET版完整的消息队列系统
在一个大型的分布式系统中,消息队列是不可缺少的中间件,能很好的解决异步消息.应用解耦.均衡并发等问题.在.net中,偶然发现一个效率不错.安全可靠.功能齐全的消息组件,忍不住翻译过来,供大家快速预览. ...
- Spring Boot 揭秘与实战(六) 消息队列篇 - RabbitMQ
文章目录 1. 什么是 RabitMQ 2. Spring Boot 整合 RabbitMQ 3. 实战演练4. 源代码 3.1. 一个简单的实战开始 3.1.1. Configuration 3.1 ...
- 消息队列之 RabbitMQ
https://www.jianshu.com/p/79ca08116d57 关于消息队列,从前年开始断断续续看了些资料,想写很久了,但一直没腾出空,近来分别碰到几个朋友聊这块的技术选型,是时候把这块 ...
- RabbitMQ,Apache的ActiveMQ,阿里RocketMQ,Kafka,ZeroMQ,MetaMQ,Redis也可实现消息队列,RabbitMQ的应用场景以及基本原理介绍,RabbitMQ基础知识详解,RabbitMQ布曙
消息队列及常见消息队列介绍 2017-10-10 09:35操作系统/客户端/人脸识别 一.消息队列(MQ)概述 消息队列(Message Queue),是分布式系统中重要的组件,其通用的使用场景可以 ...
- 转 消息队列之 RabbitMQ
转 https://www.jianshu.com/p/79ca08116d57 消息队列之 RabbitMQ 预流 2017.05.06 16:03* 字数 4884 阅读 80990评论 18喜欢 ...
- 快速入门分布式消息队列之 RabbitMQ(2)
目录 目录 前文列表 RabbitMQ 的特性 Message Acknowledgment 消息应答 Prefetch Count 预取数 RPC 远程过程调用 vhost 虚拟主机 插件系统 最后 ...
- 快速入门分布式消息队列之 RabbitMQ(1)
目录 目录 前言 简介 安装 RabbitMQ 基本对象概念 Message 消息 Producer 生产者 Consumer 消费者 Queue 队列 Exchange 交换机 Binding 绑定 ...
- 消息队列,RabbitMQ、Kafka、RocketMQ
目录 1.消息列队概述 1.1消息队列MQ 1.2AMQP和JMS 1.2.1AMQP 1.2.2JMS 1.2.3AMOP 与 JMS 区别 1.3消息队列产品 1.3.1 Kafka 1.3.2 ...
- 消息队列之rabbitmq学习使用
消息队列之rabbitmq学习使用 1.RabbitMQ简介 1.1.什么是RabbitMQ? RabbitMQ是一个开源的消息代理和队列服务器,用来通过普通协议在完全不同的应用之间共享数据,Rabb ...
随机推荐
- HTML5 通过 FileReader 实现文件上传
概述 在页面中上传时,之前一般都是需要使用form表单进行上传.html5 中提供了FileReader 可以将文件转换成Base64编码字符串,因此就可以直接使用 AJAX实现文件上传. 实现代码 ...
- 移动构造函数(c++11)
1.概念 1)C++中对象发生拷贝的场景可以分为两种,一种是被拷贝的对象还要继续使用,另一种是被拷贝的对象不再使用:第二种一般可以认为是对右值的拷贝 2)C++11中引入了移动构造函数,对象发生拷贝时 ...
- 关于css中设置属性的常识
1.cellspacing 属性规定单元格之间的空间,请勿将该属性与 cellpadding 属性相混淆. 2.cellpadding 属性规定的是单元边沿与单元内容之间的空间. 3.text-ali ...
- STS启动失败:Failed to load the JNI shared library
版本位不一致 jdk 版本 ↓ eclipse 版本(%STS_HOME%/STS.ini)
- MIT molecular Biology 笔记8 RNA剪接
视频 https://www.bilibili.com/video/av7973580/ 教材 Molecular biology of the gene 7th edition J.D. Wat ...
- 移动端 - APP测试要点
功能测试 1.运行 1)App安装完成后的试运行,可正常打开软件. 2)App打开测试,是否有加载状态进度提示. 3)App页面间的切换是否流畅,逻辑是否正确. 2.注册 1)同表单编辑页面 2)用户 ...
- Mysql逻辑分层、存储引擎
Mysql的逻辑分层: 连接层 服务层 引擎层 存储层 常见的数据库引擎有InnorDB和MylSAM. InnorDB:事物优先,(适合高并发操作:行锁,顾名思义一次锁一行数据) MylSAM:性能 ...
- 在mac下配置Andriod环境 包括eclipse和andriod studio
1 前提 已经配置好了java的环境,课上要使用andriod开发. 2 步骤 2.1 eclipse 2.1.1先安装adt,adt是一个在eclipse中开发andriod的插件.由于墙,我是从其 ...
- kotlin面向对象-笔记
- .NET Core下开源任务调度框架Hangfire的Api任务拓展(支持秒级任务)
HangFire的拓展和使用 看了很多博客,小白第一次写博客. 最近由于之前的任务调度框架总出现问题,因此想寻找一个替代品,之前使用的是Quartz.Net,这个框架方便之处就是支持cron表达式适合 ...