MySQL高可用架构-MMM安装教程
安装指南:
一、架构以及服务器信息

| 用途 | IP | 主机名 | Server-id |
| MMM-Monitor01 | 192.168.0.30 | mon01 | - |
| MMM-Monitor02 | 192.168.0.31 | mon02 | - |
| Master01 | 192.168.0.1 | db1 | 1 |
| Master02 | 192.168.0.2 | db2 | 2 |
| Slave01 | 192.168.0.11 | db3 | 11 |
| Slave02 | 192.168.0.12 | db4 | 12 |
| Slave03 | 192.168.0.13 | db5 | 13 |
我使用了以下虚拟IP。它们将由MMM分发给主机。
| IP | 角色 | 描述 |
| 192.168.0.100 | writer | 应用程序应连接到此IP以进行写入查询 |
| 192.168.0.101 | reader | 应用程序应连接到这两个IP之一以进行读取查询 |
| 192.168.0.102 | reader |
二、配置服务器上的MySQL
echo '''[mysql-release-$basearch]

name = Percona-Release YUM repository - $basearch

baseurl = https://mirror.tuna.tsinghua.edu.cn/mysql/yum/mysql57-community-el7/

gpgcheck=''' > /etc/yum.repos.d/mysql.repo
yum -y install mysql mysql-server
[client]

default-character-set = utf8mb4

[mysql]

default-character-set = utf8mb4

[mysqld]

basedir=/var/lib/mysql

datadir=/var/lib/mysql

socket=/var/lib/mysql/mysql.sock

pid-file=/var/run/mysqld/mysqld.pid

# Disabling symbolic-links is recommended to prevent assorted security risks

symbolic-links=

default-storage-engine = InnoDB

########basic settings########

#服务器ID,不能重复

server-id =

character_set_server=utf8mb4

skip_name_resolve =

max_connections =

#MySQL读入缓冲区的大小

read_buffer_size = 16M

#MySQL的随机读缓冲区大小

read_rnd_buffer_size = 8M

#MySQL的顺序读缓冲区大小

sort_buffer_size = 8M

####innodb配置#################

innodb_buffer_pool_size=2G

innodb_log_file_size=256M

innodb_flush_method=O_DIRECT

#innodb独享表空间,优点很多,缺点会导致单个表文件过大

innodb_file_per_table =

# 从库需要加上只读选项,主库不需要此选项,另外super和replica权限的用户不受只读选项的影响。

#read_only=

########log settings########

log_error = /var/log/mysql/error.log

#开启慢查询日志

slow_query_log =

#超出次设定值的SQL即被记录到慢查询日志

long_query_time =

slow_query_log_file = /var/log/mysql/slow.log

#表示记录下没有使用索引的查询

log_queries_not_using_indexes =

#记录管理语句

log_slow_admin_statements =

#开启复制从库复制的慢查询的日志

log_slow_slave_statements =

#设置每分钟增长的没有使用索引查询的日志数量

log_throttle_queries_not_using_indexes =

expire_logs_days =

min_examined_row_limit =

log-bin = mysql-bin

log-bin-index = mysql-bin.index

max-binlog-size = 100M

# binlog-do-db = test

# binlog-ignore-db = mysql

sync-binlog =

relay-log = mysql-relay

relay-log-index = mysql-relay.index

log-slave-updates =

# replicate-do-db = test

# replicate-ignore-db = mysql

#设置为主节点人数

auto_increment_increment =

#在每台服务器上设置为唯一的递增数字,小于auto_increment_increment(两台就是1,)

auto_increment_offset =
最后启动MySQL:
systemctl enable mysql

#此处需要先创建mysql的日志文件夹

mkdir /var/log/mysql && chown -R mysql.mysql /var/log/mysqls

systemctl start mysql
查看MySQL的日志,可以看到如下信息:
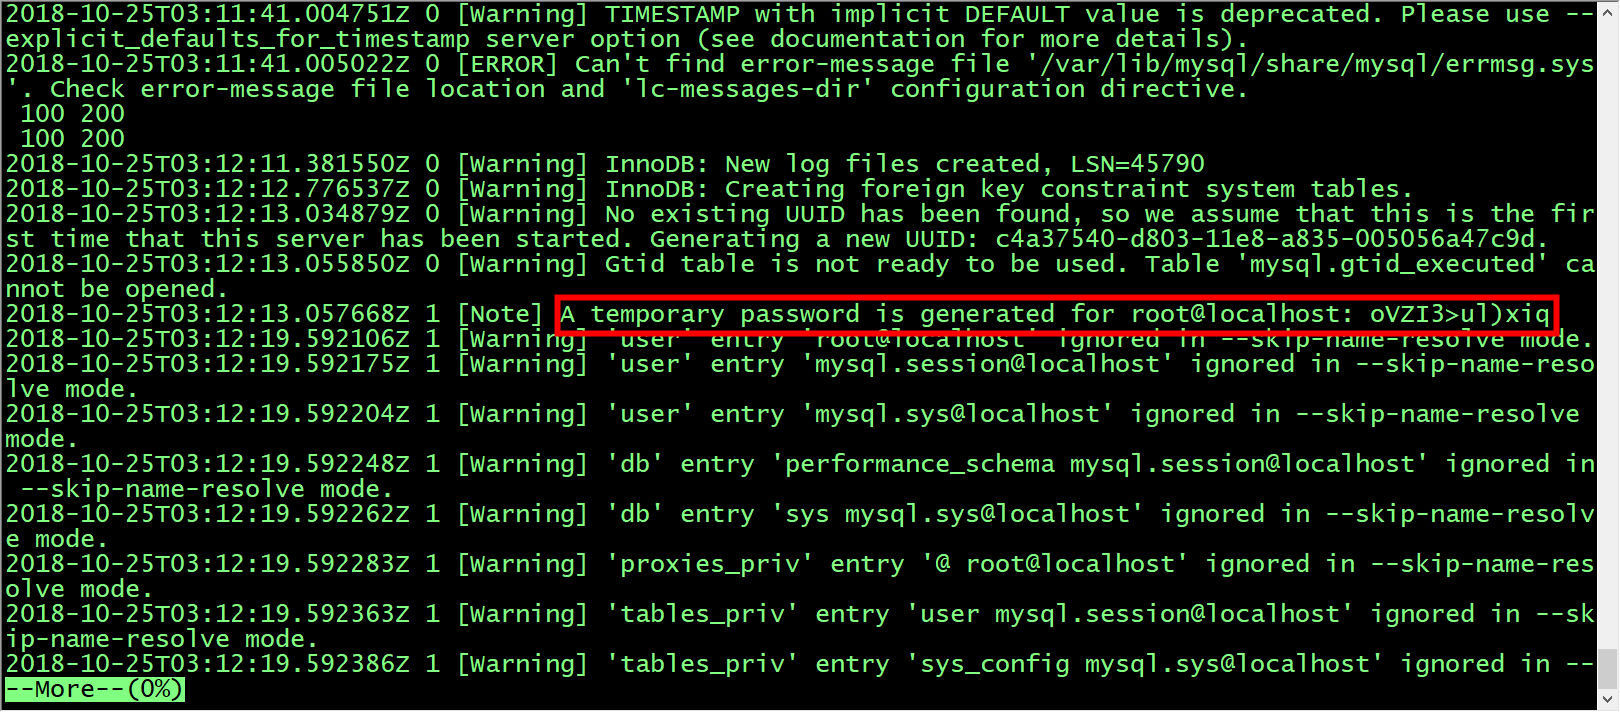
mysql -uroot -p<password>

> set password for 'root'@'localhost'=password('')
| 用途 | 描述 | 权限 |
| monitor user | mmm监视器使用它来检查MySQL服务器的运行状况 | REPLICATION CLIENT |
| agent user | mmm代理用于更改只读模式,复制主机等 | SUPER, REPLICATION CLIENT, PROCESS |
| replication user | 用于复制 | REPLICATION SLAVE |
> GRANT REPLICATION CLIENT                 ON *.* TO 'mmm_monitor'@'192.168.0.%' IDENTIFIED BY 'monitor_password';

> GRANT SUPER, REPLICATION CLIENT, PROCESS ON *.* TO 'mmm_agent'@'192.168.0.%'   IDENTIFIED BY 'agent_password';

> GRANT REPLICATION SLAVE                  ON *.* TO 'replication'@'192.168.0.%' IDENTIFIED BY 'replication_password';
三、db之间的数据同步配置
配置同步的准备工作
> FLUSH TABLES WITH READ LOCK;
> SHOW MASTER STATUS;

+------------------+----------+--------------+------------------+

| File             | Position | Binlog_Do_DB | Binlog_Ignore_DB |

+------------------+----------+--------------+------------------+

| mysql-bin. |       |              |                  |

+------------------+----------+--------------+------------------+

 row in set (0.00 sec)
mysqldump -u root -p --all-databases> /tmp/database-backup.sql
> UNLOCK TABLES;
scp /tmp/database-backup.sql <user> @ 192.168.0.2:/tmp

scp /tmp/database-backup.sql <user> @ 192.168.0.11:/tmp

scp /tmp/database-backup.sql <user> @ 192.168.0.12:/tmp

scp /tmp/database-backup.sql <user> @ 192.168.0.13:/tmp
mysql -u root -p < /tmp/database-backup.sql

mysql -u root -p < /tmp/database-backup.sql

mysql -u root -p < /tmp/database-backup.sql

mysql -u root -p < /tmp/database-backup.sql
flush privileges;

flush privileges;

flush privileges;

flush privileges;
安装复制
> CHANGE MASTER TO master_host ='192.168.0.1',master_port = ,master_user ='replication',

              master_password ='replication_password',master_log_file ='<file>',master_log_pos = <position>;

> CHANGE MASTER TO master_host ='192.168.0.1',master_port = ,master_user ='replication',

              master_password ='replication_password',master_log_file ='<file>',master_log_pos = <position>;

> CHANGE MASTER TO master_host ='192.168.0.1',master_port = ,master_user ='replication',

              master_password ='replication_password',master_log_file ='<file>',master_log_pos = <position>;

> CHANGE MASTER TO master_host ='192.168.0.1',master_port = ,master_user ='replication',

              master_password ='replication_password',master_log_file ='<file>',master_log_pos = <position>;
> START SLAVE;

> START SLAVE;

> START SLAVE;

> START SLAVE;
> SHOW SLAVE STATUS\G

*************************** . row ***************************

             Slave_IO_State: Waiting for master to send event

                Master_Host: 192.168.0.1

                Master_User: replication

                Master_Port:

              Connect_Retry:

…

> SHOW SLAVE STATUS\G

*************************** . row ***************************

             Slave_IO_State: Waiting for master to send event

                Master_Host: 192.168.0.1

                Master_User: replication

                Master_Port:

              Connect_Retry:

…

> SHOW SLAVE STATUS\G

*************************** . row ***************************

             Slave_IO_State: Waiting for master to send event

                Master_Host: 192.168.0.1

                Master_User: replication

                Master_Port:

              Connect_Retry:

…

> SHOW SLAVE STATUS\G

*************************** . row ***************************

             Slave_IO_State: Waiting for master to send event

                Master_Host: 192.168.0.1

                Master_User: replication

                Master_Port:

              Connect_Retry:

…
> SHOW MASTER STATUS;

+------------------+----------+--------------+------------------+

| File             | Position | Binlog_Do_DB | Binlog_Ignore_DB |

+------------------+----------+--------------+------------------+

| mysql-bin. |       |              |                  |

+------------------+----------+--------------+------------------+

 row in set (0.00 sec)
> CHANGE MASTER TO master_host = '192.168.0.2', master_port=, master_user='replication',

              master_password='replication_password', master_log_file='<file>', master_log_pos=<position>;
> START SLAVE;
SHOW SLAVE STATUS\G

*************************** . row ***************************

             Slave_IO_State: Waiting for master to send event

                Master_Host: 192.168.0.2

                Master_User: <replication>

                Master_Port:

              Connect_Retry:

…
四、安装MMM
创建用户
useradd --comment “MMM Script owner” --shell / sbin / nologin mmmd
监控主机
yum install mysql-mmm mysql-mmm-agent mysql-mmm-tools mysql-mmm-monitor -y
数据库主机
yum install -y mysql-mmm-agent
配置MMM
active_master_role      writer

<host default>

    cluster_interface       eno16777984

    pid_path                /run/mysql-mmm-agent.pid

    bin_path                /usr/libexec/mysql-mmm/

    replication_user        replication

    replication_password    replication_password

    agent_user              mmm_agent

    agent_password          agent_password

</host>

<host db1>

    ip      192.168.0.1

    mode    master

    peer    db2

</host>

<host db2>

    ip      192.168.0.2

    mode    master

    peer    db1

</host>

<host db3>

    ip      192.168.0.11

    mode    slave

</host>

<host db4>

    ip      192.168.0.12

    mode    slave

</host>

<host db5>

    ip      192.168.0.13

    mode    slave

</host>

<role writer>

    hosts   db1, db2

    ips     192.168.0.100

    mode    exclusive

</role>

<role reader>

    hosts   db3, db4, db5

    ips     192.168.0.101,192.168.0.102

    mode    balanced

</role>
include mmm_common.conf

this db1
include mmm_common.conf

<monitor>

    ip                  192.168.0.30

    pid_path            /run/mysql-mmm-monitor.pid

    bin_path            /usr/libexec/mysql-mmm

    status_path         /var/lib/mysql-mmm/mmm_mond.status

    ping_ips            192.168.0.254, 192.168.0.1, 192.168.0.2, 192.168.0.11, 192.168.0.12, 192.168.0.13

    auto_set_online

    # The kill_host_bin does not exist by default, though the monitor will

    # throw a warning about it missing.  See the section 5.10 "Kill Host

    # Functionality" in the PDF documentation.

    #

    # kill_host_bin     /usr/libexec/mysql-mmm/monitor/kill_host

    #

</monitor>

<host default>

    monitor_user        mmm_monitor

    monitor_password    monitor_password

</host>

debug
启动MMM
启动agent
systemctl enable mysql-mmm-agent

systemctl start mysql-mmm-agent
启动monitor
systemctl enable mysql-mmm-monitor

systemctl start mysql-mmm-monitor
$ mmm_control show

  db1(192.168.0.1) master/AWAITING_RECOVERY. Roles:

  db2(192.168.0.2) master/AWAITING_RECOVERY. Roles:

  db3(192.168.0.11) slave/AWAITING_RECOVERY. Roles:

  db4(192.168.0.12) slave/AWAITING_RECOVERY. Roles:

  db4(192.168.0.13) slave/AWAITING_RECOVERY. Roles:
$ tail /var/log/mysql-mmm/mmm_mon.warn

…

// ::  WARN Detected new host 'db1': Setting its initial state to 'AWAITING_RECOVERY'. Use 'mmm_control set_online db1' to switch it online.

// ::  WARN Detected new host 'db2': Setting its initial state to 'AWAITING_RECOVERY'. Use 'mmm_control set_online db2' to switch it online.

// ::  WARN Detected new host 'db3': Setting its initial state to 'AWAITING_RECOVERY'. Use 'mmm_control set_online db3' to switch it online.

// ::  WARN Detected new host 'db4': Setting its initial state to 'AWAITING_RECOVERY'. Use 'mmm_control set_online db4' to switch it online.

// ::  WARN Detected new host 'db5': Setting its initial state to 'AWAITING_RECOVERY'. Use 'mmm_control set_online db5' to switch it online.
$ mmm_control set_online db1

OK: State of 'db1' changed to ONLINE. Now you can wait some time and check its new roles!

$ mmm_control set_online db2

OK: State of 'db2' changed to ONLINE. Now you can wait some time and check its new roles!

$ mmm_control set_online db3

OK: State of 'db3' changed to ONLINE. Now you can wait some time and check its new roles!

$ mmm_control set_online db4

OK: State of 'db4' changed to ONLINE. Now you can wait some time and check its new roles!

$ mmm_control set_online db5

OK: State of 'db5' changed to ONLINE. Now you can wait some time and check its new roles!
cat /opt/scripts/mysql-mmm-backup.sh

#!/bin/bash

remote_port_status=`nc -z -w  192.168.0.1 ;echo $?`

local_mmm_svc_status=`systemctl status mysql-mmm-monitor.service | grep Active | awk -F '[(,)]' '{print $2}'`

if [ $remote_port_status -eq  ];then

    echo "远端服务正常!"

    if [ $local_mmm_svc_status = 'running' ];then

        echo "本地服务需要关闭!"

        systemctl stop mysql-mmm-monitor.service

        echo "远端服务器Mysql-mmm-monitor服务恢复,关闭备用服务!" | mail -s 'Mysql-mmm' admin@local.com

    fi

else

    echo "远端服务异常!"

    if [ $local_mmm_svc_status = 'dead' ];then

        echo "本地服务需要开启!"

        systemctl start mysql-mmm-monitor.service

        echo "远端服务器Mysql-mmm-monitor服务异常,启动备用服务!" | mail -s 'Mysql-mmm' admin@local.com

    fi

fi

#配置cron任务

vim /etc/crontab

*/ * * * * root for i in {..};do /opt/scripts/mysql-mmm-backup.sh;sleep ; done >> /opt/scripts/mysql-mmm-backup.log
MySQL高可用架构-MMM安装教程的更多相关文章
- MySQL高可用架构-MMM环境部署记录
MMM介绍MMM(Master-Master replication manager for MySQL)是一套支持双主故障切换和双主日常管理的脚本程序.MMM使用Perl语言开发,主要用来监控和管理 ...
- MySQL高可用架构-MMM、MHA、MGR、PXC
主从复制如何工作 在主库把数据记录到binlog(二进制日志). 备库开IO线程把binlog复制到自己的relaylog(中继日志). 备库读取中继日志,重放到备库上. 半同步复制 半同步复制可以确 ...
- [MySQL] 高可用架构MMM简单介绍
一.来源及原理: 众所周知,MySQL自身提供了AB复制(主从复制),然后可以很轻松实现master-master双向复制,同时再为其中一个Master节点搭建一个Slave库. 这样就实现了MySQ ...
- MySQL高可用架构之Mycat-关于Mycat安装和参数设置详解
MySQL高可用架构之Mycat-关于Mycat安装和参数设置详解 作者:尹正杰 版权声明:原创作品,谢绝转载!否则将追究法律责任. 一.Mycat介绍 1>.什么是Mycat Mycat背后是 ...
- (转)MySQL高可用架构之MHA
MySQL高可用架构之MHA 原文:http://www.cnblogs.com/gomysql/p/3675429.html 简介: MHA(Master High Availability)目前 ...
- 从mysql高可用架构看高可用架构设计
高可用HA(High Availability)是分布式系统架构设计中必须考虑的因素之一,它通常是指,通过设计减少系统不能提供服务的时间. 假设系统一直能够提供服务,我们说系统的可用性是100%.如果 ...
- mysql高可用架构之MHA,haproxy实现读写分离详解
MySQL高可用架构之MHA 一.运维人员需要掌握的MySQL技术: 1.基本SQL语句 2.基本的管理[库表数据的管理 权限的管理] 3.容灾 保证数据不丢失. 二.工作中MySQ ...
- 032:基于Consul和MGR的MySQL高可用架构
目录 一.Consul 1.Consul简介 2.准备环境 3.Consul 安装 4.Consul配置文件 5.Consul 服务检查脚本 6.Consul启动 二.MGR搭建 1.MGR配置 2. ...
- MySQL 高可用架构在业务层面的应用分析
MySQL 高可用架构在业务层面的应用分析 http://mp.weixin.qq.com/s?__biz=MzAxNjAzMTQyMA==&mid=208312443&idx=1&a ...
随机推荐
- C# Bitmap长宽参数构造的图片对象的每个像素ARGB都是0
var img = new Bitmap(100 , 100); for (int i = 0; i < img.Width; i++) { for (int j = 0; j < i ...
- Transforming Real-Time Task Graphs to Improve Schedulability
Basic idea: insert artificial delays to the release times of certain vertices of a task graph to ge ...
- linux命令tee用法
功能说明:读取标准输入的数据,并将其内容输出成文件. 语 法:tee [-ai][--help][--version][文件…] 补充说明:tee指令会从标准输入设备读取数据,将其内容输出到标准输出设 ...
- DOM中的事件对象和IE事件对象
DOM中的事件对象 IE事件对象 属性/方法 类型 读/写 说明 属性/方法 类型 读/写 说明 bubles Boolean 只读 表明事件是否冒泡 cancleBubble Boolean ...
- 论文翻译技巧--Notepad替换回车
- Java异常、事件、多线程
异常 捕捉异常,以便程序继续执行,同时可进行异常处理使程序更加健壮. Throwble类,派生Exception类和Error类,Exception类供应用程序用,Error类系统保留 ...
- linux grep进阶
1.搜寻特定字符串 搜寻特定字符串很简单吧?假设我们要从刚刚的文件当中取得 the 这个特定字符串,最简单的方式就是这样: 那如果想要『反向选择』呢?也就是说,当该行没有 'the' 这个字符串时才显 ...
- 软工网络15团队作业4——Alpha阶段敏捷冲刺(一)
第 1 篇 Scrum 冲刺: 各个成员在 Alpha 阶段认领的任务 成员 任务 预期任务量/小时 曾艺佳 学习模块:单词及其释义 单词发音 例句学习 添加笔记 ...
- Beta阶段第五篇Scrum冲刺博客-Day4
1.站立式会议 提供当天站立式会议照片一张 2.每个人的工作 (有work item 的ID),并将其记录在码云项目管理中: 昨天已完成的工作. 张晨晨:目标增加单词收藏功能 郭琪容:学习收藏功能的实 ...
- noip第28课作业
分段数列 [问题描述] 对于给定的一个长度为N的正整数数列A[i],现要将其分成连续的若干段,并且每段和不超过M(可以等于M),问最少能将其分成多少段使得满足要求. 输入格式: 输入第1行包含两个正整 ...