mysql高可用框架-MHA
- 用一个管理节点监控后端数据库主库可用性
- 提供VIP漂移接口,不提供具体方法
- 提供补全从库日志的脚本
.png)
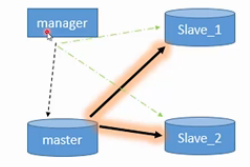
- 监控主库,提供自动主从切换;
- 提供VIP漂移接口
- 提供补全从库日志的脚本
- 规划
- 配置服务器间域名和ssh互信访问
- 在manager节点安装MHA node 和manager组件及依赖包
- 在数据库服务器安装MHA node组件及依赖包
- 配置VIP管理脚本master_ip_failover和master_ip_online_change
- 配置MHA配置文件mha_manager.cnf
- 数据库配置主从,添加mha连接用户 ...etc
- 启动MHA开始监控数据库主从集群
.png)
操作步骤:
- .确保主从复制配置完成
- 此列中主从复制账号repl
-
- ##
-
- 虚拟ip已经,部署在主库
- 主库,为mha提供mha账户
-
-
-
-
- .确保hosts和hostname配置正确
- ##
-
- root@debtest1:~/.ssh# cat /etc/hosts
- 127.0.0.1 localhost
- 192.168.0.113 debtest1.sam.test debtest1
- 192.168.0.114 debtest2.sam.test debtest2
- 192.168.0.115 debtest3.sam.test debtest3
-
- # The following lines are desirable for IPv6 capable hosts
- :: localhost ip6-localhost ip6-loopback
- ff02:: ip6-allnodes
- ff02:: ip6-allrouters
- root@debtest1:~/.ssh# cat /etc/hostname
- debtest1
-
- ###############################################################################
-
- .使用ssh-keygen工具生成统一公私钥对,并同步到所有三台机器.测试公私钥验证访问
- ##
-
- ssh-keygen -t rsa
-
- cd ~/.ssh
- cat id_rsa.pub authorized_keys
-
-
- scp ./* root@debtest2:/root/.ssh/
- scp ./* root@debtest3:/root/.ssh/
-
-
- ssh debtest1
- ssh debtest2
- ssh debtest3
-
-
- ###############################################################################
-
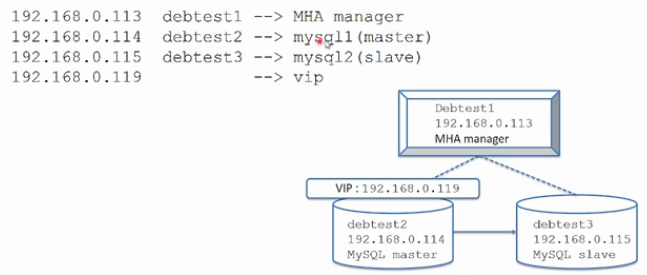
- 3.规划节点用户和ip配置
- ##
-
-
- 192.168.0.113 debtest1 --> master
- 192.168.0.114 debtest2 --> mysql1(master)
- 192.168.0.115 debtest3 --> mysql2(slave)
- 192.168.0.119 vip
-
- 定好虚拟ip后别忘了在当前的主库上添加虚拟ip
- ##
- ip addr add 192.168.0.119/32 dev eth1
-
- #删除虚拟ip的命令
- ##ip addr del 192.168.0.119/32 dev eth1
-
- ###############################################################################
-
- 4.在全部节点上安装mha node包和其依赖包
- ##
-
-
- debtest1,debtest1,debtest1
-
- apt-get install libdbd-mysql-perl
-
- dpkg -i mha4mysql-node_0.53_all.deb
-
- ###############################################################################
-
- 5.仅需要在manager节点上安装mha manager包及其依赖包
- ##
-
- debtest1
-
- apt-get install libdbd-mysql-perl
- apt-get install libconfig-tiny-perl
- apt-get install liblog-dispatch-perl
- apt-get install libparallel-forkmanager-perl
-
- dpkg -i mha4mysql-manager_0.53_all.deb
-
-
- ###############################################################################
-
-
- 6.建立配置文件目录,编辑mha必要的三个文件,一个配置文件,2个虚拟ip管理脚本且内容可以一致
- ##
-
- master_ip_online_change
- master_ip_failover
- mha_manager.cnf
-
-
- ###############################################################################
-
- 7.可以尝试验证一下配置是否成功
- ##
-
- masterha_check_ssh --conf=./mha_manager.cnf
- masterha_check_repl --conf=./mha_manager.cnf
-
- ###############################################################################
-
- 8.在manager节点启动mha服务,然后观察日志,并尝试关闭当前主库,注意观察日志,主要看失效发现,日志检测,ip漂移和角色切换过程
- ##
-
- nohup /usr/bin/masterha_manager --conf=/root/mha_base/mha_manager.cnf --ignore_last_failover < /dev/null > /root/mha_base/manager.log 2>&1 &
MHA配置文件
MHA配置文件

[server default]

manager_workdir=/root/mha_base

manager_log=/root/mha_base/manager.log

remote_workdir=/root/mha_base

ssh_user=root

ssh_port=

user=mha

password=mha

repl_user=repl

repl_password=repl

multi_tier_slave=

ping_interval=

ping_type=CONNECT

master_ip_failover_script=/root/mha_base/master_ip_failover

master_ip_online_change_script=/root/mha_base/master_ip_online_change

secondary_check_script=/usr/bin/masterha_secondary_check -s 192.168.0.113 -s 192.168.0.115 --user=root --port= --master_host=debtest2 --master_ip=192.168.0.114 --master_port=

[server1]

candidate_master=

ignore_fail=

check_repl_delay =

hostname=debtest2

ip=192.168.0.114

port=

ssh_port=

master_binlog_dir=/var/log/mysql/

[server2]

candidate_master=

ignore_fail=

check_repl_delay =

hostname=debtest3

ip=192.168.0.115

port=

ssh_port=

master_binlog_dir=/var/log/mysql/
#!/usr/bin/env perl ## Note: This is a sample script and is not complete. Modify the script based on your environment. use strict;
use warnings FATAL => 'all'; use Getopt::Long;
use MHA::DBHelper; my (
$command, $ssh_user, $orig_master_host,
$orig_master_ip, $orig_master_port, $new_master_host,
$new_master_ip, $new_master_port
); my $vip = '192.168.0.119/24'; #virtual ip
my $ssh_start_vip = "ip addr add $vip dev eth1";
my $ssh_stop_vip = "ip addr del $vip dev eth1"; GetOptions(
'command=s' => \$command,
'ssh_user=s' => \$ssh_user,
'orig_master_host=s' => \$orig_master_host,
'orig_master_ip=s' => \$orig_master_ip,
'orig_master_port=i' => \$orig_master_port,
'new_master_host=s' => \$new_master_host,
'new_master_ip=s' => \$new_master_ip,
'new_master_port=i' => \$new_master_port,
);
exit &main(); sub main {
if ( $command eq "stop" || $command eq "stopssh" ) { # $orig_master_host, $orig_master_ip, $orig_master_port are passed.
# If you manage master ip address at global catalog database,
# invalidate orig_master_ip here.
my $exit_code = ;
eval {
print "Disabling the VIP on old master: $orig_master_host \n";
&stop_vip();
$exit_code = ;
# updating global catalog, etc };
if ($@) {
warn "Got Error: $@\n";
exit $exit_code;
}
exit $exit_code;
}
elsif ( $command eq "start" ) { # all arguments are passed.
# If you manage master ip address at global catalog database,
# activate new_master_ip here.
# You can also grant write access (create user, set read_only=, etc) here.
my $exit_code = ;
eval {
print "Enabling the VIP - $vip on old master: $new_master_host \n";
&start_vip();
$exit_code = ;
};
if ($@) {
warn $@; # If you want to continue failover, exit .
exit $exit_code;
}
exit $exit_code;
}
elsif ( $command eq "status" ) { # do nothing
exit ;
}
else {
&usage();
exit ;
}
} # Enable the VIP on the new_master
sub start_vip() {
`ssh $ssh_user\@$new_master_host \" $ssh_start_vip \"`;
} # Disable the VIP on the old_master sub stop_vip() {
my $ssh_user = "root";
`ssh $ssh_user\@$orig_master_host \" $ssh_stop_vip \"`;
} sub usage {
"Usage: master_ip_failover --command=start|stop|stopssh|status --orig_master_host=host --orig_master_ip=ip --orig_master_port=port --new_master_host=host --new_master_ip=ip --new_master_port=port\n";
}
mysql高可用框架-MHA的更多相关文章
- MySQL高可用之MHA (转)
MySQL高可用之MHA MHA简介 MHA是由日本人yoshinorim(原就职于DeNA现就职于FaceBook)开发的比较成熟的MySQL高可用方案.MHA能够在30秒内实现故障切换,并能在故障 ...
- mysql高可用方案MHA介绍
mysql高可用方案MHA介绍 概述 MHA是一位日本MySQL大牛用Perl写的一套MySQL故障切换方案,来保证数据库系统的高可用.在宕机的时间内(通常10-30秒内),完成故障切换,部署MHA, ...
- MySQL高可用方案MHA自动Failover与手动Failover的实践及原理
集群信息 角色 IP地址 ServerID 类型 Master ...
- MySQL高可用方案--MHA部署及故障转移
架构设计及必要配置 主机环境 IP 主机名 担任角色 192.168.192.128 node_master MySQL-Master| ...
- MySQL高可用方案MHA在线切换的步骤及原理
在日常工作中,会碰到如下的场景,如mysql数据库升级,主服务器硬件升级等,这个时候就需要将写操作切换到另外一台服务器上,那么如何进行在线切换呢?同时,要求切换过程短,对业务的影响比较小. MHA就提 ...
- 【DB宝42】MySQL高可用架构MHA+ProxySQL实现读写分离和负载均衡
目录 一.MHA+ProxySQL架构 二.快速搭建MHA环境 2.1 下载MHA镜像 2.2 编辑yml文件,创建MHA相关容器 2.3 安装docker-compose软件(若已安装,可忽略) 2 ...
- MySQL高可用之MHA的搭建 转
http://www.cnblogs.com/muhu/p/4045780.html http://www.cnblogs.com/gomysql/p/3675429.html http://www ...
- MySQL高可用方案MHA的部署和原理
MHA(Master High Availability)是一套相对成熟的MySQL高可用方案,能做到在0~30s内自动完成数据库的故障切换操作,在master服务器不宕机的情况下,基本能保证数据的一 ...
- MySQL高可用之MHA的搭建
MySQL MHA架构介绍: MHA(Master High Availability)目前在MySQL高可用方面是一个相对成熟的解决方案,它由日本DeNA公司youshimaton(现就职于Face ...
随机推荐
- React Native交互组件之Touchable
React Native交互组件之Touchable:只要在组件外面包一个Touchable组件就可以实现点击交互. TouchableHighlight:高亮触摸 当点击时,组件的透明度会改变,可以 ...
- 一行代码从表中选取N行到另一个表
private void Form1_Load(object sender, EventArgs e) { DataTable dt = new DataTable(); ...
- C++ Pirmer : 第十五章 : 面向对象程序设计之基类和派生的定义、类型转换与继承与虚函数
基类和派生类的定义以及虚函数 基类Quote的定义: classs Quote { public: Quote() = default; Quote(cosnt std::string& bo ...
- 数论 UVA 10780
数论题目.有关内容:整数质因数分解,N的阶乘质因数分解,整除的判断. 这道题的题意是给你两个数n.m,要求你求出n!所能整除的m^k的最大值的k是多少. 由于数据范围:1<m<5000,1 ...
- 在Swift中应用Grand Central Dispatch(上)转载自的goldenfiredo001的博客
尽管Grand Central Dispatch(GCD)已经存在一段时间了,但并非每个人都知道怎么使用它.这是情有可原的,因为并发很棘手,而且GCD本身基于C的API在 Swift世界中很刺眼. 在 ...
- 工具第二天 cocoaPods 私有库的创建
之前介绍了cocoaPods的安装与使用,今天简单谈一下 自己的私有库运用cocoaPods依赖. cd到需要做库的工程目录下 创建一个podspec文件 创建:pod spec create 名称 ...
- 关于如何获取/清除 MAXScript 侦听器内的文本
关于如何获取/清除 MAXScript 侦听器内的文本 用来保存记录?还没想到实际用处,先记上. macroRecorder as string listener as stringclearList ...
- linux网络环境下socket套接字编程(UDP文件传输)
今天我们来介绍一下在linux网络环境下使用socket套接字实现两个进程下文件的上传,下载,和退出操作! 在socket套接字编程中,我们当然可以基于TCP的传输协议来进行传输,但是在文件的传输中, ...
- Shell 显示带颜色字体
格式: echo "/033[字背景颜色;字体颜色m字符串/033[控制码"如果单纯显示字体颜色可以固定控制码位0m.格式: echo "/033[字背景颜色;字体颜色m ...
- Java 程序优化:字符串操作、基本运算方法等优化策略(二)
五.数据定义.运算逻辑优化 多使用局部变量 调用方法时传递的参数以及在调用中创建的临时变量都保存在栈 (Stack) 里面,读写速度较快. 其他变量,如静态变量.等,都在堆实例变量 (heap) 中创 ...