Smart210学习记录----nand flash驱动
【详解】如何编写Linux下Nand Flash驱动 :http://www.cnblogs.com/linux-rookie/articles/3016990.html
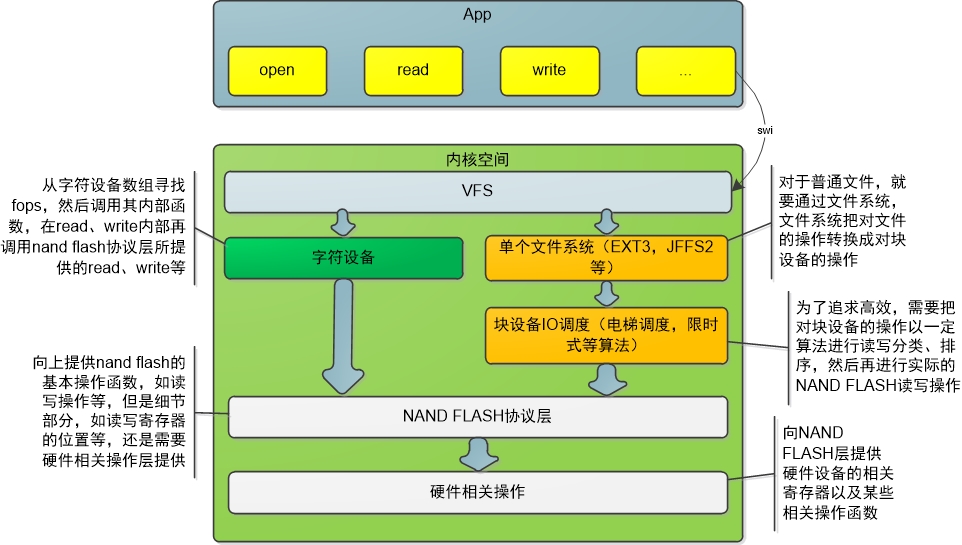
当读写文件请求到来的时候,流程如下
1.通过vfs进入文件系统,
2.文件系统把文件读写转换为块设备读写,其中有运用算法对读写操作进行合并,排序等,最后把块设备读写放进队列
3.循环从队列中取出读写要求,然后用处理函数(blk_init_queue设置)进行处理。
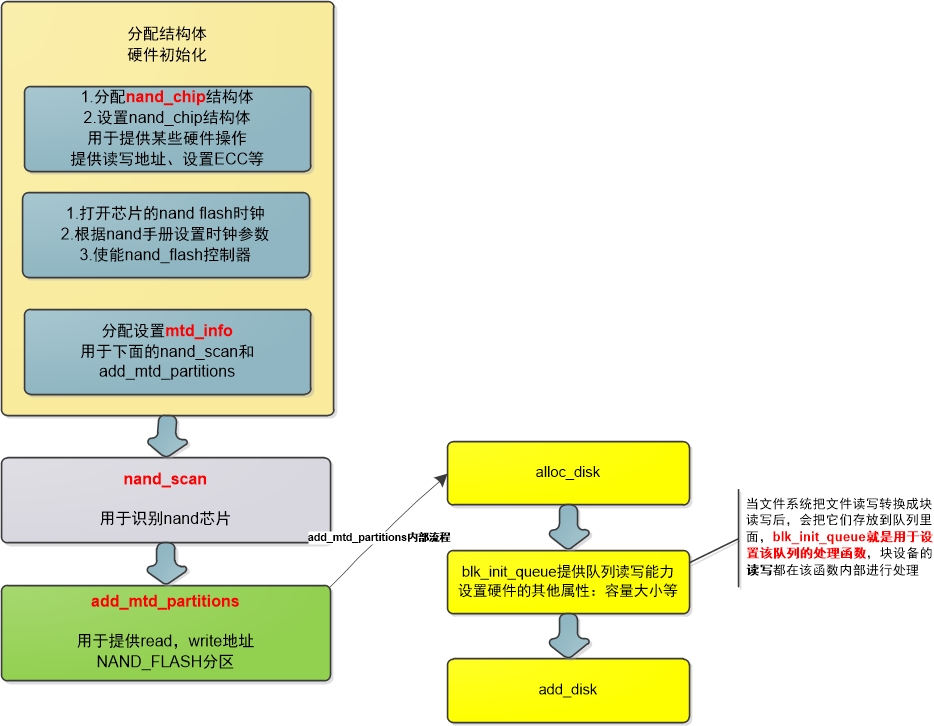
这个函数就是连接上层(IO调度)跟底层(硬件操作)的桥梁,当我们调用add_mtd_partitions的时候,就建立了上下层的联系。
4.对不同的处理要求,调用不同的nand的底层处理函数
nand flash驱动代码:
#include <linux/module.h>

#include <linux/types.h>

#include <linux/init.h>

#include <linux/kernel.h>

#include <linux/string.h>

#include <linux/ioport.h>

#include <linux/platform_device.h>

#include <linux/delay.h>

#include <linux/err.h>

#include <linux/slab.h>

#include <linux/clk.h>

#include <linux/cpufreq.h>

#include <linux/mtd/mtd.h>

#include <linux/mtd/nand.h>

#include <linux/mtd/nand_ecc.h>

#include <linux/mtd/partitions.h>

#include <asm/io.h>

#include <plat/regs-nand.h>

#include <plat/nand.h>

struct nand_flash_regs {

        unsigned long    NFCONF ;

        unsigned long    NFCONT ;

        unsigned long    NFCMMD ;

        unsigned long    NFADDR ;

        unsigned long    NFDATA ;

        unsigned long    NFMECCD0 ;

        unsigned long    NFMECCD1 ;

        unsigned long    NFSECCD ;

        unsigned long    NFSBLK ;

        unsigned long    NFEBLK ;

        unsigned long    NFSTAT ;

        unsigned long    NFECCERR0 ;

        unsigned long    NFECCERR1 ;

        unsigned long    NFMECC0 ;

        unsigned long    NFMECC1 ;

        unsigned long    NFSECC ;

        unsigned long    NFMLCBITPT ;

};

static unsigned long *MP0_3CON ;

static struct nand_flash_regs *nand_regs;

static struct nand_chip *chip;

static struct mtd_info  *nand_mtd;

static struct clk       *nand_clk;

//nand flash分区

static unsigned char nbparts = ;

struct mtd_partition mynand_partition_info[] = {

    {

        .name        = "misc",

        .offset        = (*SZ_1K),          /* for bootloader */

        .size        = (*SZ_1K),

        .mask_flags    = MTD_CAP_NANDFLASH,

    },

    {

        .name        = "recovery",

        .offset        = MTDPART_OFS_APPEND,

        .size        = (*SZ_1M),

    },

    {

        .name        = "kernel",

        .offset        = MTDPART_OFS_APPEND,

        .size        = (*SZ_1M),

    },

    {

        .name        = "ramdisk",

        .offset        = MTDPART_OFS_APPEND,

        .size        = (*SZ_1M),

    },

    {

        .name        = "system",

        .offset        = MTDPART_OFS_APPEND,

        .size        = (*SZ_1M),

    },

    {

        .name        = "cache",

        .offset        = MTDPART_OFS_APPEND,

        .size        = (*SZ_1M),

    },

    {

        .name        = "userdata",

        .offset        = MTDPART_OFS_APPEND,

        .size        = MTDPART_SIZ_FULL,

    }

};

static void my_select_chip(struct mtd_info *mtd, int chip)

{

    if(chip == -) {

        /*取消片选*/

        nand_regs->NFCONT |=  << ;

    }

    else {

        /*使能片选*/

        nand_regs->NFCONT &= ~( << );

    }

}

static void my_cmd_ctrl(struct mtd_info *mtd, int dat, unsigned int ctrl)

{

    if(ctrl & NAND_CLE) /*发命令*/

        nand_regs->NFCMMD = dat;

    if(ctrl & NAND_ALE) /*发地址*/

        nand_regs->NFADDR = dat;

}

static int my_dev_ready(struct mtd_info *mtd)

{

    return nand_regs->NFSTAT & ( << );

}

static int __init my_nand_init(void)

{

    int err;

    /*分配一个nand_chip结构体*/

    chip = kzalloc(sizeof(struct nand_chip), GFP_KERNEL);

    if(IS_ERR(chip)) {

        printk(KERN_ALERT"nand_chip kzalloc error\n");

        return -ENOMEM;

    }

    nand_regs = ioremap(0xB0E00000, sizeof(struct nand_flash_regs));

    MP0_3CON  = ioremap(0xE0200320, );

    /*使能nand flash时钟*/

    nand_clk = clk_get(NULL, "nand");

    if(IS_ERR(nand_clk)) {

        printk(KERN_ALERT"nand_clk clk_get error\n");

        err = -ENOMEM;

        goto clk_err;

    }

    clk_enable(nand_clk);

    /*设置结构体nand_chip*/

    chip->select_chip = my_select_chip;

    chip->cmd_ctrl    = my_cmd_ctrl;

    chip->dev_ready   = my_dev_ready;

    chip->IO_ADDR_R   = &nand_regs->NFDATA;

    chip->IO_ADDR_W   = &nand_regs->NFDATA;

    chip->ecc.mode    = NAND_ECC_SOFT;

    /*硬件设置*/

    /*设置MP0_3CON寄存器*/

    *MP0_3CON = 0x22222222;

    /*设置时序*/

#define TACLS    1

#define TWRPH0   1

#define TWRPH1   1

    nand_regs->NFCONF |= (TACLS << ) | (TWRPH0 << ) | (TWRPH1 << );

    //1 = 5 address cycle ,其他默认

    nand_regs->NFCONF |=  << ;

    //1 = Force nRCS[0] to High (Disable chip select)

    //1 = Enable NAND Flash Controller

    nand_regs->NFCONT |= ( << ) | ( << );

    /*使用nand_chip  :  nand_sacn*/

    nand_mtd = kzalloc(sizeof(struct mtd_info), GFP_KERNEL);

    if(IS_ERR(nand_mtd)) {

        printk(KERN_ALERT"nand_mtd kzalloc error\n");

        return -ENOMEM;

    }

    nand_mtd->owner = THIS_MODULE;

    nand_mtd->priv  = chip;

    nand_scan(nand_mtd, );

    /*添加分区*/

    err = mtd_device_register(nand_mtd, mynand_partition_info, nbparts);

    if(!err) {

        printk(KERN_ALERT"add_mtd_partitions error\n");

        return -EINVAL;

    }

    return ;

clk_err:

    kfree(chip);

    return err;

}

static void __exit my_nand_exit(void)

{

    mtd_device_unregister(nand_mtd);

    iounmap(nand_regs);

    iounmap(MP0_3CON);

    kfree(nand_mtd);

    kfree(chip);

}

module_init(my_nand_init);

module_exit(my_nand_exit);

MODULE_LICENSE("GPL");
Smart210学习记录----nand flash驱动的更多相关文章
- Smart210学习记录------nor flash驱动
nor flash驱动与nand flash驱动的差别不大,只是设置不同的结构体而已,, nor flash驱动代码: #include <linux/module.h> #include ...
- Smart210学习记录-----Linux i2c驱动
一:Linux i2c子系统简介: 1.Linux 的 I2C 体系结构分为 3 个组成部分: (1) I2C 核心. I2C 核心提供了 I2C 总线驱动和设备驱动的注册.注销方法,I2C 通信方法 ...
- Smart210学习记录------linux串口驱动
转自:http://blog.chinaunix.net/xmlrpc.php?r=blog/article&uid=27025492&id=327609 一.核心数据结构 串口驱动有 ...
- Smart210学习记录-------Linux设备驱动结构
cdev结构体 1 struct cdev { 2 struct kobject kobj; /* 内嵌的 kobject 对象 */ 3 struct module *owner; /*所属模块*/ ...
- Nand Flash驱动(实现初始化以及读操作)
简单制作一个Nand Flash驱动(只需要初始化Flash以及读Flash) 打开2440芯片手册,K9F2G08U0M芯片手册(因为2440中Nand Flash是用的256MB(2Gb)内存,8 ...
- 如何编写linux下nand flash驱动-2
[Nand Flash引脚(Pin)的说明] 图3.Nand Flash引脚功能说明 上图是常见的Nand Flash所拥有的引脚(Pin)所对应的功能,简单翻译如下: 1. I/O0 ~ ...
- 十八、Nand Flash驱动和Nor Flash驱动
在读者学习本章之前,最好了解Nand Flash读写过程和操作,可以参考:Nand Flash裸机操作. 一开始想在本章写eMMC框架和设备驱动,但是没有找到关于eMMC设备驱动具体写法,所以本章仍继 ...
- linux2.6.30.4内核移植(2)——Nand Flash驱动移植
内核源码:linux2.6.30.4 交叉编译工具:3.4.5 移植linux内核至:TQ2440 工作基础:http://www.cnblogs.com/nufangrensheng/p/36696 ...
- linux下Pl353 NAND Flash驱动分析
linux的NAND Flash驱动位于drivers/mtd/nand子文件夹下: nand_base.c-->定义通用的nand flash基本操作函数,如读写page,可自己重写这些函数 ...
随机推荐
- document.compatMode属性和获取鼠标的位置
document.compatMode属性 document.compatMode用来判断当前浏览器采用的渲染方式. 官方解释: BackCompat:标准兼容模式关闭.CSS1Compat:标准兼容 ...
- c++11中的for简化用法
1.序列for循环 map<string,int> m{{"a",1},{"b",2},{"c",3}} for(auto p: ...
- CSS 盒子模型概述
一.简介 CSS 盒子模型(元素框)由元素内容(content).内边距(padding).边框(border).外边距(margin)组成. 盒子模型,最里面的部分是实际内容:直接包围内 ...
- <转>linux crontab 定时任务
基本格式 : * * * * * command 分 时 日 月 周 命令 第1列表示分钟1-59 每分钟用*或者 */1表示 第2列表示小时1-23(0表示0点) 第3列表示日期1-31 ...
- Sprint(第三天11.16)
Sprint1第一阶段 1.类名:软件工程-第一阶段 2.时间:11.14-11.23 3.选题内容:点餐系统 4.团队博客地址:http://www.cnblogs.com/iamCarson/ 团 ...
- Redis - 发布和订阅
一.概述 1). 发布和订阅是一种消息通信模式. 2). 优点:使消息订阅者和消息发布者耦合度降低,类似设计模式中的观察者模式. 二.发布和订阅 订阅命令: // 订阅一个或多个频道 // 返回值:v ...
- requestAnimationFrame 动画
requestAnimationFrame : 调用这个方法,就是告诉浏览器要执行动画了,从而浏览器自动计算动画时间间隔,从而在恰当的时候刷新UI, 动画更加平滑. 他的用法和setTimeout() ...
- MFC编程入门之十二(对话框:非模态对话框的创建及显示)
上一节讲了模态对话框及其弹出过程,本节接着讲另一种对话框--非模态对话框的创建及显示. 非模态对话框显示后,程序其他窗口仍然能正常运行,可以响应用户输入,还可以相互切换.上一讲中创建的Tip模态对话框 ...
- LinkedList源码分析
LinkedList也和ArrayList一样实现了List接口,但是它执行插入和删除操作时比ArrayList更加高效,因为它是基于链表的.基于链表也决定了它在随机访问方面要比ArrayList逊色 ...
- List怎么遍历删除元素
public static void main(String[] args) { List<String> list = new ArrayList<String>(); ...