区块链使用Java,以太坊 Ethereum, web3j, Spring Boot
Blockchain is one of the buzzwords in IT world during some last months. This term is related to cryptocurrencies, and was created together with Bitcoins. It is decentralized, immutable data structure divided into blocks, which are linked and secured using cryptographic algorithms. Every single block in this structure typically contains a cryptographic hash of the previous block, a timestamp, and transaction data. Blockchain is managed by peer-to-peer network, and during inter-node communication every new block is validated before adding. This is short portion of theory about blockchain. In a nutshell, this is a technology which allows us to managed transactions between two parties in a decentralized way. Now, the question is how we can implement it in our system.
Here comes Ethereum. It is a decentralized platform created by Vitarik Buterin that provides scripting language for a development of applications. It is based on ideas from Bitcoin, and is driven by the new cryptocurrency called Ether. Today, Ether is the second largest cryptocurrency after Bitcoin. The heart of Ethereum technology is EVM (Ethereum Virtual Machine), which can be treated as something similar to JVM, but using a network of fully decentralized nodes. To implement transactions based Ethereum in Java world we use web3j library. This is a lightweight, reactive, type safe Java and Android library for integrating with nodes on Ethereum blockchains. More details can be found on its websitehttps://web3j.io.
1. Running Ethereum locally
Although there are many articles on the Web about blockchain and ethereum it is not easy to find a solution describing how to run ready-for-use instance of Ethereum on the local machine. It is worth to mention that generally there are two most popular Ethereum clients we can use: Geth and Parity. It turns out we can easily run Geth node locally using Docker container. By default it connects the node to the Ethereum main network. Alternatively, you can connect it to test network or Rinkeby network. But the best option for beginning is just to run it in development mode by setting--dev parameter on Docker container running command.
Here’s the command that starts Docker container in development mode and exposes Ethereum RPC API on port 8545.
$ docker run -d --name ethereum -p 8545:8545 -p 30303:30303 ethereum/client-go --rpc --rpcaddr "0.0.0.0" --rpcapi="db,eth,net,web3,personal" --rpccorsdomain "*" --dev
The one really good message when running that container in development mode is that you have plenty of Ethers on your default, test account. In that case, you don’t have to mine any Ethers to be able to start tests. Great! Now, let’s create some other test accounts and also check out some things. To achieve it we need to run Geth’s interactive JavaScript console inside Docker container.
$ docker exec -it ethereum geth attach ipc:/tmp/geth.ipc
2. Managing Ethereum node using JavaScript console
After running JavaScript console you can easily display default account (coinbase), the list of all available accounts and their balances. Here’s the screen illustrating results for my Ethereum node.
Now, we have to create some test accounts. We can do it by callingpersonal.newAccount(password) function. After creating required accounts, you can perform some test transactions using JavaScript console, and transfer some funds from base account to the newly created accounts. Here are the commands used for creating accounts and executing transactions.
3. System architecture
The architecture of our sample system is very simple. I don’t want to complicate anything, but just show you how to send transaction to Geth node and receive notifications. While transaction-servicesends new transaction to Ethereum node, bonus-service observe node and listening for incoming transactions. Then it send bonus to the sender’s account once per 10 transactions received from his account. Here’s the diagram that illustrates an architecture of our sample system.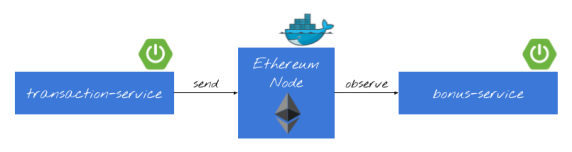
4. Enable Web3j for Spring Boot app
I think that now we have clarity what exactly we want to do. So, let’s proceed to the implementation. First, we should include all required dependencies in order to be able to use web3j library inside Spring Boot application. Fortunately, there is a starter that can be included.
<dependency>

	<groupId>org.web3j</groupId>

	<artifactId>web3j-spring-boot-starter</artifactId>

	<version>1.6.0</version>

</dependency>
Because we are running Ethereum Geth client on Docker container we need to change auto-configured client’s address for web3j.
spring:

  application:

    name: transaction-service

server:

  port: ${PORT:8090}

web3j:

  client-address: http://192.168.99.100:8545
5. Building applications
If we included web3j starter to the project dependencies all you need is to autowire Web3j bean. Web3j is responsible for sending transaction to Geth client node. It receives response with transaction hash if it has been accepted by the node or error object if it has been rejected. While creating transaction object it is important to set gas limit to minimum 21000. If you sent lower value, you will probably receive error Error: intrinsic gas too low.
@Service

public class BlockchainService {

    private static final Logger LOGGER = LoggerFactory.getLogger(BlockchainService.class);

    @Autowired

    Web3j web3j;

    public BlockchainTransaction process(BlockchainTransaction trx) throws IOException {

        EthAccounts accounts = web3j.ethAccounts().send();

        EthGetTransactionCount transactionCount = web3j.ethGetTransactionCount(accounts.getAccounts().get(trx.getFromId()), DefaultBlockParameterName.LATEST).send();

        Transaction transaction = Transaction.createEtherTransaction(accounts.getAccounts().get(trx.getFromId()), transactionCount.getTransactionCount(), BigInteger.valueOf(trx.getValue()), BigInteger.valueOf(21_000), accounts.getAccounts().get(trx.getToId()),BigInteger.valueOf(trx.getValue()));

        EthSendTransaction response = web3j.ethSendTransaction(transaction).send();

        if (response.getError() != null) {

            trx.setAccepted(false);

            return trx;

        }

        trx.setAccepted(true);

        String txHash = response.getTransactionHash();

        LOGGER.info("Tx hash: {}", txHash);

        trx.setId(txHash);

        EthGetTransactionReceipt receipt = web3j.ethGetTransactionReceipt(txHash).send();

        if (receipt.getTransactionReceipt().isPresent()) {

            LOGGER.info("Tx receipt: {}", receipt.getTransactionReceipt().get().getCumulativeGasUsed().intValue());

        }

        return trx;

    }

}
The @Service bean visible above is invoked by the controller. The implementation of POST method takes BlockchainTransaction object as parameter. You can send there sender id, receiver id, and transaction amount. Sender and receiver ids are equivalent to index in query eth.account[index].
@RestController

public class BlockchainController {

    @Autowired

    BlockchainService service;

    @PostMapping("/transaction")

    public BlockchainTransaction execute(@RequestBody BlockchainTransaction transaction) throws NoSuchAlgorithmException, NoSuchProviderException, InvalidAlgorithmParameterException, CipherException, IOException {

        return service.process(transaction);

    }

}
You can send a test transaction by calling POST method using the following command.
$ curl --header "Content-Type: application/json" --request POST --data '{"fromId":2,"toId":1,"value":3}' http://localhost:8090/transaction
Before sending any transactions you should also unlock sender account.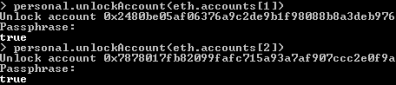
Application bonus-service listens for transactions processed by Ethereum node. It subscribes for notifications from Web3j library by calling web3j.transactionObservable().subscribe(...) method. It returns the amount of received transaction to the sender’s account once per 10 transactions sent from that address. Here’s the implementation of observable method inside application bonus-service.
@Autowired

Web3j web3j;

@PostConstruct

public void listen() {

	Subscription subscription = web3j.transactionObservable().subscribe(tx -> {

		LOGGER.info("New tx: id={}, block={}, from={}, to={}, value={}", tx.getHash(), tx.getBlockHash(), tx.getFrom(), tx.getTo(), tx.getValue().intValue());

		try {

			EthCoinbase coinbase = web3j.ethCoinbase().send();

			EthGetTransactionCount transactionCount = web3j.ethGetTransactionCount(tx.getFrom(), DefaultBlockParameterName.LATEST).send();

			LOGGER.info("Tx count: {}", transactionCount.getTransactionCount().intValue());

			if (transactionCount.getTransactionCount().intValue() % 10 == 0) {

				EthGetTransactionCount tc = web3j.ethGetTransactionCount(coinbase.getAddress(), DefaultBlockParameterName.LATEST).send();

				Transaction transaction = Transaction.createEtherTransaction(coinbase.getAddress(), tc.getTransactionCount(), tx.getValue(), BigInteger.valueOf(21_000), tx.getFrom(), tx.getValue());

				web3j.ethSendTransaction(transaction).send();

			}

		} catch (IOException e) {

			LOGGER.error("Error getting transactions", e);

		}

	});

	LOGGER.info("Subscribed");

}
Conclusion
Blockchain and cryptocurrencies are not the easy topics to start. Ethereum simplifies development of applications that use blockchain, by providing a complete, scripting language. Using web3j library together with Spring Boot and Docker image of Ethereum Geth client allows to quickly start local development of solution implementing blockchain technology. IF you would like to try it locally just clone my repository available on GitHubhttps://github.com/piomin/sample-spring-blockchain.git
转自:https://piotrminkowski.wordpress.com/2018/06/22/introduction-to-blockchain-with-java-using-ethereum-web3j-and-spring-boot/
区块链使用Java,以太坊 Ethereum, web3j, Spring Boot的更多相关文章
- 创建自己的区块链游戏SLOT——以太坊代币(三)
一个以太坊合约版本的轮盘游戏,向合约转账ETH,有几率获得3,5,10,100倍奖励 合约地址:0x53DA598E70a1505Ad95cBF17fc5DCA0d2c51174b 捐赠ETH地址:0 ...
- 区块链入门到实战(27)之以太坊(Ethereum) – 智能合约开发
智能合约的优点 与传统合同相比,智能合约有一些显著优点: 不需要中间人 费用低 代码就是规则 区块链网络中有多个备份,不用担心丢失 避免人工错误 无需信任,就可履行协议 匿名履行协议 以太坊(Ethe ...
- 区块链入门到实战(26)之以太坊(Ethereum) – 挖矿
以太坊(Ethereum)与其他公共区块链一样,使用工作量证明机制确保区块链网络正常运行. 矿工进行工作量证明计算,即挖矿,来选择区块,写入区块链,确认交易. 交易过程如下图所示: 从技术角度来看,以 ...
- 区块链入门到实战(24)之以太坊(Ethereum) – 网络节点
用途: 全节点:用于区块和交易的校验 轻节点:电子钱包 以太坊(Ethereum)网络是一个公共的区块链网络,网络中包含2种网络节点: 全节点 轻节点 全节点 包含了从初始区块开始的全部区块,这些区块 ...
- 区块链入门到实战(22)之以太坊(Ethereum) – 账号(地址)
作用: 外部账号 – 用户使用的账号,账户余额. 合约账号 – 智能合约使用的账号,每个智能合约都有一个账号,内存和账户余额 以太坊(Ethereum)网络中,有2种账号: 外部账号 – 用户使用的账 ...
- 区块链入门到实战(20)之以太坊(Ethereum) – 虚拟机(E.V.M.)
作用:执行智能合约代码的引擎 以太坊(Ethereum)虚拟机是执行智能合约代码的引擎. 可以用某种语言,例如Solidity语言,开发智能合约程序,编译成以太坊(Ethereum)虚拟机支持的字节码 ...
- 区块链入门到实战(19)之以太坊(Ethereum) – 以太币
以太币的作用:防范以太坊网络被滥用和激励矿工. 与比特币网络有比特币类似,以太坊(Ethereum)也有自己的虚拟币 — 以太币. 以太币的主要作用有2个: 应用程序执行任何操作都需要支付以太币,防范 ...
- 区块链入门到实战(17)之以太坊(Ethereum) – 是什么
以太坊的作用:构建基于区块链的分布式应用. 以太坊是什么:可编程的虚拟币. 以太坊(Ethereum)是一个可编程的虚拟币,它是一个基于公共区块链的分布式计算平台,可用于构建基于区块链的分布式应用. ...
- 区块链入门到实战(23)之以太坊(Ethereum) – 虚拟机架构
以太坊(Ethereum)网络中,定义了一组通用协议用于支持智能合约的运行,其核心便是以太坊(Ethereum)虚拟机. 下图解释了该架构: 开发人员使用Solidity等开发语言开发智能合约 源程序 ...
随机推荐
- composer 自动加载一 通过file加载
github地址 https://github.com/brady-wang/composer composer init 可以生成一个composer.json文件 { "name&quo ...
- 简单理解laravel框架中的服务容器,服务提供者以及怎样调用服务
laravel被称为最优雅的框架,最近正在学习中,对于用惯了thinkphp.ci框架的人来说,服务容器.服务提供者,依赖注入这些概念简直是一脸懵逼.我花了些时间梳理了一下,也不敢确定自己说的是对 ...
- [转帖]xserver相关知识汇总
xserver相关知识汇总 https://blog.csdn.net/QTVLC/article/details/81739984 本文主要是从以下几个方面介绍xorg-xserver 相关的知 ...
- GANs (Generative Adversarial Networks)
#!/usr/bin/python2.7 #coding:utf-8 import tensorflow as tf import numpy as np import matplotlib.pypl ...
- Oracle的数据类型详述
数据类型 (1)字符型 CHAR: 定长最多(2000字节)特定情况下用 VARCHAR2:可变长度的字符串最多(4000字节) LONG:大文本类型最多(2个G) (2)数值型 NUMBER:可以是 ...
- Angular 过滤器
<!DOCTYPE html><html ng-app="myApp"><head lang="en"> <meta ...
- python爬虫之scrapy安装(一)
简介: Scrapy,Python开发的一个快速.高层次的屏幕抓取和web抓取框架,用于抓取web站点并从页面中提取结构化的数据.Scrapy用途广泛,可以用于数据挖掘.监测和自动化测试. Scrap ...
- mysql 清除大数据表单
背景:mysql数据库中有个日志表记录高达800多万,影响了mysql的正常业务访问,现需要清理三个月之前的所有数据,大概600多万(大概13G) 方法一:传统delete from xxx,传统,普 ...
- 9.Pod控制器概念和基本操作2
利用一个简单的例子来启动一个deployment的Pod控制器 [root@master song]# cat deploy.yml apiVersion: apps/v1 kind: Deploym ...
- JS 单线程和事件循环
Js 是单线程,js代码从上到下依次执行,比如我们写了两个函数,肯定是上面的函数先执行,下面的函数后执行.但是这种单线程有一个非常大的问题,那就是遇到耗时的任务,后面的任务只能等待它执行完,才能进行. ...