Spring MVC(一)五大核心组件和配置
一,五大核心组件
1.DispatcherServlet 请求入口
2.HandlerMapping 请求派发,负责请求和控制器建立一一对应的关系
3.Controller 处理器
4.ModelAndView 封装模型信息和视图信息
5.ViewResolver 视图处理器,定位页面
二,Spring MVC的编写步骤(访问WEB-INF下的.jsp)
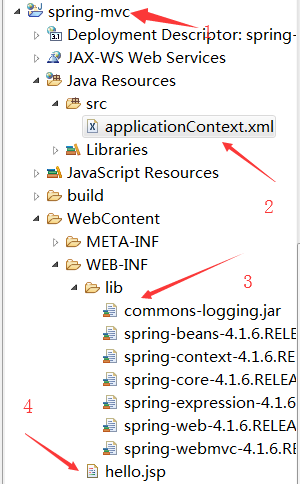
1.建立项目,导入jar包(ioc mvc)并且拷贝Spring容器中对应的配置文件到src下,并且在WEB-INF下创建一个hello.jsp
2.在web.xml中配置DispatcherServlet并通过初始化参数contextConfigLocation指定Spring容器对应的配置文件
3.在Spring配置文件中配置HandlerMapping的实现类SimpleUrlHandlerMapping
4.写一个控制器类实现Controller接口,控制器方法中返回ModelAndView,在Spring容器中配置控制器
5.配置ViewResolver的实现类internalResourceViewResolver
如图:
配置DispatcherServlet
 <?xml version="1.0" encoding="UTF-8"?>

 <web-app xmlns:xsi="http://www.w3.org/2001/XMLSchema-instance" xmlns="http://xmlns.jcp.org/xml/ns/javaee" xsi:schemaLocation="http://xmlns.jcp.org/xml/ns/javaee http://xmlns.jcp.org/xml/ns/javaee/web-app_3_1.xsd" version="3.1">

   <display-name>spring-mvc</display-name>

   <welcome-file-list>

     <welcome-file>index.html</welcome-file>

     <welcome-file>index.htm</welcome-file>

     <welcome-file>index.jsp</welcome-file>

     <welcome-file>default.html</welcome-file>

     <welcome-file>default.htm</welcome-file>

     <welcome-file>default.jsp</welcome-file>

   </welcome-file-list>

   <!-- 配置请求入口 -->

   <servlet>

       <servlet-name>SpringMVC</servlet-name>

       <servlet-class>org.springframework.web.servlet.DispatcherServlet</servlet-class>

       <!-- 配置初始化参数 -->

       <init-param>

           <param-name>contextConfigLocation</param-name>

           <param-value>classpath:applicationContext.xml</param-value>

       </init-param>

   </servlet>

   <servlet-mapping>

       <servlet-name>SpringMVC</servlet-name>

       <url-pattern>*.do</url-pattern>

   </servlet-mapping>

 </web-app>
配置HandlerMapping
 <?xml version="1.0" encoding="UTF-8"?>

 <beans xmlns="http://www.springframework.org/schema/beans"

     xmlns:xsi="http://www.w3.org/2001/XMLSchema-instance"

     xmlns:context="http://www.springframework.org/schema/context"

     xmlns:jdbc="http://www.springframework.org/schema/jdbc"

     xmlns:jee="http://www.springframework.org/schema/jee"

     xmlns:tx="http://www.springframework.org/schema/tx"

     xmlns:aop="http://www.springframework.org/schema/aop"

     xmlns:mvc="http://www.springframework.org/schema/mvc"

     xmlns:util="http://www.springframework.org/schema/util"

     xmlns:jpa="http://www.springframework.org/schema/data/jpa"

     xsi:schemaLocation="

         http://www.springframework.org/schema/beans http://www.springframework.org/schema/beans/spring-beans-4.1.xsd

         http://www.springframework.org/schema/context http://www.springframework.org/schema/context/spring-context-4.1.xsd

         http://www.springframework.org/schema/jdbc http://www.springframework.org/schema/jdbc/spring-jdbc-4.1.xsd

         http://www.springframework.org/schema/jee http://www.springframework.org/schema/jee/spring-jee-4.1.xsd

         http://www.springframework.org/schema/tx http://www.springframework.org/schema/tx/spring-tx-4.1.xsd

         http://www.springframework.org/schema/data/jpa http://www.springframework.org/schema/data/jpa/spring-jpa-1.3.xsd

         http://www.springframework.org/schema/aop http://www.springframework.org/schema/aop/spring-aop-4.1.xsd

         http://www.springframework.org/schema/mvc http://www.springframework.org/schema/mvc/spring-mvc-4.1.xsd

         http://www.springframework.org/schema/util http://www.springframework.org/schema/util/spring-util-4.1.xsd">

     <!-- 配置请求分发器,让请求和控制器之间建立一一对应关系 -->

     <bean id="handlerMapping" class="org.springframework.web.servlet.handler.SimpleUrlHandlerMapping">

         <property name="mappings">

             <props>

                 <prop key="/toHello.do">helloController</prop>

             </props>

         </property>

     </bean>

     <!-- 配置控制器 -->

     <bean id="helloController" class="com.xcz.controller.ToHelloController"></bean>

 </beans>
配置ViewResolver
 <?xml version="1.0" encoding="UTF-8"?>

 <beans xmlns="http://www.springframework.org/schema/beans"

     xmlns:xsi="http://www.w3.org/2001/XMLSchema-instance"

     xmlns:context="http://www.springframework.org/schema/context"

     xmlns:jdbc="http://www.springframework.org/schema/jdbc"

     xmlns:jee="http://www.springframework.org/schema/jee"

     xmlns:tx="http://www.springframework.org/schema/tx"

     xmlns:aop="http://www.springframework.org/schema/aop"

     xmlns:mvc="http://www.springframework.org/schema/mvc"

     xmlns:util="http://www.springframework.org/schema/util"

     xmlns:jpa="http://www.springframework.org/schema/data/jpa"

     xsi:schemaLocation="

         http://www.springframework.org/schema/beans http://www.springframework.org/schema/beans/spring-beans-4.1.xsd

         http://www.springframework.org/schema/context http://www.springframework.org/schema/context/spring-context-4.1.xsd

         http://www.springframework.org/schema/jdbc http://www.springframework.org/schema/jdbc/spring-jdbc-4.1.xsd

         http://www.springframework.org/schema/jee http://www.springframework.org/schema/jee/spring-jee-4.1.xsd

         http://www.springframework.org/schema/tx http://www.springframework.org/schema/tx/spring-tx-4.1.xsd

         http://www.springframework.org/schema/data/jpa http://www.springframework.org/schema/data/jpa/spring-jpa-1.3.xsd

         http://www.springframework.org/schema/aop http://www.springframework.org/schema/aop/spring-aop-4.1.xsd

         http://www.springframework.org/schema/mvc http://www.springframework.org/schema/mvc/spring-mvc-4.1.xsd

         http://www.springframework.org/schema/util http://www.springframework.org/schema/util/spring-util-4.1.xsd">

     <!-- 配置视图处理器 -->

     <bean class="org.springframework.web.servlet.view.InternalResourceViewResolver">

         <property name="prefix" value="/WEB-INF/"></property>

         <property name="suffix" value=".jsp"></property>

     </bean>

 </beans>
最终配置结果
 <?xml version="1.0" encoding="UTF-8"?>

 <beans xmlns="http://www.springframework.org/schema/beans"

     xmlns:xsi="http://www.w3.org/2001/XMLSchema-instance"

     xmlns:context="http://www.springframework.org/schema/context"

     xmlns:jdbc="http://www.springframework.org/schema/jdbc"

     xmlns:jee="http://www.springframework.org/schema/jee"

     xmlns:tx="http://www.springframework.org/schema/tx"

     xmlns:aop="http://www.springframework.org/schema/aop"

     xmlns:mvc="http://www.springframework.org/schema/mvc"

     xmlns:util="http://www.springframework.org/schema/util"

     xmlns:jpa="http://www.springframework.org/schema/data/jpa"

     xsi:schemaLocation="

         http://www.springframework.org/schema/beans http://www.springframework.org/schema/beans/spring-beans-4.1.xsd

         http://www.springframework.org/schema/context http://www.springframework.org/schema/context/spring-context-4.1.xsd

         http://www.springframework.org/schema/jdbc http://www.springframework.org/schema/jdbc/spring-jdbc-4.1.xsd

         http://www.springframework.org/schema/jee http://www.springframework.org/schema/jee/spring-jee-4.1.xsd

         http://www.springframework.org/schema/tx http://www.springframework.org/schema/tx/spring-tx-4.1.xsd

         http://www.springframework.org/schema/data/jpa http://www.springframework.org/schema/data/jpa/spring-jpa-1.3.xsd

         http://www.springframework.org/schema/aop http://www.springframework.org/schema/aop/spring-aop-4.1.xsd

         http://www.springframework.org/schema/mvc http://www.springframework.org/schema/mvc/spring-mvc-4.1.xsd

         http://www.springframework.org/schema/util http://www.springframework.org/schema/util/spring-util-4.1.xsd">

     <!-- 配置请求分发器,让请求和控制器之间建立一一对应关系 -->

     <bean id="handlerMapping" class="org.springframework.web.servlet.handler.SimpleUrlHandlerMapping">

         <property name="mappings">

             <props>

                 <prop key="/toHello.do">helloController</prop>

             </props>

         </property>

     </bean>

     <!-- 配置控制器 -->

     <bean id="helloController" class="com.xcz.controller.ToHelloController"></bean>

     <!-- 配置视图处理器 -->

     <bean class="org.springframework.web.servlet.view.InternalResourceViewResolver">

         <property name="prefix" value="/WEB-INF/"></property>

         <property name="suffix" value=".jsp"></property>

     </bean>

 </beans>
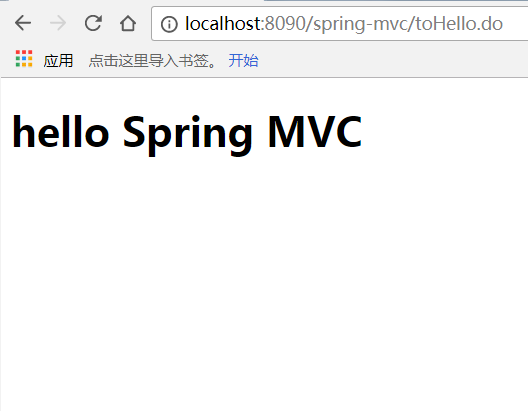
最后开启服务,在浏览器上输入localhost:端口号/项目名/toHello.do,看到如下界面,说明配置成功
Spring MVC(一)五大核心组件和配置的更多相关文章
- 转载 Spring、Spring MVC、MyBatis整合文件配置详解
Spring.Spring MVC.MyBatis整合文件配置详解 使用SSM框架做了几个小项目了,感觉还不错是时候总结一下了.先总结一下SSM整合的文件配置.其实具体的用法最好还是看官方文档. ...
- Spring MVC、MyBatis整合文件配置详解
Spring:http://spring.io/docs MyBatis:http://mybatis.github.io/mybatis-3/ Building a RESTful Web Serv ...
- spring MVC处理请求过程及配置详解
本文主要梳理下Spring MVC处理http请求的过程,以及配置servlet及业务application需要的常用标签,及其包含的意义. spring MVC处理请求过程 首先看一个整体图 简单说 ...
- Scrapy 框架 安装 五大核心组件 settings 配置 管道存储
scrapy 框架的使用 博客: https://www.cnblogs.com/bobo-zhang/p/10561617.html 安装: pip install wheel 下载 Twisted ...
- Spring MVC 5 + Thymeleaf 基于Java配置和注解配置
Spring MVC 5 + Thymeleaf 注解配置 Spring的配置方式一般为两种:XML配置和注解配置 Spring从3.0开始以后,推荐使用注解配置,这两种配置的优缺点说的人很多,我就不 ...
- spring mvc静态资源访问的配置
如果我们使用spring mvc来做web访问请求的控制转发,那么默认所有访问都将被DispatcherServlet独裁统治.比如我现在想访问的欢迎页index.html根本无需任何业务逻辑处理,仅 ...
- spring启动,spring mvc ,要不要xml配置,基于注解配置
老项目是09-11年搞的,用的是spring+struts2,没有用注解,全xml配置.web.xml中也配置了一大堆. 现在启动新项目,在项目中用spring+springmvc ,主要用注解,也用 ...
- Spring + Spring MVC+Hibernate框架整合详细配置
来源于:http://www.jianshu.com/p/8e2f92d0838c 具体配置参数: Spring: spring-framework-4.2.2Hibernate: hibernate ...
- Spring、Spring MVC、MyBatis整合文件配置详解
原文 http://www.cnblogs.com/wxisme/p/4924561.html 主题 MVC模式MyBatisSpring MVC 使用SSM框架做了几个小项目了,感觉还不错是时候总 ...
随机推荐
- 前端笔记之Vue(二)组件&案例&props&计算属性
一.Vue组件(.vue文件) 组件 (Component) 是 Vue.js 最强大的功能之一.组件可以扩展 HTML 元素,封装可重用的代码.在较高层面上,组件是自定义元素,Vue.js 的编译器 ...
- asp.net core系列 47 Identity 自定义用户数据
一.概述 接着上篇的WebAppIdentityDemo项目,将自定义用户数据添加到Identity DB,自定义扩展的用户数据类应继承IdentityUser类, 文件名为Areas / Ident ...
- “崩溃了?不可能,我全 Catch 住了” | Java 异常处理
前言 今天我们来讨论一下,程序中的错误处理. 在任何一个稳定的程序中,都会有大量的代码在处理错误,有一些业务错误,我们可以通过主动检查判断来规避,可对于一些不能主动判断的错误,例如 RuntimeEx ...
- 搭建基于Docker社区版的Kubernetes本地集群
Kubernetes的本地集群搭建是一件颇费苦心的活,网上有各种参考资源,由于版本和容器的不断发展,搭建的方式也是各不相同,这里基于Docker CE的18.09.0版本,在Mac OS.Win10下 ...
- 学习web的第二天
之前因为技能大赛的原因,导致我这门课没有上.其实上学期是开Dreamweaver网页制作的课程的,所以老师讲的很快.我就利用课后时间去补漏,今天讲了HTML标签:1.标题标签<h1>~&l ...
- phpmyadmin登陆错误:The requested URL /phpmyadmin was not found on this serve
解决方法: 首先,重新安装apache2: sudo dpkg-reconfigure -plow phpmyadmin 配置时记得选择apache2 如果仍然无法登陆,再对phpmyadmin和a ...
- 使用d3.v5实现条形图
效果图: 条形图: 目录结构: <!DOCTYPE html> <html lang="en"> <head> <meta charset ...
- Cocos Creator—定制H5游戏首页loading界面
Cocos Creator从1.0版本发布到现在也有一年多了,按理说一些常见的问题网上都有解决方案,例如"如何自定义首页加载进度条界面"这种普遍需求,应该所有人都会遇到的,因此也有 ...
- 清除过期日志的py脚本
本篇和大家分享的是一个清除过期日志的python脚本,年后第二篇希望对大家有帮助: 该python脚本创建的由来 代码及分析 crontab定时任务 该python脚本创建的由来 此由来,是在过年假期 ...
- 【视频】Entity Framework Core 2.* 入门教程
视频专辑在B站上:https://www.bilibili.com/video/av34462368/ 内容暂时如下,还在更新中: 1. 简介 & 创建Model,生成数据库 2. 在ASP. ...