Spring MVC(一)五大核心组件和配置
一,五大核心组件
1.DispatcherServlet 请求入口
2.HandlerMapping 请求派发,负责请求和控制器建立一一对应的关系
3.Controller 处理器
4.ModelAndView 封装模型信息和视图信息
5.ViewResolver 视图处理器,定位页面
二,Spring MVC的编写步骤(访问WEB-INF下的.jsp)
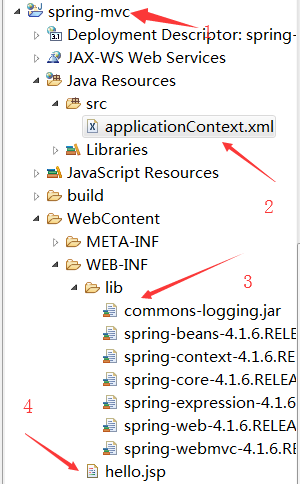
1.建立项目,导入jar包(ioc mvc)并且拷贝Spring容器中对应的配置文件到src下,并且在WEB-INF下创建一个hello.jsp
2.在web.xml中配置DispatcherServlet并通过初始化参数contextConfigLocation指定Spring容器对应的配置文件
3.在Spring配置文件中配置HandlerMapping的实现类SimpleUrlHandlerMapping
4.写一个控制器类实现Controller接口,控制器方法中返回ModelAndView,在Spring容器中配置控制器
5.配置ViewResolver的实现类internalResourceViewResolver
如图:
配置DispatcherServlet
 <?xml version="1.0" encoding="UTF-8"?>

 <web-app xmlns:xsi="http://www.w3.org/2001/XMLSchema-instance" xmlns="http://xmlns.jcp.org/xml/ns/javaee" xsi:schemaLocation="http://xmlns.jcp.org/xml/ns/javaee http://xmlns.jcp.org/xml/ns/javaee/web-app_3_1.xsd" version="3.1">

   <display-name>spring-mvc</display-name>

   <welcome-file-list>

     <welcome-file>index.html</welcome-file>

     <welcome-file>index.htm</welcome-file>

     <welcome-file>index.jsp</welcome-file>

     <welcome-file>default.html</welcome-file>

     <welcome-file>default.htm</welcome-file>

     <welcome-file>default.jsp</welcome-file>

   </welcome-file-list>

   <!-- 配置请求入口 -->

   <servlet>

       <servlet-name>SpringMVC</servlet-name>

       <servlet-class>org.springframework.web.servlet.DispatcherServlet</servlet-class>

       <!-- 配置初始化参数 -->

       <init-param>

           <param-name>contextConfigLocation</param-name>

           <param-value>classpath:applicationContext.xml</param-value>

       </init-param>

   </servlet>

   <servlet-mapping>

       <servlet-name>SpringMVC</servlet-name>

       <url-pattern>*.do</url-pattern>

   </servlet-mapping>

 </web-app>
配置HandlerMapping
 <?xml version="1.0" encoding="UTF-8"?>

 <beans xmlns="http://www.springframework.org/schema/beans"

     xmlns:xsi="http://www.w3.org/2001/XMLSchema-instance"

     xmlns:context="http://www.springframework.org/schema/context"

     xmlns:jdbc="http://www.springframework.org/schema/jdbc"

     xmlns:jee="http://www.springframework.org/schema/jee"

     xmlns:tx="http://www.springframework.org/schema/tx"

     xmlns:aop="http://www.springframework.org/schema/aop"

     xmlns:mvc="http://www.springframework.org/schema/mvc"

     xmlns:util="http://www.springframework.org/schema/util"

     xmlns:jpa="http://www.springframework.org/schema/data/jpa"

     xsi:schemaLocation="

         http://www.springframework.org/schema/beans http://www.springframework.org/schema/beans/spring-beans-4.1.xsd

         http://www.springframework.org/schema/context http://www.springframework.org/schema/context/spring-context-4.1.xsd

         http://www.springframework.org/schema/jdbc http://www.springframework.org/schema/jdbc/spring-jdbc-4.1.xsd

         http://www.springframework.org/schema/jee http://www.springframework.org/schema/jee/spring-jee-4.1.xsd

         http://www.springframework.org/schema/tx http://www.springframework.org/schema/tx/spring-tx-4.1.xsd

         http://www.springframework.org/schema/data/jpa http://www.springframework.org/schema/data/jpa/spring-jpa-1.3.xsd

         http://www.springframework.org/schema/aop http://www.springframework.org/schema/aop/spring-aop-4.1.xsd

         http://www.springframework.org/schema/mvc http://www.springframework.org/schema/mvc/spring-mvc-4.1.xsd

         http://www.springframework.org/schema/util http://www.springframework.org/schema/util/spring-util-4.1.xsd">

     <!-- 配置请求分发器,让请求和控制器之间建立一一对应关系 -->

     <bean id="handlerMapping" class="org.springframework.web.servlet.handler.SimpleUrlHandlerMapping">

         <property name="mappings">

             <props>

                 <prop key="/toHello.do">helloController</prop>

             </props>

         </property>

     </bean>

     <!-- 配置控制器 -->

     <bean id="helloController" class="com.xcz.controller.ToHelloController"></bean>

 </beans>
配置ViewResolver
 <?xml version="1.0" encoding="UTF-8"?>

 <beans xmlns="http://www.springframework.org/schema/beans"

     xmlns:xsi="http://www.w3.org/2001/XMLSchema-instance"

     xmlns:context="http://www.springframework.org/schema/context"

     xmlns:jdbc="http://www.springframework.org/schema/jdbc"

     xmlns:jee="http://www.springframework.org/schema/jee"

     xmlns:tx="http://www.springframework.org/schema/tx"

     xmlns:aop="http://www.springframework.org/schema/aop"

     xmlns:mvc="http://www.springframework.org/schema/mvc"

     xmlns:util="http://www.springframework.org/schema/util"

     xmlns:jpa="http://www.springframework.org/schema/data/jpa"

     xsi:schemaLocation="

         http://www.springframework.org/schema/beans http://www.springframework.org/schema/beans/spring-beans-4.1.xsd

         http://www.springframework.org/schema/context http://www.springframework.org/schema/context/spring-context-4.1.xsd

         http://www.springframework.org/schema/jdbc http://www.springframework.org/schema/jdbc/spring-jdbc-4.1.xsd

         http://www.springframework.org/schema/jee http://www.springframework.org/schema/jee/spring-jee-4.1.xsd

         http://www.springframework.org/schema/tx http://www.springframework.org/schema/tx/spring-tx-4.1.xsd

         http://www.springframework.org/schema/data/jpa http://www.springframework.org/schema/data/jpa/spring-jpa-1.3.xsd

         http://www.springframework.org/schema/aop http://www.springframework.org/schema/aop/spring-aop-4.1.xsd

         http://www.springframework.org/schema/mvc http://www.springframework.org/schema/mvc/spring-mvc-4.1.xsd

         http://www.springframework.org/schema/util http://www.springframework.org/schema/util/spring-util-4.1.xsd">

     <!-- 配置视图处理器 -->

     <bean class="org.springframework.web.servlet.view.InternalResourceViewResolver">

         <property name="prefix" value="/WEB-INF/"></property>

         <property name="suffix" value=".jsp"></property>

     </bean>

 </beans>
最终配置结果
 <?xml version="1.0" encoding="UTF-8"?>

 <beans xmlns="http://www.springframework.org/schema/beans"

     xmlns:xsi="http://www.w3.org/2001/XMLSchema-instance"

     xmlns:context="http://www.springframework.org/schema/context"

     xmlns:jdbc="http://www.springframework.org/schema/jdbc"

     xmlns:jee="http://www.springframework.org/schema/jee"

     xmlns:tx="http://www.springframework.org/schema/tx"

     xmlns:aop="http://www.springframework.org/schema/aop"

     xmlns:mvc="http://www.springframework.org/schema/mvc"

     xmlns:util="http://www.springframework.org/schema/util"

     xmlns:jpa="http://www.springframework.org/schema/data/jpa"

     xsi:schemaLocation="

         http://www.springframework.org/schema/beans http://www.springframework.org/schema/beans/spring-beans-4.1.xsd

         http://www.springframework.org/schema/context http://www.springframework.org/schema/context/spring-context-4.1.xsd

         http://www.springframework.org/schema/jdbc http://www.springframework.org/schema/jdbc/spring-jdbc-4.1.xsd

         http://www.springframework.org/schema/jee http://www.springframework.org/schema/jee/spring-jee-4.1.xsd

         http://www.springframework.org/schema/tx http://www.springframework.org/schema/tx/spring-tx-4.1.xsd

         http://www.springframework.org/schema/data/jpa http://www.springframework.org/schema/data/jpa/spring-jpa-1.3.xsd

         http://www.springframework.org/schema/aop http://www.springframework.org/schema/aop/spring-aop-4.1.xsd

         http://www.springframework.org/schema/mvc http://www.springframework.org/schema/mvc/spring-mvc-4.1.xsd

         http://www.springframework.org/schema/util http://www.springframework.org/schema/util/spring-util-4.1.xsd">

     <!-- 配置请求分发器,让请求和控制器之间建立一一对应关系 -->

     <bean id="handlerMapping" class="org.springframework.web.servlet.handler.SimpleUrlHandlerMapping">

         <property name="mappings">

             <props>

                 <prop key="/toHello.do">helloController</prop>

             </props>

         </property>

     </bean>

     <!-- 配置控制器 -->

     <bean id="helloController" class="com.xcz.controller.ToHelloController"></bean>

     <!-- 配置视图处理器 -->

     <bean class="org.springframework.web.servlet.view.InternalResourceViewResolver">

         <property name="prefix" value="/WEB-INF/"></property>

         <property name="suffix" value=".jsp"></property>

     </bean>

 </beans>
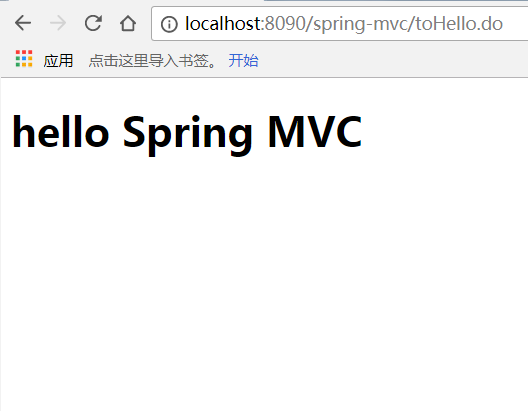
最后开启服务,在浏览器上输入localhost:端口号/项目名/toHello.do,看到如下界面,说明配置成功
Spring MVC(一)五大核心组件和配置的更多相关文章
- 转载 Spring、Spring MVC、MyBatis整合文件配置详解
Spring.Spring MVC.MyBatis整合文件配置详解 使用SSM框架做了几个小项目了,感觉还不错是时候总结一下了.先总结一下SSM整合的文件配置.其实具体的用法最好还是看官方文档. ...
- Spring MVC、MyBatis整合文件配置详解
Spring:http://spring.io/docs MyBatis:http://mybatis.github.io/mybatis-3/ Building a RESTful Web Serv ...
- spring MVC处理请求过程及配置详解
本文主要梳理下Spring MVC处理http请求的过程,以及配置servlet及业务application需要的常用标签,及其包含的意义. spring MVC处理请求过程 首先看一个整体图 简单说 ...
- Scrapy 框架 安装 五大核心组件 settings 配置 管道存储
scrapy 框架的使用 博客: https://www.cnblogs.com/bobo-zhang/p/10561617.html 安装: pip install wheel 下载 Twisted ...
- Spring MVC 5 + Thymeleaf 基于Java配置和注解配置
Spring MVC 5 + Thymeleaf 注解配置 Spring的配置方式一般为两种:XML配置和注解配置 Spring从3.0开始以后,推荐使用注解配置,这两种配置的优缺点说的人很多,我就不 ...
- spring mvc静态资源访问的配置
如果我们使用spring mvc来做web访问请求的控制转发,那么默认所有访问都将被DispatcherServlet独裁统治.比如我现在想访问的欢迎页index.html根本无需任何业务逻辑处理,仅 ...
- spring启动,spring mvc ,要不要xml配置,基于注解配置
老项目是09-11年搞的,用的是spring+struts2,没有用注解,全xml配置.web.xml中也配置了一大堆. 现在启动新项目,在项目中用spring+springmvc ,主要用注解,也用 ...
- Spring + Spring MVC+Hibernate框架整合详细配置
来源于:http://www.jianshu.com/p/8e2f92d0838c 具体配置参数: Spring: spring-framework-4.2.2Hibernate: hibernate ...
- Spring、Spring MVC、MyBatis整合文件配置详解
原文 http://www.cnblogs.com/wxisme/p/4924561.html 主题 MVC模式MyBatisSpring MVC 使用SSM框架做了几个小项目了,感觉还不错是时候总 ...
随机推荐
- Navicat:实现两个数据库结构同步和数据库对比
Navicat版本:Navicat Premium 12 选择 工具 ——> 结构同步 选择源数据库和目标数据库,选择完成后点击右下角对比按钮 要修改的对象:源数据库和目标数据库中都有的 ...
- 有趣的8个IT冷知识
阅读本文大概需要 2.8 分钟. 想要成为一名成功的程序员,我们除了了解不同编程语言的设计思路,也应当了解编程的发展历史,从而判断未来的编程技术将走向何方.接下就为大家普及下计算机发展历程中的8个冷门 ...
- 利用Sqoop将MySQL海量测试数据导入HDFS和HBase
声明:作者原创,转载注明出处. 作者:帅气陈吃苹果 一.安装Sqoop 1.下载sqoop,解压.文件夹重命名 wget http://mirror.bit.edu.cn/apache/sqoop/1 ...
- 面试前必须要知道的Redis面试题
前言 只有光头才能变强. 文本已收录至我的GitHub仓库,欢迎Star:https://github.com/ZhongFuCheng3y/3y 回顾前面: 从零单排学Redis[青铜] 从零单排学 ...
- SignalR第一节-在5分钟内完成通信连接和消息发送
前言 首先声明,这又是一个小白从入门到进阶系列. SignalR 这个项目我关注了很长时间,中间好像还看到过微软即将放弃该项目的消息,然后我也就没有持续关注了,目前的我项目中使用的是自己搭建的 Web ...
- Android 程序结构
Android程序在创建的时,Android studio就为其构建了基本结构,设计者可在此结构上开发应用程序, manifests :用于存放AndroidManifest.xml文件(又称清单文件 ...
- Ubuntu安装apache+Yii2
1.下载Yii2 https://www.yiichina.com/download 2.将解压后的文件放在指定的位置,这里是/home/www/yii/ 3.安装apache2 sudo apt-g ...
- Core文件简单介绍及生成设置方法
Core文件简单介绍及生成设置方法 Core文件其实就是内存的映像,当程序崩溃时,存储内存的相应信息,主用用于对程序进行调试.当程序崩溃时便会产生core文件,其实准确的应该说是core dump 文 ...
- 6.[leetcode] ZigZag Conversion
The string "PAYPALISHIRING" is written in a zigzag pattern on a given number of rows like ...
- asp.net core导入excel
接昨天的导出 导入excel内容 对比昨天导出的内容增加了一行实体属性名称作为标题行,这样到转换为实体的时候才能找到对应的属性. 导入代码 public IActionResult InportExc ...