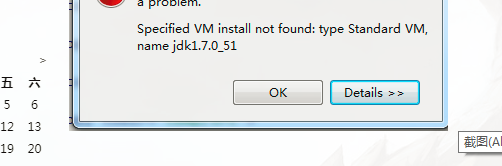
build.xml编译报错Specified VM install not found: type Standard VM, name jdk1.7.0_45
build.xml编译打包时报错:
解决方法:
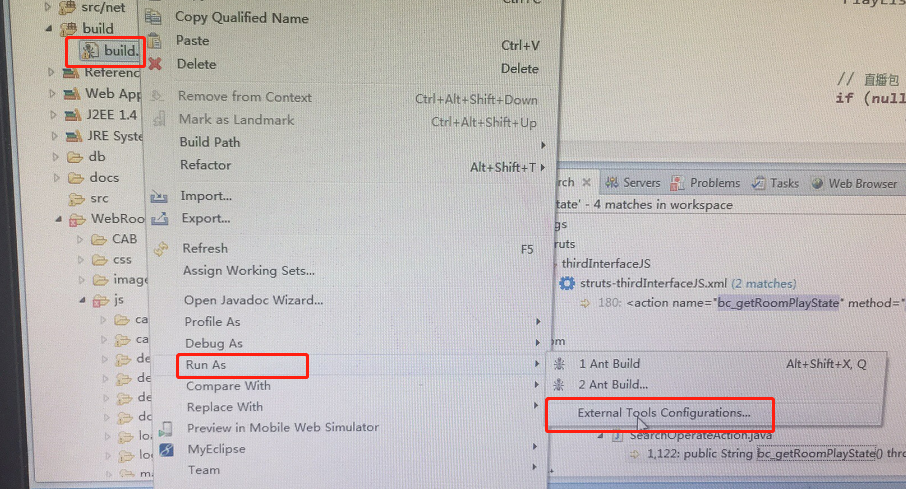
build.xml —— 右键 —— Run As —— External Tools Configuration
在这个页面的顶端就会看到有红叉叉的报错,报错信息就是Specified VM install not found: type Standard VM。
然后选择JRE tab页
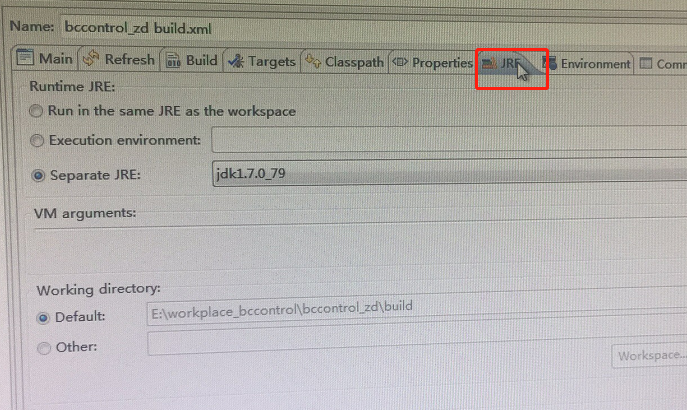
在这里可以重新指定所使用的JRE

选定使用的jdk,这样就完成了。
build.xml编译报错Specified VM install not found: type Standard VM, name jdk1.7.0_45的更多相关文章
- ant 错误 Specified VM install not found: type Standard VM, name jdk1.6.0_27
ant 错误 ant Specified VM install not found: type Standard VM, name jdk1.6.0_27 原因: 安装了新的jdk, 在workspa ...
- Specified VM install not found: type Standard VM, name jdk1.6.0_05
重装系统换了jdk,之前jdk用的1.6,现在改成1.7了.但是更新之后发现ant打包用不了了,报错 Specified VM install not found: type Standard VM, ...
- Specified VM install not found: type Standard VM, name Java
Specified VM install not found: type Standard VM, name Java 下了一个新项目,使用SpringSource中执行ant脚本时,莫名提示以下错误 ...
- Specified VM install not found: type Standard VM, name jdk1.7
网上抄袭来抄袭去,都说是将“workspace /.metadata/.plugins/org.eclipse.debug.core/.launches/”下的文件都删除掉. 的确,删除了解决问题了, ...
- Specified VM install not found: type Standard VM, name JDK1.8
真正的问题解决方法在这里:在项目中,右键点击ant文件,选择Run As -- External Tools Configuration,在这个页面的顶端就会看到有红叉叉的报错,报错信息就是Speci ...
- eclipse Specified VM install not found: type Standard VM, name
运行ant的时候出现 Specified VM install not found: type Standard VM, name.... 尝试删除这些文件: ... / .metadata / .p ...
- Specified VM install not found: type Standard VM, name jdk1.6...
运行ant的时候出现 Specified VM install not found: type Standard VM, name.... 搞了好久..汗汗 尝试删除这些文件: ... / .meta ...
- 关于出现Specified VM install not found: type Standard VM, name jdk1.5.0_04问题的解决办法
问题出现背景: 今天把原来电脑中的jdk版本由1.7换到了1.8,,重新在Eclipse中配置环境后出现了此问题 问题解决办法: 在你的项目中,选中ant文件,右键>>Run As > ...
- VC中编译报错:error C2011: 'fd_set' : 'struct' type redefinition
这是头文件包含顺序的问题,原因与解决办法见下面代码的注释. /* 包含下面这两个头文件时,必须把winsock2.h放在前面 否则编译报错,N多的重定义错误:例如 error C2011: 'fd_s ...
随机推荐
- PowerDesigner的Table视图同时显示Code和Name的方法[转发]
PowerDesigner中Table视图同时显示Code和Name,像下图这样的效果: 实现方法:Tools-Display Preference
- Python-Django 模型层-单表查询
单表操作 -增加,删,改:两种方式:queryset对象的方法,book对象的方法 -改:需要用save() -get()方法:查询的数据有且只有一条,如果多,少,都抛异常 单表查询 -<1&g ...
- celery 大量消息的分布式系统 定时任务
Celery 1.什么是Celery Celery是一个简单.灵活且可靠的,处理大量消息的分布式系统 专注于实时处理的异步任务队列 同时也支持任务调度 Celery架构 https://www.jia ...
- Android 键盘键名和键值列表
电话键 KEYCODE_CALL 拨号键 5 KEYCODE_ENDCALL 挂机键 6 KEYCODE_HOME 按键Home 3 KEYCODE_MENU 菜单键 82 KEYCODE_BACK ...
- beta冲刺2/7
目录 摘要 团队部分 个人部分 摘要 队名:小白吃 组长博客:hjj 作业博客:beta冲刺(2/7) 团队部分 后敬甲(组长) 过去两天完成了哪些任务 整理博客 做了点商家数据表格 接下来的计划 做 ...
- 【ABP】工作单元——不进行事物独立执行功能
1.注入 private readonly IUnitOfWorkManager unitOfWorkManager; 2.构造 3.开启新事物 using (var unitOfWork = uni ...
- base和this的用法
[意义] this:指当前类,this调用当前类的属性,方法,包括构造函数的方法,继承本类的构造函数 base:指当前类的父类,可调用父类的非私有属性,方法,继承父类的构造函数括号里的参数 [用处] ...
- django——简介
1.django的介绍 Django是一个开放源代码的Web应用框架,由Python写成.采用了MVT的软件设计模式,即模型Model,视图View和模板Template.它最初是被开发来用于管理劳伦 ...
- Urozero Autumn 2016. NCPC 2016
A. Artwork 倒过来并查集维护即可. #include<cstdio> #include<algorithm> using namespace std; const i ...
- LOJ #6303. 水题 (约数 质因数)
#6303. 水题 内存限制 10 MiB 时间限制:1000 ms 标准输入输出 题目描述 给定正整数 n,kn, kn,k,已知非负整数 xxx 满足 n!modkx=0,求 xmaxx_{max ...