
android开发_ViewGroup(组视图)-- 五大布局
view组--ViewGroup(组视图)
ViewGroup的作用:在view中添加子控件。ViewGroup的5个子类,就是五大布局:
(1) LinearLayout 线性布局(常用)
(2) RelativeLayout 相对布局(常用)
(3) FrameLayout 帧布局
(4) AbsoluteLayout 绝对布局
(5) TableLayout 表格布局
1 LinearLayout 线性布局:在该布局下包含的子布局列表为 横向 或 纵向 排布
1.1 LinearLayout 默认是横向布局,即:从左到右 布局控件
指定布局方向: android:orientation=“ ”
 1 <!-- 指定布局方向的属  性:orientation,

 2                  属性值:horizontal(横向)

 3                         vertical(纵向)

 4  -->

 5

 6 <!--横向布局-->

 7 <LinearLayout xmlns:android="http://schemas.android.com/apk/res/android"

 8     android:layout_width="match_parent"

 9     android:layout_height="match_parent"

10     android:orientation="horizontal" >

11

12 <!--纵向布局-->

13 <LinearLayout xmlns:android="http://schemas.android.com/apk/res/android"

14     android:layout_width="match_parent"

15     android:layout_height="match_parent"

16     android:orientation="vertical" >
1.2 权重(只有在子控件中才有的属性)
android:layout_weight=" "
例1:没添加权重属性之前:
 1 <?xml version="1.0" encoding="utf-8"?>

 2

 3 <!-- 指定布局方向的属相为:orientation,属性值:horizontal(横向)或vertical(纵向) -->

 4 <LinearLayout xmlns:android="http://schemas.android.com/apk/res/android"

 5     android:layout_width="match_parent"

 6     android:layout_height="match_parent"

 7     android:orientation="horizontal" >

 8

 9     <TextView

10         android:id="@+id/textView1"

11         android:layout_width="wrap_content"

12         android:layout_height="wrap_content"

13         android:text="TextView" />

14

15     <TextView

16         android:id="@+id/textView2"

17         android:layout_width="wrap_content"

18         android:layout_height="wrap_content"

19         android:text="TextView" />

20

21     <TextView

22         android:id="@+id/textView3"

23         android:layout_width="wrap_content"

24         android:layout_height="wrap_content"

25         android:text="TextView" />

26

27 </LinearLayout>

添加权重属性 android:layout_weight=" " 之后
 1 <?xml version="1.0" encoding="utf-8"?>

 2

 3 <!-- 指定布局方向的属相为:orientation,属性值:horizontal(横向)或vertical(纵向) -->

 4 <LinearLayout xmlns:android="http://schemas.android.com/apk/res/android"

 5     android:layout_width="match_parent"

 6     android:layout_height="match_parent"

 7     android:orientation="horizontal" >

 8

 9     <TextView

10         android:id="@+id/textView1"

11         android:layout_width="wrap_content"

12         android:layout_height="wrap_content"

13         android:layout_weight="1"

14         android:text="TextView" />

15

16     <TextView

17         android:id="@+id/textView2"

18         android:layout_width="wrap_content"

19         android:layout_height="wrap_content"

20         android:layout_weight="1"

21         android:text="TextView" />

22

23     <TextView

24         android:id="@+id/textView3"

25         android:layout_width="wrap_content"

26         android:layout_height="wrap_content"

27         android:layout_weight="1"

28         android:text="TextView" />

29

30 </LinearLayout>
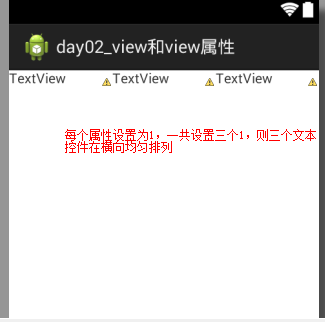
纵向布局同理。
例2:实现下面布局
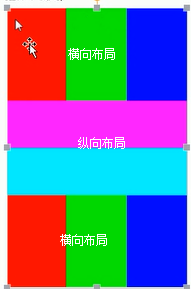
颜色值忽略
 <?xml version="1.0" encoding="utf-8"?>

 <LinearLayout xmlns:android="http://schemas.android.com/apk/res/android"

     android:layout_width="match_parent"

     android:layout_height="match_parent"

     android:orientation="vertical" >

     <LinearLayout

         android:layout_width="match_parent"

         android:layout_height="0dp"

         android:layout_weight="1"

         android:background="#F00">

         <View

             android:layout_width="0dp"

             android:layout_height="match_parent"

             android:layout_weight="1"

             android:background="#F00"

             />

         <View

             android:layout_width="0dp"

             android:layout_height="match_parent"

             android:layout_weight="1"

             android:background="#0F0"

             />

         <View

             android:layout_width="0dp"

             android:layout_height="match_parent"

             android:layout_weight="1"

             android:background="#00F"

             />

     </LinearLayout>

     <LinearLayout

         android:layout_width="match_parent"

         android:layout_height="0dp"

         android:layout_weight="1"

         android:orientation="vertical"  >

         <View

             android:layout_width="match_parent"

             android:layout_height="0dp"

             android:layout_weight="1"

             android:background="#F00"

             />

         <View

             android:layout_width="match_parent"

             android:layout_height="0dp"

             android:layout_weight="1"

             android:background="#0F0"

             />

     </LinearLayout>

     <LinearLayout

         android:layout_width="match_parent"

         android:layout_height="0dp"

         android:layout_weight="1"

         android:background="#00F">

         <View

             android:layout_width="0dp"

             android:layout_height="match_parent"

             android:layout_weight="1"

             android:background="#F00"

             />

         <View

             android:layout_width="0dp"

             android:layout_height="match_parent"

             android:layout_weight="1"

             android:background="#0F0"

             />

         <View

             android:layout_width="0dp"

             android:layout_height="match_parent"

             android:layout_weight="1"

             android:background="#00F"

             />

         </LinearLayout>

 </LinearLayout>
2 RelativeLayout 相对布局:
2.1相对父控件布局
(1) android:layout_centerHorizontal 横向居中
(2) android:layout_centerVertical 纵向居中
(3) android:layout_centerInParent 横向纵向居中
跟父控件最左边/最右边/顶部/底部对齐
(1) android:layout_alignParentLeft
(2) android:layout_alignParentRight
(3) android:layout_alignParentTop
(4) android:layout_alignParentBottom
2.1.1位置默认在左上角
 <?xml version="1.0" encoding="utf-8"?>

 <RelativeLayout xmlns:android="http://schemas.android.com/apk/res/android"

     android:layout_width="match_parent"

     android:layout_height="match_parent" >

      <!--如果没有位置属性,按钮在左上角  -->

     <Button

         android:id="@+id/button1"

         android:layout_width="wrap_content"

         android:layout_height="wrap_content"

         android:text="最左上角" />

 </RelativeLayout>
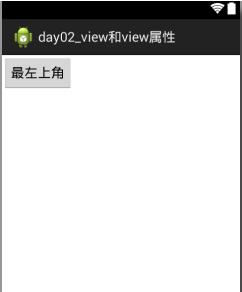
2.1.2属性:android:layout_centerHorizontal="true" 横向中间
android:layout_centerVertical="true" 纵向中间
 <?xml version="1.0" encoding="utf-8"?>

 <RelativeLayout xmlns:android="http://schemas.android.com/apk/res/android"

     android:layout_width="match_parent"

     android:layout_height="match_parent" >

   <Button

         android:id="@+id/button1"

         android:layout_width="wrap_content"

         android:layout_height="wrap_content"

         android:layout_centerHorizontal="true"

         android:layout_centerVertical="true"

         android:text="两种属性定位到中间" />

 </RelativeLayout>

2.1.3属性:android:layout_centerInParent="true" 父窗体中间
 <?xml version="1.0" encoding="utf-8"?>

 <RelativeLayout xmlns:android="http://schemas.android.com/apk/res/android"

     android:layout_width="match_parent"

     android:layout_height="match_parent" >

     <Button

         android:id="@+id/button1"

         android:layout_width="wrap_content"

         android:layout_height="wrap_content"

         android:layout_centerInParent="true"

         android:text="一种属性定位到中间" />

 </RelativeLayout>
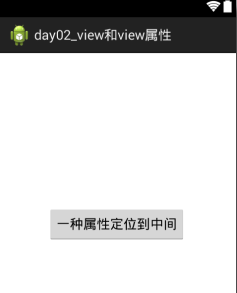
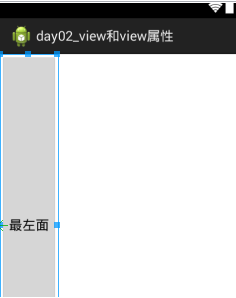
2.1.4属性:android:layout_alignParentLeft="true" 对齐到父窗口的左面,其中align是“对齐”的意思
 <?xml version="1.0" encoding="utf-8"?>

 <RelativeLayout xmlns:android="http://schemas.android.com/apk/res/android"

     android:layout_width="match_parent"

     android:layout_height="match_parent" >

     <Button

         android:layout_width="wrap_content"

         android:layout_height="match_parent"

         android:layout_alignParentLeft="true"

         android:text="最左面" />

 </RelativeLayout>
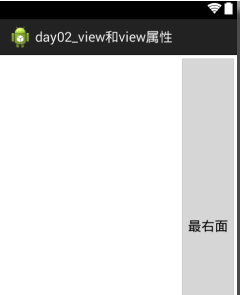
2.1.5属性:android:layout_alignParentRight="true" 对齐到父窗口的右面,其中align是“对齐”的意思
  1 <?xml version="1.0" encoding="utf-8"?>

  2 <RelativeLayout xmlns:android="http://schemas.android.com/apk/res/android"

  3     android:layout_width="match_parent"

  4     android:layout_height="match_parent" >

  5     <Button

  6         android:layout_width="wrap_content"

  7         android:layout_height="match_parent"

  8         android:layout_alignParentRight ="true"

  9         android:text="最右面" />

 10

 11 </RelativeLayout>
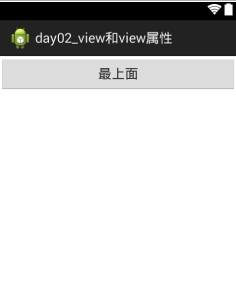
2.1.6属性:android:layout_alignParentTop="true" 对齐到父窗口的右面,其中align是“对齐”的意思
 <?xml version="1.0" encoding="utf-8"?>

  <RelativeLayout xmlns:android="http://schemas.android.com/apk/res/android"

     android:layout_width="match_parent"

     android:layout_height="match_parent" >

     <Button

         android:layout_width="match_parent"

         android:layout_height="wrap_content"

         android:layout_alignParentTop="true"

         android:text="最上面" />

 </RelativeLayout>
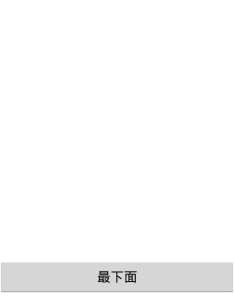
2.1.7属性:android:layout_alignParentBottom="true" 对齐到父窗口的右面,其中align是“对齐”的意思
 <?xml version="1.0" encoding="utf-8"?>

  <RelativeLayout xmlns:android="http://schemas.android.com/apk/res/android"

     android:layout_width="match_parent"

     android:layout_height="match_parent" >

     <Button

         android:layout_width="match_parent"

         android:layout_height="wrap_content"

         android:layout_alignParentBottom="true"

         android:text="最下面" />

 </RelativeLayout>
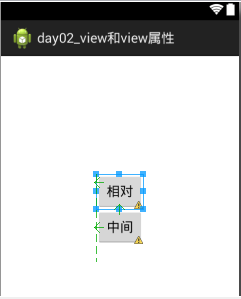
2.2相对于同等级的控件进行布局
针对已存在的兄弟控件(在某个控件的左边/右边/上面/下面)
(1)android:layout_toLeftOf
(2)android:layout_toRightOf
(3)android:layout_above
(4)android:layout_below
相对于兄弟控件的边对齐
(1)android:layout_alignTop
(2)android:layout_alignBottom
(3) android:layout_alignLeft
(4)android:layout_alignRight
上述属性的值为@id/相对控件的id。如:android:layout_above="@id/center_btn"
 <?xml version="1.0" encoding="utf-8"?>

  <RelativeLayout xmlns:android="http://schemas.android.com/apk/res/android"

     android:layout_width="match_parent"

     android:layout_height="match_parent" >

 <Button

     android:id="@+id/center_btn"

     android:layout_width="wrap_content"

     android:layout_height="wrap_content"

     android:layout_centerInParent="true"

     android:text="中间"/>

 <Button

     android:layout_width="wrap_content"

     android:layout_height="wrap_content"

     android:layout_above="@id/center_btn"

     android:layout_alignLeft="@id/center_btn"

     android:text="相对"/>

     />

 </RelativeLayout>
3 FrameLayout 帧布局:越写在后面的控件,越展示最前面(最上层)
4 AbsoluteLayout 绝对布局:

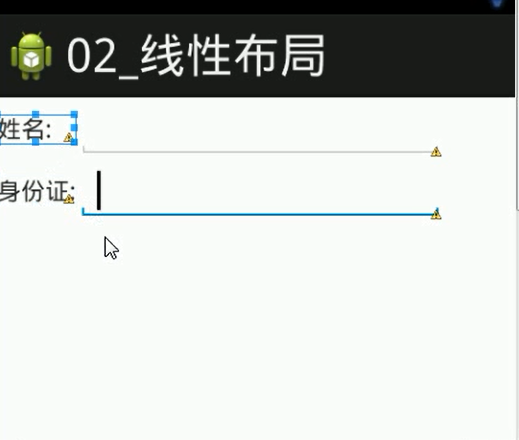
5 TableLayout 表格布局:就是一个表格(应用场景:银行表格)
<TableLayout><TableLayout/>表格标签
<TableRow><TableRow/> 行标签

上面代码只给出了身份证那一行的代码
android开发_ViewGroup(组视图)-- 五大布局的更多相关文章
- Android开发之详解五大布局
http://bbs.chinaunix.net/thread-3654213-1-1.html 为了适应各式各样的界面风格,Android系统提供了5种布局,这5种布局分别是: LinearLayo ...
- Android开发之玩转FlexboxLayout布局
在这之前,我曾认真的研究过鸿洋大神的Android 自定义ViewGroup 实战篇 -> 实现FlowLayout,按照大神的思路写出了一个流式布局,所有的东西都是难者不会会者不难,当自己能自 ...
- Android开发之自定义视图
继承View 1.重写onMeasure(int wMeasureSpec,int hMeasureSpec)处理程序,这样可以标明视图尺寸 2.重写onDraw,以便绘制我们自己的自定义视图内 3. ...
- android开发------编写用户界面之相对布局
今天要说的是RelativeLayout.RelativeLayout相对于LinearLayout的主要不同点在于它需要一个参照物. 我们先来看一下官方对这个布局的解释: RelativeLayou ...
- android开发------编写用户界面之线性布局(补充知识)
在前面的文章中 http://www.cnblogs.com/ai-developers/p/android_linearlayout.html 我们看到了布局中有这样一个属性: layout_wei ...
- android开发------编写用户界面之线性布局
一个好的应用程序离不开人性化的用户界面.在学习其他东西之前.理应先学习编写程序的布局(外观) 今天,我们就来学习android的UI布局----LinearLayout. LinearLayout,即 ...
- Android开发:组播(多播)与广播
近期由于需要编写能够使同一局域网中的Android客户端与PC端进行自动匹配通信功能的程序,学习并试验了JAVA组播与广播的内容,记录一些理解如下: 一.组播(多播) 背景知识:组播使用UDP对一定范 ...
- android 开发 RecyclerView 横排列列表布局
1.写一个一竖的自定义布局: <?xml version="1.0" encoding="utf-8"?> <LinearLayout xml ...
- Android 开发日常积累
Android 集合 Android 开源项目分类汇总 扔物线的 HenCoder 高级 Android 教程 hencoder HenCoder:给高级 Android 工程师的进阶手册 Andro ...
随机推荐
- TCP断开那些事
继上一篇后,我们再来看一下四次挥手的过程 这里其实没有必要过多阐述,一张图胜过千言万语. 与三次握手一样,四次挥手的过程中也有许多扩展问题. 当然问的最多的还是:为什么要四次握手?为什么要等待2MSL ...
- python基础的学习
今日内容 1.常见操作系 1.win win7 win10 window serrer 2.linux centons 图像界面差 upuntu 个人开发(图形化较好) redhat 企业 3.mac ...
- NodeJS笔记(四) NPM 指令--- npm start
在上一节中使用我们使用下面的指令启动了Express的demo APP项目 npm start 这个指令具体执行了哪些内容呢? Node.js新版本改变了启动方式,npm start 会执行 bi ...
- keras训练cnn模型时loss为nan
keras训练cnn模型时loss为nan 1.首先记下来如何解决这个问题的:由于我代码中 model.compile(loss='categorical_crossentropy', optimiz ...
- Linux —— 命令
Linux —— 命令 各种查看 查看文件绝对路径 pwd 查看某服务占用端口 netstat -ano |grep mysql Linux 下的复制粘贴 0.在KDE/Gnome下: 复制命令:Ct ...
- js篇-数组合并其中属性值相同的项目且属性值相加
项目背景是:var a = [{id:1,num:"12"},{id:2,num:"13"},{id:3,num:"3"},{id:2,nu ...
- pdf下载速度
- 从零开始一起学习SLAM | 掌握g2o顶点编程套路
点"计算机视觉life"关注,置顶更快接收消息! ## 小白:师兄,上一次将的g2o框架<从零开始一起学习SLAM | 理解图优化,一步步带你看懂g2o代码>真的很清晰 ...
- C#设计模式(13)——代理模式(Proxy Pattern)(转)
一.引言 在软件开发过程中,有些对象有时候会由于网络或其他的障碍,以至于不能够或者不能直接访问到这些对象,如果直接访问对象给系统带来不必要的复杂性,这时候可以在客户端和目标对象之间增加一层中间层,让代 ...
- 第四周Java作业
老师说让用二维数组找最大,也就是最大和块,要求必须挨着,我其实不会写这个程序,所以我只能把自己的思路写出来 我觉得可以大问题缩小,我的思路是先把四个数一个正方形来进行计算,然后六个数矩形,把他化成两个 ...