使用VB.Net Express版本创建服务
Services Part 1:> Creating Services
Visual Basic Express is a great, free tool from Microsoft. You don’t get all that Visual Studio 2005 offers though. One of the things VB Express does not have is templates to create a Windows Service.
We can still make Services with VB 2005 Express. All it takes is a little manual work. I will walk you thru a example on how to make a service in Visual Basic Express.
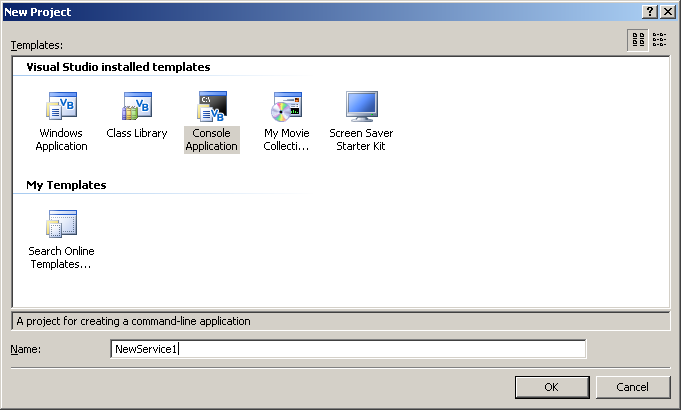
Choose Console Application, and give it the name of NewService1.
It will open in the designer with a module. Rename the module to NewService1.
Now we have to get some references for our Service. In the solution Explorer, double click on My Project and choose the References tab.
We need to Add the following references:
System.Configuration.Install
System.ServiceProcess
Now back to the NewService1 Module. We will be replacing all the text in the module, thus turning it into a class. Replace all the text with the text below:
Imports System.ServiceProcess

Imports System.Configuration.Install

Public Class NewService1

    Inherits System.ServiceProcess.ServiceBase

    Friend WithEvents Timer1 As System.Timers.Timer

    Public Sub New()

        MyBase.New()

        InitializeComponents()

        ' TODO: Add any further initialization code

    End Sub

    Private Sub InitializeComponents()

        Me.ServiceName = "NewService1″"

        Me.AutoLog = True

        Me.CanStop = True

        Me.Timer1 = New System.Timers.Timer()

        Me.Timer1.Interval = 6000

        Me.Timer1.Enabled = True

    End Sub

    ' This method starts the service.

    <MTAThread()> Shared Sub Main()

        ' To run more than one service you have to add them to the array

        System.ServiceProcess.ServiceBase.Run(New System.ServiceProcess.ServiceBase() {New NewService1})

    End Sub

    ' Clean up any resources being used.

    Protected Overloads Overrides Sub Dispose(ByVal disposing As Boolean)

        MyBase.Dispose(disposing)

        ' TODO: Add cleanup code here (if required)

    End Sub

    Protected Overrides Sub OnStart(ByVal args() As String)

        ' TODO: Add start code here (if required)

        ' to start your service.

        Me.Timer1.Enabled = True

    End Sub

    Protected Overrides Sub OnStop()

        ' TODO: Add tear-down code here (if required)

        ' to stop your service.

        Me.Timer1.Enabled = False

    End Sub

    Private Sub InitializeComponent()

        Me.Timer1 = New System.Timers.Timer

        CType(Me.Timer1, System.ComponentModel.ISupportInitialize).BeginInit()

        '

        'Timer1

        '

        Me.Timer1.Enabled = True

        CType(Me.Timer1, System.ComponentModel.ISupportInitialize).EndInit()

    End Sub

 Private Sub Timer1_Elapsed(ByVal sender As System.Object, ByVal e As System.Timers.ElapsedEventArgs) Handles Timer1.Elapsed

        Dim MyLog As New EventLog() ' create a new event log

        ' Check if the the Event Log Exists

        If Not MyLog.SourceExists(“NewService1″) Then

            MyLog.CreateEventSource(“NewService1″, “NewService1 Log”) ‘ Create Log

        End If

        MyLog.Source = "NewService1″"

        MyLog.WriteEntry("NewService1 Log", "It is running", EventLogEntryType.Information)

        'disable the timer so you dont fill up the log

        Timer1.Enabled = False

    End Sub

End Class
This will create the NewService class and insert a Timer into your designer.
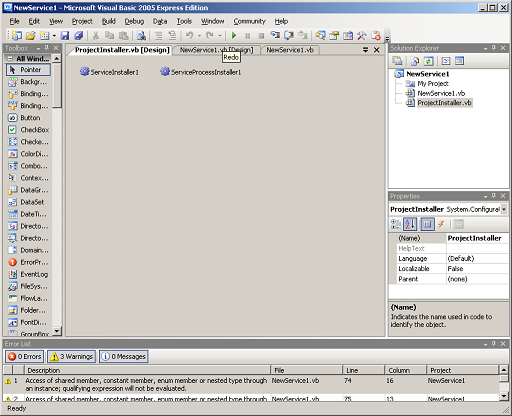
If you Double-Click on the NewService1 in the SolutionExplorer, you will see the designer and the Timer1 object.
This code will run after 6 seconds has passed, and will insert a log entry for our service saying “ It is running”.
We need to set the Service Name in the Designer:
Double click on NewService1 to get the gray page. Then click somewhere in the grey to get the properties for this class.
Under ServiceName put NewService1.

Services Part 2:> Creating the needed Installers
This is not the Actual “Installer”. This is code needed for the Service to operate correctly.
We will get to Installing Later…
Add the Installer Code:
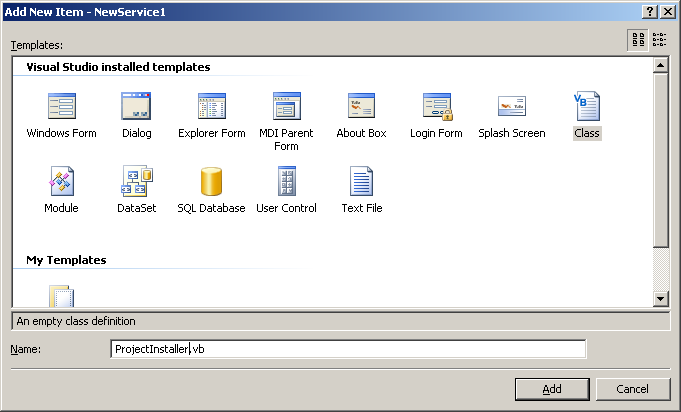
Create a new class file in your project and call it ProjectInstaller.
We wil replace the text in the ProjectInstaller class with the following code:
Imports System.ComponentModel

Imports System.Configuration.Install

<RunInstaller(True)> Public Class ProjectInstaller

    Inherits System.Configuration.Install.Installer

    'Installer overrides dispose to clean up the component list.

    <System.Diagnostics.DebuggerNonUserCode()> _

    Protected Overrides Sub Dispose(ByVal disposing As Boolean)

        Try

            If disposing AndAlso components IsNot Nothing Then

                components.Dispose()

            End If

        Finally

            MyBase.Dispose(disposing)

        End Try

    End Sub

    'Required by the Component Designer

    Private components As System.ComponentModel.IContainer

    'NOTE: The following procedure is required by the Component Designer

    'It can be modified using the Component Designer.

    'Do not modify it using the code editor.

    <System.Diagnostics.DebuggerStepThrough()> _

    Private Sub InitializeComponent()

        Me.ServiceProcessInstaller1 = New System.ServiceProcess.ServiceProcessInstaller

        Me.ServiceInstaller1 = New System.ServiceProcess.ServiceInstaller

        '

        'ServiceProcessInstaller1

        '

        Me.ServiceProcessInstaller1.Account = System.ServiceProcess.ServiceAccount.LocalSystem

        Me.ServiceProcessInstaller1.Password = Nothing

        Me.ServiceProcessInstaller1.Username = Nothing

        '

        'ServiceInstaller1

        '

        Me.ServiceInstaller1.ServiceName = "NewService1″"

        Me.ServiceInstaller1.StartType = System.ServiceProcess.ServiceStartMode.Automatic

        '

        'ProjectInstaller

        '

        Me.Installers.AddRange(New System.Configuration.Install.Installer() {Me.ServiceProcessInstaller1, Me.ServiceInstaller1})

    End Sub

    Friend WithEvents ServiceProcessInstaller1 As System.ServiceProcess.ServiceProcessInstaller

    Friend WithEvents ServiceInstaller1 As System.ServiceProcess.ServiceInstaller

    Public Sub New()

        MyBase.New()

        'This call is required by the Component Designer.

        InitializeComponent()

        'Add initialization code after the call to InitializeComponent

    End Sub

End Class
This will create the ProjectInstaller class and insert 2 Objects in the designer:
ServiceInstaller1 – Settings: The Service Name, Display Name, description, StartType
ServiceProcessInstaller – Settings: The Account the service will run under
In this example, the settings are set as follows:
ServiceName: NewService1
DisplayName: {blank}
Description: {blank}
StartType: Automatic – (will auto start on reboot)
Account: LocalSystem – (do not need user/password. This will run under System account)
Now we have to build the project.
Services Part 3:> Build and Install your Service
Build and Install service on your pc:
Go to build menu and choose Build NewService1 – This will create an EXE file in our project’s \bin\Release folder.
Next we will need to use the InstallUtil.exe to install the service into the PC.
InstallUtil.exe is part of the Dot Net distribution package.
It is found in the c:\windows\Microsoft.net\Firmware\v2.0.50727\ folder.
Its command line usage is:
Install Service:
Installutil.exe PATH_TO_EXE.exe
Uninstall Service:
InstallUtil.exe PATH_TO_EXE.exe /u
For this example, I changed directory into the c:\windows\Microsoft.net\Firmware\v2.0.50727\ folder.
Then I ran:
InstallUtil.exe “c:\vb2005\projects\NewService1\bin\Release\NewService1.exe”
The installer should give you lots of text, It should end by saying:
The Commit phase completed successfully.
The transacted install has completed.
If there are any error messages in the install of the service, it will list them.
After successful installation, you should see the Service listed as NewService1 in the Service Manager.
To get the service manager, Right click on My Computer on the desktop, and choose Manage.
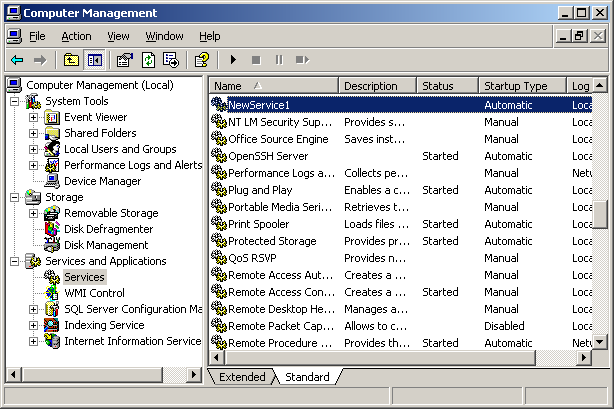
Then choose Services and Applications > Services. Right-Click on the NewService1 and choose Start.
Then go to System Tools > Event Viewer > Application, and you should see your log entries.
The service will make one entry saying “It is running” then disable the Timer so your log doesn’t fill up.
To install this service on another computer:
Prerequisites: You need to have .net distributable 2.0 on the target PC.
You need to copy over the files in the Release folder to the target computer. Then inside the c:\windows\Microsoft.net\Firmware\v2.0.50727\ folder run the InstallUtil.exe program as described previously.
That’s It.
使用VB.Net Express版本创建服务的更多相关文章
- node.js中express模块创建服务器和http模块客户端发请求
首先下载express模块,命令行输入 npm install express 1.node.js中express模块创建服务端 在js代码同文件位置新建一个文件夹(www_root),里面存放网页文 ...
- Redis-环境搭建、创建服务、搭建主从复制-Windows版本
一.搭建Redis环境 1.链接:http://pan.baidu.com/s/1boKAzzL 密码:sh2r 2.不赘述:执行redis-server.再执行redis-cli即可.redis环境 ...
- paip.sql2k,sql2005,sql2008,sql2008 r2,SQL2012以及EXPRESS版本的区别
paip.sql2k,sql2005,sql2008,sql2008 r2,SQL2012以及EXPRESS版本的区别 作者Attilax , EMAIL:1466519819@qq.com 来源 ...
- express 应用创建及app.js详解
#1 express 应用创建 1.安装node.js (自行百度) 2.npm install express -g 3.全局安装express生成器 express-generator npm i ...
- Maven搭建webService (一) 创建服务端---使用main函数发布服务
今天和大家分享下 使用maven 搭建 webService 服务端: 首先需要在你的IDE中集成Maven.集成办法此处略....... 1.创建一个web工程. 2.在pom文件中增加以下依赖: ...
- MSSQL Express版本自动备份数据库
由于Express版本的数据库没有自动备份数据库的功能,所以需要自己搭建好备份功能 一.具体原理: 1.利用SQL备份命令:Backup Database 2.使用sqlcmd执行备份命令 3.使用系 ...
- nodejs零基础详细教程2:模块化、fs文件操作模块、http创建服务模块
第二章 建议学习时间4小时 课程共10章 学习方式:详细阅读,并手动实现相关代码 学习目标:此教程将教会大家 安装Node.搭建服务器.express.mysql.mongodb.编写后台业务逻辑 ...
- Node.js--安装express以及创建第一个express项目(windows)
1.根据新版的express出现了安装器的概念,安装express需要两个步骤(命令行找到nodejs目录全局安装): (1)npm install -g express@4.15.0 (也可省略 ...
- Composer 结合 Git 创建 “服务类库”
Composer 结合 Git 创建 "服务类库" 我一直认为,现在的 PHP 已经进展到了工程化的领域.以前的 PHP 开发者,以快为美,速度和规模永远都是矛盾体.现在的 PHP ...
随机推荐
- bootstrap modal模态框的运用
http://www.ziqiangxuetang.com/bootstrap/bootstrap-modal-plugin.html 方法 下面是一些可与 modal() 一起使用的有用的方法. 方 ...
- Python+VSCode+Git 学习总结
稍等,先写个脑图... 继续,读完本文,你会学会: 1.如何在VSCode中写Python代码: 2.如何在VSCode中使用Git: 为什么写这篇总结 首先,我假设你是一名Python语言初学者,你 ...
- STL查找序列中处于某一大小范围内的元素个数
还是头条的笔试题(咦?),问题最后转换成这样的形式: 输入:不包含重复元素的有序数组a[N]以及上下界low, high; 输出:数组a[N]中满足元素处于闭区间[low,high]内(即low &l ...
- eclipse 新项目导入到tfs 步骤
为了下次导入项目 不动脑子,写下此步骤.... 1.右键要导入的项目>> share project(如果有这项就点它,然后 进入 分享至你的tfs服务器即可) 1.右键要导入的项目> ...
- 关于lidroid xUtils 开源项目
最近搜了一些框架供初学者学习,比较了一下XUtils是目前git上比较活跃 功能比较完善的一个框架,是基于afinal开发的,比afinal稳定性提高了不少,下面是介绍: xUtils简介 xUtil ...
- RDD之三:RDD创建方式
RDD创建方式 1)从Hadoop文件系统(如HDFS.Hive.HBase)输入创建.2)从父RDD转换得到新RDD.3)通过parallelize或makeRDD将单机数据创建为分布式RDD. 4 ...
- R语言学习——列表
1.列表 列表是一种泛化的向量,其并没有要求所有元素都是同一类型,其元素甚至可为任意类型. 列表格式自由,为统计的计算结果的返回提供了极便利的方法. 2.列表的创建 可以用list()函数创建列表. ...
- java-appium-527进阶-1 UiAutomator1&2区别和封装
1.UiAutomator和UiAtumator2的区别: 1.1 UiAutomator1有关于id定位的策略 UiAutomator1 id定位在resourceid匹配失败时,会匹配conten ...
- Linux 期中架构 MySQL
MySQL基础部分 mysql安装脚本 安装前请将相关安装包copy放到/server/tools目录下 -rw-r--r-- 1 root root 314149697 Mar 23 2017 ...
- ThinkPHP 5使用 Composer 组件名称可以从https://packagist.org/ 搜索到
http://www.phpcomposer.com/ 1 这个是国内的composer网站 thinkphp5自带了composer.phar组件,如果没有安装,则需要进行安装 以下命令全部在项目目 ...