《TensorFlow实战》中AlexNet卷积神经网络的训练中
TensorFlow实战中AlexNet卷积神经网络的训练
01 出错
TypeError: as_default() missing 1 required positional argument: 'self'
经过百度、谷歌的双重查找,没找到就具体原因。后面去TensorFlow官方文档中发现,tf.Graph的用法如下:
g = tf.Graph()

with g.as_default():

  # Define operations and tensors in `g`.

  c = tf.constant(30.0)

  assert c.graph is g
因此,做了一点小改动。把语句:
with tf.Graph().as_default():
改成:
g = tf.Graph()

with g.as_default():
02 运行代码对比带LRN和不带
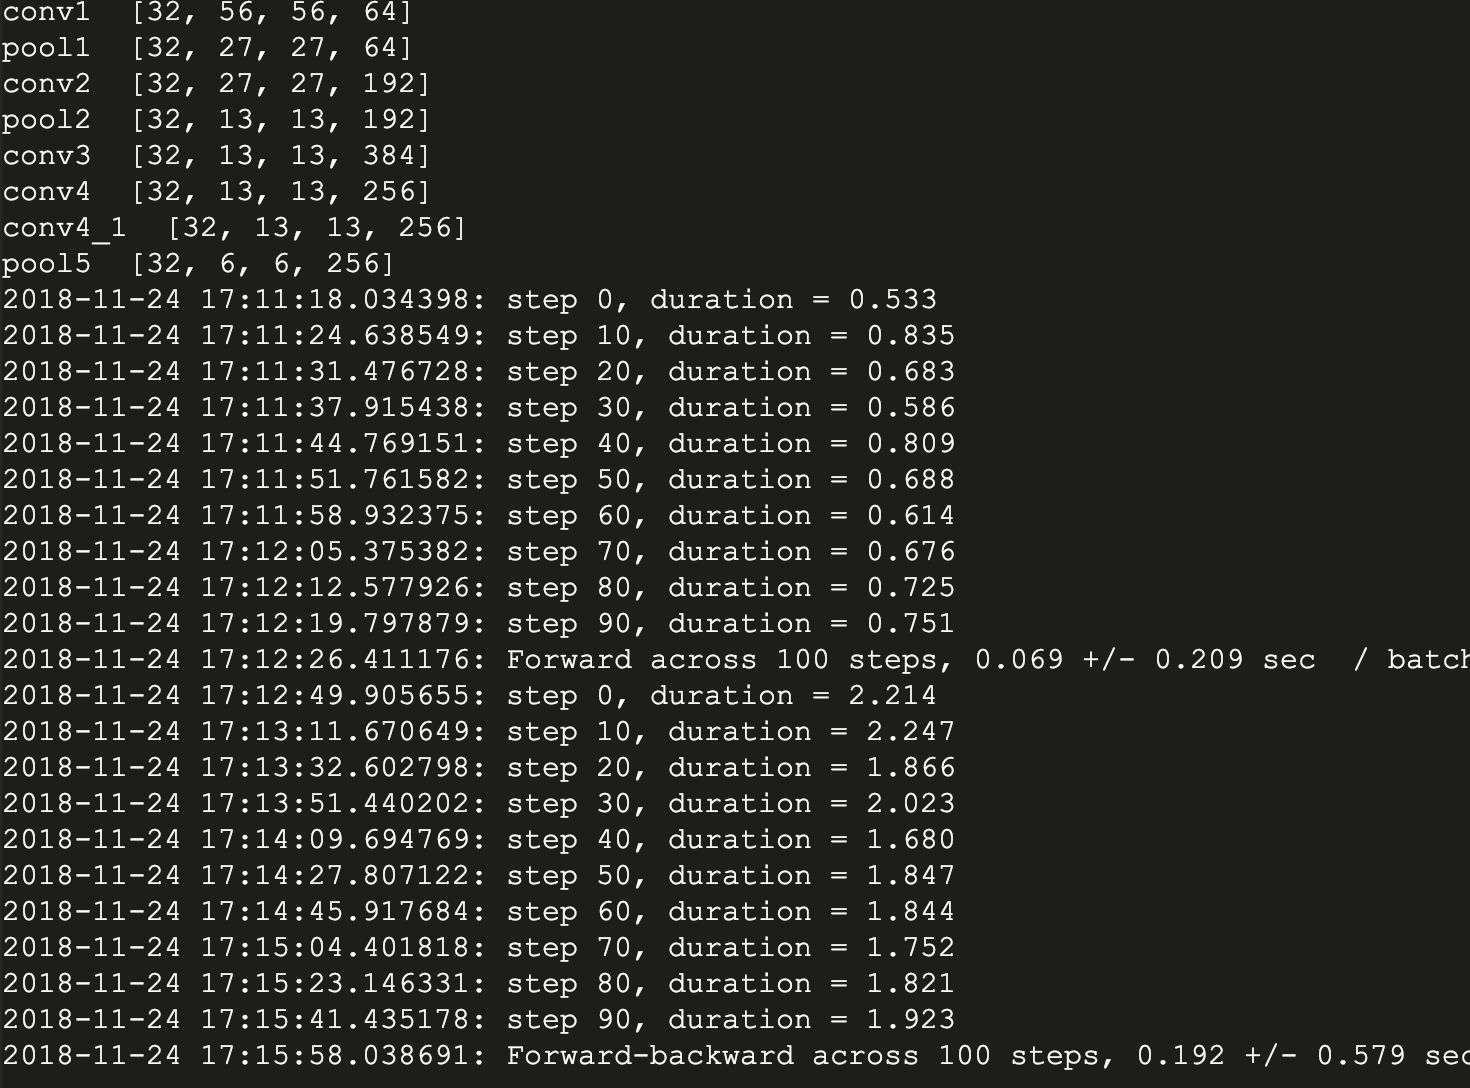
最后成功运行了第一个带有LRN的版本:
#!/usr/bin/env python

# -*- coding: utf-8 -*-

# @Time    : 2018/11/20 10:42

# @Author  : Chen Cjv

# @Site    : http://www.cnblogs.com/cjvae/

# @File    : AlexNet.py

# @Software: PyCharm

import os

os.environ['TF_CPP_MIN_LOG_LEVEL']='2'

from datetime import datetime

import math

import time

import tensorflow as tf

batch_size = 32

num_batches = 100

# 展示每一个卷积层或池化层输出的tensor的尺寸,接收一个tensor输入

def print_activation(t):

    print(t.op.name, '', t.get_shape().as_list())

def inference(images):

    # 训练的模型参数

    parameters = []

    # 1th CL starting

    with tf.name_scope('conv1') as scope:

        # 截断正态分布初始化卷积核参数

        # 卷积核尺寸11 x 11 颜色3通道 卷积核64

        kernel = tf.Variable(tf.truncated_normal([11, 11, 3, 64],

                                                 dtype=tf.float32, stddev=1e-1), name='weights')

        # 实现卷积操作,步长4x4(在图像上每4x4区域取样一次,每次取样卷积核大小为11x11)

        conv = tf.nn.conv2d(images, kernel, [1, 4, 4, 1], padding='SAME')

        # 卷积偏置为0

        biases = tf.Variable(tf.constant(0.0, shape=[64], dtype=tf.float32),

                             trainable=True, name='biases')

        # 将卷积结果与偏置相加

        bias = tf.nn.bias_add(conv, biases)

        # 对结果非线性处理

        conv1 = tf.nn.relu(bias, name=scope)

        # 输出conv1的信息

        print_activation(conv1)

        # 添加参数

        parameters  += [kernel, biases]

    # 1th CL ending

    # add 1th LRN layer and max-pooling layer starting

    # depth_radius设为4,lrn可以选择不用,效果待测试

    lrn1 = tf.nn.lrn(conv1, 4, bias=1.0, alpha=0.001/9, beta=0.75, name='lrn1')

    # 池化:尺寸3x3(将3x3的大小的像素块降为1x1 步长为2x2 VALID表示取样不超过边框)

    pool1 = tf.nn.max_pool(lrn1, ksize=[1, 3, 3, 1], strides=[1, 2, 2, 1], padding='VALID', name='pool1')

    print_activation(pool1)

    # add 1th LRN layer and max-pooling layer ending

    # designing second Convolutional Layer starting

    with tf.name_scope('conv2') as scope:

        # 不同第一卷积层,这层卷积核尺寸5x5,通道为上层输出通道数(即卷积核数)64

        # 卷积核数量为192

        kernel = tf.Variable(tf.truncated_normal([5, 5, 64, 192],

                                                 dtype=tf.float32, stddev=1e-1), name='weights')

        # 卷积步长为1,即扫描全部图像

        conv = tf.nn.conv2d(pool1, kernel, [1, 1, 1, 1], padding='SAME')

        biases = tf.Variable(tf.constant(0.0, shape=[192],

                                         dtype=tf.float32), trainable=True, name='biases')

        bias = tf.nn.bias_add(conv, biases)

        conv2 = tf.nn.relu(bias, name=scope)

        parameters += [kernel, biases]

    print_activation(conv2)

    # designing 2th CL ending

    # add 2th LRN layer and max-pooling layer starting

    lrn2 = tf.nn.lrn(conv2, 4, bias=1.0, alpha=0.001 / 9, beta=0.75, name='lrn2')

    pool2 = tf.nn.max_pool (lrn2, ksize=[1, 3, 3, 1], strides=[1, 2, 2, 1], padding='VALID', name='pool2')

    print_activation(pool2)

    # add 2th LRN layer and max-pooling layer ending

    # designing 3th Convolutional Layer starting

    with tf.name_scope('conv3') as scope:

        # 卷积核尺寸3x3 通道数192 卷积核384

        kernel = tf.Variable(tf.truncated_normal([3, 3, 192, 384],

                                                 dtype=tf.float32, stddev=1e-1), name='weights')

        conv = tf.nn.conv2d(pool2, kernel, [1, 1, 1, 1], padding='SAME')

        biases = tf.Variable(tf.constant(0.0, shape=[384],

                                       dtype=tf.float32), trainable=True, name='biases')

        bias = tf.nn.bias_add(conv, biases)

        conv3 = tf.nn.relu(bias, name=scope)

        parameters += [kernel, biases]

        print_activation(conv3)

    # designing 3th CL ending

    # designing 4th CL starting

    with tf.name_scope('conv4') as scope:

        # 卷积核尺寸3x3 通道数384 卷积核降为256

        kernel = tf.Variable(tf.truncated_normal([3, 3, 384, 256],

                                                 dtype=tf.float32, stddev=1e-1), name='weights')

        conv = tf.nn.conv2d(conv3, kernel, [1, 1, 1, 1], padding='SAME')

        biases = tf.Variable(tf.constant(0.0, shape=[256],

                                       dtype=tf.float32), trainable=True, name='biases')

        bias = tf.nn.bias_add(conv, biases)

        conv4 = tf.nn.relu(bias, name=scope)

        parameters += [kernel, biases]

        print_activation(conv4)

    # designing fourth Convolutional Layer ending

    # designing fifth Convolutional Layer starting

    with tf.name_scope('conv4') as scope:

        # 卷积核尺寸3x3 通道数256 卷积核256

        kernel = tf.Variable(tf.truncated_normal([3, 3, 256, 256],

                                                 dtype=tf.float32, stddev=1e-1), name='weights')

        conv = tf.nn.conv2d(conv4, kernel, [1, 1, 1, 1], padding='SAME')

        biases = tf.Variable(tf.constant(0.0, shape=[256],

                                       dtype=tf.float32), trainable=True, name='biases')

        bias = tf.nn.bias_add(conv, biases)

        conv5 = tf.nn.relu(bias, name=scope)

        parameters += [kernel, biases]

        print_activation(conv5)

    # designing fifth Convolutional Layer ending

    pool5 = tf.nn.max_pool(conv5, ksize=[1, 3, 3, 1], strides=[1, 2, 2, 1],

                            padding='VALID', name='pool5')

    print_activation (pool5)

    return pool5, parameters

# 评估每轮的计算时间

# session是训练句柄,target是训练算子,info_string是测试名称

def time_tensorflow_run(session, target, info_string):

    # 只考虑预热轮数10轮之后的时间

    num_steps_burn_in = 10

    # 总时间

    total_duration = 0.0

    # 平方和

    total_duration_squared = 0.0

    for i in range(num_batches + num_steps_burn_in):

        start_time = time.time()

        _ = session.run(target)

        duration = time.time() - start_time

        if i >= num_steps_burn_in:

            if not i % 10:

                print('%s: step %d, duration = %.3f' %

                      (datetime.now(), i - num_steps_burn_in, duration))

                total_duration += duration

                total_duration_squared += duration * duration

    # 计算平均耗时mn 标准差sd

    mn = total_duration / num_batches

    vr = total_duration_squared / num_batches - mn * mn

    sd = math.sqrt(vr)

    print('%s: %s across %d steps, %.3f +/- %.3f sec  / batch' %

          (datetime.now(), info_string, num_batches, mn, sd))

# 主函数

def run_benchmark():

    g = tf.Graph ()

    # 定义默认Graph

    with g.as_default():

        # 构造随机数据

        image_size = 224

        images = tf.Variable(tf.random_normal(

            [batch_size, image_size, image_size, 3],

            dtype=tf.float32, stddev=1e-1 ))

        pool5, parameters = inference(images)

        init = tf.global_variables_initializer()

        sess = tf.Session()

        sess.run(init)

        # 统计运行时间

        time_tensorflow_run(sess, pool5, "Forward")

        objective = tf.nn.l2_loss(pool5)

        grad = tf.gradients(objective, parameters)

        time_tensorflow_run(sess, grad, "Forward-backward")

# 执行主函数

run_benchmark()
下面是我的运行结果:
然后是不带LRN的版本:
#!/usr/bin/env python

# -*- coding: utf-8 -*-

# @Time    : 2018/11/20 10:42

# @Author  : Chen Cjv

# @Site    : http://www.cnblogs.com/cjvae/

# @File    : AlexNet.py

# @Software: PyCharm

import os

os.environ['TF_CPP_MIN_LOG_LEVEL']='2'

from datetime import datetime

import math

import time

import tensorflow as tf

batch_size = 32

num_batches = 100

# 展示每一个卷积层或池化层输出的tensor的尺寸,接收一个tensor输入

def print_activation(t):

    print(t.op.name, '', t.get_shape().as_list())

def inference(images):

    # 训练的模型参数

    parameters = []

    # 1th CL starting

    with tf.name_scope('conv1') as scope:

        # 截断正态分布初始化卷积核参数

        # 卷积核尺寸11 x 11 颜色3通道 卷积核64

        kernel = tf.Variable(tf.truncated_normal([11, 11, 3, 64],

                                                 dtype=tf.float32, stddev=1e-1), name='weights')

        # 实现卷积操作,步长4x4(在图像上每4x4区域取样一次,每次取样卷积核大小为11x11)

        conv = tf.nn.conv2d(images, kernel, [1, 4, 4, 1], padding='SAME')

        # 卷积偏置为0

        biases = tf.Variable(tf.constant(0.0, shape=[64], dtype=tf.float32),

                             trainable=True, name='biases')

        # 将卷积结果与偏置相加

        bias = tf.nn.bias_add(conv, biases)

        # 对结果非线性处理

        conv1 = tf.nn.relu(bias, name=scope)

        # 输出conv1的信息

        print_activation(conv1)

        # 添加参数

        parameters  += [kernel, biases]

    # 1th CL ending

    # add 1th max-pooling layer starting

    # 池化:尺寸3x3(将3x3的大小的像素块降为1x1 步长为2x2 VALID表示取样不超过边框)

    pool1 = tf.nn.max_pool (conv1, ksize=[1, 3, 3, 1], strides=[1, 2, 2, 1],

                            padding='VALID', name='pool1')

    print_activation(pool1)

    # add max-pooling layer ending

    # designing second Convolutional Layer starting

    with tf.name_scope('conv2') as scope:

        # 不同第一卷积层,这层卷积核尺寸5x5,通道为上层输出通道数(即卷积核数)64

        # 卷积核数量为192

        kernel = tf.Variable(tf.truncated_normal([5, 5, 64, 192],

                                                 dtype=tf.float32, stddev=1e-1), name='weights')

        # 卷积步长为1,即扫描全部图像

        conv = tf.nn.conv2d(pool1, kernel, [1, 1, 1, 1], padding='SAME')

        biases = tf.Variable(tf.constant(0.0, shape=[192],

                                         dtype=tf.float32), trainable=True, name='biases')

        bias = tf.nn.bias_add(conv, biases)

        conv2 = tf.nn.relu(bias, name=scope)

        parameters += [kernel, biases]

    print_activation(conv2)

    # designing 2th CL ending

    # add 2th max-pooling layer starting

    pool2 = tf.nn.max_pool (conv2, ksize=[1, 3, 3, 1], strides=[1, 2, 2, 1],

                            padding='VALID', name='pool2')

    print_activation(pool2)

    # add 2th max-pooling layer ending

    # designing 3th Convolutional Layer starting

    with tf.name_scope('conv3') as scope:

        # 卷积核尺寸3x3 通道数192 卷积核384

        kernel = tf.Variable(tf.truncated_normal([3, 3, 192, 384],

                                                 dtype=tf.float32, stddev=1e-1), name='weights')

        conv = tf.nn.conv2d(pool2, kernel, [1, 1, 1, 1], padding='SAME')

        biases = tf.Variable(tf.constant(0.0, shape=[384],

                                       dtype=tf.float32), trainable=True, name='biases')

        bias = tf.nn.bias_add(conv, biases)

        conv3 = tf.nn.relu(bias, name=scope)

        parameters += [kernel, biases]

        print_activation(conv3)

    # designing 3th CL ending

    # designing 4th CL starting

    with tf.name_scope('conv4') as scope:

        # 卷积核尺寸3x3 通道数384 卷积核降为256

        kernel = tf.Variable(tf.truncated_normal([3, 3, 384, 256],

                                                 dtype=tf.float32, stddev=1e-1), name='weights')

        conv = tf.nn.conv2d(conv3, kernel, [1, 1, 1, 1], padding='SAME')

        biases = tf.Variable(tf.constant(0.0, shape=[256],

                                       dtype=tf.float32), trainable=True, name='biases')

        bias = tf.nn.bias_add(conv, biases)

        conv4 = tf.nn.relu(bias, name=scope)

        parameters += [kernel, biases]

        print_activation(conv4)

    # designing fourth Convolutional Layer ending

    # designing fifth Convolutional Layer starting

    with tf.name_scope('conv4') as scope:

        # 卷积核尺寸3x3 通道数256 卷积核256

        kernel = tf.Variable(tf.truncated_normal([3, 3, 256, 256],

                                                 dtype=tf.float32, stddev=1e-1), name='weights')

        conv = tf.nn.conv2d(conv4, kernel, [1, 1, 1, 1], padding='SAME')

        biases = tf.Variable(tf.constant(0.0, shape=[256],

                                       dtype=tf.float32), trainable=True, name='biases')

        bias = tf.nn.bias_add(conv, biases)

        conv5 = tf.nn.relu(bias, name=scope)

        parameters += [kernel, biases]

        print_activation(conv5)

    # designing fifth Convolutional Layer ending

    pool5 = tf.nn.max_pool(conv5, ksize=[1, 3, 3, 1], strides=[1, 2, 2, 1],

                            padding='VALID', name='pool5')

    print_activation (pool5)

    return pool5, parameters

# 评估每轮的计算时间

# session是训练句柄,target是训练算子,info_string是测试名称

def time_tensorflow_run(session, target, info_string):

    # 只考虑预热轮数10轮之后的时间

    num_steps_burn_in = 10

    # 总时间

    total_duration = 0.0

    # 平方和

    total_duration_squared = 0.0

    for i in range(num_batches + num_steps_burn_in):

        start_time = time.time()

        _ = session.run(target)

        duration = time.time() - start_time

        if i >= num_steps_burn_in:

            if not i % 10:

                print('%s: step %d, duration = %.3f' %

                      (datetime.now(), i - num_steps_burn_in, duration))

                total_duration += duration

                total_duration_squared += duration * duration

    # 计算平均耗时mn 标准差sd

    mn = total_duration / num_batches

    vr = total_duration_squared / num_batches - mn * mn

    sd = math.sqrt(vr)

    print('%s: %s across %d steps, %.3f +/- %.3f sec  / batch' %

          (datetime.now(), info_string, num_batches, mn, sd))

# 主函数

def run_benchmark():

    g = tf.Graph ()

    # 定义默认Graph

    with g.as_default():

        # 构造随机数据

        image_size = 224

        images = tf.Variable(tf.random_normal(

            [batch_size, image_size, image_size, 3],

            dtype=tf.float32, stddev=1e-1 ))

        pool5, parameters = inference(images)

        init = tf.global_variables_initializer()

        sess = tf.Session()

        sess.run(init)

        # 统计运行时间

        time_tensorflow_run(sess, pool5, "Forward")

        objective = tf.nn.l2_loss(pool5)

        grad = tf.gradients(objective, parameters)

        time_tensorflow_run(sess, grad, "Forward-backward")

# 执行主函数

run_benchmark()
运行结果:
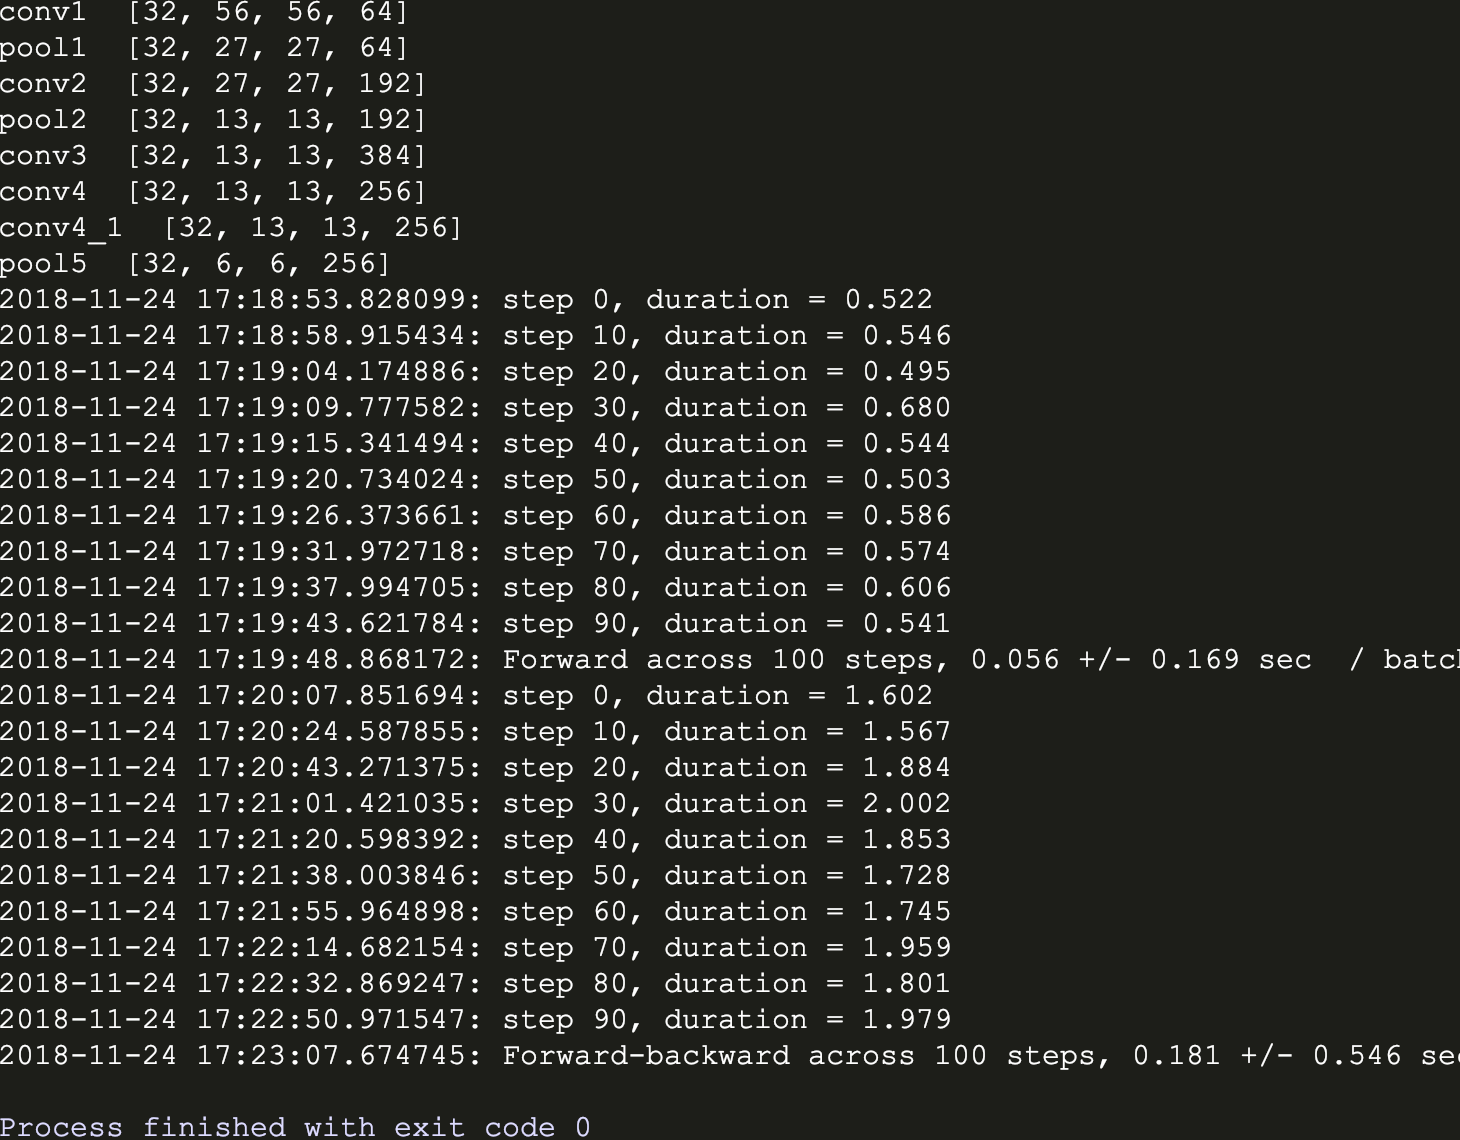
从两个版本可见,带有LRN层的AlexNet训练时间比较长,据说效果有待商榷。
《TensorFlow实战》中AlexNet卷积神经网络的训练中的更多相关文章
- TensorFlow 实战之实现卷积神经网络
本文根据最近学习TensorFlow书籍网络文章的情况,特将一些学习心得做了总结,详情如下.如有不当之处,请各位大拿多多指点,在此谢过. 一.相关性概念 1.卷积神经网络(ConvolutionNeu ...
- TensorFlow 2.0 深度学习实战 —— 浅谈卷积神经网络 CNN
前言 上一章为大家介绍过深度学习的基础和多层感知机 MLP 的应用,本章开始将深入讲解卷积神经网络的实用场景.卷积神经网络 CNN(Convolutional Neural Networks,Conv ...
- 使用TensorFlow v2.0构建卷积神经网络
使用TensorFlow v2.0构建卷积神经网络. 这个例子使用低级方法来更好地理解构建卷积神经网络和训练过程背后的所有机制. CNN 概述 MNIST 数据集概述 此示例使用手写数字的MNIST数 ...
- 斯坦福NLP课程 | 第11讲 - NLP中的卷积神经网络
作者:韩信子@ShowMeAI,路遥@ShowMeAI,奇异果@ShowMeAI 教程地址:http://www.showmeai.tech/tutorials/36 本文地址:http://www. ...
- 理解NLP中的卷积神经网络(CNN)
此篇文章是Denny Britz关于CNN在NLP中应用的理解,他本人也曾在Google Brain项目中参与多项关于NLP的项目. · 翻译不周到的地方请大家见谅. 阅读完本文大概需要7分钟左右的时 ...
- TensorFlow深度学习实战---图像识别与卷积神经网络
全连接层网络结构:神经网络每两层之间的所有结点都是有边相连的. 卷积神经网络:1.输入层 2.卷积层:将神经网络中的每一个小块进行更加深入地分析从而得到抽象程度更高的特征. 3 池化层:可以认为将一张 ...
- TensorFlow 深度学习笔记 卷积神经网络
Convolutional Networks 转载请注明作者:梦里风林 Github工程地址:https://github.com/ahangchen/GDLnotes 欢迎star,有问题可以到Is ...
- 【深度学习与TensorFlow 2.0】卷积神经网络(CNN)
注:在很长一段时间,MNIST数据集都是机器学习界很多分类算法的benchmark.初学深度学习,在这个数据集上训练一个有效的卷积神经网络就相当于学习编程的时候打印出一行“Hello World!”. ...
- 机器学习与Tensorflow(4)——卷积神经网络与tensorflow实现
1.标准卷积神经网络 标准的卷积神经网络由输入层.卷积层(convolutional layer).下采样层(downsampling layer).全连接层(fully—connected laye ...
随机推荐
- GUI的最终选择 Tkinter(五):Text用法
Text组件 绘制单行文本使用Label组件,多行选使用Listbox,输入框使用Entry,按钮使用Button组件,还有Radiobutton和Checkbutton组件用于提供单选或多选的情况, ...
- Problem Statement
题目链接:https://vjudge.net/contest/239445#problem/E E - Problem Statement You are given nn strings ...
- C# Thread类 线程优先级
1.C#对线程进行操作时,通过Thread类,可以对线程进行创建.挂起.恢复.休眠.终止及设置优先级. Thread类位于System.Threading命名空间下,该命名空间还包含一个ThreadP ...
- Java编程中中文乱码问题的研究及解决方案
0 引言 Java最大的特性是与平台的无关性及开发环境的多样性.字符串被Java应用程序转化之前,是根据操作系统默认的编码方式编码.Java语言内部采用Unicode编码,它是定长双字节编码,即任何符 ...
- C++中的swap函数
最通用的模板交换函数模式:创建临时对象,调用对象的赋值操作符 template <class T> void swap ( T& a, T& b ) { T c(a); a ...
- HDU 2586——How far away ?——————【LCA模板题】
How far away ? Time Limit: 2000/1000 MS (Java/Others) Memory Limit: 32768/32768 K (Java/Others)To ...
- SpringBoot | 第二十一章:异步开发之异步调用
前言 上一章节,我们知道了如何进行异步请求的处理.除了异步请求,一般上我们用的比较多的应该是异步调用.通常在开发过程中,会遇到一个方法是和实际业务无关的,没有紧密性的.比如记录日志信息等业务.这个时候 ...
- <Openssl下hash函数>
hash函数:是不可逆的函数,它的输入可以是任意长度的字节流.它的输出是固定大小的,hash函数的作用就是给你的文件产生一个摘要,它是独一无二的. 例如:y=f(x) x代表输入 y代表输出 输 ...
- SpringMVC 返回自定义属性名
SpringMVC 返回的属性名默认是小写驼峰形式的实体对象中的属性名,如 userID 属性名它会返回 userId. 如果接口方式之前已经定下来,这样前端按原来的方式取数据会读取失败的,那有没有方 ...
- ArcMap中提取影像数据边界
1.前言 客户手里有一些经过裁剪的不规则多边形影像数据(如图例所示),希望能批量获取该类影像的边界信息,即影像对应的面信息,边界线信息.这里我们提供一种利用镶嵌数据集Footprint图层的方法来获取 ...