Android客户端与PC服务端、android服务端通过WiFi通信
前期准备:我的是Linux Mint操作系统(总之折腾的过程中怀疑过是不是系统的问题),首先是要创建wifi热点给android手机使用,这个时候笔记本作为通信的服务器端,android手机作为客户端,通过socket进行通信。
1.在eclipse下写好服务器端的代码,包括监听的端口好,客户端的IP地址获取,发送的数据处理等,这里涉及到J2EE的环境配置,有时间我在写下,这个代码是直接百度到的,能用:
import java.io.BufferedReader;

import java.io.InputStreamReader;

import java.io.PrintWriter;

import java.net.ServerSocket;

import java.net.Socket;

public class Test {

    private ServerSocket server;

    private Socket client;

    private BufferedReader in;

    private PrintWriter out;

    public Test() {

        try {

            server = new ServerSocket(9400);

            while (true) {

                System.out.println("start!");

                // 获得客户端连接

                client = server.accept();

                // 获得客户端的IP和端口

                String remoteIP = client.getInetAddress().getHostAddress();

                int remotePort = client.getLocalPort();

                System.out.println("A client connected. IP:" + remoteIP

                        + ", Port: " + remotePort);

                System.out.println();

                // 获得 client 端的输入输出流,为进行交互做准备

                in = new BufferedReader(new InputStreamReader(

                        client.getInputStream()));

                out = new PrintWriter(client.getOutputStream(), false);

                // 获得 client 端发送的数据

                String tmp = in.readLine();

                // String content = new String(tmp.getBytes("utf-8"));

                System.out.println("Client message is: " + tmp);

                // 向 client 端发送响应数据

                out.println("Your message has been received successfully!.");

                // 关闭各个流

                out.close();

                in.close();

                // server.close();

            }

        } catch (Exception e) {

            // 发送响应,接收失败

            System.out.println(e.toString());

            out.println("Receive Error!");

        }

    }

    public static void main(String[] args) {

        new Test();

    }

}
代码看起来也不是太难,关键是Java EE的使用,尤其是服务器的配置,(配置教程涉及到tomcat的配置,以及服务器的建立),
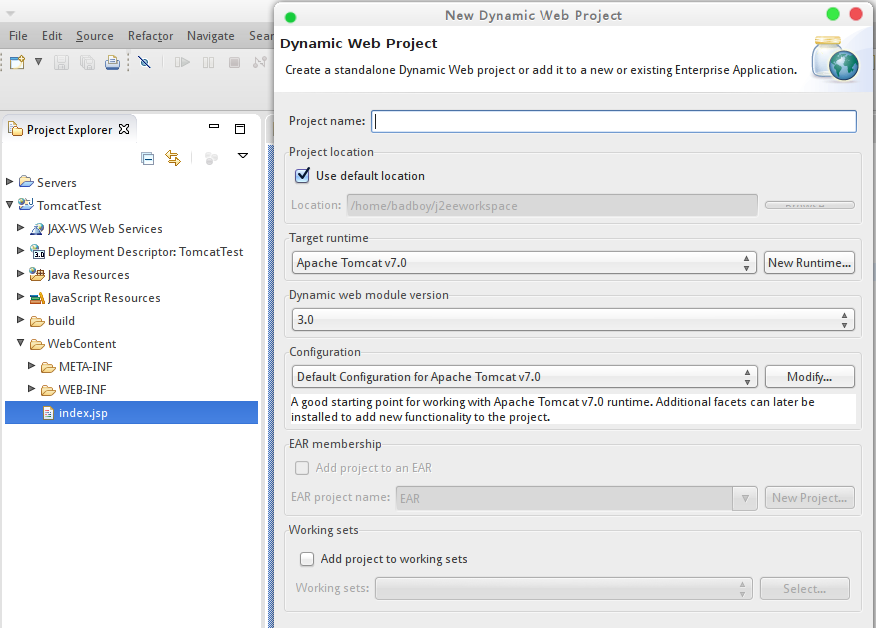
Project name随便写好了,然后next---->next,需要把Generate web.xml deployment descriptor勾选上。注意:
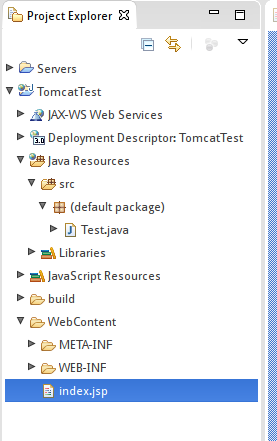
Java Resources 下的src文件夹下里面放的是相关的类,这个类写完之后还在Webcontent文件夹--->WEB-INF文件夹下的web.xml里面配置:
<?xml version="1.0" encoding="UTF-8"?>

<web-app xmlns:xsi="http://www.w3.org/2001/XMLSchema-instance"

    xmlns="http://java.sun.com/xml/ns/javaee"

    xsi:schemaLocation="http://java.sun.com/xml/ns/javaee http://java.sun.com/xml/ns/javaee/web-app_3_0.xsd"

    id="WebApp_ID" version="3.0">

    <display-name>TomcatTest</display-name>

    <welcome-file-list>

        <welcome-file>index.html</welcome-file>

        <welcome-file>index.htm</welcome-file>

        <welcome-file>index.jsp</welcome-file>

        <welcome-file>default.html</welcome-file>

        <welcome-file>default.htm</welcome-file>

        <welcome-file>default.jsp</welcome-file>

    </welcome-file-list>

    <servlet>

        <servlet-name>Test</servlet-name>

        <servlet-class>Test</servlet-class>

    </servlet>

    <servlet-mapping>

        <servlet-name>Test</servlet-name>

        <url-pattern></url-pattern>

    </servlet-mapping>

</web-app>
到这里你可以运行你的服务端,选中项目,右击选中Run as--->Run on server,到此你的网站基本上就发布成功了,在你的手机的浏览器中输入你PC端的IP地址,注意端口号是9400,比如我之前测试的用是的10.3.19.26:9400,就可以看到服务端返回的信息。
2.android端的程序比较简单,但是一开始的时候怎么都不能成功运行,最后发现的两个问题a.权限没有加,b.自从android3.0以后,android的运行机制不容许在主线程中使用网络的相关操作
我的值加了这几个权限,貌似也能够运行起来,呵呵:
    <uses-permission android:name="android.permission.INTERNET" />

    <uses-permission android:name="android.permission.ACCESS_WIFI_STATE"/>
第二个问题,网上的一些代码太坑了,明明都是有问题,也不知道修改,下面写的很简单,没有图形界面,
package com.example.client;

import java.io.IOException;

import java.io.PrintStream;

import java.net.Socket;

import java.net.UnknownHostException;

import android.app.Activity;

import android.os.Bundle;

import android.view.Menu;

import android.view.MenuItem;

import android.view.View;

import android.view.View.OnClickListener;

import android.widget.Button;

import android.widget.EditText;

import android.widget.Toast;

public class MainActivity extends Activity {

    private Button btnConnect, btnSend;

    private Socket socket;

    private PrintStream output;

    private EditText editSend;

    @Override

    protected void onCreate(Bundle savedInstanceState) {

        super.onCreate(savedInstanceState);

        setContentView(R.layout.activity_main);

        btnConnect = (Button) findViewById(R.id.button1);

        btnSend = (Button) findViewById(R.id.button2);

        editSend = (EditText) findViewById(R.id.editText1);

        btnConnect.setOnClickListener(new OnClickListener() {

            @Override

            public void onClick(View v) {

                // TODO Auto-generated method stub

                new Thread(runnable).start();//开启线程

            }

        });

        btnSend.setOnClickListener(new OnClickListener() {

            @Override

            public void onClick(View v) {

                // TODO Auto-generated method stub

                sendMessage(editSend.getText().toString());

            }

        });

    }

    Runnable runnable = new Runnable() {

        @Override

        public void run() {

            // TODO Auto-generated method stub

            initClientSocket();

        }

    };

    public void initClientSocket() {

        try {

            EditText edit_ip = (EditText) MainActivity.this.findViewById(R.id.editText2);

            String ip = edit_ip.getText().toString().trim();

            socket = new Socket("10.3.19.26", 9400);

            output = new PrintStream(socket.getOutputStream(), true, "gbk");

        } catch (UnknownHostException e) {

            // TODO Auto-generated catch block

            Toast.makeText(MainActivity.this, "请检查端口号是否为服务器IP",

                    Toast.LENGTH_LONG).show();

            e.printStackTrace();

        } catch (IOException e) {

            // TODO Auto-generated catch block

            Toast.makeText(MainActivity.this, "服务器未开启", Toast.LENGTH_LONG)

                    .show();

            e.printStackTrace();

        }

        output.println("this is the message from client");

    }

    private void sendMessage(String str) {

        output.println(str);

    }

    public void closeSocket() {

        try {

            output.close();

            socket.close();

        } catch (IOException e) {

            System.out.println("error"+e);

        }

    }

}
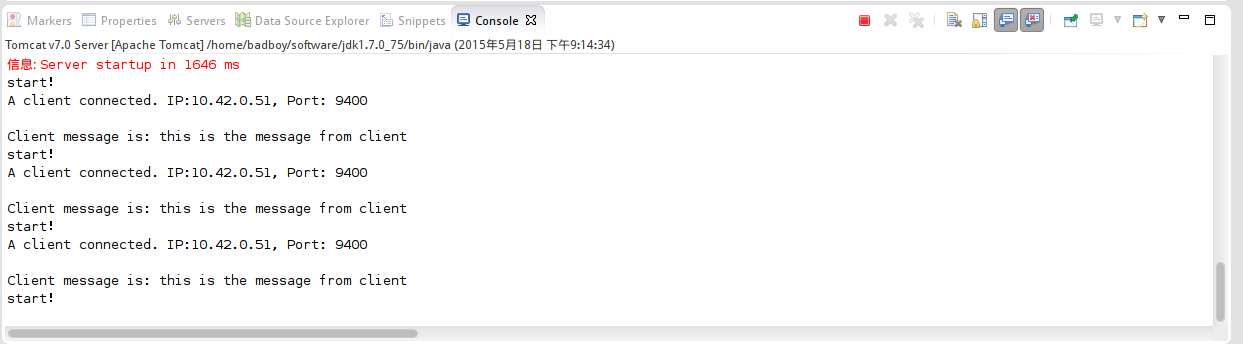
基本上控件只有一个按钮,其他的都是没有用的,在按钮的监听器里面写的方法,就是使用Runable开启一个线程,在runable的方法中调用initClientSocket()方法,你会发现,里连接的代码很简单,我连接成功后就使用
output.println("this is the message from client");
这个就是返回给服务器的信息,一开始放在另一个按钮中的,但是考虑到上述的问题,还是直接在线程中发送(我测试过,在UI线程中不能使用这个方法,发送完了也没有反应)最终的服务器端接受的数据情况如下:
从下午到晚上总算弄完了2015-05-18 22:11:21,有时间把相关的配置弄下。
2015年5月19日星期二 21:53在github上看到一个程序,用的是内部异步任务方法处理的,放在这里参考下,很简单就是一个MainActivity.java:
     package com.example.androidclient;

     import java.io.ByteArrayOutputStream;

     import java.io.IOException;

     import java.io.InputStream;

     import java.net.Socket;

     import java.net.UnknownHostException;

     import android.os.AsyncTask;

     import android.os.Bundle;

     import android.app.Activity;

     import android.view.View;

     import android.view.View.OnClickListener;

     import android.widget.Button;

     import android.widget.EditText;

     import android.widget.TextView;

     public class MainActivity extends Activity {

         TextView textResponse;

         EditText editTextAddress, editTextPort;//用户自己输入的服务器端的地址和端口号

         Button buttonConnect, buttonClear;

         @Override

         protected void onCreate(Bundle savedInstanceState) {

             super.onCreate(savedInstanceState);

             setContentView(R.layout.activity_main);

             editTextAddress = (EditText)findViewById(R.id.address);

             editTextPort = (EditText)findViewById(R.id.port);

             buttonConnect = (Button)findViewById(R.id.connect);

             buttonClear = (Button)findViewById(R.id.clear);

             textResponse = (TextView)findViewById(R.id.response);

             buttonConnect.setOnClickListener(buttonConnectOnClickListener);

             buttonClear.setOnClickListener(new OnClickListener(){

                 @Override

                 public void onClick(View v) {

                     textResponse.setText("");

                 }});

         }

         OnClickListener buttonConnectOnClickListener =

                 new OnClickListener(){//连接的监听器

                     @Override

                     public void onClick(View arg0) {

                         MyClientTask myClientTask = new MyClientTask(

                                 editTextAddress.getText().toString(),

                                 Integer.parseInt(editTextPort.getText().toString()));//构造异步任务内部类

                         myClientTask.execute();

                     }};

         public class MyClientTask extends AsyncTask<Void, Void, Void> {//异步任务

             String dstAddress;

             int dstPort;

             String response = "";

             MyClientTask(String addr, int port){//构造方法,传进IP地址和对应的端口号

                 dstAddress = addr;

                 dstPort = port;

             }

             @Override

             protected Void doInBackground(Void... arg0) {

                 Socket socket = null;//

                 try {

                     socket = new Socket(dstAddress, dstPort);//建立连接,需要try-catch

                     ByteArrayOutputStream byteArrayOutputStream =

                             new ByteArrayOutputStream(1024);

                     byte[] buffer = new byte[1024];

                     int bytesRead;

                     InputStream inputStream = socket.getInputStream();

                     /*

                      * notice:

                      * inputStream.read() will block if no data return

                      */

                     while ((bytesRead = inputStream.read(buffer)) != -1){

                         byteArrayOutputStream.write(buffer, 0, bytesRead);

                         response += byteArrayOutputStream.toString("UTF-8");

                     }

                 } catch (UnknownHostException e) {

                     // TODO Auto-generated catch block

                     e.printStackTrace();

                     response = "UnknownHostException: " + e.toString();

                 } catch (IOException e) {

                     // TODO Auto-generated catch block

                     e.printStackTrace();

                     response = "IOException: " + e.toString();

                 }finally{

                     if(socket != null){

                         try {

                             socket.close();

                         } catch (IOException e) {

                             // TODO Auto-generated catch block

                             e.printStackTrace();

                         }

                     }

                 }

                 return null;

             }

             @Override

             protected void onPostExecute(Void result) {//更新UI线程

                 textResponse.setText(response);

                 super.onPostExecute(result);

             }

         }

     }
那么对应的服务器android端的代码如下,写的也很简单浅显易懂:MainActivity.java
package com.example.androidserversocket;

import java.io.IOException;

import java.io.OutputStream;

import java.io.PrintStream;

import java.net.InetAddress;

import java.net.NetworkInterface;

import java.net.ServerSocket;

import java.net.Socket;

import java.net.SocketException;

import java.util.Enumeration;

import android.os.Bundle;

import android.app.Activity;

import android.widget.TextView;

public class MainActivity extends Activity {

    TextView info, infoip, msg;

    String message = "";

    ServerSocket serverSocket;//ServerSocket实例

    @Override

    protected void onCreate(Bundle savedInstanceState) {

        super.onCreate(savedInstanceState);

        setContentView(R.layout.activity_main);

        info = (TextView) findViewById(R.id.info);

        infoip = (TextView) findViewById(R.id.infoip);

        msg = (TextView) findViewById(R.id.msg);

        infoip.setText(getIpAddress());//

        Thread socketServerThread = new Thread(new SocketServerThread());

        socketServerThread.start();

    }

    @Override

    protected void onDestroy() {

        super.onDestroy();

        if (serverSocket != null) {

            try {

                serverSocket.close();

            } catch (IOException e) {

                // TODO Auto-generated catch block

                e.printStackTrace();

            }

        }

    }

    private class SocketServerThread extends Thread {

        static final int SocketServerPORT = 8080;

        int count = 0;

        @Override

        public void run() {

            try {

                serverSocket = new ServerSocket(SocketServerPORT);//监听端口

                MainActivity.this.runOnUiThread(new Runnable() {

                    @Override

                    public void run() {

                        info.setText("I'm waiting here: "

                                + serverSocket.getLocalPort());

                    }

                });

                while (true) {//接受客户端的信息

                    Socket socket = serverSocket.accept();

                    count++;

                    message += "#" + count + " from " + socket.getInetAddress()

                            + ":" + socket.getPort() + "\n";

                    MainActivity.this.runOnUiThread(new Runnable() {

                        @Override

                        public void run() {

                            msg.setText(message);

                        }

                    });

                    SocketServerReplyThread socketServerReplyThread = new SocketServerReplyThread(

                            socket, count);

                    socketServerReplyThread.run();

                }

            } catch (IOException e) {

                // TODO Auto-generated catch block

                e.printStackTrace();

            }

        }

    }

    private class SocketServerReplyThread extends Thread {

        private Socket hostThreadSocket;

        int cnt;

        SocketServerReplyThread(Socket socket, int c) {

            hostThreadSocket = socket;

            cnt = c;

        }

        @Override

        public void run() {

            OutputStream outputStream;

            String msgReply = "Hello from Android, you are #" + cnt;

            try {

                outputStream = hostThreadSocket.getOutputStream();

                PrintStream printStream = new PrintStream(outputStream);

                printStream.print(msgReply);

                printStream.close();

                message += "replayed: " + msgReply + "\n";

                MainActivity.this.runOnUiThread(new Runnable() {

                    @Override

                    public void run() {

                        msg.setText(message);

                    }

                });

            } catch (IOException e) {

                // TODO Auto-generated catch block

                e.printStackTrace();

                message += "Something wrong! " + e.toString() + "\n";

            }

            MainActivity.this.runOnUiThread(new Runnable() {

                @Override

                public void run() {

                    msg.setText(message);

                }

            });

        }

    }

    private String getIpAddress() {

        String ip = "";

        try {

            Enumeration<NetworkInterface> enumNetworkInterfaces = NetworkInterface

                    .getNetworkInterfaces();

            while (enumNetworkInterfaces.hasMoreElements()) {

                NetworkInterface networkInterface = enumNetworkInterfaces

                        .nextElement();

                Enumeration<InetAddress> enumInetAddress = networkInterface

                        .getInetAddresses();

                while (enumInetAddress.hasMoreElements()) {

                    InetAddress inetAddress = enumInetAddress.nextElement();

                    if (inetAddress.isSiteLocalAddress()) {

                        ip += "SiteLocalAddress: "

                                + inetAddress.getHostAddress() + "\n";

                    }

                }

            }

        } catch (SocketException e) {

            // TODO Auto-generated catch block

            e.printStackTrace();

            ip += "Something Wrong! " + e.toString() + "\n";

        }

        return ip;

    }

}
Android客户端与PC服务端、android服务端通过WiFi通信的更多相关文章
- 极光推送使用实例(二) Android客户端
上一篇简单介绍了极光推送在Java服务端的实现,如果感兴趣的可以看一下极光推送使用实例(一)JAVA服务端.这篇文章介绍下极光推送在Android客户端的实现. JPush Android SDK 是 ...
- SSH服务器与Android通信(2)--Android客户端接收数据
基本原理是Android客户端通过HttpClient向服务器发出请求,服务器向Android客户端返回JSON字符串,Android客户端解析JSON字符串获得数据. 1. 新建一个Android项 ...
- Android 开源项目 eoe 社区 Android 客户端(转)
本文内容 环境 开源项目 eoe 社区 Android 客户端 本文介绍 eoe 社区 Android 客户端.它是一个开源项目,功能相对简单,采用侧边菜单栏.可以学习一下.点击此处查看 GitHub ...
- Android 开源项目 eoe 社区 Android 客户端
本文内容 环境 开源项目 eoe 社区 Android 客户端 本文介绍 eoe 社区 Android 客户端.它是一个开源项目,功能相对简单,采用侧边菜单栏.可以学习一下.点击此处查看 GitHub ...
- 停车场管理软件附带源代码 J2EE服务端+android客户端
该源码是停车场管理软件附带源代码 J2EE服务端+android客户端,也是一套停车场管理车辆进出的管理软,喜欢的朋友可以看看吧. 应用的后台管理主要功能介绍:1 机构管理 ,机构有从属管理< ...
- Android客户端与服务端交互之登陆示例
Android客户端与服务端交互之登陆示例 今天了解了一下android客户端与服务端是怎样交互的,发现其实跟web有点类似吧,然后网上找了大神的登陆示例,是基于IntentService的 1.后台 ...
- socket 通信 入门3 android 客户端 C# 服务端
这是一个android端操控服务器的例子 就是发送简单指令到服务器 然后服务器响应什么的... 当然这里是未完成的 只是简单展示一下大致思路 首先连接建立起来后 服务端给客户端一条信息 告诉 ...
- “快的打车”创始人陈伟星的新项目招人啦,高薪急招Java服务端/Android/Ios 客户端研发工程师/ mysql DBA/ app市场推广专家,欢迎大家加入我们的团队! - V2EX
"快的打车"创始人陈伟星的新项目招人啦,高薪急招Java服务端/Android/Ios 客户端研发工程师/ mysql DBA/ app市场推广专家,欢迎大家加入我们的团队! - ...
- android客户端app和服务端交互token的作用
Android客户端和服务端如何使用Token和Session niceheart关注1人评论34644人阅读2014-09-16 16:38:44 对于初学者来说,对Token和Session的 ...
随机推荐
- javascript如何判断手机是什么系统
做H5页面的时候,经常会用到判断手机是什么系统,根据系统的型号,实现不同的效果,那么如何判断显示页面的手机型号呢? (function(){ var isMobile={ Android:functi ...
- maven spring3.2.5
出现的情形: 开发环境: spring3.2.5 + springmvc +spirngDATA +maven 一. 偶然的spring Junit4测试 加载applicationContext.x ...
- hadoop自动安装脚本
还不能实现完全自动安装,只能算半自动的. 进行交互主要障碍有两点: 1. ssh-keygen的时候需要点击回车. 2. passwd 需要设置密码 如果谁能解决以上两点,欢迎email给我. 另外 ...
- PCC-S-02201, Encountered the symbol "DB_USER_OPER_COUNT"
今天编译PROC程序时,遇到这个错误.最后发现原因是.pc文件里声明变量块时,不识别结构体. 今天时间紧知识用第一种方法暂时解决了.晚上抽时间用第二种方法优化一下代码. 查了很多资料,发现只有这个答案 ...
- php获取request_uri
urlParameters = http_build_query( filter_input_array( INPUT_GET, FILTER_SANITIZE_URL ) ); $_request_ ...
- c#中Marshal.Copy()方法的使用
c#中Marshal.Copy方法的使用 Marshal.copy()方法用来在托管对象(数组)和非托管对象(IntPtr)之间进行内容的复制 函数有很多重载,如下所示: Copy(array< ...
- Jquery的parent和parents(找到某一特定的祖先元素)用法
<!-- parent是指取得一个包含着所有匹配元素的唯一父元素的元素集合. parents则是取得一个包含着所有匹配元素的祖先元素的元素集合(不包含根元素).可以通过一个可选的表达式进行筛选. ...
- Window 7 安装Docker toolbox , 启动terminal时遇到的小问题
参考:http://blog.csdn.net/tina_ttl/article/details/51372604 参考前面网页成功安装后打开terminal,出现下面问题: Looks like s ...
- 对 React Context 的理解以及应用
在React的官方文档中,Context被归类为高级部分(Advanced),属于React的高级API,但官方并不建议在稳定版的App中使用Context. 很多优秀的React组件都通过Conte ...
- ch8 -- useLK
useLK 光流法跟踪FAST角点 执行 ./useLK ../../data 运行程序. 光流法需要include<opencv2/video/tracking.hpp>,用到列表 ...