SYS/BIOS实例分析
SYS/BIOS简介
创建一个SYS/BIOS项目
在项目模板中选择SYS/BIOS项目中的Hello Example模板,点击Next:

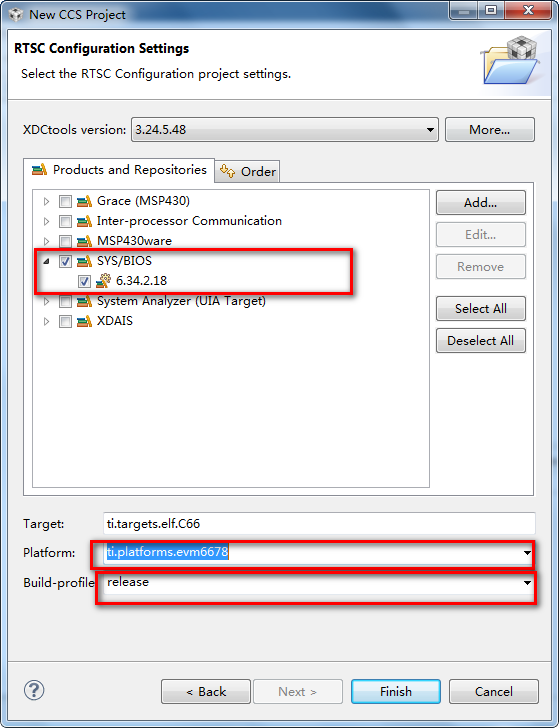
在RTSC(XDCtools的别称)配置页中选中需要的SYS/BIOS,XDCtools及其他组件的版本,Target保持默认,不需修改,如果Platform没有自动填充,选择与设备适用的平台。Build-profile决定程序链接的库,推荐使用release,即使仍然处于创建和调试阶段,点击Finish完成创建项目。
SYS/BIOS的模块与配置
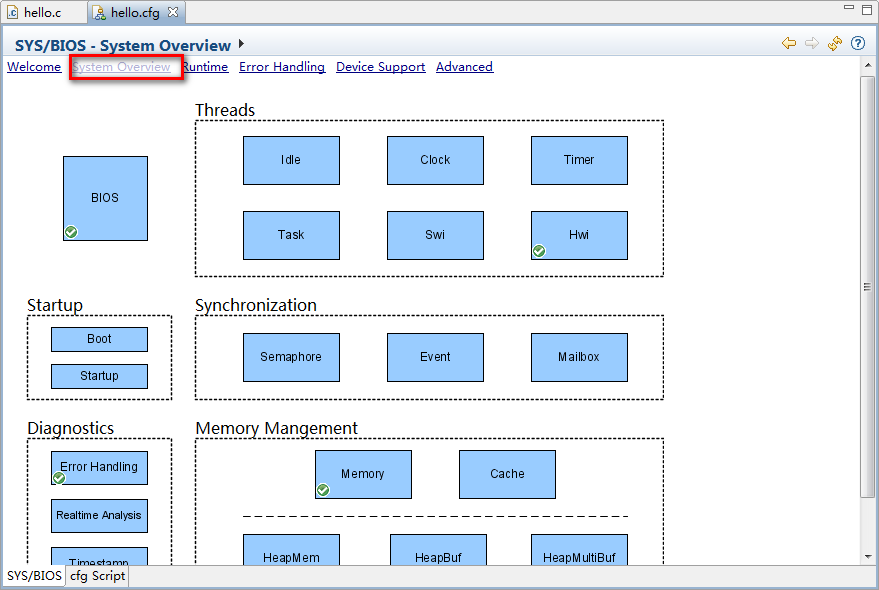
SYS/BIOS可以用文本编辑器或者是图像配置编辑器XGCONF来编辑,双击打开.cfg文件:
单击System Overview,可以显示程序当前使用的主模块(带绿色小箭头的):
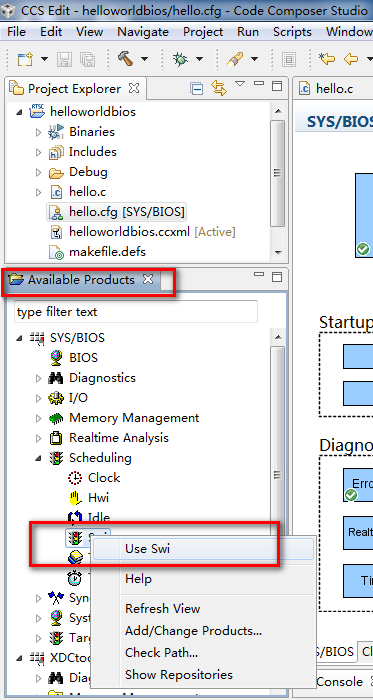
各种APIs模块的添加这里有两种方法,一种是直接双击主模板进入,然后勾选Add:
各个API模块的作用
在项目中导入LOG模块
LOG模块实际上是一个实现打印信息的API。
添加LOG模块,默认是自动添加的。
LOG模块定义了许多比如Log_error、Log_info、Log_warning、Log_print等之类函数,这些函数的用法同printf函数的用法很相似,这些函数都可以在<xdc/runtime/Log.h>找到,其实际上是将printf的有用法分成许多不同的类(如错误信息、提示信息、警告信息等),LOG模块打印的内容查看:
右下角会出现面板:

LOG中定义了许多如下的函数,比如Log_info1函数后面的数字代表函数接的变量数目,如:
Log_info1("%d",s1); Log_info2("%d, %d", s1, s2)
在项目中导入TSK任务模块
TSK任务模块是操作系统中最基本的模块,其实际上反映了多线程抢占,每个任务单独是一个线程,各个线程(任务)具有各自的优先级。
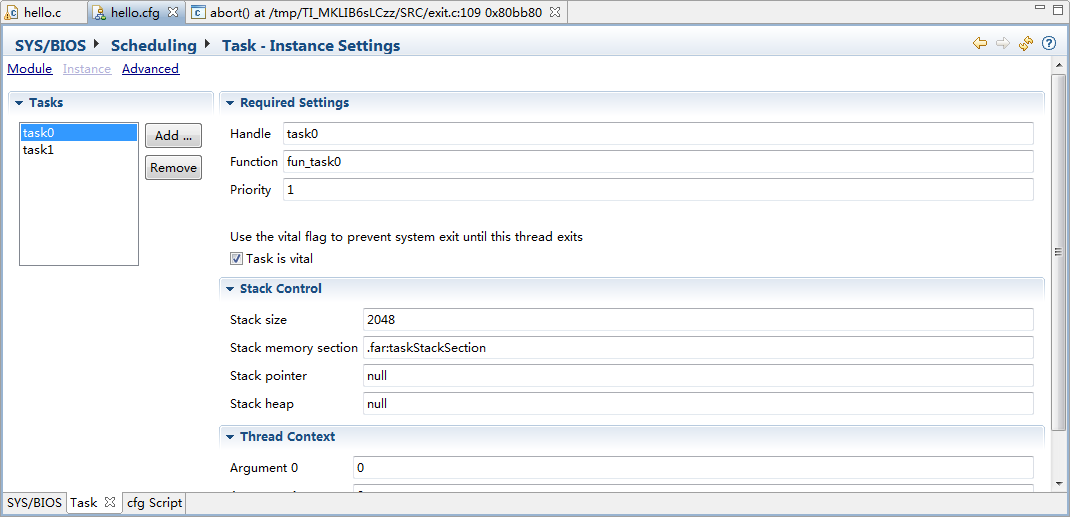
创建新任务,我们创建两个任务task0、task1,分别对应其函数func_tsk0、func_tsk1。其优先级都为1:
编写任务函数:
/*

 *  ======== hello.c ========

 *  The hello example serves as a basic sanity check program for SYS/BIOS. It

 *  demonstrates how to print the string "hello world" to stdout.

 */

#include <xdc/std.h>

#include <xdc/runtime/System.h>

#include <ti/sysbios/BIOS.h>

#include <xdc/runtime/Log.h>

#include <ti/sysbios/knl/Task.h>

/*

 *  ======== main ========

 */

void fun_task0(void);

void fun_task1(void);

Void main()

{

    System_printf("hello world\n");

    BIOS_start();

}

void fun_task0(void)

{

    Int count = ;

    while(count<)

    {

        Log_info1("Task0 is doing %d\n",count);

        Task_yield();

        count++;

    }

    BIOS_exit();

}

void fun_task1(void)

{

    Int count = ;

    while(count<)

    {

        Log_info1("Task1 is doing %d\n",count);

        Task_yield();

        count++;

    }

    BIOS_exit();

}
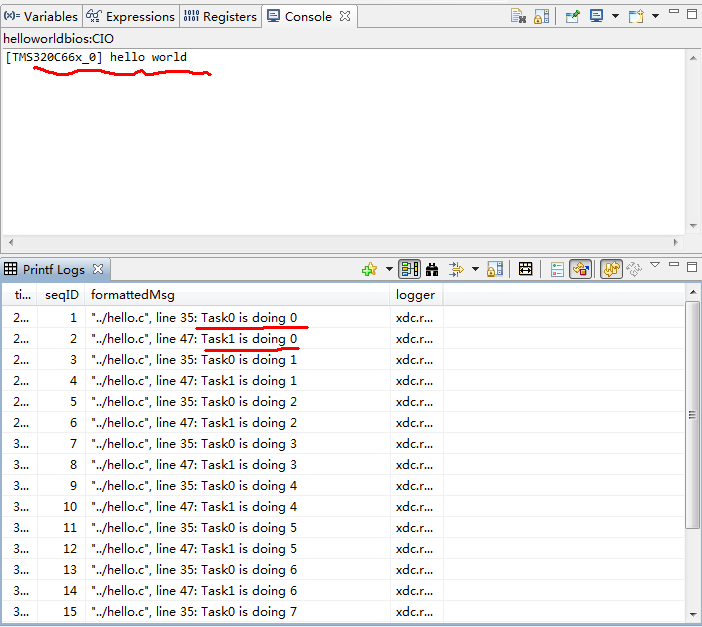
我们可以看到两个任务是相互依次运行的,每个任务运行一次后,其优先级就会降低,此时就切换到下一个任务。
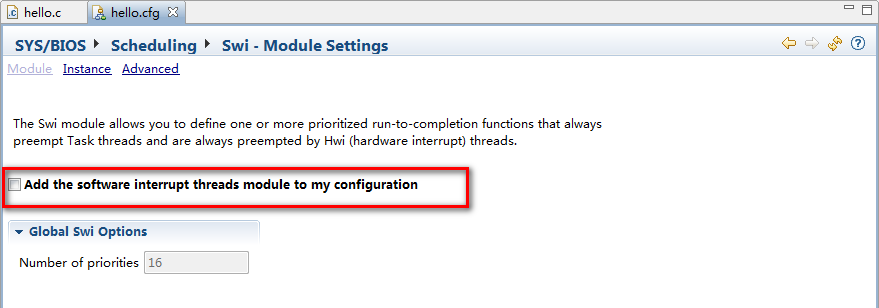
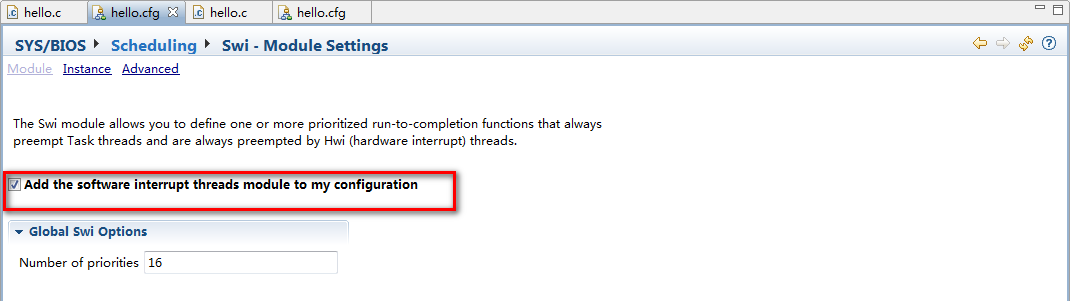
在项目中导入Swi软件中断模块
不同任务有不同优先级,而软件中断具有比任何任务都高的优先级,而其中硬件中断(HWI)又比软件中断(SWI)优先级更高。
添加软件中断Swi:
代码:
/*

 *  ======== hello.c ========

 *  The hello example serves as a basic sanity check program for SYS/BIOS. It

 *  demonstrates how to print the string "hello world" to stdout.

 */

#include <xdc/std.h>

#include <xdc/runtime/System.h>

#include <ti/sysbios/BIOS.h>

#include <xdc/runtime/Log.h>

#include <ti/sysbios/knl/Task.h>

#include <ti/sysbios/knl/Swi.h>

/*

 *  ======== main ========

 */

void fun_task0(void);

void fun_task1(void);

void func_swi0(void);

Swi_Handle swi0;    //声明一个全局的SWI句柄

Void main()

{

    System_printf("hello world\n");

    //初始化SWI参数

    Swi_Params swiParams;

    Swi_Params_init(&swiParams);

    swiParams.priority = ;  //软件中断优先级设置为2

    swiParams.trigger = ;   //设置软件中断计数器

    swi0 = Swi_create(func_swi0, &swiParams, NULL); //创建软件中断swi0,func_swi0为软件中断函数

    BIOS_start();

}

void func_swi0(void)

{

     static Int count = ;

     Log_info1("Swi0 is doing %d\n",count);

     count++;

}

/*更改软件中断计数器trigger,要触发软件中断,首先需要让trigger的计数为0,

这里我们可以在任务函数内增加一个trigger自减的函数,任务函数执行两次后,将会触发软件中断*/

void fun_task0(void)

{

    Int count = ;

    while(count<)

    {

        Log_info1("Task0 is doing %d\n",count);

        Swi_dec(swi0);

        Task_yield();

        count++;

    }

    BIOS_exit();

}

void fun_task1(void)

{

    Int count = ;

    while(count<)

    {

        Log_info1("Task1 is doing %d\n",count);

        Swi_dec(swi0);

        Task_yield();

        count++;

    }

    BIOS_exit();

}
编译调试,运行查看结果(这里我们只需要选择单核运行就可以了):
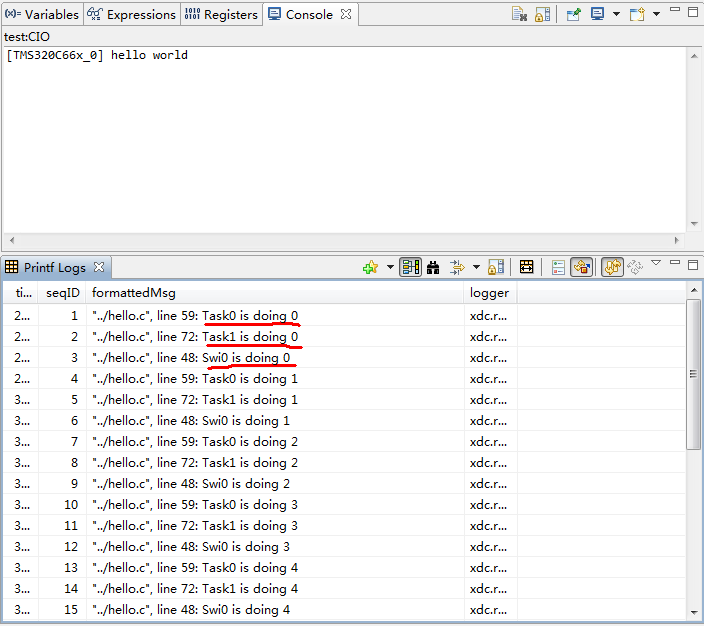
可以看到两个任务的每次都会使得软件中断计数trigger减1(通过Swi_dec函数),直到trigger的值减少到0时,执行软件中断,中断后,trigger恢复到原来的值,这里的trigger初始值为2,所以执行两次任务后就会触发一次软件中断。
在项目中导入信号量Semaphore模块
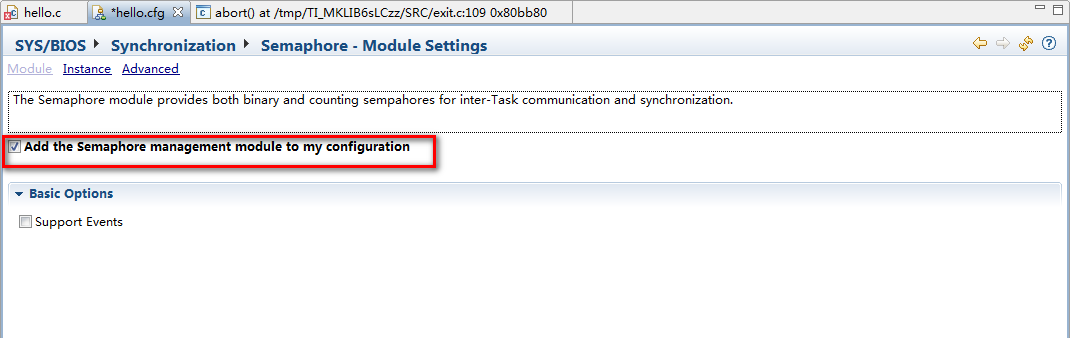
代码:
/*

 *  ======== hello.c ========

 *  The hello example serves as a basic sanity check program for SYS/BIOS. It

 *  demonstrates how to print the string "hello world" to stdout.

 */

#include <xdc/std.h>

#include <xdc/runtime/System.h>

#include <ti/sysbios/BIOS.h>

#include <xdc/runtime/Log.h>

#include <ti/sysbios/knl/Task.h>

#include <ti/sysbios/knl/Swi.h>

#include <ti/sysbios/knl/Semaphore.h>

/*

 *  ======== main ========

 */

void fun_task0(void);

void fun_task1(void);

void func_swi0(void);

Swi_Handle swi0;

Semaphore_Handle sem0;  //添加全局的信号量句柄

Void main()

{

    System_printf("hello world\n");

    Swi_Params swiParams;

    Swi_Params_init(&swiParams);

    swiParams.priority = ;

    swiParams.trigger = ;

    swi0 = Swi_create(func_swi0, &swiParams, NULL);

    sem0 = Semaphore_create(, NULL, NULL);//创建信号量

    BIOS_start();

}

void func_swi0(void)

{

     static Int count = ;

     Log_info1("Swi0 is doing %d\n",count);

     count++;

     //增加一个解锁信号量的函数

     Semaphore_post(sem0);

}

void fun_task0(void)

{

    Int count = ;

    while(count<)

    {

        Semaphore_pend(sem0, BIOS_WAIT_FOREVER);//在增加互斥信号量的任务函数中增加一个等待信号量为1的函数

        Log_info1("Task0 is doing %d\n",count);

        Swi_dec(swi0);

        Task_yield();

        count++;

    }

    BIOS_exit();

}

void fun_task1(void)

{

    Int count = ;

    while(count<)

    {

        Log_info1("Task1 is doing %d\n",count);

        Swi_dec(swi0);

        Task_yield();

        count++;

    }

    BIOS_exit();

}
编译调试,运行查看结果(这里我们只需要选择单核运行就可以了):

可以看到只有当软件中断执行后,此时信号量才解锁,task0才能执行,而任务执行两次,才能触发一次软件中断。
在项目中导入时钟Clock模块
Clocks模块主要提供周期性执行函数,我们这里新建一个周期性执行函数,其每四个周期执行一次.
添加时钟:
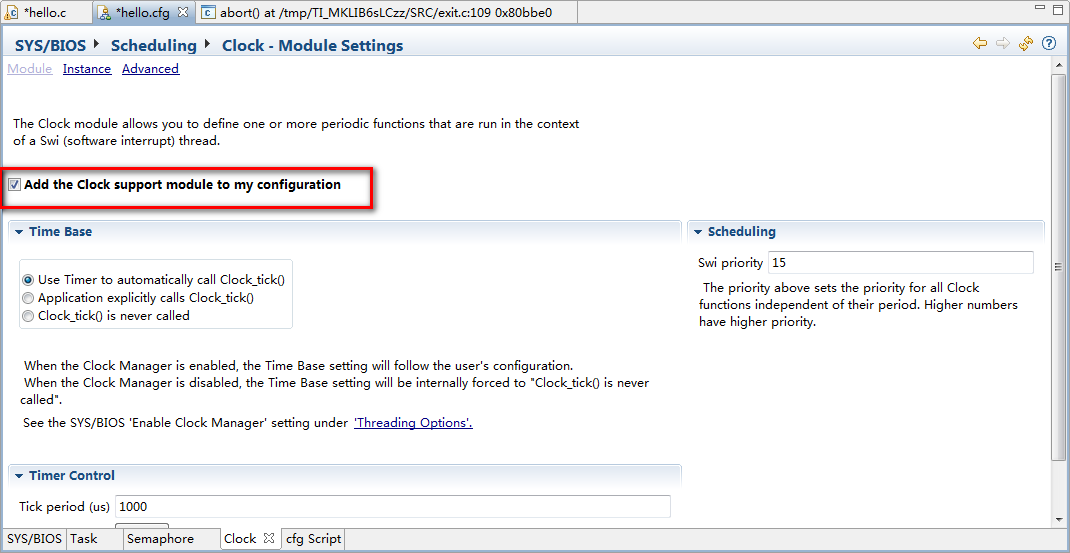
代码:
/*

 *  ======== hello.c ========

 *  The hello example serves as a basic sanity check program for SYS/BIOS. It

 *  demonstrates how to print the string "hello world" to stdout.

 */

#include <xdc/std.h>

#include <xdc/runtime/System.h>

#include <ti/sysbios/BIOS.h>

#include <xdc/runtime/Log.h>

#include <ti/sysbios/knl/Task.h>

#include <ti/sysbios/knl/Swi.h>

#include <ti/sysbios/knl/Semaphore.h>

#include <ti/sysbios/knl/Clock.h>

/*

 *  ======== main ========

 */

void fun_task0(void);

void fun_task1(void);

void func_swi0(void);

void func_clk(UArg arg0);

Swi_Handle swi0;

Semaphore_Handle sem0;

Void main()

{

    System_printf("hello world\n");

    Swi_Params swiParams;

    Swi_Params_init(&swiParams);

    swiParams.priority = ;

    swiParams.trigger = ;

    swi0 = Swi_create(func_swi0, &swiParams, NULL);

    Clock_Params clkParams;

    Clock_Params_init(&clkParams);

    clkParams.period = ; // 函数执行周期

    clkParams.startFlag = TRUE; // True说明时钟立即开始计时

    Clock_create(func_clk, , &clkParams, NULL); //创建时钟,func_clk是周期执行的函数,这里5是开始执行的延时。

    sem0 = Semaphore_create(, NULL, NULL);

    BIOS_start();

}

void func_swi0(void)

{

     static Int count = ;

     Log_info1("Swi0 is doing %d\n",count);

     count++;

     Semaphore_post(sem0);

}

void func_clk(UArg arg0)

{

    UInt32 time;

    time = Clock_getTicks(); // 这里是定时器的节拍器

    System_printf("System time in clk0Fxn = %lu\n", (ULong)time);

    if(time>)

        BIOS_exit();

}

/*

  因为任务的执行时间非常快,所以需要先把任务内的退出BIOS命令先删除下,否则当任务完成后,时钟函数还没执行

 */

void fun_task0(void)

{

    Int count = ;

    while()

    {

        Semaphore_pend(sem0, BIOS_WAIT_FOREVER);

        Log_info1("Task0 is doing %d\n",count);

        Swi_dec(swi0);

        Task_yield();

        count++;

    }

}

void fun_task1(void)

{

    Int count = ;

    while()

    {

        Log_info1("Task1 is doing %d\n",count);

        Swi_dec(swi0);

        Task_yield();

        count++;

    }

}
编译调试,运行查看结果(这里我们只需要选择单核运行就可以了):
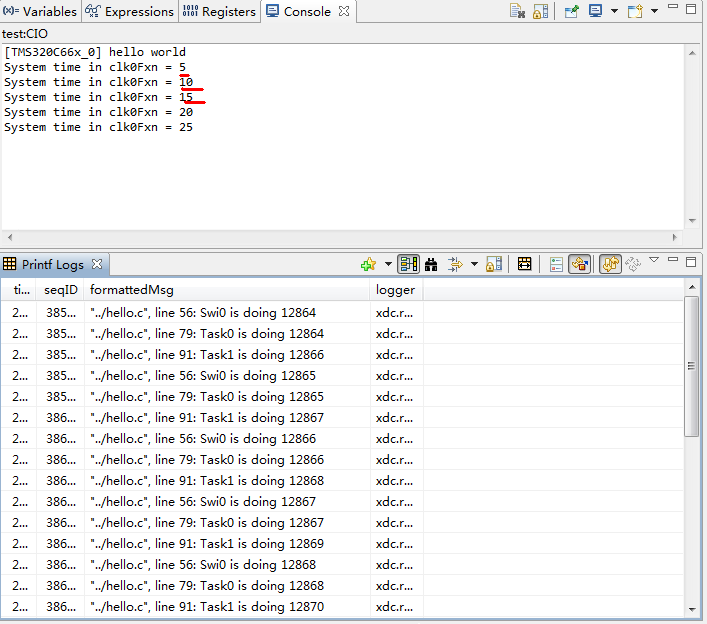
可以看到只有当周期函数func_clk每隔5个周期开始执行,开始执行时间为5。
SYS/BIOS实例分析的更多相关文章
- Linux Kernel PANIC(三)--Soft Panic/Oops调试及实例分析【转】
转自:https://blog.csdn.net/gatieme/article/details/73715860 版权声明:本文为博主原创文章,遵循 CC 4.0 BY-SA 版权协议,转载请附上原 ...
- Linux系统网络性能实例分析
由于TCP/IP是使用最普遍的Internet协议,下面只集中讨论TCP/IP 栈和以太网(Ethernet).术语 LinuxTCP/IP栈和 Linux网络栈可互换使用,因为 TCP/IP栈是 L ...
- (多核DSP快速入门)SYS/BIOS入门
(多核DSP快速入门)SYS/BIOS入门 原创文章 转载请注册来源http://blog.csdn.net/tostq 系列教程目录:http://blog.csdn.net/tostq/art ...
- RPC原理及RPC实例分析
在学校期间大家都写过不少程序,比如写个hello world服务类,然后本地调用下,如下所示.这些程序的特点是服务消费方和服务提供方是本地调用关系. 1 2 3 4 5 6 public class ...
- java基础学习05(面向对象基础01--类实例分析)
面向对象基础01(类实例分析) 实现的目标 1.如何分析一个类(类的基本分析思路) 分析的思路 1.根据要求写出类所包含的属性2.所有的属性都必须进行封装(private)3.封装之后的属性通过set ...
- (转)实例分析:MySQL优化经验
[IT专家网独家]同时在线访问量继续增大,对于1G内存的服务器明显感觉到吃力,严重时甚至每天都会死机,或者时不时的服务器卡一下,这个问题曾经困扰了我半个多月.MySQL使用是很具伸缩性的算法,因此你通 ...
- sql注入实例分析
什么是SQL注入攻击?引用百度百科的解释: sql注入_百度百科: 所谓SQL注入,就是通过把SQL命令插入到Web表单提交或输入域名或页面请求的查询字符串,最终达到欺骗服务器执行恶意的SQL命令.具 ...
- 实例分析ELF文件静态链接
参考文献: <ELF V1.2> <程序员的自我修养---链接.装载与库>第4章 静态链接 开发平台: [thm@tanghuimin static_link]$ uname ...
- 用实例分析H264 RTP payload
用实例分析H264 RTP payload H264的RTP中有三种不同的基本负载(Single NAL,Non-interleaved,Interleaved) 应用程序可以使用第一个字节来识别. ...
随机推荐
- SQLServer判断一个IP是否在一个IP段里
declare @ip1 varchar(20)declare @ip2 varchar(20)set @ip1='221.231.138.101'set @ip2='255.255.255.255' ...
- 【题解】POJ2279 Mr.Young′s Picture Permutations dp
[题解]POJ2279 Mr.Young′s Picture Permutations dp 钦定从小往大放,然后直接dp. \(dp(t1,t2,t3,t4,t5)\)代表每一行多少人,判断边界就能 ...
- spring AOP理解和相关术语
一.AOP理解 AOP:横向抽取机制,底层使用代理方式实现. 示例: 现有LogDAO接口以及实现Log接口的Log类.类有add的方法,现在要打印add方法的开始时间和结束时间.(即增强Log的ad ...
- (转)linux访问windows共享文件夹的两种方法
有时需要在linux下访问window的共享文件,可以使用mount挂载或使用samba连接. 1,mount挂载 $ mkdir windows 将共享文件夹挂载到windows文件夹: mount ...
- Xen虚拟化基础篇
一.xen的简介 Xen是一个开放源代码虚拟机监视器,由剑桥大学开发.它打算在单个计算机上运行多达128个有完全功能的操作系统. 在旧(无虚拟硬件)的处理器上执行Xen,操作系统必须进行显式地修改(& ...
- sqlalchemy——基本操作
以下所有代码片段都使用了统一的引用,该引用如下: from sqlalchemy import create_engine, ForeignKey from sqlalchemy.ext.declar ...
- TCP标准模板
伪代码 #创建一个TCP服务器 ss = socket() #创建服务器套接字 ss.bind() #把地址绑定到套接字上 ss.listen() #监听连接 inf_loop: #服务器无线循环 c ...
- log4j2.xml的例子
项目中用到的一个log4j2.xml的配置文件: <?xml version="1.0" encoding="UTF-8"?> <!--设置l ...
- QCon2016 上海会议汇总(2) - 团队管理
QCon 2016上海日程:http://2016.qconshanghai.com/schedule <当你的团队还支撑不起梦想时> - 链尚网技术合伙人 杨荣伟 Figo讲述了如何训练 ...
- python3 mysql 多表查询
python3 mysql 多表查询 一.准备表 创建二张表: company.employee company.department #建表 create table department( id ...