
从baselines库的common/vec_env/vec_normalize.py模块看方差的近似计算方法
在baselines库的common/vec_env/vec_normalize.py中计算方差的调用方法为:
RunningMeanStd
同时该计算函数的解释也一并给出了:
https://en.wikipedia.org/wiki/Algorithms_for_calculating_variance#Parallel_algorithm
也就是说这个函数是在对方差进行近似计算,找了下中文的这方面的资料:
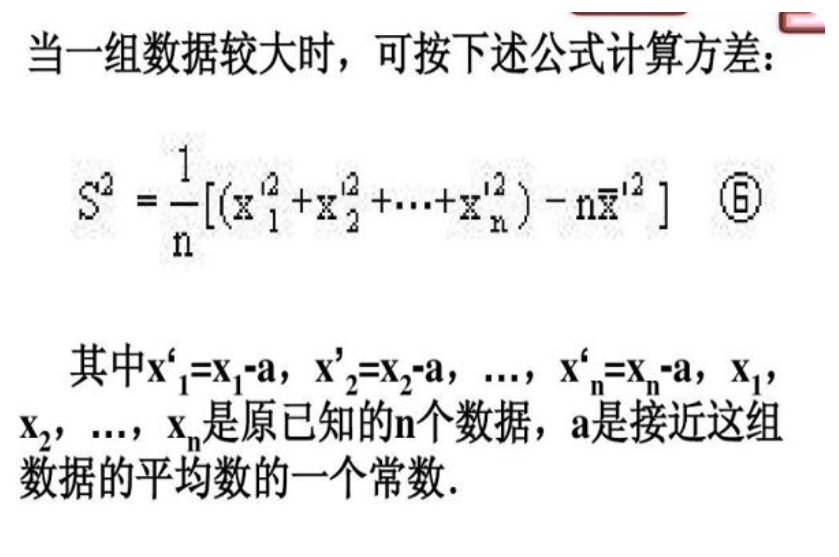
上图来自:https://baijiahao.baidu.com/s?id=1715371851391883847&wfr=spider&for=pc
可以看到在wiki上给出了python的计算代码:


def shifted_data_variance(data):

    if len(data) < 2:

        return 0.0

    K = data[0]

    n = Ex = Ex2 = 0.0

    for x in data:

        n = n + 1

        Ex += x - K

        Ex2 += (x - K) * (x - K)

    variance = (Ex2 - (Ex * Ex) / n) / (n - 1)

    # use n instead of (n-1) if want to compute the exact variance of the given data

    # use (n-1) if data are samples of a larger population

    return variance
该代码的计算公式为:

也就是说在样本数据较大的情况下可以使用该计算方法来近似计算样本方差。
给出自己的测试代码:
import numpy as np

data = np.random.normal(10, 5, 100000000)

print(data)

print(data.shape)

print(np.mean(data), np.var(data))

print('......')

def shifted_data_variance(data, K):

    if len(data) < 2:

        return 0.0

    # K = data[0]

    n = Ex = Ex2 = 0.0

    for x in data:

        n = n + 1

        Ex += x - K

        Ex2 += (x - K) * (x - K)

    variance = (Ex2 - (Ex * Ex) / n) / (n - 1)

    # use n instead of (n-1) if want to compute the exact variance of the given data

    # use (n-1) if data are samples of a larger population

    return variance

print(shifted_data_variance(data, data[0]))

print(shifted_data_variance(data, 0))

print(shifted_data_variance(data, -10000))
运行结果:
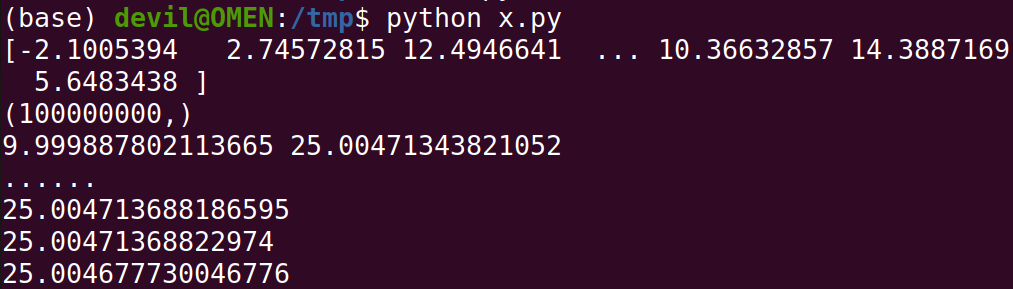
可以知道如果K值越接近真实的均值那么所得到的近似方差会更加逼近真实的样本方差。
那么如果样本数据较少的情况呢,上面的测试使用的是100000000个数据样本,如果是100个呢,给出测试:
代码:
import numpy as np

data = np.random.normal(10, 5, 100)

print(data)

print(data.shape)

print(np.mean(data), np.var(data))

print('......')

def shifted_data_variance(data, K):

    if len(data) < 2:

        return 0.0

    # K = data[0]

    n = Ex = Ex2 = 0.0

    for x in data:

        n = n + 1

        Ex += x - K

        Ex2 += (x - K) * (x - K)

    variance = (Ex2 - (Ex * Ex) / n) / (n - 1)

    # use n instead of (n-1) if want to compute the exact variance of the given data

    # use (n-1) if data are samples of a larger population

    return variance

print(shifted_data_variance(data, data[0]))

print(shifted_data_variance(data, 0))

print(shifted_data_variance(data, -10000))
运行结果:
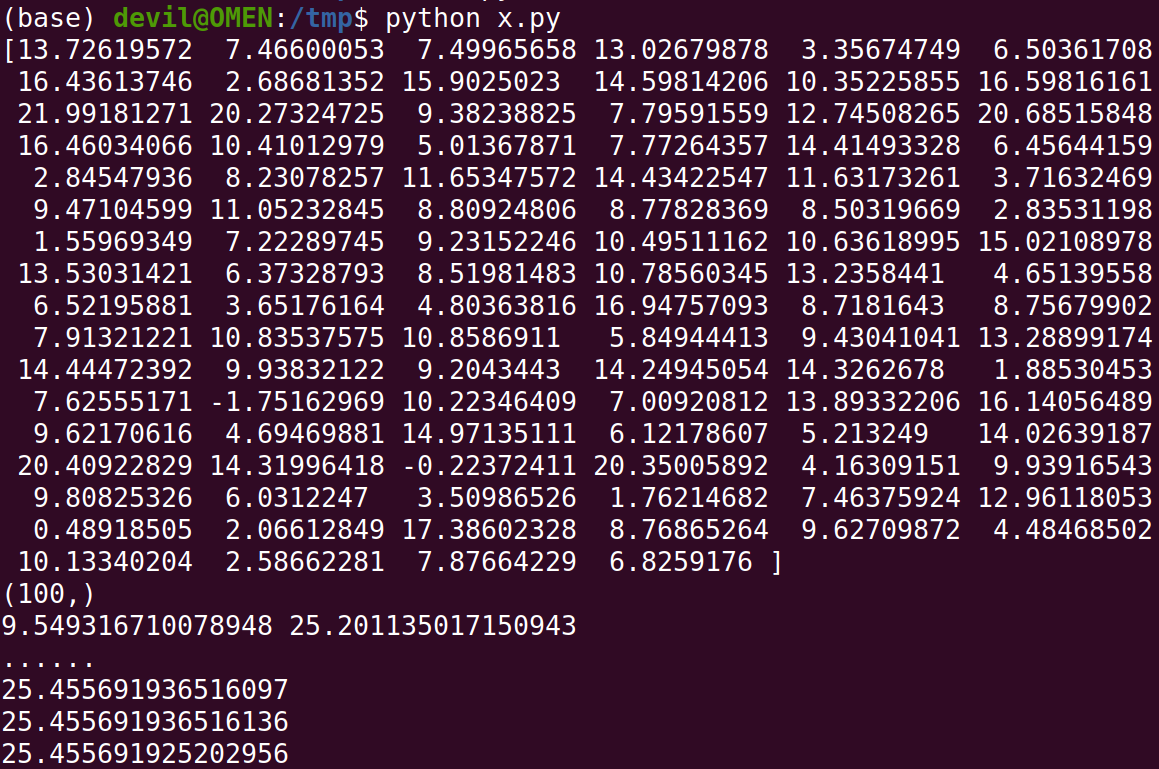
可以看到和数据样本较大规模的情况一样,该方法依然可以得到非常好的近似方差,同时K值越接近真实均值近似方差就越接近真实方差,不过这里可以看到这里的差别也是在小数点后九位,因此这个差距可以看做没有。
总结:
这个计算方差的最大好处就是可以在不计算样本均值的情况下就直接计算样本方差,该种计算方法非常适合样本数据量在不断增加的情况,不过这里的样本数据量增加也是在服从同一分布的条件下的。
比如我们需要不断的从一个数据分布中获得样本并获得分布的方差,如果不适用这种近似计算方差的方法每当我们得到一个新的样本都需要重新计算样本的方差,这样就会成几何倍数的增加计算量,毕竟标准的方差计算是需要遍历所有样本数据的。
给出标准的方差计算公式:
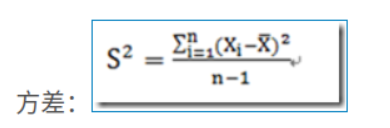
图片源自:https://www.cnblogs.com/devilmaycry812839668/p/16072130.html
不得不说算法设计可以有效提升计算性能。
================================================
不过根据wiki的说明可以知道,上述的方法在计算过程中设计到大量的求和sum计算,而求和计算由于会由于浮点数计算时的精度取舍从而影响最终的结果精度:
This algorithm is numerically stable if n is small.[1][4] However, the results of both of these simple algorithms ("naïve" and "two-pass") can depend inordinately on the ordering of the data and can give poor results for very large data sets due to repeated roundoff error in the accumulation of the sums. Techniques such as compensated summation can be used to combat this error to a degree.
================================================
在baselines库中使用的求方差的方法为:

也就是baselines中的函数:
class RunningMeanStd(object):

    # https://en.wikipedia.org/wiki/Algorithms_for_calculating_variance#Parallel_algorithm

    def __init__(self, epsilon=1e-4, shape=()):

        self.mean = np.zeros(shape, 'float64')

        self.var = np.ones(shape, 'float64')

        self.count = epsilon

    def update(self, x):

        batch_mean = np.mean(x, axis=0)

        batch_var = np.var(x, axis=0)

        batch_count = x.shape[0]

        self.update_from_moments(batch_mean, batch_var, batch_count)

    def update_from_moments(self, batch_mean, batch_var, batch_count):

        self.mean, self.var, self.count = update_mean_var_count_from_moments(

            self.mean, self.var, self.count, batch_mean, batch_var, batch_count)

def update_mean_var_count_from_moments(mean, var, count, batch_mean, batch_var, batch_count):

    delta = batch_mean - mean

    tot_count = count + batch_count

    new_mean = mean + delta * batch_count / tot_count

    m_a = var * count

    m_b = batch_var * batch_count

    M2 = m_a + m_b + np.square(delta) * count * batch_count / tot_count

    new_var = M2 / tot_count

    new_count = tot_count

    return new_mean, new_var, new_count
使用自己的测试代码:
import numpy as np

data = np.random.normal(10, 5, 1000000)

print(data)

print(data.shape)

print(np.mean(data), np.var(data))

print('......')

def shifted_data_variance(data, K):

    if len(data) < 2:

        return 0.0

    # K = data[0]

    n = Ex = Ex2 = 0.0

    for x in data:

        n = n + 1

        Ex += x - K

        Ex2 += (x - K) * (x - K)

    variance = (Ex2 - (Ex * Ex) / n) / (n - 1)

    # use n instead of (n-1) if want to compute the exact variance of the given data

    # use (n-1) if data are samples of a larger population

    return variance

print(shifted_data_variance(data, data[0]))

print(shifted_data_variance(data, 0))

print(shifted_data_variance(data, -10000))

print('......')

class RunningMeanStd(object):

    # https://en.wikipedia.org/wiki/Algorithms_for_calculating_variance#Parallel_algorithm

    def __init__(self, epsilon=1e-4, shape=()):

        self.mean = np.zeros(shape, 'float64')

        self.var = np.ones(shape, 'float64')

        self.count = epsilon

    def update(self, x):

        batch_mean = np.mean(x, axis=0)

        batch_var = np.var(x, axis=0)

        batch_count = x.shape[0]

        self.update_from_moments(batch_mean, batch_var, batch_count)

    def update_from_moments(self, batch_mean, batch_var, batch_count):

        self.mean, self.var, self.count = update_mean_var_count_from_moments(

            self.mean, self.var, self.count, batch_mean, batch_var, batch_count)

def update_mean_var_count_from_moments(mean, var, count, batch_mean, batch_var, batch_count):

    delta = batch_mean - mean

    tot_count = count + batch_count

    new_mean = mean + delta * batch_count / tot_count

    m_a = var * count

    m_b = batch_var * batch_count

    M2 = m_a + m_b + np.square(delta) * count * batch_count / tot_count

    new_var = M2 / tot_count

    new_count = tot_count

    return new_mean, new_var, new_count

rsd = RunningMeanStd(0)

for d in range(10000):

    rsd.update(data[d*100:(d+1)*100])

print(rsd.mean, rsd.var, rsd.count)
运行结果:
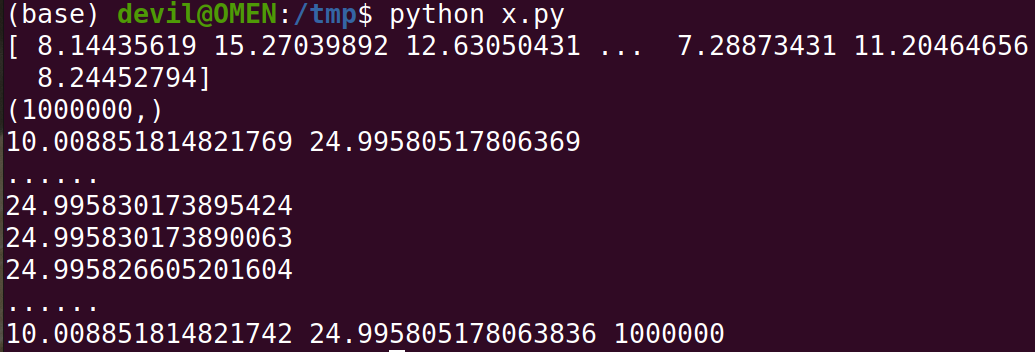
从运行结果中可以看到这种的求方差方法也可以得到很好的效果。
上面的这个baselines库中的求解方差的方法主要是适用于增量数据以集合的形式出现,在机器学习中可以看做是不断有的额batch的数据来到。
比如说我们收到的数据是一个集合增量,通过融合已有集合数据的方差、均值以及新到集合的方差、均值就可以得到合集的方差。
=======================================================
本文中的求解增量数据的方差的的方法来源:
https://en.wikipedia.org/wiki/Algorithms_for_calculating_variance#Parallel_algorithm
由于这里的增强数据方差求解方法比较难以证明,因此这里也是直接拿过来进行使用。
========================
从baselines库的common/vec_env/vec_normalize.py模块看方差的近似计算方法的更多相关文章
- Python 库打包分发、setup.py 编写、混合 C 扩展打包的简易指南(转载)
转载自:http://blog.konghy.cn/2018/04/29/setup-dot-py/ Python 有非常丰富的第三方库可以使用,很多开发者会向 pypi 上提交自己的 Python ...
- 【Python】【Web.py】详细解读Python的web.py框架下的application.py模块
详细解读Python的web.py框架下的application.py模块 这篇文章主要介绍了Python的web.py框架下的application.py模块,作者深入分析了web.py的源码, ...
- 第三百零六节,Django框架,models.py模块,数据库操作——创建表、数据类型、索引、admin后台,补充Django目录说明以及全局配置文件配置
Django框架,models.py模块,数据库操作——创建表.数据类型.索引.admin后台,补充Django目录说明以及全局配置文件配置 数据库配置 django默认支持sqlite,mysql, ...
- 四 Django框架,models.py模块,数据库操作——创建表、数据类型、索引、admin后台,补充Django目录说明以及全局配置文件配置
Django框架,models.py模块,数据库操作——创建表.数据类型.索引.admin后台,补充Django目录说明以及全局配置文件配置 数据库配置 django默认支持sqlite,mysql, ...
- Python标准库:datetime 时间和日期模块 —— 时间的获取和操作详解
datetime 时间和日期模块 datetime 模块提供了以简单和复杂的方式操作日期和时间的类.虽然支持日期和时间算法,但实现的重点是有效的成员提取以进行输出格式化和操作.该模块还支持可感知时区的 ...
- web.py模块使用
web.py模块 import time import web urls=("/",'hello') class hello(): def GET(self): return (t ...
- 第三百零九节,Django框架,models.py模块,数据库操作——F和Q()运算符:|或者、&并且——queryset对象序列化
第三百零九节,Django框架,models.py模块,数据库操作——F()和Q()运算符:|或者.&并且 F()可以将数据库里的数字类型的数据,转换为可以数字类型 首先要导入 from dj ...
- 第三百零八节,Django框架,models.py模块,数据库操作——链表结构,一对多、一对一、多对多
第三百零八节,Django框架,models.py模块,数据库操作——链表结构,一对多.一对一.多对多 链表操作 链表,就是一张表的外键字段,连接另外一张表的主键字段 一对多 models.Forei ...
- 第三百零七节,Django框架,models.py模块,数据库操作——表类容的增删改查
Django框架,models.py模块,数据库操作——表类容的增删改查 增加数据 create()方法,增加数据 save()方法,写入数据 第一种方式 表类名称(字段=值) 需要save()方法, ...
- 第三百零四节,Django框架,urls.py模块,views.py模块,路由映射与路由分发以及逻辑处理——url控制器
Django框架,urls.py模块,views.py模块,路由映射与路由分发以及逻辑处理——url控制器 这一节主讲url控制器 一.urls.py模块 这个模块是配置路由映射的模块,当用户访问一个 ...
随机推荐
- mysql备份实战
1.备份恢复演练(mysqldump+binlog) 知识储备 如下内容.. 全量备份 全量数据,指的是某一整个数据库(如kings)中所有的表.以及表数据,进行备份. 例如备份所有数据库.以及所有数 ...
- js中字符串的方法,17种方法
字符串的17种方法...... 1.length:返回字符串的长度. const str = "Hello, World!"; console.log(str.length); / ...
- docker制作springboot镜像
以下步骤在具有Docker环境的Linux机器上操作. 把springboot-1.0.0.jar放到/usr/local/springboot目录下,并在该目录下创建Dockerfile文件,内容为 ...
- ELKF(elasticsearch、logstash、kibana、filebeat)搭建及收集nginx日志
1.elasticsearch 1.1.根目录下新建data文件夹 1.2.修改elasticsearch.yml文件,添加以下内容 path.data: /home/wwq/elk/elastics ...
- 剖析 Kafka 消息丢失的原因
目录 前言 一.生产者导致消息丢失的场景 场景1:消息体太大 解决方案 : 1.减少生产者发送消息体体积 2.调整参数max.request.size 场景2:异步发送机制 解决方案 : 1.使用带回 ...
- 纯代码搭建iOS三级结构(UITabbarController+UINavigationController+UIViewController)
声明:这里所指的三级结构不是网上百度中所经常提及的三级框架或者MVC模式,而是指UITabbarController+UINavigationController+UIViewController. ...
- WPF/C#:如何实现拖拉元素
前言 在Canvas中放置了一些元素,需要能够拖拉这些元素,在WPF Samples中的DragDropObjects项目中告诉了我们如何实现这种效果. 效果如下所示: 拖拉过程中的效果如下所示: 具 ...
- hive第一课:# hive-3.1.2分布式搭建文档
hive-3.1.2分布式搭建文档 谷歌浏览器下载网址:Google Chrome – Download the fast, secure browser from Google 华为云镜像站:htt ...
- Linux内核:通知链 机制
Linux内核:通知链 机制 背景 在驱动分析中经常看到fb_notifier_callback,现在趁有空学习一下. 参考: https://www.cnblogs.com/armlinux/arc ...
- NXP i.MX 8M Plus工业开发板硬件说明书( 四核ARM Cortex-A53 + 单核ARM Cortex-M7,主频1.6GHz)
前 言 本文主要介绍创龙科技TLIMX8MP-EVM评估板硬件接口资源以及设计注意事项等内容. 创龙科技TLIMX8MP-EVM是一款基于NXP i.MX 8M Plus的四核ARM Cortex- ...