
学习ASP.NET MVC(十)——排序
1 按照价格对书籍进行排序
下面我们通过一个简单的例子学习如何对书籍信息按照价格进行排序。
首先,我们在Controllers\BookController.cs文件中的SearchIndex方法添加一个switch语句段,实现按照价格对书籍信息进行排序的功能。代码如下列粗体显示:
  public ActionResult SearchIndex(string Category, string searchString, string sortBy)

        {

//类型选项

            var cateLst = new List<string>();

            var cateQry = from d in db.Books

                          orderby d.Category

                          select d.Category;

            cateLst.AddRange(cateQry.Distinct());

            ViewBag.category = new SelectList(cateLst);

            var books = from m in db.Books

                        select m;

            if (!String.IsNullOrEmpty(searchString))

            {

                books = books.Where(s => s.Name.Contains(searchString));

            }

            //排序实现代码

            switch (sortBy)

            {

                case "price_lowest":

                    books = books.OrderBy(p => p.Price);

                    break;

                case "price_highest":

                    books = books.OrderByDescending(p => p.Price);

                    break;

                default:

                    break;

            }

            if (string.IsNullOrEmpty(Category))

                return View(books);

            else

            {

                return View(books.Where(x => x.Category == Category));

            }

        }
上面这段代码分别使用Entity Framework的OrderBy和OrderByDescending方法,按照价格对书籍信息进行升序或降序排序。
前端界面代码
@model IEnumerable<MvcApplication1.Models.Book>

@{

    ViewBag.Title = "书籍查询";

}

<h2>书籍查询</h2>

     @using (Html.BeginForm("SearchIndex","book",FormMethod.Get)){

         <p>书籍种类: @Html.DropDownList("category", "All")

           书籍名称: @Html.TextBox("SearchString")

            <input type="submit" value="查询" /> </p>

        }

<table>

    <tr>

        <th>

            @Html.DisplayNameFor(model => model.Category)

        </th>

        <th>

            @Html.DisplayNameFor(model => model.Name)

        </th>

        <th>

            @Html.DisplayNameFor(model => model.Numberofcopies)

        </th>

        <th>

            @Html.DisplayNameFor(model => model.AuthorID)

        </th>

        <th>

            @Html.DisplayNameFor(model => model.Price)

        </th>

        <th>

            @Html.DisplayNameFor(model => model.PublishDate)

        </th>

        <th></th>

    </tr>

@foreach (var item in Model) {

    <tr>

        <td>

            @Html.DisplayFor(modelItem => item.Category)

        </td>

        <td>

            @Html.DisplayFor(modelItem => item.Name)

        </td>

        <td>

            @Html.DisplayFor(modelItem => item.Numberofcopies)

        </td>

        <td>

            @Html.DisplayFor(modelItem => item.AuthorID)

        </td>

        <td>

            @Html.DisplayFor(modelItem => item.Price)

        </td>

        <td>

            @Html.DisplayFor(modelItem => item.PublishDate)

        </td>

        <td>

            @Html.ActionLink("Edit", "Edit", new { id=item.BookID }) |

            @Html.ActionLink("Details", "Details", new { id=item.BookID }) |

            @Html.ActionLink("Delete", "Delete", new { id=item.BookID })

        </td>

    </tr>

}

</table>
其次,在Visual Studio中调试—>开始执行(不调试)-->启动应用程序,然后在浏览器的地址栏中修改URL数据,进行排序测试,URL的格式分别为book/SearchIndex?category=&SearchString=&sortBy=price_lowest和book/SearchIndex? category=&SearchString=&sortBy=price_highest。书籍信息应该分别显示为最低价格显示在列表的头部和最高价格显示在列表的头部。 如下图1,图2。

图1价格从低到高排序

图2 价格从高到低排序
2 在书籍查询页面中增加排序选项
排序功能,是给用户使用的,当然不能象上面我们做测试一样手工修改URL地址,所以我们不能使用上面的方法。我们需要在书籍查询页面中增加排序选项,允许用户可以按照他们自己选定的排序方式进行排序。我们需要在书籍查询页面中添加一个下拉列表以及一个填充该下拉列表值和文本的字典。
首先,我们需要在BookController类中修改SearchIndex方法。修改\Controllers\BookController.cs文件,在SearchIndex方法中添加排序选项,见下列粗体显示的代码:
public ActionResult SearchIndex(string Category, string searchString, string sortBy)

        {

//类型选项

            var cateLst = new List<string>();

            var cateQry = from d in db.Books

                          orderby d.Category

                          select d.Category;

            cateLst.AddRange(cateQry.Distinct());

            ViewBag.category = new SelectList(cateLst);

//排序选项

                var orderbyLst = new Dictionary<string, string>

     {

         { "价格从低到高", "price_lowest" },

         { "价格从高到低", "price_highest" }

     };

                ViewBag.sortBy = new SelectList(orderbyLst, "Value", "Key");

            var books = from m in db.Books

                        select m;

            if (!String.IsNullOrEmpty(searchString))

            {

                books = books.Where(s => s.Name.Contains(searchString));

            }

            // 排序功能实现

            switch (sortBy)

            {

                case "price_lowest":

                    books = books.OrderBy(p => p.Price);

                    break;

                case "price_highest":

                    books = books.OrderByDescending(p => p.Price);

                    break;

                default:

                    break;

            }

            if (string.IsNullOrEmpty(Category))

                return View(books);

            else

            {

                return View(books.Where(x => x.Category == Category));

            }

        }
其次,我们需要在书籍查询界面中添加一个下拉列表控件,用来显示排序方式,方便用户进行选择。在Views\Book\SearchIndex.cshtml文件的按照分类来过滤产品信息的代码后面,添加下列粗体显示的代码:
@model IEnumerable<MvcApplication1.Models.Book>

@{

    ViewBag.Title = "书籍查询";

}

<h2>书籍查询</h2>

     @using (Html.BeginForm("SearchIndex","book",FormMethod.Get)){

         <p>书籍种类: @Html.DropDownList("category", "All")

           书籍名称: @Html.TextBox("SearchString")

              排序: @Html.DropDownList("sortBy", "不排序")

         <input type="submit" value="查询" /> </p>        }

 <table>

    <tr>

        <th>

            @Html.DisplayNameFor(model => model.Category)

        </th>

        <th>

            @Html.DisplayNameFor(model => model.Name)

        </th>

        <th>

            @Html.DisplayNameFor(model => model.Numberofcopies)

        </th>

        <th>

            @Html.DisplayNameFor(model => model.AuthorID)

        </th>

        <th>

            @Html.DisplayNameFor(model => model.Price)

        </th>

        <th>

            @Html.DisplayNameFor(model => model.PublishDate)

        </th>

        <th></th>

    </tr>

@foreach (var item in Model) {

    <tr>

        <td>

            @Html.DisplayFor(modelItem => item.Category)

        </td>

        <td>

            @Html.DisplayFor(modelItem => item.Name)

        </td>

        <td>

            @Html.DisplayFor(modelItem => item.Numberofcopies)

        </td>

        <td>

            @Html.DisplayFor(modelItem => item.AuthorID)

        </td>

        <td>

            @Html.DisplayFor(modelItem => item.Price)

        </td>

        <td>

            @Html.DisplayFor(modelItem => item.PublishDate)

        </td>

        <td>

            @Html.ActionLink("Edit", "Edit", new { id=item.BookID }) |

            @Html.ActionLink("Details", "Details", new { id=item.BookID }) |

            @Html.ActionLink("Delete", "Delete", new { id=item.BookID })

        </td>

    </tr>

}

</table>
排序选项下拉列表控件使用视图包的sortBy属性来生成排序选项下拉列表控件中的下拉选项数据,其中下拉列表控件的显示文本使用Value值来指定,下拉列表控件中数据的值使用Key值来指定。
第三、在Visual Studio中调试—>开始执行(不调试)-->启动应用程序,然后点击书籍查询链接,在分类过滤下拉列表后面,我们会看到一个用于按照价格排序的下拉列表。如图3,4所示。
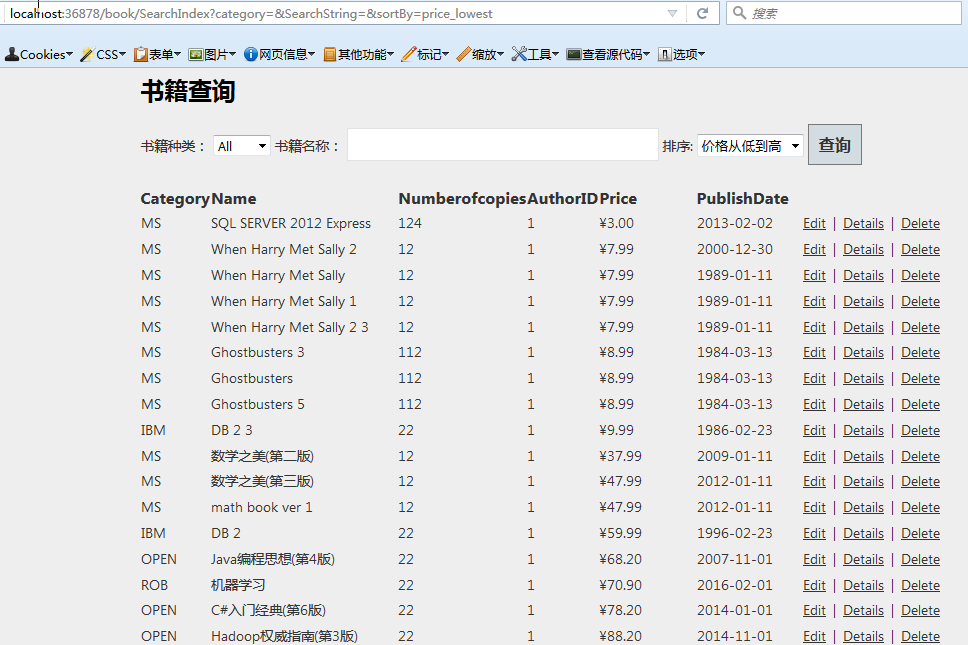
图3价格从低到高排序
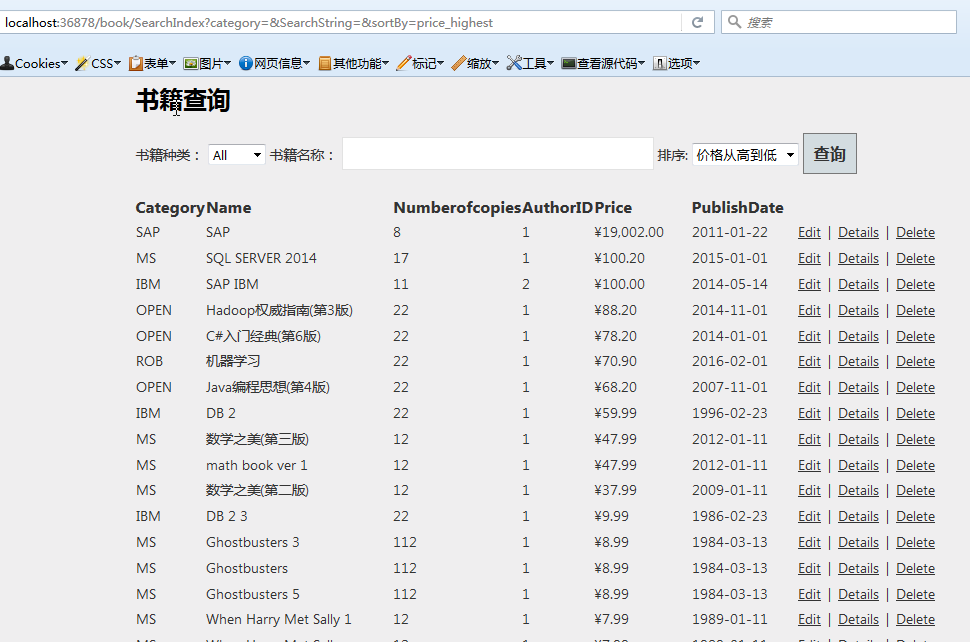
图4:价格从高到低排序
学习ASP.NET MVC(十)——排序的更多相关文章
- 学习ASP.NET MVC(七)——我的第一个ASP.NET MVC 查询页面
在本篇文章中,我将添加一个新的查询页面(SearchIndex),可以按书籍的种类或名称来进行查询.这个新页面的网址是http://localhost:36878/Book/ SearchIndex. ...
- 学习ASP.NET MVC(十一)——分页
在这一篇文章中,我们将学习如何在MVC页面中实现分页的方法.分页功能是一个非常实用,常用的功能,当数据量过多的时候,必然要使用分页.在今天这篇文章中,我们学习如果在MVC页面中使用PagedList. ...
- 学习ASP.NET MVC(九)——“Code First Migrations ”工具使用示例
在上一篇文章中,我们学习了如何使用实体框架的“Code First Migrations ”工具,使用其中的“迁移”功能对模型类进行一些修改,同时同步更新对应数据库的表结构. 在本文章中,我们将使用“ ...
- 学习ASP.NET MVC(一)——我的第一个ASP.NET MVC应用程序
学习ASP.NET MVC系列: 学习ASP.NET MVC(一)——我的第一个ASP.NET MVC应用程序 学习ASP.NET MVC(二)——我的第一个ASP.NET MVC 控制器 学习ASP ...
- 从零开始学习ASP.NET MVC 1.0
转自:http://www.cnblogs.com/zhangziqiu/archive/2009/02/27/ASPNET-MVC-1.html <从零开始学习ASP.NET MVC 1.0& ...
- 系列文章--从零开始学习ASP.NET MVC 1.0
从零开始学习ASP.NET MVC 1.0 (一) 开天辟地入门篇 从零开始学习 ASP.NET MVC 1.0 (二) 识别URL的Routing组件 从零开始学习 ASP.NET MVC 1.0 ...
- 学习ASP.NET MVC系列 - 还有比这更简炼的吗?把复杂的事情变简单了,贡献啊!
转自
- 学习ASP.NET MVC(三)——我的第一个ASP.NET MVC 视图
今天我将对前一篇文章中的示例进行修改,前一篇文章中并没有用到视图,这次将用到视图.对于前一个示例中的HelloWorldController类进行修改,使用视图模板文件生成HTML响应给浏览器. 一. ...
- 七天来学习ASP.NET MVC (两)——ASP.NET MVC 数据传输
通过第一天的学习之后,我们相信您已经对MVC有一些基本了解. 本节所讲的内容是在上节的基础之上.因此须要确保您是否掌握了上一节的内容. 本章的目标是在今天学习结束时利用最佳实践解决方式创建一个小型的M ...
随机推荐
- MVC笔记2:mvc+jquery.validate.js 进行前端验证
1.引用如下js和css 代码 <link href="@Url.Content("~/Content/Site.css")" rel="sty ...
- flash跨域访问
-------------------------------------------------------背景------------------------------------------- ...
- Python 一些常用模块的安装
(1)python PIL(image)模块的安装 sudo apt-get install python-imaging
- css :active伪类的理解
/*active伪类为点击鼠标按下去还没松开鼠标的那一瞬间的事件*/
- Iframe 自适应高度并实时监控高度变化的js代码
不得不用到iframe,且被强烈要求不能让它出现滚动条!嵌入的页面肯定是高度不一的,页面中也不能出现大片空白,所以也不能写死高度!真是麻鬼烦啊!google N次 + 百度M次 + 试验了1605次之 ...
- HDU-1232-畅通工程(并查集)
题目链接http://acm.hdu.edu.cn/showproblem.php?pid=1232考察并查集,(最小生成树)题目很简单用k记录树根的个数,k-1就是还需要建设的路 #include& ...
- C++ 常量类型 const 详解
1.什么是const? 常类型是指使用类型修饰符const说明的类型,常类型的变量或对象的值是不能被更新的.(当然,我们可以偷梁换柱进行更新:) 2.为什么引入const? const 推出的初始目的 ...
- Paxos 实现日志复制同步(Multi-Paxos)
Paxos 实现日志复制同步 这篇文章以一种易于理解的方式来解释 Multi-Paxos 的机制. Multi-Paxos 的是为了创建日志复制 一种实现方式是用一组基础 Paxos 实例,每条记录都 ...
- Zookeeper以Windows服务安装运行
1.下载的Zookeeper是.cmd的批处理命令运行的,默认没有提供以windows服务的方式运行的方案 下载地址:http://zookeeper.apache.org/ 2.下载prunsrv ...
- 我为什么不看好微信小程序
我自认为对新技术还是比较有热情的,可对于小程序这个“新技术”,我却完全是被动的.去年9月份的时候,微信小程序开始内测,瞬间引爆朋友圈.知乎等一众分享平台.当时我大概了解了一下,觉得从技术角度上来说没啥 ...