
Angular:路由的配置、传参以及跳转
①路由的配置
1、首先用脚手架新建一个项目,在路由配置时选择yes

2、用ng g component创建组件
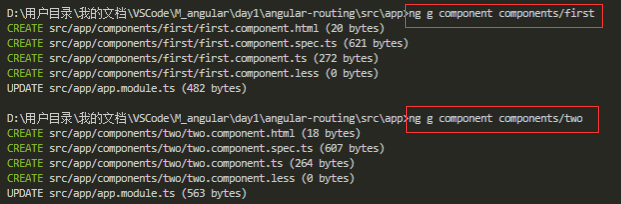
3、在src/app/app-routing.module.ts中配置路由
import { NgModule } from '@angular/core';

import { Routes, RouterModule } from '@angular/router';

import { FirstComponent } from './components/first/first.component';

import { TwoComponent } from './components/two/two.component';

import { FirstChildrenComponent } from './components/first-children/first-children.component';

import { TwoChildrenComponent } from './components/two-children/two-children.component';

import { ThreeComponent } from './components/three/three.component';

const routes: Routes = [

  // { path: '', component: FirstComponent }, //表示匹配到'/'路径,显示FirstComponent组件

  {

    path: 'first', component: FirstComponent,

    children: [  //设置子路由

      { path: 'firstC/:hxId', component: FirstChildrenComponent } //设置动态路由

    ]

  },

  {

    path: 'two', component: TwoComponent,

    children: [

      { path: 'twoC', component: TwoChildrenComponent }

    ]

  },

  {

    path: 'three', component: ThreeComponent

  },

  // { path: '**', component: FirstComponent }, //**表示匹配任意路径,显示FirstComponent组件

  { path: '', redirectTo: '/first', pathMatch: 'full' },  //表示匹配到'/'路径,重定向到'/first'路径

  // { path: '**', redirectTo: '/two', pathMatch: 'full' } //**表示匹配任意路径,重定向到'/first'路径

];

@NgModule({

  imports: [RouterModule.forRoot(routes)],

  exports: [RouterModule]

})

export class AppRoutingModule { }
②路由传参
1、使用动态路由传参
在first.component.html中,进行路由跳转,传参
<p>我用动态路由进行传参</p>

<ul>

  <!-- 使用动态路由 -->

  <li><a [routerLink]="[ '/first/firstC/',1]">我是商品1的详情</a></li>

</ul>

<router-outlet></router-outlet>

<button (click)="tiaoZhuan()">js跳转路由</button>
在first-children.component.ts子组件中引入ActivatedRoute模块,接收参数
import { Component, OnInit } from '@angular/core';

import { ActivatedRoute } from '@angular/router';

@Component({

  selector: 'app-first-children',

  templateUrl: './first-children.component.html',

  styleUrls: ['./first-children.component.less']

})

export class FirstChildrenComponent implements OnInit {

  constructor(public route: ActivatedRoute) { }

  ngOnInit(): void {

    console.log(this.route);

    this.route.params.subscribe({

      next(res): any {

        console.log(res);

      }

    });

  }

}
2、使用get传参
在two.component.html中,进行路由跳转,传参
<p>我用get进行传参</p>

<ul>

  <!-- 使用get传参 -->

  <li><a [routerLink]="['/two/twoC']" [queryParams]="{hxId:1}">我是商品1的详情</a></li>

</ul>

<router-outlet></router-outlet>
在two-children.component.ts子组件中引入ActivatedRoute模块,接收参数
import { Component, OnInit } from '@angular/core';

import { ActivatedRoute } from '@angular/router';

@Component({

  selector: 'app-two-children',

  templateUrl: './two-children.component.html',

  styleUrls: ['./two-children.component.less']

})

export class TwoChildrenComponent implements OnInit {

  constructor(public route: ActivatedRoute) { }

  ngOnInit(): void {

    console.log(this.route);

    this.route.queryParams.subscribe({

      next(res): any {

        console.log(res);

      }

    });

  }

}
③js路由跳转
在first.component.html中,进行路由跳转
<p>我用动态路由进行传参</p>

<!-- js跳转路由 -->

<button (click)="tiaoZhuan()">js跳转路由</button>
在first.component.ts中实现,引入Router模块
import { Component, OnInit } from '@angular/core';

import { Router } from '@angular/router';

@Component({

  selector: 'app-first',

  templateUrl: './first.component.html',

  styleUrls: ['./first.component.less']

})

export class FirstComponent implements OnInit {

  constructor(public router: Router) { }

  ngOnInit(): void {

  }

  tiaoZhuan(): any {

    console.log(this.router);

    this.router.navigate(['/three']); //实现路由跳转,也可以用动态路由或者get方式传参

  }

}
Angular:路由的配置、传参以及跳转的更多相关文章
- vue路由对不同界面进行传参及跳转的总结
最近在做一个公众号的商城项目,主要用的VUE+MUI,其实今天这个点对于有过项目经验的前端工作者来说是最基础的,但也是必须要掌握的,今天小编主要是记录下传参和跳转的一些总结(仅供参考). 首先我们先上 ...
- Vue Router路由导航及传参方式
路由导航及传参方式 一.两种导航方式 ①:声明式导航 <router-link :to="..."> ②:编程式导航 router.push(...) 二.编程式导航参 ...
- vue路由传参并跳转页面
在vue项目中参数的传递可以使用本地缓存或者Vuex,那么vue能不能像小程序一样路由传参呢,显然是可以的而且非常简单 方式一:query传参 //传参 go(){ that.$router.push ...
- ionic简单路由及页面传参
1)页面跳转及传参方法 angular.module('app.routes', [])//routes路由模型 .config(function($stateProvider, $urlRouter ...
- Tornado学习笔记(二) 路由/post/get传参
本章我们学习 Tornado 的路由传参等问题 路由 路由的匹配 Tornado的路由匹配采用的是正则匹配 一般情况下不需要多复杂的正则,正则的基本规则如下(站长之家) 举个例子 (r'/sum/(\ ...
- vue2.0路由写法、传参和嵌套
前置知识请戳这里 vue-routerCDN地址:https://unpkg.com/vue-router@3.0.1/dist/vue-router.js vue-router下载地址:https: ...
- vue-router路由如何实现传参
tip: 用params传参,F5强制刷新参数会被清空,用query,由于参数适用路径传参的所以F5强制刷新也不会被清空.(传参强烈建议适用string) 也可以选用sessionstorage/lo ...
- vue学习(6)-路由(导入包;创建子组件;创建路由对象)传参,子路由,多个组件
后端路由:对于普通的网站,所有的超链接都是URL地址,所有的URL地址都对应服务器上对应的资源 前端路由:对于单页面应用程序来说,主要通过URL中的hash(#号)来实现不同页面之间的切换(不会刷新页 ...
- ng4 路由多参数传参以及接收
import { Router } from '@angular/router'; constructor( private router:Router, ) { } goApplicationDet ...
随机推荐
- 利用s3-test进行ceph的接口兼容性测试
前言 ceph的rgw能够提供一个兼容性的s3的接口,既然是兼容性,当然不可能是所有接口都会兼容,那么我们需要有一个工具来进行接口的验证以及测试,这个在其他测试工具里面有类似的posix接口验证工具, ...
- ssh 方面问题总结
ssh 远程执行命令: https://www.cnblogs.com/youngerger/p/9104144.html ssh免密登录: https://blog.csdn.net/jeikerx ...
- python-基础入门-5(模块、类和对象)
模块 模块用import来调用,例如 from sys import argv 调用sys中argv模块 在模块里有多个def的函数 import调用全部或其中一个 类和对象 下面定义了一个类 1 c ...
- js前端读取文件内容
方法1:原生 <input type="file" name="file" id="file" onchange="jsRe ...
- kafka SASL认证介绍及自定义SASL PLAIN认证功能
目录 kafka 2.x用户认证方式小结 SASL/PLAIN实例(配置及客户端) broker配置 客户端配置 自定义SASL/PLAIN认证(二次开发) kafka2新的callback接口介绍 ...
- 推荐一个适用于SpringBoot项目的轻量级HTTP客户端框架,快来试试它!
在SpringBoot项目直接使用okhttp.httpClient或者RestTemplate发起HTTP请求,既繁琐又不方便统一管理.因此,在这里推荐一个适用于SpringBoot项目的轻量级HT ...
- 新鲜出炉!凭借着这份面试宝典,我终于拿下了字节跳动的offer!
前言 我做Java也十来年了,现在也算是中层管理,每次招聘都需要找一些面试题,干脆自己整理了一份,这份面试宝典是从我 去年开始收集的,一方面是给公司招聘用,另一方面也是想用它,来挖掘自己在 Java ...
- 追踪聚光特效怎么实现,有Vegas就够了
舞台聚光灯大家一定都不陌生,在电视上某些颁奖活动里,主持人的进场一定伴随着舞台灯光的聚光效果.随着主持人的移动,灯光也随之移动.这里的舞台灯光就起到了一个追踪聚光的效果. Vegas Pro 16 增 ...
- K8ssandra——专为Kubernetes云原生数据而生
DataStax最近发布了K8ssandra--一个开源的.部署于Kubernetes上的Apache Cassandra全新发行版本.K8ssandra一站式集合了在Kubernetes上部署开源版 ...
- MindSpore手写数字识别初体验,深度学习也没那么神秘嘛
摘要:想了解深度学习却又无从下手,不如从手写数字识别模型训练开始吧! 深度学习作为机器学习分支之一,应用日益广泛.语音识别.自动机器翻译.即时视觉翻译.刷脸支付.人脸考勤--不知不觉,深度学习已经渗入 ...