Android成长之路-编码实现软件界面
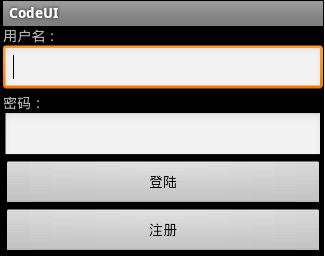
实现一个登陆界面:
相对布局:
- package cn.csdn.codeui;
- import android.app.Activity;
- import android.os.Bundle;
- import android.view.ViewGroup.LayoutParams;
- import android.widget.Button;
- import android.widget.EditText;
- import android.widget.RelativeLayout;
- import android.widget.TextView;
- public class LoginRelativeActivity extends Activity {
- protected void onCreate(Bundle savedInstanceState) {
- super.onCreate(savedInstanceState);
- initUI();
- }
- private void initUI() {
- RelativeLayout rlayout = new RelativeLayout(this);
- int id = 100;
- /**添加一个TextView*/
- TextView textView1 = new TextView(this);
- /**android:id=""*/
- textView1.setId(id);
- /**android:text="用户名:"*/
- textView1.setText("用户名:");
- /**android:layout_width="wrap_content"
- android:layout_height="wrap_content"*/
- RelativeLayout.LayoutParams textParams1 = new RelativeLayout.LayoutParams(
- LayoutParams.WRAP_CONTENT, LayoutParams.WRAP_CONTENT);
- /**android:layout_alignParentLeft="true"*/
- textParams1.addRule(RelativeLayout.ALIGN_PARENT_LEFT);
- rlayout.addView(textView1, textParams1);
- //////////
- int id1 = 200;
- EditText userEdit = new EditText(this);
- userEdit.setId(id1);
- RelativeLayout.LayoutParams EditParams1 = new RelativeLayout.LayoutParams(
- LayoutParams.FILL_PARENT, LayoutParams.WRAP_CONTENT);
- /**android:layout_toRightOf="id的值"*/
- EditParams1.addRule(RelativeLayout.RIGHT_OF, id);
- rlayout.addView(userEdit, EditParams1);
- //////////
- int Id = 300;
- TextView textView2 = new TextView(this);
- textView2.setId(Id);
- textView2.setText("密码 :");
- RelativeLayout.LayoutParams TextParams2 = new RelativeLayout.LayoutParams(
- LayoutParams.WRAP_CONTENT, LayoutParams.WRAP_CONTENT);
- TextParams2.addRule(RelativeLayout.BELOW, id1);
- rlayout.addView(textView2, TextParams2);
- //////////
- int Id1 = 400;
- EditText passEdit = new EditText(this);
- passEdit.setId(Id1);
- RelativeLayout.LayoutParams EditParams2 = new RelativeLayout.LayoutParams(
- LayoutParams.FILL_PARENT, LayoutParams.WRAP_CONTENT);
- EditParams2.addRule(RelativeLayout.BELOW, id1);
- EditParams2.addRule(RelativeLayout.RIGHT_OF, Id);
- rlayout.addView(passEdit, EditParams2);
- //////////
- int Id2 = 500;
- Button login = new Button(this);
- login.setId(Id2);
- login.setText("登陆");
- RelativeLayout.LayoutParams loginParams = new RelativeLayout.LayoutParams(
- LayoutParams.WRAP_CONTENT, LayoutParams.WRAP_CONTENT);
- loginParams.addRule(RelativeLayout.BELOW, Id1);
- loginParams.addRule(RelativeLayout.ALIGN_PARENT_RIGHT);
- rlayout.addView(login, loginParams);
- //////////
- Button insert = new Button(this);
- insert.setText("注册");
- RelativeLayout.LayoutParams insertParams = new RelativeLayout.LayoutParams(
- LayoutParams.WRAP_CONTENT, LayoutParams.WRAP_CONTENT);
- insertParams.addRule(RelativeLayout.BELOW, Id1);
- insertParams.addRule(RelativeLayout.LEFT_OF, Id2);
- rlayout.addView(insert, insertParams);
- setContentView(rlayout);
- }
- }
效果图:

表格布局:
- package cn.csdn.codeui;
- import android.app.Activity;
- import android.os.Bundle;
- import android.view.ViewGroup.LayoutParams;
- import android.widget.Button;
- import android.widget.EditText;
- import android.widget.TableLayout;
- import android.widget.TableRow;
- import android.widget.TextView;
- public class LoginTableActivity extends Activity {
- protected void onCreate(Bundle savedInstanceState) {
- super.onCreate(savedInstanceState);
- initUI();
- }
- private void initUI() {
- ///表格布局
- TableLayout tlayout = new TableLayout(this);
- tlayout.setColumnStretchable(1, true);
- ///行
- TableRow tableRow1 = new TableRow(this);
- TextView textView1 = new TextView(this);
- textView1.setText("用户名:");
- tableRow1.addView(textView1);
- EditText userEdit = new EditText(this);
- tableRow1.addView(userEdit);
- tlayout.addView(tableRow1);
- TableRow tableRow2 = new TableRow(this);
- TextView textView2 = new TextView(this);
- textView2.setText("密码:");
- tableRow2.addView(textView2);
- EditText passEdit = new EditText(this);
- tableRow2.addView(passEdit);
- tlayout.addView(tableRow2);
- TableRow tableRow3 = new TableRow(this);
- Button btn0 = new Button(this);
- btn0.setText("登录");
- tableRow3.addView(btn0);
- Button btn1 = new Button(this);
- btn1.setText("注册");
- tableRow3.addView(btn1);
- tlayout.addView(tableRow3);
- setContentView(tlayout);
- }
- }
效果图:

线性布局:
- package cn.csdn.codeui;
- import android.app.Activity;
- import android.os.Bundle;
- import android.view.ViewGroup.LayoutParams;
- import android.widget.Button;
- import android.widget.EditText;
- import android.widget.LinearLayout;
- import android.widget.TextView;
- public class LoginLinearActivity extends Activity {
- @Override
- protected void onCreate(Bundle savedInstanceState) {
- // TODO Auto-generated method stub
- super.onCreate(savedInstanceState);
- init();
- }
- private void init() {
- //线性布局
- LinearLayout linearLayout = new LinearLayout(this);
- /**android:orientation="vertical"*/
- linearLayout.setOrientation(LinearLayout.VERTICAL);
- LayoutParams layoutParams = new LayoutParams(LayoutParams.FILL_PARENT,
- LayoutParams.FILL_PARENT);
- //////////
- TextView userText = new TextView(this);
- userText.setText("用户名:");
- LayoutParams userTextParams = new LayoutParams(
- LayoutParams.FILL_PARENT, LayoutParams.WRAP_CONTENT);
- linearLayout.addView(userText, userTextParams);
- //////////
- EditText userEdit = new EditText(this);
- LayoutParams userEditParams = new LayoutParams(
- LayoutParams.FILL_PARENT, LayoutParams.WRAP_CONTENT);
- linearLayout.addView(userEdit, userEditParams);
- //////////
- TextView passText = new TextView(this);
- passText.setText("密码:");
- LayoutParams passTextParams = new LayoutParams(
- LayoutParams.FILL_PARENT, LayoutParams.WRAP_CONTENT);
- linearLayout.addView(passText, passTextParams);
- //////////
- EditText passEdit = new EditText(this);
- LayoutParams passEditParams = new LayoutParams(
- LayoutParams.FILL_PARENT, LayoutParams.WRAP_CONTENT);
- linearLayout.addView(passEdit, passEditParams);
- //////////
- Button login = new Button(this);
- login.setText("登陆");
- LayoutParams loginParams = new LayoutParams(LayoutParams.FILL_PARENT,
- LayoutParams.WRAP_CONTENT);
- linearLayout.addView(login, loginParams);
- //////////
- Button insert = new Button(this);
- insert.setText("注册");
- LayoutParams insertParams = new LayoutParams(LayoutParams.FILL_PARENT,
- LayoutParams.WRAP_CONTENT);
- linearLayout.addView(insert, insertParams);
- setContentView(linearLayout, layoutParams);
- }
- }
效果图:
Android成长之路-编码实现软件界面的更多相关文章
- Android成长之路-实现简单动画
实现简单动画: 在drawable目录中放入图片, 并且创建xml文件 frame.xml 存入图片,如下: <pre class="html" name="cod ...
- Android成长之路-手势库的创建
手势库的创建: 使用SDK自带的例子GestureBuilder建立手势库,这个文件夹存在于android\android-sdk-windows \samples\android-10\Gest ...
- Android成长之路-手势识别的实现
手势识别系统: 先把手势库放到项目中:(创建手势库见下一篇博客) 在res文件夹下新建一个名为raw的文件夹,然后把手势库放进去 然后开始项目的创建: strings.xml: <?xml ...
- Android成长之路-LayoutInflater和inflate的用法
在这里用Tabhost的例子来说明: package cn.csdn.activity; import android.app.TabActivity; import android.os.Bundl ...
- Android成长之路-实现监听器的三种方法
第一种: 在Test类中 定义一个类接口OnClickListener 第二种:直接在Test类上写一个接口 其中的this相当于new OnClickListener()对象, 即class ...
- 单片机成长之路(51基础篇) - 004 STC89C52MCU 软件实现系统复位
用户应用程序在运行过程中,有时会有特殊需求,需要实现单片机系统复位(热启动之一),传统的8051单片机由于硬件上未支持此功能,用户必须用软件模拟实现,实现起来较麻烦.STC单片机增加了相应的硬件功能, ...
- 【腾讯Bugly干货分享】JSPatch 成长之路
本文来自于腾讯bugly开发者社区,非经作者同意,请勿转载,原文地址:http://dev.qq.com/topic/579efa7083355a9a57a1ac5b Dev Club 是一个交流移动 ...
- 介绍开发Android手持终端PDA盘点APP软件
介绍开发Android手持终端PDA盘点APP软件 软件需要自动识别我导入的TXT格式或者excl格式的盘点表,然后自动生成一个复盘数据,做AB比对,界面上需要显示的有总数量,单品数量,条码,编码,商 ...
- --专访雷果国: 从1.5K到18K 一个程序员的5年成长之路--
导语:今年三月份,在CSDN博客和新浪微博上有一篇<从1.5K到18K,一个程序员的5年成长之路>被众人分享和传阅,这篇博文首先介绍了作者自学之初薄弱的基础,然后通过流水账形式分享了那个从 ...
随机推荐
- 图解linux内核编译框架
内核是如何编译成的 -知其然而不知其所以然 (第一篇) 转载:http://blog.chinaunix.net/uid-28236237-id-3840137.html Linux内核有分门别类的目 ...
- Tor Browser(洋葱浏览器)——一款使你匿名上网的浏览器
第一次知道Tor是在有关斯诺登的新闻报道中. 简单说Tor是一款是你匿名访问网络的的软件.用户通过Tor可以在因特网上进行匿名交流. 为了实现匿名目的,Tor把分散在全球的计算机集合起来形成一个加密回 ...
- How to create a Maven web app and deploy to Tomcat - fast
原文地址: http://www.blogjava.net/sealyu/archive/2010/01/08/308706.html Procedure Prerequisites and Assu ...
- FAQ:Domain Event 和 C# 中的 Event 有啥区别?
问: Domain Event 和 C# 中的 Event 有啥区别? 答: C# 中的 Event,事件.监听者列表和事件发布器是由一个类型承担,事件源和监听者之间的生命周期耦合在一起,C# 帮你提 ...
- ExtJs4.0日期控件只显示年月按年月格式会跳月的解决办法
如果是Ext.form.panel的话,只要设置一下属性就可以.如下代码: { text : '期间', width : 80, sortable : true, dataIndex : 'accou ...
- 14.ThreadLocal
ThreadLocal 1.线程局部变量,是一种多线程并发访问变量的解决方案,与同步技术 synchronize 加锁的方式不同,threadlocal完全不提供锁,而使用 空间 ...
- M1卡说明及使用proxmark3破解方法
看了网上写的一些关于M1卡的文章,多数有些误导之嫌.首先谈谈M1卡的规格,M1卡的容量为1KB,好多网上写8KB,这里其实是有个误区,应该是8K位.1Byte=1B=8位.其实也就是说8k位想到于1K ...
- Django admin管理
admin的配置 admin是django强大功能之一,它能共从数据库中读取数据,呈现在页面中,进行管理.默认情况下,它的功能已经非常强大,如果你不需要复杂的功能,它已经够用,但是有时候,一些特殊的功 ...
- django from表单基础知识点
今日概要: - 内容拾遗 - 分页 - Form验证 1.内容拾遗 - 新URL -提交时,保留之前的内容? - 对话框 - var data = $('#fmForm表单的ID').serializ ...
- Dialog 样式 主题 标题 背景 使用【总结】
最重要的是这两行代码 dialog.requestWindowFeature(Window.FEATURE_NO_TITLE);//设置Dialog没有标题,需在setContentView之前设置 ...