
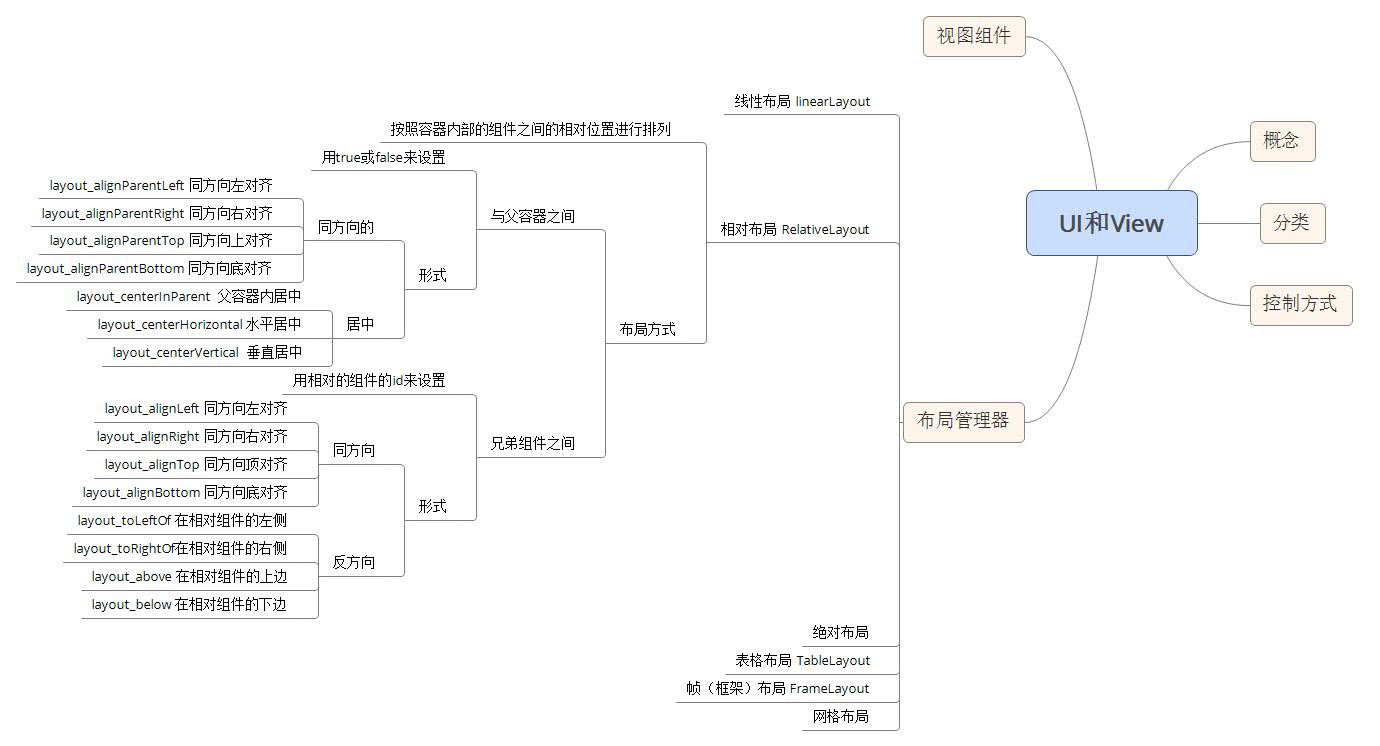
Android——RelativeLayout(相对布局)
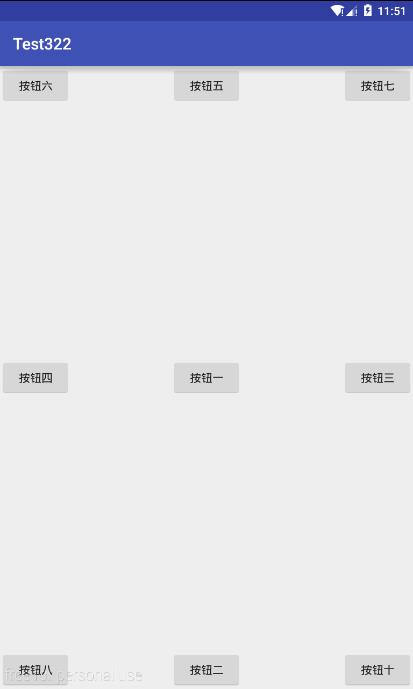
一、相对于父容器
1.居中
2.同方向
<?xml version="1.0" encoding="utf-8"?>

<RelativeLayout xmlns:android="http://schemas.android.com/apk/res/android"

    android:layout_width="match_parent"

    android:layout_height="match_parent">

    <!--相对于父容器

    1.居中

    2.同方向对齐方式

    -->

    <Button

        android:layout_width="wrap_content"

        android:layout_height="wrap_content"

        android:text="按钮一"

        android:layout_centerInParent="true"

        /><!--位于父容器居中位置-->

    <Button

        android:layout_width="wrap_content"

        android:layout_height="wrap_content"

        android:text="按钮二"

        android:layout_alignParentBottom="true"

        android:layout_centerHorizontal="true"

        /><!--与父容器底端对齐-->

          <!--位于父容器水平居中位置-->

    <Button

        android:layout_width="wrap_content"

        android:layout_height="wrap_content"

        android:text="按钮三"

        android:layout_alignParentRight="true"

        android:layout_centerVertical="true"

        /><!--与父容器右侧对齐-->

          <!--位于父容器垂直居中位置-->

    <Button

        android:layout_width="wrap_content"

        android:layout_height="wrap_content"

        android:text="按钮四"

        android:layout_alignParentLeft="true"

        android:layout_centerVertical="true"

        /><!--与父容器左侧对齐-->

    <!--位于父容器垂直居中位置-->

    <Button

        android:layout_width="wrap_content"

        android:layout_height="wrap_content"

        android:text="按钮五"

        android:layout_alignParentTop="true"

        android:layout_centerHorizontal="true"

        /><!--与父容器顶端对齐-->

    <!--位于父容器水平居中位置-->

    <Button

        android:layout_width="wrap_content"

        android:layout_height="wrap_content"

        android:text="按钮六"

        /><!--与父容器左侧对齐-->

    <!--与父容器顶端对齐-->

    <!--默认位置-->

    <Button

        android:layout_width="wrap_content"

        android:layout_height="wrap_content"

        android:text="按钮七"

        android:layout_alignParentRight="true"

        /><!--与父容器右侧对齐-->

    <!--与父容器顶端对齐-->

    <Button

        android:layout_width="wrap_content"

        android:layout_height="wrap_content"

        android:text="按钮八"

        android:layout_alignParentLeft="true"

        android:layout_alignParentBottom="true"

        /><!--与父容器左侧对齐-->

    <!--与父容器底端对齐-->

    <Button

        android:layout_width="wrap_content"

        android:layout_height="wrap_content"

        android:text="按钮十"

        android:layout_alignParentRight="true"

        android:layout_alignParentBottom="true"

      /><!--与父容器右侧对齐-->

    <!--与父容器底端对齐-->

</RelativeLayout>
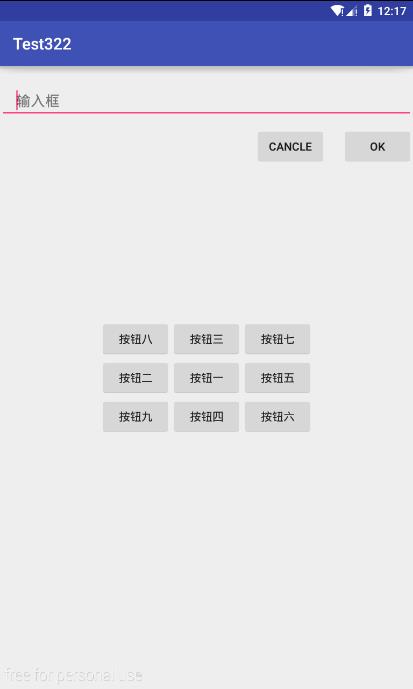
二、与兄弟组件的相对位置
1.同方向
2.反方向
+lay_outmargin +padding
<?xml version="1.0" encoding="utf-8"?>

<RelativeLayout xmlns:android="http://schemas.android.com/apk/res/android"

    android:layout_width="match_parent"

    android:layout_height="match_parent">

    <!--与兄弟组件之间

    1.同方向

    2.反方向-->

    <!--margin  外边距

    padding   内间距

    -->

    <Button

        android:layout_width="wrap_content"

        android:layout_height="wrap_content"

        android:text="按钮一"

        android:layout_centerInParent="true"

        android:id="@+id/bt"/><!--父容器内居中-->

    <Button

        android:layout_width="wrap_content"

        android:layout_height="wrap_content"

        android:text="按钮二"

        android:layout_alignTop="@id/bt"

        android:layout_toLeftOf="@id/bt"/>

    //相对于按钮一  顶部对齐  位于左侧

    <Button

        android:layout_width="wrap_content"

        android:layout_height="wrap_content"

        android:text="按钮三"

        android:layout_alignRight="@id/bt"

        android:layout_above="@id/bt"/>

    //相对于按钮一  右侧对齐  位于上方

    <Button

        android:layout_width="wrap_content"

        android:layout_height="wrap_content"

        android:text="按钮四"

        android:layout_alignRight="@id/bt"

        android:layout_below="@id/bt"/>

    //相对于按钮一  右侧对齐  位于下方

    <Button

        android:layout_width="wrap_content"

        android:layout_height="wrap_content"

        android:text="按钮五"

        android:layout_alignTop="@id/bt"

        android:layout_toRightOf="@id/bt"/>

    //相对于按钮一  顶部对齐  位于右侧

    <Button

        android:layout_width="wrap_content"

        android:layout_height="wrap_content"

        android:text="按钮六"

        android:layout_toRightOf="@id/bt"

        android:layout_below="@id/bt"/>

    //相对于按钮一  位于右侧  位于下方

    <Button

        android:layout_width="wrap_content"

        android:layout_height="wrap_content"

        android:text="按钮七"

        android:layout_toRightOf="@id/bt"

        android:layout_above="@id/bt"/>

    //相对于按钮一  位于右侧  位于上方

    <Button

        android:layout_width="wrap_content"

        android:layout_height="wrap_content"

        android:text="按钮八"

        android:layout_toLeftOf="@id/bt"

        android:layout_above="@id/bt"/>

    //相对于按钮一  位于左侧  位于上方

    <Button

        android:layout_width="wrap_content"

        android:layout_height="wrap_content"

        android:text="按钮九"

        android:layout_toLeftOf="@id/bt"

        android:layout_below="@id/bt"/>

    //相对于按钮一  位于左侧  位于下方

    <EditText

        android:layout_width="match_parent"

        android:layout_height="wrap_content"

        android:hint="输入框"

        android:id="@+id/et"

        android:paddingLeft="20dp"

        android:layout_marginTop="20dp"

        android:layout_marginBottom="10dp"/>

    //内左侧间距20dp 上边距20dp 下边距10dp

    <Button

        android:layout_width="wrap_content"

        android:layout_height="wrap_content"

        android:text="OK"

        android:layout_alignParentRight="true"

        android:layout_below="@id/et"

        android:id="@+id/ok"/>

    //ok按钮  位于父窗口右侧  输入框下方

    <Button

        android:layout_width="wrap_content"

        android:layout_height="wrap_content"

        android:text="CANCLE"

        android:layout_alignTop="@id/ok"

        android:layout_toLeftOf="@id/ok"

        android:layout_marginRight="20dp"/>

    //cancle按钮  相对于ok按钮顶部对齐 位于左侧 右边距20dp

</RelativeLayout>
Android——RelativeLayout(相对布局)的更多相关文章
- Android RelativeLayout相对布局
RelativeLayout是相对布局控件:以控件之间相对位置或相对父容器位置进行排列. 相对布局常用属性: 子类控件相对子类控件:值是另外一个控件的id android:layout_above-- ...
- Android开发重点难点1:RelativeLayout(相对布局)详解
前言 啦啦啦~博主又推出了一个新的系列啦~ 之前的Android开发系列主要以完成实验的过程为主,经常会综合许多知识来写,所以难免会有知识点的交杂,给人一种混乱的感觉. 所以博主推出“重点难点”系列, ...
- Android开发3:Intent、Bundle的使用和ListView的应用 、RelativeLayout(相对布局)简述(简单通讯录的实现)
前言 啦啦啦~博主又来骚扰大家啦~大家是不是感觉上次的Android开发博文有点长呢~主要是因为博主也是小白,在做实验的过程中查询了很多很多概念,努力去理解每一个知识点,才完成了最终的实验.还有就是随 ...
- Android(java)学习笔记164:Relativelayout相对布局案例
我们看看案例代码,自己心领神会: <?xml version="1.0" encoding="utf-8"?> <RelativeLayout ...
- 第13章、布局Layouts之RelativeLayout相对布局(从零開始学Android)
RelativeLayout相对布局 RelativeLayout是一种相对布局,控件的位置是依照相对位置来计算的,后一个控件在什么位置依赖于前一个控件的基本位置,是布局最经常使用,也是最灵活的一种布 ...
- Android开发之布局--RelativeLayout布局
RelativeLayout 相对布局 true或false属性 Layout_centerHorizontal 当控件位于父控件的横向中间位置 Layout_centerVertical 当 ...
- Android精通:TableLayout布局,GridLayout网格布局,FrameLayout帧布局,AbsoluteLayout绝对布局,RelativeLayout相对布局
在Android中提供了几个常用布局: LinearLayout线性布局 RelativeLayout相对布局 FrameLayout帧布局 AbsoluteLayout绝对布局 TableLayou ...
- Android精通:View与ViewGroup,LinearLayout线性布局,RelativeLayout相对布局,ListView列表组件
UI的描述 对于Android应用程序中,所有用户界面元素都是由View和ViewGroup对象构建的.View是绘制在屏幕上能与用户进行交互的一个对象.而对于ViewGroup来说,则是一个用于存放 ...
- Android(java)学习笔记107:Relativelayout相对布局
1. Relativelayout相对布局案例: 我们看看案例代码,自己心领神会: <?xml version="1.0" encoding="utf-8" ...
随机推荐
- 怎样改动android系统字体大小
改动字体大小的方法是运用到一个ActivityManagerNative类 首先先在代码宣告 private Configuration mconfig = new Configuration(); ...
- [Firebase] 2. Firebase Event Handling
/** * Created by Answer1215 on 11/9/2014. */ var app = angular.module('app', ['firebase']); app.cons ...
- Android Activity的生命周期的几个方法介绍
onCreate():创建Activity调用,用于Activity的初始化,还有个Bundle类型的参数,可以访问以前存储的状态. onStart():Activity在屏幕上对用户可见时调用 on ...
- SQL2005 镜像配置
新添加了一台服务器,做原来服务器的备份机,用交叉线+双网卡配置了内网. 系统环境:Windows 2008 R2 数据库:SQL2005 SP3 设置镜像可以用证书和域两种情况,不过域设置的权限比 ...
- 转:sock_ev——linux平台socket事件框架(logTrace) .
写代码要有调试log,采用syslog的输出:一般会输出到"/var/log/messages" /**************************************** ...
- 基于olami开放语义平台的微信小程序遥知之源码实现
概述 实现一个智能生活信息查询的小秘书功能,支持查天气.新闻.日历.汇率.笑话.故事.百科.诗词.邮编.区号.菜谱.股票.节目预告,还支持闲聊.算24点.数学计算.单位换算.购物.搜索等功能. 使用方 ...
- maven web配置发布路径 cargo自动部署项目到tomcat
pom.xml中加入以下 配置发布路径 <build> <!-- 发布名 www.locathost:8080/HelloWeb可以访问,如果改成ROOT那么 默认的tomcat也就 ...
- perl: warning: Setting locale failed.
本篇文章由:http://xinpure.com/perl-warning-setting-locale-failed/ 将 mac 系统切换成英文后,使用 git 命令出现如下错误: perl: w ...
- 探秘蓝牙隐藏API
上次讲解Android的蓝牙基本用法,这次讲得深入些,探讨下蓝牙方面的隐藏API.用过Android系统设置(Setting)的人都知道蓝牙搜索之后可以建立配对和解除配对,但是这两项功能的函数没有在S ...
- Node Redis 小试
Redis 是一个高性能的 key-value 数据库,为了保证效率,数据都是缓存在内存中,在执行频繁而又复杂的数据库查询条件时,可以使用 Redis 缓存一份查询结果,以提升应用性能. 背景 如果一 ...