SpringBoot 2.3 整合最新版 ShardingJdbc + Druid + MyBatis
今天项目不忙,想搞一下shardingJDBC分库分表看看,主要想实现以下几点:
- 舍弃xml配置,使用.yml或者.properties文件+java的方式配置spring。
- 使用 Druid 作为数据库连接池,同时开启监控界面,并支持监控多数据源。
- 不依赖 com.dangdang 的 sharding-jdbc-core 包。此包过于古老,最后一次更新在2016年。目测只是封装了一层,意义不大。感觉如果不是dangdang公司内部开发,没必要用这个包。(且本人实测不能和最新的Druid包一起用,insert语句报错)
折腾了半天,网上找的例子大部分跑不通。直接自己从零开搞,全部组件直接上当前最新版本。
SpringBoot: 2.3.0
mybatis: 2.1.3
druid: 1.1.22
sharding-jdbc: 4.1.1
注意:这里因为是自己边看源码边配置,(sharding官网的例子可能是版本问题基本没法用,GitHub 我这里网络基本打不开),所以数据源和sharding大部分用java代码配置。部分配置,应该可以简化到 .yml / .properties 文件中。如您有兴趣优化,成功后可发一份demo给116269651@qq.com,感谢。
Sharding-JDBC简介
Apache ShardingSphere 是一套开源的分布式数据库中间件解决方案组成的生态圈,它由 JDBC、Proxy 和 Sidecar(规划中)这 3 款相互独立,却又能够混合部署配合使用的产品组成。
Sharding-JDBC定位为轻量级 Java 框架,在 Java 的 JDBC 层提供的额外服务。 它使用客户端直连数据库,以 jar 包形式提供服务,无需额外部署和依赖,可理解为增强版的 JDBC 驱动,完全兼容 JDBC 和各种 ORM 框架。
- 适用于任何基于 JDBC 的 ORM 框架,如:JPA, Hibernate, Mybatis, Spring JDBC Template 或直接使用 JDBC。
- 支持任何第三方的数据库连接池,如:DBCP, C3P0, BoneCP, Druid, HikariCP 等。
- 支持任意实现JDBC规范的数据库。目前支持 MySQL,Oracle,SQLServer,PostgreSQL 以及任何遵循 SQL92 标准的数据库。
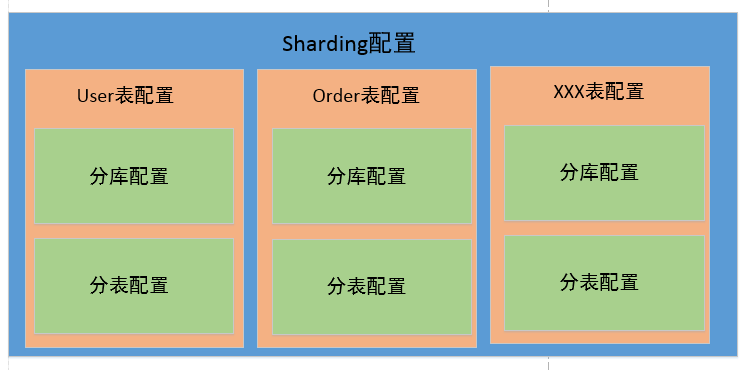
Sharding配置示意图
简单的理解如下图,对sharding-jdbc进行配置,其实就是对所有需要进行分片的表进行配置。对表的配置,则主要是对分库的配置和分表的配置。这里可以只分库不分表,或者只分表不分库,或者同时包含分库和分表逻辑。
先看一下我的项目目录结构整体如下:

一、POM依赖配置
完整的pom表如下,其中主要是对 mysql-connector-java、mybatis-spring-boot-starter、druid-spring-boot-starter、sharding-jdbc-core 的依赖。
注意:sharding-jdbc-core 我用的4.0+的版本,因为已经晋升为 apache 基金会的顶级项目,其 groupId 变为了 org.apache.shardingsphere,之前是io.shardingsphere。


<?xml version="1.0" encoding="UTF-8"?>

<project xmlns="http://maven.apache.org/POM/4.0.0" xmlns:xsi="http://www.w3.org/2001/XMLSchema-instance"

         xsi:schemaLocation="http://maven.apache.org/POM/4.0.0 https://maven.apache.org/xsd/maven-4.0.0.xsd">

    <modelVersion>4.0.0</modelVersion>

    <parent>

        <groupId>org.springframework.boot</groupId>

        <artifactId>spring-boot-starter-parent</artifactId>

        <version>2.3.0.RELEASE</version>

        <relativePath/> <!-- lookup parent from repository -->

    </parent>

    <groupId>com.example</groupId>

    <artifactId>shardingjdbc</artifactId>

    <version>0.0.1-SNAPSHOT</version>

    <name>shardingjdbc</name>

    <description>Demo project for Spring Boot</description>

    <properties>

        <!--<sharding.jdbc.version>3.0.0</sharding.jdbc.version>-->

        <java.version>1.8</java.version>

    </properties>

    <dependencies>

        <dependency>

            <groupId>org.springframework.boot</groupId>

            <artifactId>spring-boot-starter-web</artifactId>

        </dependency>

        <dependency>

            <groupId>org.springframework</groupId>

            <artifactId>spring-tx</artifactId>

        </dependency>

        <dependency>

            <groupId>mysql</groupId>

            <artifactId>mysql-connector-java</artifactId>

            <scope>runtime</scope>

        </dependency>

        <dependency>

            <groupId>org.mybatis.spring.boot</groupId>

            <artifactId>mybatis-spring-boot-starter</artifactId>

            <version>2.1.3</version>

        </dependency>

        <dependency>

            <groupId>com.alibaba</groupId>

            <artifactId>druid-spring-boot-starter</artifactId>

            <version>1.1.22</version>

        </dependency>

        <dependency>

            <groupId>org.apache.shardingsphere</groupId>

            <artifactId>sharding-jdbc-core</artifactId>

            <version>4.1.1</version>

        </dependency>

        <dependency>

            <groupId>org.projectlombok</groupId>

            <artifactId>lombok</artifactId>

            <optional>true</optional>

        </dependency>

        <dependency>

            <groupId>org.springframework.boot</groupId>

            <artifactId>spring-boot-starter-test</artifactId>

            <scope>test</scope>

            <exclusions>

                <exclusion>

                    <groupId>org.junit.vintage</groupId>

                    <artifactId>junit-vintage-engine</artifactId>

                </exclusion>

            </exclusions>

        </dependency>

        <dependency>

            <groupId>log4j</groupId>

            <artifactId>log4j</artifactId>

            <version>1.2.16</version>

        </dependency>

        <dependency>

            <groupId>org.slf4j</groupId>

            <artifactId>slf4j-log4j12</artifactId>

            <version>1.7.5</version>

        </dependency>

    </dependencies>

    <build>

        <resources>

            <resource>

                <directory>src/main/java</directory>

                <includes>

                    <include>**/*.xml</include>

                </includes>

            </resource>

        </resources>

        <plugins>

            <plugin>

                <groupId>org.apache.maven.plugins</groupId>

                <artifactId>maven-compiler-plugin</artifactId>

                <configuration>

                    <source>1.8</source>

                    <target>1.8</target>

                    <encoding>UTF-8</encoding>

                </configuration>

            </plugin>

            <plugin>

                <groupId>org.springframework.boot</groupId>

                <artifactId>spring-boot-maven-plugin</artifactId>

            </plugin>

        </plugins>

    </build>

</project>
pom.xml
二、application.properties
这里配置了两个数据源,目前还没试过自动装配多个数据源。为避免自动装备产生问题,属性前缀要和自动装备扫描的区分开,这里我用 datasource0 和 datasource1。
下面 spring.datasource.druid 开头的配置,会被 druid 的代码自动扫描装配。
#################################### common config : ####################################

spring.application.name=shardingjdbc

# 应用服务web访问端口

server.port=8080

# mybatis配置

mybatis.mapper-locations=classpath:com/example/shardingjdbc/mapper/*.xml

mybatis.type-aliases-package=com.example.shardingjdbc.**.entity

datasource0.url=jdbc:mysql://localhost:3306/test0?useUnicode=true&characterEncoding=utf-8&useSSL=false&serverTimezone=Asia/Shanghai

datasource0.driver-class-name=com.mysql.cj.jdbc.Driver

datasource0.type=com.alibaba.druid.pool.DruidDataSource

datasource0.username=root

datasource0.password=852278

datasource1.url=jdbc:mysql://localhost:3306/test1?useUnicode=true&characterEncoding=utf-8&useSSL=false&serverTimezone=Asia/Shanghai

datasource1.driver-class-name=com.mysql.cj.jdbc.Driver

datasource1.type=com.alibaba.druid.pool.DruidDataSource

datasource1.username=root

datasource1.password=852278

#

##### 连接池配置 #######

# 过滤器设置(第一个stat很重要,没有的话会监控不到SQL)

spring.datasource.druid.filters=stat,wall,log4j2

##### WebStatFilter配置 #######

#启用StatFilter

spring.datasource.druid.web-stat-filter.enabled=true

#添加过滤规则

spring.datasource.druid.web-stat-filter.url-pattern=/*

#排除一些不必要的url

spring.datasource.druid.web-stat-filter.exclusions=*.js,*.gif,*.jpg,*.png,*.css,*.ico,/druid/*

#开启session统计功能

spring.datasource.druid.web-stat-filter.session-stat-enable=true

#缺省sessionStatMaxCount是1000个

spring.datasource.druid.web-stat-filter.session-stat-max-count=1000

#spring.datasource.druid.web-stat-filter.principal-session-name=

#spring.datasource.druid.web-stat-filter.principal-cookie-name=

#spring.datasource.druid.web-stat-filter.profile-enable=

##### StatViewServlet配置 #######

#启用内置的监控页面

spring.datasource.druid.stat-view-servlet.enabled=true

#内置监控页面的地址

spring.datasource.druid.stat-view-servlet.url-pattern=/druid/*

#关闭 Reset All 功能

spring.datasource.druid.stat-view-servlet.reset-enable=false

#设置登录用户名

spring.datasource.druid.stat-view-servlet.login-username=admin

#设置登录密码

spring.datasource.druid.stat-view-servlet.login-password=123

#白名单(如果allow没有配置或者为空,则允许所有访问)

spring.datasource.druid.stat-view-servlet.allow=127.0.0.1

#黑名单(deny优先于allow,如果在deny列表中,就算在allow列表中,也会被拒绝)

spring.datasource.druid.stat-view-servlet.deny=
三、数据源和分片配置
如下代码,先从配置文件读取数据源的所需要的属性,然后生成 Druid 数据源。注意这里配置语句中的 setFilters,如果不添加 filters,则 Duird 监控界面无法监控到sql。另外,其他诸如最大连接数之类的属性这里没有配,按需配置即可。数据源创建好后,添加到 dataSourceMap 集合中。
再往下注释比较清楚,构造 t_user 表的分片规则(包括分库规则 + 分表规则),然后将所有表的分片规则组装成 ShardingRuleConfiguration。
最后,将前两步配好的 dataSourceMap 和 shardingRuleConfiguration 交给 ShardingDataSourceFactory,用来构造数据源。
到这里,sharding 、druid 的配置代码就都写好了。剩下基本都是业务代码了。
package com.example.shardingjdbc.config;

import com.alibaba.druid.pool.DruidDataSource;

import com.example.shardingjdbc.sharding.UserShardingAlgorithm;

import org.apache.shardingsphere.api.config.sharding.ShardingRuleConfiguration;

import org.apache.shardingsphere.api.config.sharding.TableRuleConfiguration;

import org.apache.shardingsphere.api.config.sharding.strategy.StandardShardingStrategyConfiguration;

import org.apache.shardingsphere.shardingjdbc.api.ShardingDataSourceFactory;

import org.springframework.beans.factory.annotation.Value;

import org.springframework.context.annotation.Bean;

import org.springframework.context.annotation.Configuration;

import javax.sql.DataSource;

import java.util.HashMap;

import java.util.Map;

import java.util.Properties;

@Configuration

public class DataSourceConfig {

    @Value("${datasource0.url}")

    private String url0;

    @Value("${datasource0.username}")

    private String username0;

    @Value("${datasource0.password}")

    private String password0;

    @Value("${datasource0.driver-class-name}")

    private String driverClassName0;

    @Value("${datasource1.url}")

    private String url1;

    @Value("${datasource1.username}")

    private String username1;

    @Value("${datasource1.password}")

    private String password1;

    @Value("${datasource1.driver-class-name}")

    private String driverClassName1;

    @Value(("${spring.datasource.druid.filters}"))

    private String filters;

    @Bean("dataSource")

    public DataSource dataSource() {

        try {

            DruidDataSource dataSource0 = new DruidDataSource();

            dataSource0.setDriverClassName(this.driverClassName0);

            dataSource0.setUrl(this.url0);

            dataSource0.setUsername(this.username0);

            dataSource0.setPassword(this.password0);

            dataSource0.setFilters(this.filters);

            DruidDataSource dataSource1 = new DruidDataSource();

            dataSource1.setDriverClassName(this.driverClassName1);

            dataSource1.setUrl(this.url1);

            dataSource1.setUsername(this.username1);

            dataSource1.setPassword(this.password1);

            dataSource1.setFilters(this.filters);

            //分库设置

            Map<String, DataSource> dataSourceMap = new HashMap<>(2);

            //添加两个数据库database0和database1

            dataSourceMap.put("ds0", dataSource0);

            dataSourceMap.put("ds1", dataSource1);

            // 配置 t_user 表规则

            TableRuleConfiguration userRuleConfiguration = new TableRuleConfiguration("t_user", "ds${0..1}.t_user${0..1}");

            // 配置分表规则

            userRuleConfiguration.setTableShardingStrategyConfig(new StandardShardingStrategyConfiguration("id", UserShardingAlgorithm.tableShardingAlgorithm));

            // 配置分库规则

            userRuleConfiguration.setDatabaseShardingStrategyConfig(new StandardShardingStrategyConfiguration("id", UserShardingAlgorithm.databaseShardingAlgorithm));

            // Sharding全局配置

            ShardingRuleConfiguration shardingRuleConfiguration = new ShardingRuleConfiguration();

            shardingRuleConfiguration.getTableRuleConfigs().add(userRuleConfiguration);

            // 创建数据源

            DataSource dataSource = ShardingDataSourceFactory.createDataSource(dataSourceMap, shardingRuleConfiguration, new Properties());

            return dataSource;

        } catch (Exception ex) {

            ex.printStackTrace();

            return null;

        }

    }

}
DataSourceConfig.java
上面构造分片规则的时候,我定义了User表的分片算法类 UserShardingAlgorithm,并定义了两个内部类分别实现了数据库分片和表分片的逻辑。代码如下:
package com.example.shardingjdbc.sharding;

import org.apache.shardingsphere.api.sharding.standard.PreciseShardingAlgorithm;

import org.apache.shardingsphere.api.sharding.standard.PreciseShardingValue;

import java.util.Collection;

public class UserShardingAlgorithm {

    public static final DatabaseShardingAlgorithm databaseShardingAlgorithm = new DatabaseShardingAlgorithm();

    public static final TableShardingAlgorithm tableShardingAlgorithm = new TableShardingAlgorithm();

    static class DatabaseShardingAlgorithm implements PreciseShardingAlgorithm<Long> {

        @Override

        public String doSharding(Collection<String> databaseNames, PreciseShardingValue<Long> shardingValue) {

            for (String database : databaseNames) {

                if (database.endsWith(String.valueOf(shardingValue.getValue() % 2))) {

                    return database;

                }

            }

            return "";

        }

    }

    static class TableShardingAlgorithm implements PreciseShardingAlgorithm<Long> {

        @Override

        public String doSharding(Collection<String> tableNames, PreciseShardingValue<Long> shardingValue) {

            for (String table : tableNames) {

                if (table.endsWith(String.valueOf(shardingValue.getValue() % 2))) {

                    return table;

                }

            }

            return "";

        }

    }

}
UserShardingAlgorithm.java
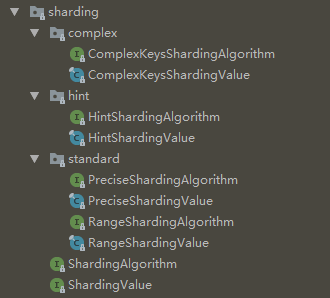
这里实现分片规则时,实现的接口是 PreciseShardingAlgorithm,即精确分片,将指定的键值记录映射到指定的1张表中(最多1张表)。这个接口基本上能满足80%的需求了。
其他的还有 Range、ComplexKey、Hint分片规则,这3种都可以将符合条件的键值记录映射到多张表,即可以将记录 a 同时插入A、B 或 B、C多张表中。
其中,
Range 是范围筛选分片。我个人理解,比如id尾数1-5插入A表,6-0插入B表,这种情况,使用Range作为筛选条件更方便。也可以根据时间范围分片。(如有误请指正)。
ComplexKey 看名字就是组合键分片,可以同时根据多个键,制定映射规则。
Hint 看名字没看懂,但看源码其实也是组合键分片,但仅支持对组合键进行精确筛选。
而 ComplexKey 支持对组合键进行范围筛选。所以可以理解为 ComplexKey 是 Hint 的高级版本。
不管实现哪种分片算法,都要确保算法覆盖所有可能的键值。
四、使用行表达式配置分片策略(对第三步优化,可略过)
上面第三步,我们通过实现 PreciseShardingValue 接口,来定义分片算法。这样每有一张表需要分片,都要重新定义一个类,太麻烦。
Sharding 提供了行表达式配置的方式,对简单的分片逻辑,直接定义一个行表达式即可。(这种方式其实就是直接在 .yml 文件中配置分片策略的解析方式)
和上面的代码类似,这里之改动了6、8行,直接 new 一个 InlineShardingStrategyConfiguration,省去了定义分片算法类的繁琐步骤。
              // .....省略其他代码

             // 配置 t_user 表规则

             TableRuleConfiguration userRuleConfiguration = new TableRuleConfiguration("t_user", "ds${0..1}.t_user${0..1}");

             // 行表达式分表规则

             userRuleConfiguration.setTableShardingStrategyConfig(new InlineShardingStrategyConfiguration("id", "t_user${id % 2}"));

             // 行表达式分库规则

             userRuleConfiguration.setDatabaseShardingStrategyConfig(new InlineShardingStrategyConfiguration("id", "ds${id % 2}"));

             // Sharding全局配置

             ShardingRuleConfiguration shardingRuleConfiguration = new ShardingRuleConfiguration();

             shardingRuleConfiguration.getTableRuleConfigs().add(userRuleConfiguration);

             // 创建数据源

             DataSource dataSource = ShardingDataSourceFactory.createDataSource(dataSourceMap, shardingRuleConfiguration, new Properties());

             return dataSource;
五、分布式主键(雪花算法)
分库后,不能再使用 mysql 的自增主键,否则会产生重复主键。自定义主键,主要需要解决两个问题:
- 主键唯一(必须)
- 主键单调递增(可选)(提升索引效率,减少索引重排产生的空间碎片)
Sharding 内部提供了2个主键生成器,一个使用雪花算法 SnowflakeShardingKeyGenerator,一个使用 UUID(考虑上面第2条,因此不使用 UUID)。
雪花算法的主要原理:用一个 64 bit 的 long 型数字做主键。其中,
第 1 位,1 bit 作为符号位永远为 0,表示是正数。
第 2 - 42 位, 41 个 bit 填充时间戳。
第 43 - 52 位,10 个 bit 填充机器唯一id。举个例子,可以用前4位标识机房号,后6位标识机器号。:表示的是机房
第 53 - 64 位,12 个 bit 填充id序号。范围 0 - 4095,即每台机器每 1 毫秒最多生成 4096 个不同的主键id。
雪花算法的主要实现代码如下:
- 先判断时钟是否回调。这里默认容忍回调时间为0,如有回调则会产生异常。可以通过配置 max.tolerate.time.difference.milliseconds 属性,让其自旋等待时钟回到上一次执行时间。
- 按当前毫秒数,递增生成id序号。如果时钟进入了下一毫秒,则从0开始重新生成id序号。
- 将 时间戳 + 机器序号 + id序号 拼装成 主键id。这里机器序号默认为0,可以通过 worker.id 属性进行配置。不同的服务器需要配置成不同的数字,范围 0 - 1023。
其中 EPOCH 是时钟基准,sharding中设置的是2016年11月1日,那么41位的时间戳差不多可以用70年,一直到2086年。
    public synchronized Comparable<?> generateKey() {

        long currentMilliseconds = timeService.getCurrentMillis();

        if (this.waitTolerateTimeDifferenceIfNeed(currentMilliseconds)) {

            currentMilliseconds = timeService.getCurrentMillis();

        }

        if (this.lastMilliseconds == currentMilliseconds) {

            if (0L == (this.sequence = this.sequence + 1L & 4095L)) {

                currentMilliseconds = this.waitUntilNextTime(currentMilliseconds);

            }

        } else {

            this.vibrateSequenceOffset();

            this.sequence = (long)this.sequenceOffset;

        }

        this.lastMilliseconds = currentMilliseconds;

        return currentMilliseconds - EPOCH << 22 | this.getWorkerId() << 12 | this.sequence;

    }
五、业务代码
使用分布式的主键ID生成器,需要给不同的表注入不同的ID生成器,在config包下加一个KeyIdConfig类,如下:
这里,为了保持时钟的统一,可以可以专门找一台机器作为时钟服务,然后给所有主键生成器配置时钟服务。
@Configuration

public class KeyIdConfig {

    @Bean("userKeyGenerator")

    public SnowflakeShardingKeyGenerator userKeyGenerator() {

        return new SnowflakeShardingKeyGenerator();

    }

    @Bean("orderKeyGenerator")

    public SnowflakeShardingKeyGenerator orderKeyGenerator() {

        return new SnowflakeShardingKeyGenerator();

    }

}
其他业务代码,整体如下:
package com.example.shardingjdbc.entity;

import lombok.Data;

import java.io.Serializable;

import java.util.Date;

@Data

public class User implements Serializable {

    private Long id;

    private String name;

    private String phone;

    private String email;

    private String password;

    private Integer cityId;

    private Date createTime;

    private Integer sex;

}
User.java
package com.example.shardingjdbc.mapper;

import com.example.shardingjdbc.entity.User;

import org.apache.ibatis.annotations.Mapper;

import java.util.List;

public interface UserMapper {

    /**

     * 保存

     */

    void save(User user);

    /**

     * 查询

     * @param id

     * @return

     */

    User get(Long id);

}
UserMapper.java
<?xml version="1.0" encoding="UTF-8" ?>

<!DOCTYPE mapper PUBLIC "-//mybatis.org//DTD Mapper 3.0//EN" "http://mybatis.org/dtd/mybatis-3-mapper.dtd">

<mapper namespace="com.example.shardingjdbc.mapper.UserMapper">

    <resultMap id="resultMap" type="com.example.shardingjdbc.entity.User">

        <id column="id" property="id" />

        <result column="name" property="name" />

        <result column="phone" property="phone"  />

        <result column="email" property="email"  />

        <result column="password" property="password"  />

        <result column="city_id" property="cityId"  />

        <result column="create_time" property="createTime"  />

        <result column="sex" property="sex"  />

    </resultMap>

    <insert id="save">

        insert into t_user (id, name, phone, email, password, city_id, create_time, sex)

        values (#{id}, #{name}, #{phone}, #{email}, #{password}, #{cityId}, #{createTime}, #{sex})

    </insert>

    <select id="get" resultMap="resultMap">

        select *

        from t_user

        where id = #{id}

    </select>

</mapper>
UserMapper.xml
 package com.example.shardingjdbc.controller;

 import com.example.shardingjdbc.entity.User;

 import com.example.shardingjdbc.mapper.UserMapper;

 import org.apache.shardingsphere.core.strategy.keygen.SnowflakeShardingKeyGenerator;

 import org.springframework.beans.factory.annotation.Autowired;

 import org.springframework.stereotype.Controller;

 import org.springframework.web.bind.annotation.PathVariable;

 import org.springframework.web.bind.annotation.RequestMapping;

 import org.springframework.web.bind.annotation.ResponseBody;

 import javax.annotation.Resource;

 import java.util.Date;

 @Controller

 public class UserController {

     @Autowired

     private UserMapper userMapper;

     @Resource

     SnowflakeShardingKeyGenerator userKeyGenerator;

     @RequestMapping("/user/save")

     @ResponseBody

     public String save() {

         for (int i = 0; i < 50; i++) {

             Long id = (Long)userKeyGenerator.generateKey();

             User user = new User();

             user.setId(id);

             user.setName("test" + i);

             user.setCityId(i);

             user.setCreateTime(new Date());

             user.setSex(i % 2 == 0 ? 1 : 2);

             user.setPhone("11111111" + i);

             user.setEmail("xxxxx");

             user.setCreateTime(new Date());

             user.setPassword("eeeeeeeeeeee");

             userMapper.save(user);

         }

         return "success";

     }

     @RequestMapping("/user/get/{id}")

     @ResponseBody

     public User get(@PathVariable Long id) {

         User user = userMapper.get(id);

         return user;

     }

 }
UserController.java
 CREATE TABLE `t_user` (

   `id` bigint(20) NOT NULL,

   `name` varchar(64) DEFAULT NULL COMMENT '名称',

   `city_id` int(12) DEFAULT NULL COMMENT '城市',

   `sex` tinyint(1) DEFAULT NULL COMMENT '性别',

   `phone` varchar(32) DEFAULT NULL COMMENT '电话',

   `email` varchar(32) DEFAULT NULL COMMENT '邮箱',

   `create_time` timestamp NOT NULL DEFAULT CURRENT_TIMESTAMP ON UPDATE CURRENT_TIMESTAMP COMMENT '创建时间',

   `password` varchar(32) DEFAULT NULL COMMENT '密码',

   PRIMARY KEY (`id`)

 ) ENGINE=InnoDB DEFAULT CHARSET=utf8;
t_user.sql
启动类如下:
 package com.example.shardingjdbc;

 import org.mybatis.spring.annotation.MapperScan;

 import org.springframework.boot.SpringApplication;

 import org.springframework.boot.autoconfigure.SpringBootApplication;

 @MapperScan("com.example.shardingjdbc.mapper")

 @SpringBootApplication

 public class ShardingjdbcApplication {

     public static void main(String[] args) {

         SpringApplication.run(ShardingjdbcApplication.class, args);

     }

 }
ShardingjdbcApplication .java
注意,这里我在启动类上加了 @MapperScan 注解。可能是因为引用依赖的问题,.properties 配置的 mybatis 包扫描目录不管用了,后面有时间再研究。
六、总结
项目启动前,先创建数据库 test0, test1, 然后分别建表 t_user0, t_user1。 可以全部在同一台机器。
项目启动后,访问 http://localhost:8080/user/save, id 是 偶数的都插入到了 test0 库的 t_user0 表中, 奇数的都插入到了 test1 库中的 t_user1 表中。
druid 的后台监控页面地址: http://localhost:8080/druid/。
本文原文地址:https://www.cnblogs.com/lyosaki88/p/springboot_shardingjdbc_druid_mybatis.html
作者QQ: 116269651
SpringBoot 2.3 整合最新版 ShardingJdbc + Druid + MyBatis的更多相关文章
- 【springboot spring mybatis】看我怎么将springboot与spring整合mybatis与druid数据源
目录 概述 1.mybatis 2.druid 壹:spring整合 2.jdbc.properties 3.mybatis-config.xml 二:java代码 1.mapper 2.servic ...
- SpringBoot学习之整合Druid的简单应用
一.Druid介绍 Druid简介 Druid是目前Java语言中最好的数据库连接池之一.结合了 C3P0.DBCP 等 DB 池的优点,同时加入了日志监控.Druid 是一个分布式的.支持实时多维 ...
- 在 springboot 中如何整合 shiro 应用 ?
Shiro是Apache下的一个开源项目,我们称之为Apache Shiro. 它是一个很易用与Java项目的的安全框架,提供了认证.授权.加密.会话管理,与spring Security 一样都是 ...
- SpringBoot 2.X整合Mybatis
1.创建工程环境 勾选Web.Mybatis.MySQL,如下 依赖如下 <dependency> <groupId>org.springframework.boot</ ...
- SpringBoot学习之整合Mybatis
本博客使用IDEA开发工具,通过Maven构建SpringBoot项目,初始化项目添加的依赖有:spring-boot-starter-jdbc.spring-boot-starter-web.mys ...
- Springboot security cas整合方案-实践篇
承接前文Springboot security cas整合方案-原理篇,请在理解原理的情况下再查看实践篇 maven环境 <dependency> <groupId>org.s ...
- Springboot security cas整合方案-原理篇
前言:网络中关于Spring security整合cas的方案有很多例,对于Springboot security整合cas方案则比较少,且有些仿制下来运行也有些错误,所以博主在此篇详细的分析cas原 ...
- 使用Springboot + Gradle快速整合Mybatis-Plus
使用Springboot + Gradle快速整合Mybatis-Plus 作者:Stanley 罗昊 [转载请注明出处和署名,谢谢!] MyBatis-Plus(简称 MP)是一个 MyBatis ...
- springboot 与 shiro 整合 (简洁版)
前言: 网上有很多springboot 与 shiro 整合的资料,有些确实写得很好, 对学习shiro和springboot 都有很大的帮助. 有些朋友比较省事, 直接转发或者复制粘贴.但是没有经过 ...
随机推荐
- nginx配置之错误和访问日志功能
错误日志功能:logs/error.log nginx.conf中: #error_log logs/error.log; #error_log logs/error.log notice; #err ...
- 万字长文!一次性弄懂 Nginx 处理 HTTP 请求的 11 个阶段
Nginx 处理一个 HTTP 请求的全过程 前面给大家讲了 Nginx 是如何处理 HTTP请求头部的,接下来就到了真正处理 HTTP 请求的阶段了.先看下面这张图,这张图是 Nginx 处理 HT ...
- 流复制-pg_basebackup (有自定义表空间)
一.组成部分 1.walsender进程是用来发送WAL日志记录的 2.walreceiver进程是用来接收WAL日志记录的 3.startup进程是用来apply日志的 二.主库配置 1.授权账号, ...
- poj3177 无向连通图加多少条边变成边双连通图
Redundant Paths Time Limit: 1000MS Memory Limit: 65536K Total Submissions: 15752 Accepted: 6609 ...
- 首字母变大写(hdu2026)
输入方式:直接循环输入带有空格的未知长度的字符串. 思考:直接循环输入带有空格的未知长度的字符串,用while(gets_s())函数,循环内外不用getchar()函数.(注意,每次字符串以整体输入 ...
- Freemarker + iTextRender 实现根据模板网页生成PDF
#0 背景 工作需要实现导出PDF的功能,在进行简单调研后,我决定采用Freemarker + iTextRender进行实现. 基本思路如下: Freemarker实现根据动态数据渲染出需要导出的H ...
- Win10上禁用Device Guard以便运行VMware
Win10上每次大版本升级后,如果你试图运行VMware,都会提示如下的错误信息: “VMware Workstation 与 Device/Credential Guard 不兼容.在禁用 Devi ...
- tp5插入百万条数据处理优化
<?php namespace app\index\controller; use think\Controller; use think\Db; class Charu extends Con ...
- 接单,开发,学习神器--基于SpringSecurity的后台权限管理系统
基于SpringSecurity--码仔后台管理系统 1.技术选项 >- 核心框架 SpringBoot >- 权限框架 SpringSecurity >- 模板引擎 Thymele ...
- Life In Changsha College - SQA计划和系统测试规程
一. SQA计划 (1) 对软件进行测试,保证软件不出问题: (2) 项目需要符合IEEE.ISO等软件工程标准 (3) 软件拥有基本的流程图.类图.数据流图等 (4) ...