【数据结构】30、hashmap=》hash 计算方式
前提知识
写在前面,为什么num&(length - 1) 在length是2的n次幂的时候等价于num%length
n - 1意味着比n最高位小的位都为1,而高的位都为0,因此通过与可以剔除位数比n最高位更高的部分,只保留比n最高位小的部分,也就是取余了。
而且用位运算取代%,效率会比较高。
基于以上几点,我们再看看hashmap中如何计算hash值得

这里吧key的hashcode取出来,然后把它右移16位,然后取异或
这里从我Google得到的信息是,int是4个字节,也就是32位,我们右移16位也即是把高位的数据右移到低位的16位,然后做异或,那就是把高位和低位的数据进行重合
同时保留了低位和高位的信息
但是为什么是右移16位,这边保留疑问,我要是右移8位,4位,2位呢???
不做右移肯定不是,不做右移直接异或,那不就是0么
我们直接做个测试
public static int hash(Object key) {

        int h;

        //也就将key的hashCode无符号右移16位然后与hashCode异或从而得到hash值在putVal方法中(n - 1)& hash计算得到桶的索引位置

        //注意,这里h是int值,也就是32位,然后无符号又移16位,那么就是折半,折半之后和原来的数据做异或操作,正好整合了高位和低位的数据

        //混合原始哈希码的高位和低位,以此来加大低位的随机性,而且混合后的低位掺杂了高位的部分特征,这样高位的信息也被变相保留下来。

        return (key == null) ? 0 : (h = key.hashCode()) ^ (h >>> 16);

    }

    //测试,如果我们不做高位低位的操作看看hash冲突是大还是小

    public static int hash2(Object key) {

        return (int) key;

    }

    public static int hash3(Object key) {

        int h = key.hashCode();

        //我们不做右移试试,那就自己跟自己异或。。。没意义,只能是0了

        return (key == null) ? 0 : h ^ h;

    }

    public static int hash4(Object key) {

        int h;

        //我们不做右移试试,或者右移8位试试

        return (key == null) ? 0 : (h = key.hashCode()) ^ (h >>> 8);

    }

    public static int hash5(Object key) {

        int h;

        //我们不做右移试试,或者右移8位试试

        return (key == null) ? 0 : (h = key.hashCode()) ^ (h >>> 4);

    }

    public static int hash6(Object key) {

        int h;

        //我们不做右移试试,或者右移8位试试

        return (key == null) ? 0 : (h = key.hashCode()) ^ (h >>> 2);

    }
hash3的测试可以去除不用考虑了
public void testHash() {

        //产生随机数

        int init = 64 * 64;

        int size = 64 * 64;

        for(int j = 0; j < 10; ++j) {

//            int size = init * (j+1);

            size *= 2;

            int hash1[] = new int[size];

            int hash2[] = new int[size];

            int hash3[] = new int[size];

            int hash4[] = new int[size];

            int hash5[] = new int[size];

            int hash6[] = new int[size];

            int testCount = size;

            int exist1 = 0;

            int exist2 = 0;

            int exist3 = 0;

            int exist4 = 0;

            int exist5 = 0;

            int exist6 = 0;

            for(int i = 0; i < testCount; ++i) {

                int key = (int) ((Math.random() * (size - 1)) + 1);

                if(hash1[MyHashMap.hash(key)&(size - 1)] != 0) {

                    exist1++;

                } else {

                    hash1[MyHashMap.hash(key)&(size - 1)] = 1;

                }

            }

            for(int i = 0; i < testCount; ++i) {

                int key = (int) ((Math.random() * (size - 1)) + 1);

                if(hash2[MyHashMap.hash2(key)&(size - 1)] != 0) {

                    exist2++;

                } else {

                    hash2[MyHashMap.hash2(key)&(size - 1)] = 1;

                }

            }

//        for(int i = 0; i < testCount; ++i) {

//

//            int key = (int) ((Math.random() * (size - 1)) + 1);

//

//            if(hash3[MyHashMap.hash3(key)&(size - 1)] != 0) {

//                exist3++;

//            } else {

//                hash3[MyHashMap.hash3(key)&(size - 1)] = 1;

//            }

//        }

            for(int i = 0; i < testCount; ++i) {

                int key = (int) ((Math.random() * (size - 1)) + 1);

                if(hash4[MyHashMap.hash4(key)&(size - 1)] != 0) {

                    exist4++;

                } else {

                    hash4[MyHashMap.hash4(key)&(size - 1)] = 1;

                }

            }

            for(int i = 0; i < testCount; ++i) {

                int key = (int) ((Math.random() * (size - 1)) + 1);

                if(hash5[MyHashMap.hash5(key)&(size - 1)] != 0) {

                    exist5++;

                } else {

                    hash5[MyHashMap.hash5(key)&(size - 1)] = 1;

                }

            }

            for(int i = 0; i < testCount; ++i) {

                int key = (int) ((Math.random() * (size - 1)) + 1);

                if(hash6[MyHashMap.hash6(key)&(size - 1)] != 0) {

                    exist6++;

                } else {

                    hash6[MyHashMap.hash6(key)&(size - 1)] = 1;

                }

            }

            System.out.println("冲突比较:\t1:" + exist1 + "\t2:" + exist2 + "\t4:" + exist4 + "\t5:" + exist5 + "\t6:" + exist6);

        }

    }
开始测试:
上面是size会递增的,现在我们先测size不变的情况看看效果
size=64 * 64
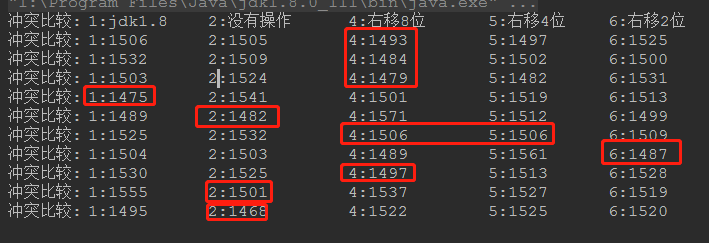
从结果上看明显是右移8位冲突比较少!!!
我们把size扩大一倍

再扩大一倍
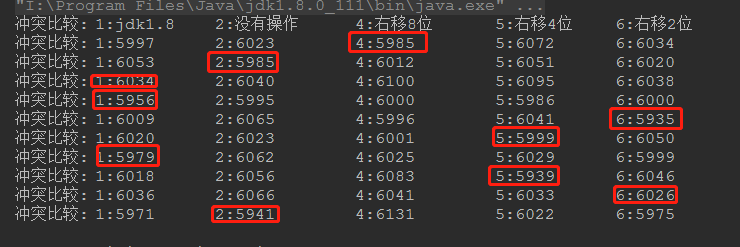
这次还比较平价
有人会说这是因为每次随机的数不一样的,每次都是产生新的随机数,没有可比性
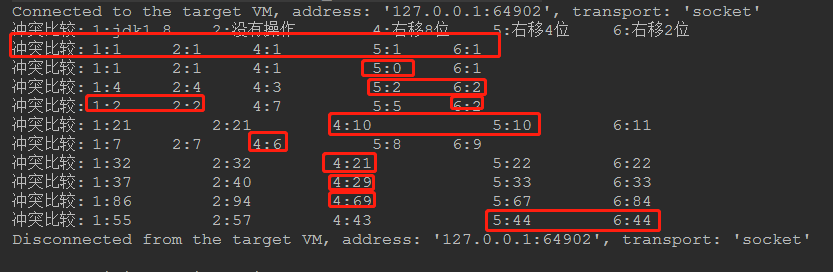
那么我们每次用一个固定的数去进行hash碰撞
还是64*64开始,依次乘以2,4
@org.junit.jupiter.api.Test

    public void testHash2() throws InterruptedException {

        //产生随机数

        int init = 64 * 64;

        int size = 8;

        System.out.println("冲突比较:\t1:jdk1.8\t2:没有操作\t\t4:右移8位\t\t5:右移4位\t\t6:右移2位");

        for(int j = 0; j < 10; ++j) {

//            int size = init * (j+1);

            size = 8 * j + size;

            int hash1[] = new int[size];

            int hash2[] = new int[size];

            int hash4[] = new int[size];

            int hash5[] = new int[size];

            int hash6[] = new int[size];

            int testCount = size / 3;

            int exist1 = 0;

            int exist2 = 0;

            int exist4 = 0;

            int exist5 = 0;

            int exist6 = 0;

            for(int i = 0; i < testCount; ++i) {

                Thread.sleep(i + 1);

                int key = (int) ((Math.random() * (size - 1)) + 1) * j * (i + 1);

                if(hash1[MyHashMap.hash(key)&(size - 1)] != 0) {

                    exist1++;

                } else {

                    hash1[MyHashMap.hash(key)&(size - 1)] = 1;

                }

                if(hash2[MyHashMap.hash2(key)&(size - 1)] != 0) {

                    exist2++;

                } else {

                    hash2[MyHashMap.hash2(key)&(size - 1)] = 1;

                }

                if(hash4[MyHashMap.hash4(key)&(size - 1)] != 0) {

                    exist4++;

                } else {

                    hash4[MyHashMap.hash4(key)&(size - 1)] = 1;

                }

                if(hash5[MyHashMap.hash5(key)&(size - 1)] != 0) {

                    exist5++;

                } else {

                    hash5[MyHashMap.hash5(key)&(size - 1)] = 1;

                }

                if(hash6[MyHashMap.hash6(key)&(size - 1)] != 0) {

                    exist6++;

                } else {

                    hash6[MyHashMap.hash6(key)&(size - 1)] = 1;

                }

            }

            System.out.println("冲突比较:\t1:" + exist1 + "\t\t2:" + exist2 + "\t\t4:" + exist4 + "\t\t\t5:" + exist5 + "\t\t6:" + exist6);

        }

    }
我们还是执行三次比较:

从第一次看结果好像jdk自带的方式冲突还比较多。。。
我最后再来一次,怎么感觉越来越不对劲。。。
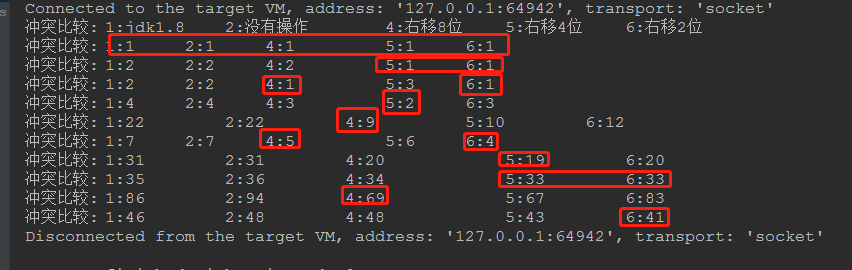
总结:我懵逼了啊!!!为什么啊,我测试出来感觉jdk自带的右移16位的方式,并不能有效减少冲突,反而右移4或者8位测试效果比较好!!!
求大神解答!!!
【数据结构】30、hashmap=》hash 计算方式的更多相关文章
- 数据结构之HashMap
前言 在我们开发中,HashMap是我们非常常用的数据结构,接下来我将进一步去了解HashMap的原理.结构. 1.HashMap的实现原理 HashMap底层是基于Hash表(也称“散列”)的数据结 ...
- Java基础-时间复杂度计算方式
Java基础-时间复杂度计算方式 作者:尹正杰 版权声明:原创作品,谢绝转载!否则将追究法律责任. 时间复杂度通常是衡量算法的优劣的,衡量算法的时间严格来讲是很难衡量的,由于不同的机器性能不用环境 ...
- HashMap循环遍历方式及其性能对比(zhuan)
http://www.trinea.cn/android/hashmap-loop-performance/ ********************************************* ...
- HashMap循环遍历方式及其性能对比
主要介绍HashMap的四种循环遍历方式,各种方式的性能测试对比,根据HashMap的源码实现分析性能结果,总结结论. 1. Map的四种遍历方式 下面只是简单介绍各种遍历示例(以HashMap为 ...
- flex布局中flex-grow与flex-shrink的计算方式
CSS 中的 Flex(弹性布局) 可以很灵活的控制网页的布局,其中决定 Flex 布局内项目宽度/高度的是三个属性: flex-basis, flex-grow, flex-shrink. flex ...
- System.currentTimeMillis()计算方式与时间的单位转换
目录[-] 一.时间的单位转换 二.System.currentTimeMillis()计算方式 一.时间的单位转换 1秒=1000毫秒(ms) 1毫秒=1/1,000秒(s)1秒=1,000,000 ...
- NTC(负温度)热敏电阻.阻值的计算方式
来源 :http://blog.csdn.net/blue0432/article/details/8690190 现在低成本测温方案中NTC热敏电阻用的比较多,一般采用查表的方法获取温度值,这就牵涉 ...
- mysql中TPS, QPS 的计算方式
今天突然有个同事问题一个问题, mysqlTPS和QPS的计算公式是什么? 以前确实也没有关注过这个计算公式,所以查了下学习了下: 下面是参考内容. 在做db基准测试的时候,qps,tps 是衡量数 ...
- 自学Aruba1.3-WLAN一些基本常识802.11n速率计算方式、802.11n及802.11AC速率表
点击返回:自学Aruba之路 自学Aruba1.3-WLAN一些基本常识802.11n速率计算 1. 802.11n速率计算方式1.1 802.11n使用的主要技术 802.11n采用MIMO多天线技 ...
随机推荐
- shp数据和tab数据的两点区别
作者:朱金灿 来源:http://blog.csdn.net/clever101 shp是ArcGIS的矢量格式,tab是Mapinfo的矢量格式.shp数据和tab数据有两点区别:一是shp数据的f ...
- 解析URL查询字符串参数为对象以及老浏览器的getElementsByClassName
高程3使用拼接字符串形式解析的查询字符串,网上有各种正则方式解析的,记得太多,临时需要写的时候,自己都搞混乱了.只记一种吧,用正则. function getQueryStringArgs() { v ...
- jQuery插件开发小总结
另一篇 jQuery插件开发通常有3种方式 通过$.extend()来扩展jQuery 通过$.fn 向jQuery添加新的方法 通过$.widget()应用jQuery UI的部件工厂方式创建 通常 ...
- url操作等
取得url ?及以前: baseUrl = url.substr(0,url.indexOf('?')+1) searchParam = searchParam.slice(0, -1);//去掉最后 ...
- 2-1 Consul简介
Consul英文意思是大使馆. Consul主要干3件事情: 1.提供服务到ip地址的注册. 2.提供服务到ip地址列表的查询. 3.对提供服务方的健康检查. Consul官网 :https://ww ...
- 使用 LaTex 制作个人简历(CV,英文版)
\documentclass[12pt]{article} \textwidth=6.5in \textheight=9in \topmargin=-1.1in \headheight=0in \he ...
- UVE开发环境搭建及项目启动
1.IDE安装visual studio code ,略: 2.node安装(node-v10.5.0-win-x64.zip),解压即可: 3.配置node环境变量,cmd 输入node -v.np ...
- html5中 table数据导出到excel文件
JS代码: /** * table数据导出到excel * 形参 table : tableId ; * sheetName : 工作薄名 * fileName : 文件名 * linkId :隐藏的 ...
- Xamarin 设置可接受的版本
一共分三个版本,编译版本.最小版本.目标版本(最适应) 一般编译使用最新的版本,目标版本选择最主流的 参考资料 https://docs.microsoft.com/en-us/xamarin/and ...
- DevExpress XtraTreeList TreeList复选框选择
权限管理涉及复选框多勾选. 1.控件属性设置 TreeList.OperationView.ShowCheckBoxes=true;用于显示CheckBox: TreeList.OperationBe ...