Android studio中的6大布局
1.相对布局
代码:
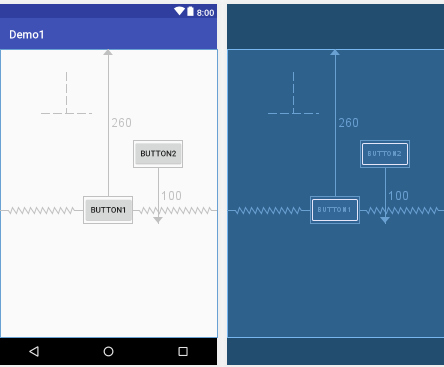
<?xml version="1.0" encoding="utf-8"?>

<RelativeLayout xmlns:android="http://schemas.android.com/apk/res/android"

xmlns:app="http://schemas.android.com/apk/res-auto"

xmlns:tools="http://schemas.android.com/tools"

android:layout_width="match_parent"

android:layout_height="match_parent"

tools:context=".MainActivity">

<Button

android:id="@+id/button1"

android:layout_width="wrap_content"

android:layout_height="wrap_content"

android:text="Button1"

android:layout_marginTop="260dp"

android:layout_alignParentTop="true"

android:layout_centerHorizontal="true" />

<Button

android:id="@+id/button2"

android:layout_width="wrap_content"

android:layout_height="wrap_content"

android:layout_toRightOf="@id/button1"

android:text="Button2"

android:layout_alignBottom="@id/button1"

android:layout_marginBottom="100dp"/>

</RelativeLayout>
如图:
2.线性布局
代码:
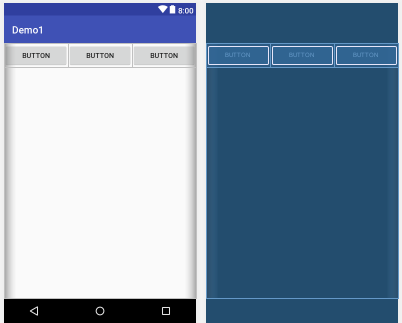
<?xml version="1.0" encoding="utf-8"?>

<LinearLayout xmlns:android="http://schemas.android.com/apk/res/android"

android:layout_width="match_parent"

android:layout_height="match_parent"

android:orientation="horizontal">

<Button

android:id="@+id/button3"

android:layout_width="wrap_content"

android:layout_height="wrap_content"

android:layout_weight="1"

android:text="Button" />

<Button

android:id="@+id/button4"

android:layout_width="wrap_content"

android:layout_height="wrap_content"

android:layout_weight="1"

android:text="Button" />

<Button

android:id="@+id/button"

android:layout_width="wrap_content"

android:layout_height="wrap_content"

android:layout_weight="1"

android:text="Button" />

</LinearLayout>
如图:
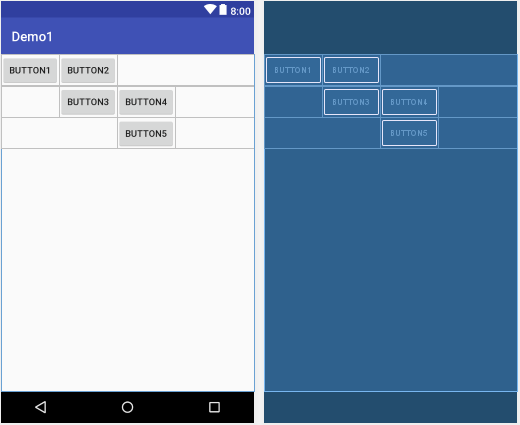
3.表格布局
表格布局就是让控件以表格的形式来排列组件的,只要将组件或信息放在单元格中,控件就可以整齐的排列
在TableLayout中,行数是由TableRow对象控制的,即对象中有多少个TableRow,就有多少行。
代码:
<?xml version="1.0" encoding="utf-8"?>

<TableLayout xmlns:android="http://schemas.android.com/apk/res/android"

android:layout_width="match_parent"

android:layout_height="match_parent">

<TableRow

android:layout_width="match_parent"

android:layout_height="match_parent"

android:id="@+id/tableRow1"

>

<Button

android:id="@+id/button1"

android:layout_width="wrap_content"

android:layout_height="wrap_content"

android:text="Button1"

android:layout_column="0"/>

<Button

android:id="@+id/button2"

android:layout_width="wrap_content"

android:layout_height="wrap_content"

android:text="Button2"

android:layout_column="1"/>

</TableRow>

<TableRow

android:layout_width="match_parent"

android:layout_height="match_parent"

android:id="@+id/tableRow2">

<Button

android:id="@+id/button3"

android:layout_width="wrap_content"

android:layout_height="wrap_content"

android:text="Button3"

android:layout_column="1"/>

<Button

android:id="@+id/button4"

android:layout_width="wrap_content"

android:layout_height="wrap_content"

android:text="Button4"

android:layout_column="2"/>

</TableRow>

<TableRow

android:layout_width="match_parent"

android:layout_height="match_parent"

android:id="@+id/tableRow3">

<Button

android:id="@+id/button5"

android:layout_width="wrap_content"

android:layout_height="wrap_content"

android:text="Button5"

android:layout_column="2"/>

</TableRow>

</TableLayout>
如图:
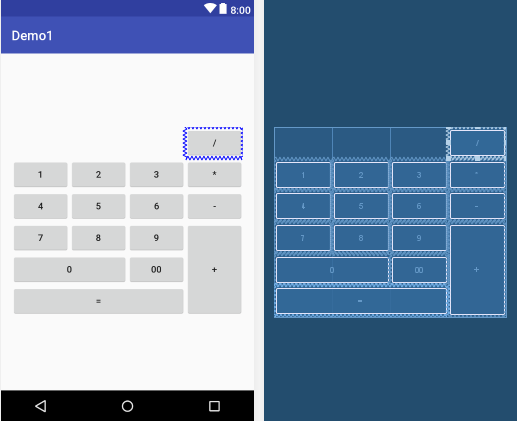
4.网格布局
代码:
<?xml version="1.0" encoding="utf-8"?>

<GridLayout xmlns:android="http://schemas.android.com/apk/res/android"

android:layout_width="wrap_content"

android:layout_height="wrap_content"

android:layout_gravity="center"

android:columnCount="4"

android:orientation="horizontal">

<Button

android:layout_column="3"

android:text="/" />

<Button

android:text="1" />

<Button

android:text="2" />

<Button

android:text="3" />

<Button

android:text="*" />

<Button

android:text="4" />

<Button

android:text="5" />

<Button

android:text="6" />

<Button

android:text="-" />

<Button

android:text="7" />

<Button

android:text="8" />

<Button

android:text="9" />

<Button

android:text="+"

android:layout_gravity="fill"

android:layout_rowSpan="3"/>

<Button

android:text="0"

android:layout_gravity="fill"

android:layout_columnSpan="2"/>

<Button

android:text="00" />

<Button

android:text="="

android:layout_gravity="fill"

android:layout_columnSpan="3"/>

</GridLayout>
如图:
5.帧布局
代码:
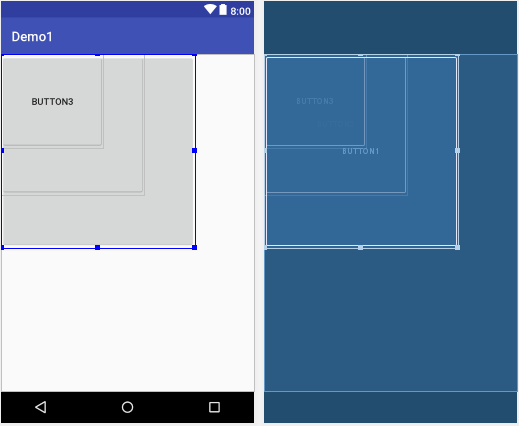
<?xml version="1.0" encoding="utf-8"?>

<FrameLayout xmlns:android="http://schemas.android.com/apk/res/android"

android:layout_width="match_parent"

android:layout_height="match_parent">

<Button

android:id="@+id/button1"

android:layout_width="294dp"

android:layout_height="294dp"

android:text="Button1"

android:visibility="visible" />

<Button

android:id="@+id/button2"

android:layout_width="218dp"

android:layout_height="214dp"

android:text="Button2"

android:visibility="visible" />

<Button

android:id="@+id/button3"

android:layout_width="156dp"

android:layout_height="143dp"

android:text="Button3"

android:visibility="visible" />

</FrameLayout>
如图:
6. 绝对布局
代码:
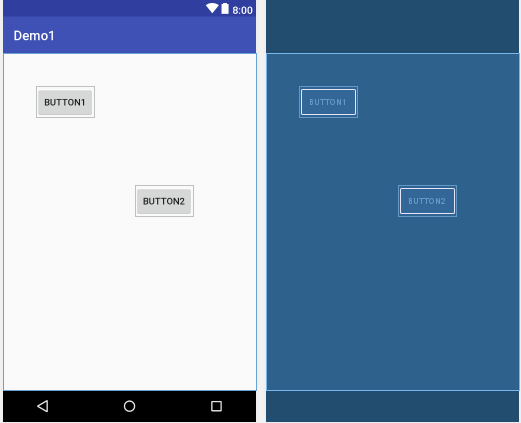
<?xml version="1.0" encoding="utf-8"?>

<AbsoluteLayout xmlns:android="http://schemas.android.com/apk/res/android"

xmlns:tools="http://schemas.android.com/tools"

android:layout_width="match_parent"

android:layout_height="match_parent">

<Button

android:id="@+id/button1"

android:layout_width="wrap_content"

android:layout_height="wrap_content"

android:text="Button1"

android:layout_y="50dp"

android:layout_x="50dp"/>

<Button

android:id="@+id/button2"

android:layout_width="wrap_content"

android:layout_height="wrap_content"

android:text="Button2"

android:layout_x="200dp"

android:layout_y="200dp"/>

</AbsoluteLayout>
如图:
Android studio中的6大布局的更多相关文章
- Android Studio中配置及使用OpenCV示例
Android Studio配置及使用OpenCV 前言:最近在做项目移植,项目较大,在Eclipse中配置的Jni及OpenCV环境没任何问题,但是迁移到Studio中就问题一大堆,网上也找了一些资 ...
- Android ImageView 不显示JPEG图片 及 Android Studio中怎样引用图片资源
Android ImageView 不显示JPEG图片 今天在写一个小实例,ImageView在xml里面设置的是INVISIBLE,在代码里须要设置成setVisibility(View.VISIB ...
- Android编程权威指南笔记3:Android Fragment讲解与Android Studio中的依赖关系,如何添加依赖关系
Android Fragment 当我在学习时,了解了Fragment词汇 Fragment是一种控制器对象,我就把所了解的简单说一下.activity可以派fragment完成一些任务,就是管理用户 ...
- Android开发的小技巧,在Android Studio中使用Designtime Layout Attributes
在编写xml文件时,为了预览效果,经常会使用默认填上一些内容,比如TextView时,随便写上一个text <TextView ... android:text="Name:" ...
- Android Studio 中 FAILURE: Build failed with an exception. * What went wrong: Execution failed for task ':compileDebugAidl'.的问题解答
Android Studio 中 FAILURE: Build failed with an exception. * What went wrong: Execution failed for ta ...
- Android Studio中有用的快捷键栏
Android Studio中有用的快捷键栏#1 Ahraewi线移动 Alt + Shift +向上/向下❖Alt + Shift +向上/向下 或上下移动在所选位置的行. 删除行 CMD + B ...
- 在Android Studio中进行单元测试和UI测试
本篇教程翻译自Google I/O 2015中关于测试的codelab,掌握科学上网的同学请点击这里阅读:Unit and UI Testing in Android Studio.能力有限,如有翻译 ...
- 浅谈Windows下SVN在Android Studio中的配置、基本使用及解除关联
看到网上很多关于svn环境配置和关联Android-Studio的很多博文,发现很零散,想集大家所长整理一下: 在AndroidStudio中开发版本控制中,除了Git就是SVN,和Eclipse不同 ...
- Android studio 中引用jar的其实是Maven?(二)
上一篇:Android studio 中引用jar的其实是Maven?(一) 搭建maven仓库: 去了解一个新的事物的时候,最好的方式就是去使用它.例如去了解一座城市的时候,最好的方式就是乘坐公共交 ...
随机推荐
- Android onLoadFinished与onLoaderReset
onLoadFinished 这个方法是在前面已创建的加载器已经完成其加载过程后被调用,这个方法保证会在应用到加载器上的数据被释放之前被调用.在此方法中,你必须删除所有对旧数据的使用(因为它将很快会被 ...
- cocos 关于文件名称的各种坑 各种斜杠坑
cocos 全部文件路径 的斜杠 必须 用 / 而不能够用 \ 不然编译到安卓各种坑 相对路径 第一个字符不可 带 / /*比如 res/test.png 这样的应该是标准的 /res/test.p ...
- eclipse开发环境下集成activiti插件
一.环境 eclipse 4.3.0 Activiti Designer 5.14.1 二.Activiti Designer 5.14.1插件安装 在eclipse中菜单help->Insta ...
- 【例题5-1 UVA 10474 】Where is the Marble?
[链接] 我是链接,点我呀:) [题意] 在这里输入题意 [题解] 排序 用lower_bound找就可以了. ->lower_bound,如果里面所有的数字都比x小,那么它的返回值会越界! [ ...
- Fragment为载体可自己主动布局的CardView(GitHub上写开源项目初体验)
转载请注明本文出自大苞米的博客(http://blog.csdn.net/a396901990),谢谢支持! 开篇废话: 前些天一直在看Android5.0 的Material Desgin,里面新增 ...
- java开发中序列化与反序列化起到的作用
基本概念: 序列化是将对象状态转换为可保持或传输的格式的过程.与序列化相对的是反序列化,它将流转换为对象. 这两个过程结合起来,能够轻松地存储和数据传输. 特别在网络传输中,它的作用显得尤为重要.我们 ...
- Java中String推断相等equals与==的差别以及StringBuilder的equals
Java中String类型具有一个equals的方法能够用于推断两种字符串是否相等,可是这样的相等又与运算符==所推断的"相等"有所不同,接下来进行分析,结论由程序进行验证 Str ...
- 如何查看一个网页特定效果的js代码(动画效果可js和css)(页面可以看到js的源代码)
如何查看一个网页特定效果的js代码(动画效果可js和css)(页面可以看到js的源代码) 一.总结 1.动画效果可能是 CSS 实现的,也可能是 JS 实现的. 2.直接Chrome的F12调试即可, ...
- [React] Render Basic SVG Components in React
React loves svg just as much as it loves html. In this lesson we cover how simple it is to make SVG ...
- 细说Oracle中NULL值
1.NULL是什么? NULL表示UNKNOW(未知),其不代表不论什么值. 比如一行中某列没有不论什么值即为NULL. ORACLE同意不论什么一种数据类型的字段为空,除了下面两种情况: 1)主键字 ...