
Hbase项目(完整版)
涉及概念梳理:命名空间
4.1.1、命名空间的结构
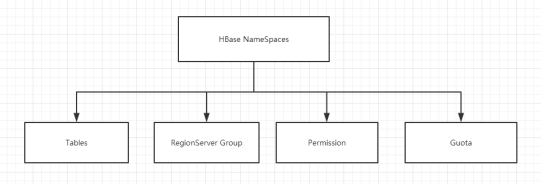
1) Table:表,所有的表都是命名空间的成员,即表必属于某个命名空间,如果没有指定,则在default默认的命名空间中。
2) RegionServer group:一个命名空间包含了默认的RegionServer Group。
3) Permission:权限,命名空间能够让我们来定义访问控制列表ACL(Access Control List)。例如,创建表,读取表,删除,更新等等操作。
4) Quota:限额,可以强制一个命名空间可包含的region的数量。
4.1.2、命名空间的使用
1) 创建命名空间
|
hbase(main):002:0> create_namespace 'student_namespace' |
2) 创建表时指定命名空间
|
hbase(main):004:0> create 'student_namespace:student_table','student_info' |
3) 观察HDFS中的目录结构的变化

4.2、微博系统
4.1.1、需求分析
1) 微博内容的浏览,数据库表设计
2) 用户社交体现:关注用户,取关用户
3) 拉取关注的人的微博内容
4.1.2、代码实现
代码设计总览:
1) 创建命名空间以及表名的定义
2) 创建微博内容表
3) 创建用户关系表
4) 创建用户微博内容接收邮件表
5) 发布微博内容
6) 添加关注用户
7) 移除(取关)用户
8) 获取关注的人的微博内容
9) 测试
1) 创建命名空间以及表名的定义
|
//获取配置conf private Configuration conf = HBaseConfiguration.create(); //微博内容表的表名 private static final byte[] TABLE_CONTENT = Bytes.toBytes("weibo:content"); //用户关系表的表名 private static final byte[] TABLE_RELATIONS = Bytes.toBytes("weibo:relations"); //微博收件箱表的表名 private static final byte[] TABLE_RECEIVE_CONTENT_EMAIL = Bytes.toBytes("weibo:receive_content_email"); public void initNamespace(){ HBaseAdmin admin = null; try { admin = new HBaseAdmin(conf); //命名空间类似于关系型数据库中的schema,可以想象成文件夹 NamespaceDescriptor weibo = NamespaceDescriptor .create("weibo") .addConfiguration("creator", "Jinji") .addConfiguration("create_time", System.currentTimeMillis() + "") .build(); admin.createNamespace(weibo); } catch (MasterNotRunningException e) { e.printStackTrace(); } catch (ZooKeeperConnectionException e) { e.printStackTrace(); } catch (IOException e) { e.printStackTrace(); }finally{ if(null != admin){ try { admin.close(); } catch (IOException e) { e.printStackTrace(); } } } } |
2) 创建微博内容表
表结构:
|
方法名 |
creatTableeContent |
|
Table Name |
weibo:content |
|
RowKey |
用户ID_时间戳 |
|
ColumnFamily |
info |
|
ColumnLabel |
标题,内容,图片 |
|
Version |
1个版本 |
代码:
|
/** * 创建微博内容表 * Table Name:weibo:content * RowKey:用户ID_时间戳 * ColumnFamily:info * ColumnLabel:标题 内容 图片URL * Version:1个版本 */ public void createTableContent(){ HBaseAdmin admin = null; try { admin = new HBaseAdmin(conf); //创建表表述 HTableDescriptor content = new HTableDescriptor(TableName.valueOf(TABLE_CONTENT)); //创建列族描述 HColumnDescriptor info = new HColumnDescriptor(Bytes.toBytes("info")); //设置块缓存 info.setBlockCacheEnabled(true); //设置块缓存大小 info.setBlocksize(2097152); //设置压缩方式 // info.setCompressionType(Algorithm.SNAPPY); //设置版本确界 info.setMaxVersions(1); info.setMinVersions(1); content.addFamily(info); admin.createTable(content); } catch (MasterNotRunningException e) { e.printStackTrace(); } catch (ZooKeeperConnectionException e) { e.printStackTrace(); } catch (IOException e) { e.printStackTrace(); }finally{ if(null != admin){ try { admin.close(); } catch (IOException e) { e.printStackTrace(); } } } } |
3) 创建用户关系表
表结构:
|
方法名 |
createTableRelations |
|
Table Name |
weibo:relations |
|
RowKey |
用户ID |
|
ColumnFamily |
attends、fans |
|
ColumnLabel |
关注用户ID,粉丝用户ID |
|
ColumnValue |
用户ID |
|
Version |
1个版本 |
代码:
|
/** * 用户关系表 * Table Name:weibo:relations * RowKey:用户ID * ColumnFamily:attends,fans * ColumnLabel:关注用户ID,粉丝用户ID * ColumnValue:用户ID * Version:1个版本 */ public void createTableRelations(){ HBaseAdmin admin = null; try { admin = new HBaseAdmin(conf); HTableDescriptor relations = new HTableDescriptor(TableName.valueOf(TABLE_RELATIONS)); //关注的人的列族 HColumnDescriptor attends = new HColumnDescriptor(Bytes.toBytes("attends")); //设置块缓存 attends.setBlockCacheEnabled(true); //设置块缓存大小 attends.setBlocksize(2097152); //设置压缩方式 // info.setCompressionType(Algorithm.SNAPPY); //设置版本确界 attends.setMaxVersions(1); attends.setMinVersions(1); //粉丝列族 HColumnDescriptor fans = new HColumnDescriptor(Bytes.toBytes("fans")); fans.setBlockCacheEnabled(true); fans.setBlocksize(2097152); fans.setMaxVersions(1); fans.setMinVersions(1); relations.addFamily(attends); relations.addFamily(fans); admin.createTable(relations); } catch (MasterNotRunningException e) { e.printStackTrace(); } catch (ZooKeeperConnectionException e) { e.printStackTrace(); } catch (IOException e) { e.printStackTrace(); }finally{ if(null != admin){ try { admin.close(); } catch (IOException e) { e.printStackTrace(); } } } } |
4) 创建微博收件箱表
表结构:
|
方法名 |
createTableReceiveContentEmails |
|
Table Name |
weibo:receive_content_email |
|
RowKey |
用户ID |
|
ColumnFamily |
info |
|
ColumnLabel |
用户ID |
|
ColumnValue |
取微博内容的RowKey |
|
Version |
1000 |
代码:
|
/** * 创建微博收件箱表 * Table Name: weibo:receive_content_email * RowKey:用户ID * ColumnFamily:info * ColumnLabel:用户ID-发布微博的人的用户ID * ColumnValue:关注的人的微博的RowKey * Version:1000 */ public void createTableReceiveContentEmail(){ HBaseAdmin admin = null; try { admin = new HBaseAdmin(conf); HTableDescriptor receive_content_email = new HTableDescriptor(TableName.valueOf(TABLE_RECEIVE_CONTENT_EMAIL)); HColumnDescriptor info = new HColumnDescriptor(Bytes.toBytes("info")); info.setBlockCacheEnabled(true); info.setBlocksize(2097152); info.setMaxVersions(1000); info.setMinVersions(1000); receive_content_email.addFamily(info);; admin.createTable(receive_content_email); } catch (MasterNotRunningException e) { e.printStackTrace(); } catch (ZooKeeperConnectionException e) { e.printStackTrace(); } catch (IOException e) { e.printStackTrace(); }finally{ if(null != admin){ try { admin.close(); } catch (IOException e) { e.printStackTrace(); } } } } |
5) 发布微博内容
a、微博内容表中添加1条数据
b、微博收件箱表对所有粉丝用户添加数据
代码:Message.java
|
package com.z.hbase.weibo; public class Message { private String uid; private String timestamp; private String content; public String getUid() { return uid; } public void setUid(String uid) { this.uid = uid; } public String getTimestamp() { return timestamp; } public void setTimestamp(String timestamp) { this.timestamp = timestamp; } public String getContent() { return content; } public void setContent(String content) { this.content = content; } @Override public String toString() { return "Message [uid=" + uid + ", timestamp=" + timestamp + ", content=" + content + "]"; } } |
代码:public void publishContent(String uid, String content)
|
/** * 发布微博 * a、微博内容表中数据+1 * b、向微博收件箱表中加入微博的Rowkey */ public void publishContent(String uid, String content){ HConnection connection = null; try { connection = HConnectionManager.createConnection(conf); //a、微博内容表中添加1条数据,首先获取微博内容表描述 HTableInterface contentTBL = connection.getTable(TableName.valueOf(TABLE_CONTENT)); //组装Rowkey long timestamp = System.currentTimeMillis(); String rowKey = uid + "_" + timestamp; Put put = new Put(Bytes.toBytes(rowKey)); put.add(Bytes.toBytes("info"), Bytes.toBytes("content"), timestamp, Bytes.toBytes(content)); contentTBL.put(put); //b、向微博收件箱表中加入发布的Rowkey //b.1、查询用户关系表,得到当前用户有哪些粉丝 HTableInterface relationsTBL = connection.getTable(TableName.valueOf(TABLE_RELATIONS)); //b.2、取出目标数据 Get get = new Get(Bytes.toBytes(uid)); get.addFamily(Bytes.toBytes("fans")); Result result = relationsTBL.get(get); List<byte[]> fans = new ArrayList<byte[]>(); //遍历取出当前发布微博的用户的所有粉丝数据 for(Cell cell : result.rawCells()){ fans.add(CellUtil.cloneQualifier(cell)); } //如果该用户没有粉丝,则直接return if(fans.size() <= 0) return; //开始操作收件箱表 HTableInterface recTBL = connection.getTable(TableName.valueOf(TABLE_RECEIVE_CONTENT_EMAIL)); List<Put> puts = new ArrayList<Put>(); for(byte[] fan : fans){ Put fanPut = new Put(fan); fanPut.add(Bytes.toBytes("info"), Bytes.toBytes(uid), timestamp, Bytes.toBytes(rowKey)); puts.add(fanPut); } recTBL.put(puts); } catch (IOException e) { e.printStackTrace(); }finally{ if(null != connection){ try { connection.close(); } catch (IOException e) { e.printStackTrace(); } } } } |
6) 添加关注用户
a、在微博用户关系表中,对当前主动操作的用户添加新关注的好友
b、在微博用户关系表中,对被关注的用户添加新的粉丝
c、微博收件箱表中添加所关注的用户发布的微博
代码实现:public void addAttends(String uid, String... attends)
|
/** * 关注用户逻辑 * a、在微博用户关系表中,对当前主动操作的用户添加新的关注的好友 * b、在微博用户关系表中,对被关注的用户添加粉丝(当前操作的用户) * c、当前操作用户的微博收件箱添加所关注的用户发布的微博rowkey */ public void addAttends(String uid, String... attends){ //参数过滤 if(attends == null || attends.length <= 0 || uid == null || uid.length() <= 0){ return; } HConnection connection = null; try { connection = HConnectionManager.createConnection(conf); //用户关系表操作对象(连接到用户关系表) HTableInterface relationsTBL = connection.getTable(TableName.valueOf(TABLE_RELATIONS)); List<Put> puts = new ArrayList<Put>(); //a、在微博用户关系表中,添加新关注的好友 Put attendPut = new Put(Bytes.toBytes(uid)); for(String attend : attends){ //为当前用户添加关注的人 attendPut.add(Bytes.toBytes("attends"), Bytes.toBytes(attend), Bytes.toBytes(attend)); //b、为被关注的人,添加粉丝 Put fansPut = new Put(Bytes.toBytes(attend)); fansPut.add(Bytes.toBytes("fans"), Bytes.toBytes(uid), Bytes.toBytes(uid)); //将所有关注的人一个一个的添加到puts(List)集合中 puts.add(fansPut); } puts.add(attendPut); relationsTBL.put(puts); //c.1、微博收件箱添加关注的用户发布的微博内容(content)的rowkey HTableInterface contentTBL = connection.getTable(TableName.valueOf(TABLE_CONTENT)); Scan scan = new Scan(); //用于存放取出来的关注的人所发布的微博的rowkey List<byte[]> rowkeys = new ArrayList<byte[]>(); for(String attend : attends){ //过滤扫描rowkey,即:前置位匹配被关注的人的uid_ RowFilter filter = new RowFilter(CompareFilter.CompareOp.EQUAL, new SubstringComparator(attend + "_")); //为扫描对象指定过滤规则 scan.setFilter(filter); //通过扫描对象得到scanner ResultScanner result = contentTBL.getScanner(scan); //迭代器遍历扫描出来的结果集 Iterator<Result> iterator = result.iterator(); while(iterator.hasNext()){ //取出每一个符合扫描结果的那一行数据 Result r = iterator.next(); for(Cell cell : r.rawCells()){ //将得到的rowkey放置于集合容器中 rowkeys.add(CellUtil.cloneRow(cell)); } } } //c.2、将取出的微博rowkey放置于当前操作用户的收件箱中 if(rowkeys.size() <= 0) return; //得到微博收件箱表的操作对象 HTableInterface recTBL = connection.getTable(TableName.valueOf(TABLE_RECEIVE_CONTENT_EMAIL)); //用于存放多个关注的用户的发布的多条微博rowkey信息 List<Put> recPuts = new ArrayList<Put>(); for(byte[] rk : rowkeys){ Put put = new Put(Bytes.toBytes(uid)); //uid_timestamp String rowKey = Bytes.toString(rk); //借取uid String attendUID = rowKey.substring(0, rowKey.indexOf("_")); long timestamp = Long.parseLong(rowKey.substring(rowKey.indexOf("_") + 1)); //将微博rowkey添加到指定单元格中 put.add(Bytes.toBytes("info"), Bytes.toBytes(attendUID), timestamp, rk); recPuts.add(put); } recTBL.put(recPuts); } catch (IOException e) { e.printStackTrace(); }finally{ if(null != connection){ try { connection.close(); } catch (IOException e) { // TODO Auto-generated catch block e.printStackTrace(); } } } } |
7) 移除(取关)用户
a、在微博用户关系表中,对当前主动操作的用户移除取关的好友(attends)
b、在微博用户关系表中,对被取关的用户移除粉丝
c、微博收件箱中删除取关的用户发布的微博
代码:public void removeAttends(String uid, String... attends)
|
/** * 取消关注(remove) * a、在微博用户关系表中,对当前主动操作的用户删除对应取关的好友 * b、在微博用户关系表中,对被取消关注的人删除粉丝(当前操作人) * c、从收件箱中,删除取关的人的微博的rowkey */ public void removeAttends(String uid, String... attends){ //过滤数据 if(uid == null || uid.length() <= 0 || attends == null || attends.length <= 0) return; HConnection connection = null; try { connection = HConnectionManager.createConnection(conf); //a、在微博用户关系表中,删除已关注的好友 HTableInterface relationsTBL = connection.getTable(TableName.valueOf(TABLE_RELATIONS)); //待删除的用户关系表中的所有数据 List<Delete> deletes = new ArrayList<Delete>(); //当前取关操作者的uid对应的Delete对象 Delete attendDelete = new Delete(Bytes.toBytes(uid)); //遍历取关,同时每次取关都要将被取关的人的粉丝-1 for(String attend : attends){ attendDelete.deleteColumn(Bytes.toBytes("attends"), Bytes.toBytes(attend)); //b Delete fansDelete = new Delete(Bytes.toBytes(attend)); fansDelete.deleteColumn(Bytes.toBytes("fans"), Bytes.toBytes(uid)); deletes.add(fansDelete); } deletes.add(attendDelete); relationsTBL.delete(deletes); //c、删除取关的人的微博rowkey 从 收件箱表中 HTableInterface recTBL = connection.getTable(TableName.valueOf(TABLE_RECEIVE_CONTENT_EMAIL)); Delete recDelete = new Delete(Bytes.toBytes(uid)); for(String attend : attends){ recDelete.deleteColumn(Bytes.toBytes("info"), Bytes.toBytes(attend)); } recTBL.delete(recDelete); } catch (IOException e) { e.printStackTrace(); } } |
8) 获取关注的人的微博内容
a、从微博收件箱中获取所关注的用户的微博RowKey
b、根据获取的RowKey,得到微博内容
代码实现:public List<Message> getAttendsContent(String uid)
|
/** * 获取微博实际内容 * a、从微博收件箱中获取所有关注的人的发布的微博的rowkey * b、根据得到的rowkey去微博内容表中得到数据 * c、将得到的数据封装到Message对象中 */ public List<Message> getAttendsContent(String uid){ HConnection connection = null; try { connection = HConnectionManager.createConnection(conf); HTableInterface recTBL = connection.getTable(TableName.valueOf(TABLE_RECEIVE_CONTENT_EMAIL)); //a、从收件箱中取得微博rowKey Get get = new Get(Bytes.toBytes(uid)); //设置最大版本号 get.setMaxVersions(5); List<byte[]> rowkeys = new ArrayList<byte[]>(); Result result = recTBL.get(get); for(Cell cell : result.rawCells()){ rowkeys.add(CellUtil.cloneValue(cell)); } //b、根据取出的所有rowkey去微博内容表中检索数据 HTableInterface contentTBL = connection.getTable(TableName.valueOf(TABLE_CONTENT)); List<Get> gets = new ArrayList<Get>(); //根据rowkey取出对应微博的具体内容 for(byte[] rk : rowkeys){ Get g = new Get(rk); gets.add(g); } //得到所有的微博内容的result对象 Result[] results = contentTBL.get(gets); List<Message> messages = new ArrayList<Message>(); for(Result res : results){ for(Cell cell : res.rawCells()){ Message message = new Message(); String rowKey = Bytes.toString(CellUtil.cloneRow(cell)); String userid = rowKey.substring(0, rowKey.indexOf("_")); String timestamp = rowKey.substring(rowKey.indexOf("_") + 1); String content = Bytes.toString(CellUtil.cloneValue(cell)); message.setContent(content); message.setTimestamp(timestamp); message.setUid(userid); messages.add(message); } } return messages; } catch (IOException e) { e.printStackTrace(); }finally{ try { connection.close(); } catch (IOException e) { e.printStackTrace(); } } return null; } |
9) 测试
-- 测试发布微博内容
public void testPublishContent(WeiBo wb)
-- 测试添加关注
public void testAddAttend(WeiBo wb)
-- 测试取消关注
public void testRemoveAttend(WeiBo wb)
-- 测试展示内容
public void testShowMessage(WeiBo wb)
代码:
|
/** * 发布微博内容 * 添加关注 * 取消关注 * 展示内容 */ public void testPublishContent(WeiBo wb){ wb.publishContent("0001", "今天买了一包空气,送了点薯片,非常开心!!"); wb.publishContent("0001", "今天天气不错。"); } public void testAddAttend(WeiBo wb){ wb.publishContent("0008", "准备下课!"); wb.publishContent("0009", "准备关机!"); wb.addAttends("0001", "0008", "0009"); } public void testRemoveAttend(WeiBo wb){ wb.removeAttends("0001", "0008"); } public void testShowMessage(WeiBo wb){ List<Message> messages = wb.getAttendsContent("0001"); for(Message message : messages){ System.out.println(message); } } public static void main(String[] args) { WeiBo weibo = new WeiBo(); weibo.initTable(); weibo.testPublishContent(weibo); weibo.testAddAttend(weibo); weibo.testShowMessage(weibo); weibo.testRemoveAttend(weibo); weibo.testShowMessage(weibo); } |
五、总结
不一定所有的企业都会使用HBase,大数据的框架可以是相互配合相互依赖的,同时,根据不同的业务,部分框架之间的使用也可以是相互独立的。例如有些企业在处理整个业务时,只是用HDFS+Spark部分的内容。所以在学习HBase框架时,一定要有宏观思维,了解其框架特性,不一定非要在所有的业务中使用所有的框架,要具体情况具体分析,酌情选择。
参考:尽际
Hbase项目(完整版)的更多相关文章
- 使用Nginx+uwsgi在亚马逊云服务器上部署python+django项目完整版(二)——部署配置及相关知识
---恢复内容开始--- 一.前提: 1.django项目文件已放置在云服务器上,配置好运行环境,可正常运行 2.云服务器可正常连接 二.相关知识 1.python manage.py runserv ...
- Eclipse 搭建tomcat+动态项目完整版
1. Tomcat搭建 1.新加服务器,右击控制台的server目录->new->server->选择本地tomcat 2.配置tomcat属性(如果更改失败,将tomcat下的项目 ...
- 完成向后台添加用户的ssm项目,完整版
1:ssm框架整合 1.1添加maven依赖pom.xml <project xmlns="http://maven.apache.org/POM/4.0.0" xmlns: ...
- 老王Python培训视频教程(价值500元)【基础进阶项目篇 – 完整版】
老王Python培训视频教程(价值500元)[基础进阶项目篇 – 完整版] 教学大纲python基础篇1-25课时1.虚拟机安装ubuntu开发环境,第一个程序:hello python! (配置开发 ...
- Asp.NET Core2.0 项目实战入门视频课程_完整版
END OR START? 看到这个标题,你开不开心,激不激动呢? 没错,.net core的入门课程已经完毕了.52ABP.School项目从11月19日,第一章视频的试录制,到今天完整版出炉,离不 ...
- Spring Boot → 11:项目实战-账单管理系统完整版
Spring Boot → 11:项目实战-账单管理系统完整版
- flexbox-CSS3弹性盒模型flexbox完整版教程
原文链接:http://caibaojian.com/flexbox-guide.html flexbox-CSS3弹性盒模型flexbox完整版教程 A-A+ 前端博客•2014-05-08•前端开 ...
- RadioStream应用源码完整版(iphone版和ipad版)
RadioStream应用源码完整版(iphone版和ipad版),这个项目是从那个ios教程网分析过了的,也是一个不错的国外音乐应用的,支持iphone版和ipad版. <ignore_js_ ...
- Genymotion配置及使用教程(最新最完整版附各部分下载地址)
Genymotion配置及使用教程(最新最完整版附各部分下载地址) FROM:http://blog.csdn.net/beiminglei/article/details/13776013 早都听说 ...
随机推荐
- NEU 1009 Happiness Hotel
1009: Happiness Hotel 时间限制: 1 Sec 内存限制: 128 MB提交: 173 解决: 19[提交][状态][讨论版] 题目描述 The life of Little ...
- [MySQL] 按年度、季度、月度、周、日统计查询
该死的mysql没有提供unix时间戳的专门处理函数,所以,如果遇到时间分组,而你用的又是整型unix时间戳,则只有转化为mysql的其他日期类型! FROM_UNIXTIM()将unix时间戳转 ...
- linux服务器网站安全狗安装教程
1.下载服务器安全狗和服务器网站安全狗,选择好版本.http://download.safedog.cn/safedog_linux64.tar.gz 这个是网站安全狗的下载地址2.登录centos进 ...
- .NET MVC权限设计思考之切入点
在WebForm下我们一般会设计个PageBase继承Page,在OnInit方法中实现对基本权限的验证业务,然后所有的页面在继承PageBase直接继承这项基本权验证业务.而在.NET MVC下我们 ...
- <Android Framework 之路>Android5.1 Camera Framework(三)
上一次讲解了一下startPreview过程,主要是为了画出一条大致的从上到下的线条,今天我们看一下Camera在Framework的sendCommand和dataCallback,这部分属于衔接过 ...
- Android设计模式——抽象工厂方法模式
1.抽象工厂方法模式:为了创建一组或相互依赖的对象提供一个接口,而不需要指定它们是具体类……无语 2.找个代码看看: 抽象工厂类<成员为接口> /** * 抽象工厂 * */ public ...
- 打包phar文件过大的问题。
根据一个开源工具得到的灵感,使用流打包,并使用token_get_all移除了所用PHP文件的空白.现在打包出来只有93k了.谢谢关注. 我一个简单的文件,加上一个symfony的process包,打 ...
- python学习——正则表达式
正则表达式 正则表达式的主要作用就是对字符串进行匹配,通过匹配,进行筛选,选择出符合规则的字符串.其实正则表达式的作用就像是一个过滤器一样.你输入好自己的 ...
- oracle插入或更新某一个指定列来执行触发器
表结构: create table TZ_GXSX ( ID VARCHAR2(15), PROJECT VARCHAR2(50), TXYX NUMBER(22) default '0', CDAT ...
- Side effect (computer science)
In computer science, a function or expression is said to have a side effect if it modifies some stat ...