
python fuzzy c-means demo
摘自:http://pythonhosted.org/scikit-fuzzy/auto_examples/plot_cmeans.html#example-plot-cmeans-py,加入了自己的理解!
# coding: utf-8

from __future__ import division, print_function

import numpy as np

import matplotlib.pyplot as plt

import skfuzzy as fuzz

colors = ['b', 'orange', 'g', 'r', 'c', 'm', 'y', 'k', 'Brown', 'ForestGreen']

#plt.figure(1)

# Define three cluster centers

centers = [[4, 2],

           [1, 7],

           [5, 6]]

# Define three cluster sigmas in x and y, respectively

sigmas = [[0.8, 0.3],

          [0.3, 0.5],

          [1.1, 0.7]]

# Generate test data

np.random.seed(42)  # Set seed for reproducibility

xpts = np.zeros(1)

ypts = np.zeros(1)

labels = np.zeros(1)

# 伪造3个高斯分布,以u和sigma作为特征分布

for i, ((xmu, ymu), (xsigma, ysigma)) in enumerate(zip(centers, sigmas)):

    xpts = np.hstack((xpts, np.random.standard_normal(200) * xsigma + xmu))

    ypts = np.hstack((ypts, np.random.standard_normal(200) * ysigma + ymu))

    labels = np.hstack((labels, np.ones(200) * i))

# Visualize the test data

fig0, ax0 = plt.subplots()

for label in range(3):

    ax0.plot(xpts[labels == label], ypts[labels == label], '.',

             color=colors[label])

ax0.set_title('Test data: 200 points x3 clusters.')

#plt.show()

# Set up the loop and plot

alldata = np.vstack((xpts, ypts))

#print alldata

# Regenerate fuzzy model with 3 cluster centers - note that center ordering

# is random in this clustering algorithm, so the centers may change places

# 使用FCM的模型训练,注意,聚集的结果在cntr里,我的机器上运行结果为:

'''

[ 5.26724628  6.14961671]

[ 1.01594428  6.98518109]

[ 3.95895105  2.05785626]

'''

cntr, u_orig, _, _, _, _, _ = fuzz.cluster.cmeans(

    alldata, 3, 2, error=0.005, maxiter=1000)

# Show 3-cluster model

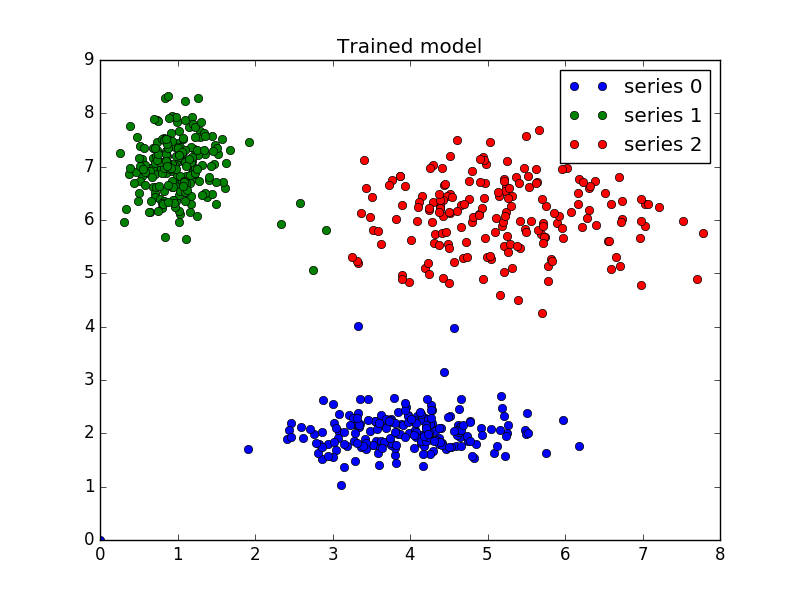
fig2, ax2 = plt.subplots()

ax2.set_title('Trained model')

for j in range(3):

    ax2.plot(alldata[0, u_orig.argmax(axis=0) == j],

             alldata[1, u_orig.argmax(axis=0) == j], 'o',

             label='series ' + str(j))

# 将聚类的中心点标记在图上

for pt in cntr:

    print (pt)

    ax2.plot(pt[0], pt[1], 's')

ax2.legend()

# Generate uniformly sampled data spread across the range [0, 10] in x and y

newdata = np.random.uniform(0, 1, (1100, 2)) * 10

# Predict new cluster membership with `cmeans_predict` as well as

# `cntr` from the 3-cluster model

u, u0, d, jm, p, fpc = fuzz.cluster.cmeans_predict(newdata.T, cntr, 2, error=0.005, maxiter=1000)

# Plot the classified uniform data. Note for visualization the maximum

# membership value has been taken at each point (i.e. these are hardened,

# not fuzzy results visualized) but the full fuzzy result is the output

# from cmeans_predict.

'''

按照行求max的index,index范围为0~2

u长成这样子:

[[ 0.54256489  0.0631068   0.00291562 ...,  0.15580619  0.17543005

   0.15652909]

 [ 0.35176643  0.02712891  0.99530463 ...,  0.2065651   0.31637093

   0.22570475]

 [ 0.10566868  0.90976429  0.00177975 ...,  0.63762871  0.50819901

   0.61776617]]

最后返回像:

[0 2 1 ..., 2 2 2]

其实,u就是聚类的概率啊,特定列的行数值求和就是1哇!

下面返回的cluster_membership 其实就是聚类的结果,0表示聚在类别0,2表示聚集在类别2,...!

补充:(np.argmax([[1,2,3],[4,1,4],[2,8,9]], axis=0)) == [1,2,2]

'''

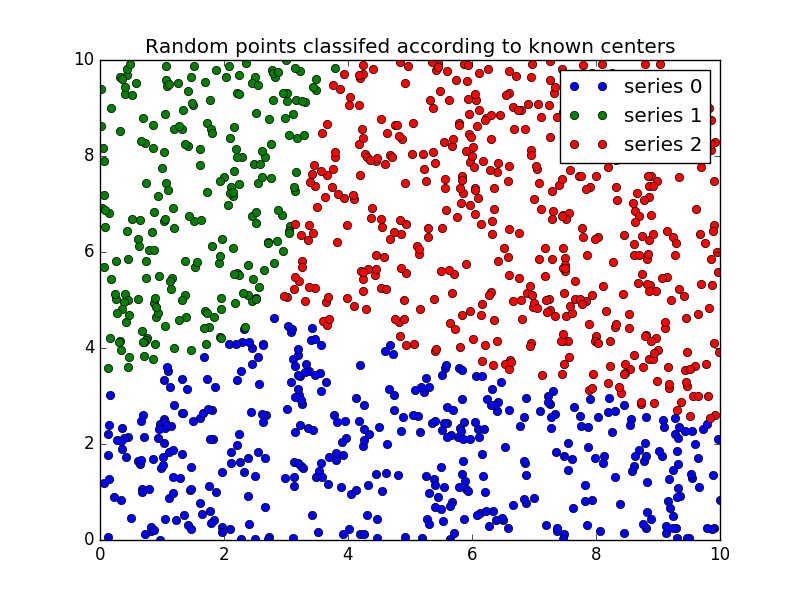
cluster_membership = np.argmax(u, axis=0)  # Hardening for visualization

fig3, ax3 = plt.subplots()

ax3.set_title('Random points classifed according to known centers')

# 将聚类预测的三类结果绘图

for j in range(3):

    ax3.plot(newdata[cluster_membership == j, 0],

             newdata[cluster_membership == j, 1], 'o',

             label='series ' + str(j))

ax3.legend()

plt.show()
预测:
经过测试,是可以处理三维数据聚类的:
    centers = [[4, 2, 100],

           [1, 7, 200],

           [5, 6, 300]]

    sigmas = [[0.8, 0.3, 0.1],

              [0.3, 0.5, 0.2],

              [1.1, 0.7, 0.9]]

    # Generate test data

    np.random.seed(42)  # Set seed for reproducibility

    xpts = np.zeros(1)

    ypts = np.zeros(1)

    zpts = np.zeros(1)

    labels = np.zeros(1)

    print "*********************"

    for i, ((xmu, ymu, zmu), (xsigma, ysigma, zsigma)) in enumerate(zip(centers, sigmas)):

        xpts = np.hstack((xpts, np.random.standard_normal(200) * xsigma + xmu))

        ypts = np.hstack((ypts, np.random.standard_normal(200) * ysigma + ymu))

        zpts = np.hstack((zpts, np.random.standard_normal(200) * zsigma + zmu))

        labels = np.hstack((labels, np.ones(200) * i))

    alldata = np.vstack((xpts, ypts, zpts))

    cntr, u_orig, _, _, _, _, _ = fuzz.cluster.cmeans(alldata, 3, 2, error=0.005, maxiter=1000)

    print "*********************"

    for pt in cntr:

        print (pt)

    print "*********************"
结果为:
*********************

*********************

[  3.95666441   2.02029976  99.72164117]

[   5.00568412    6.05765152  300.09246382]

[   1.00252037    7.06293498  199.99320473]

*********************
python fuzzy c-means demo的更多相关文章
- Fuzzy C Means 算法及其 Python 实现——写得很清楚,见原文
Fuzzy C Means 算法及其 Python 实现 转自:http://note4code.com/2015/04/14/fuzzy-c-means-%E7%AE%97%E6%B3%95%E5% ...
- appium+Python真机运行测试demo的方法
appium+Python真机运行测试demo的方法 一, 打开手机的USB调试模式 二, 连接手机到电脑 将手机用数据线连接到电脑,并授权USB调试模式.查看连接的效果,在cmd下运行命 ...
- Python caffe.TEST Example(Demo)
下面提供了caffe python的六个测试demo,大家可以根据自己的需求进行修改. Example 1 From project FaceDetection_CNN-master, under d ...
- 第一个 Python 程序 - Email Manager Demo
看了一些基础的 Python 新手教程后,深深感觉到 Python 的简洁与强大,这是我的第一个 Python Demo.下面是完整代码与执行截图. 代码: # encoding: utf-8 ''' ...
- python 词云小demo
词云小demo jiebawordcloud 一 什么是词云? 由词汇组成类似云的彩色图形.“词云”就是对网络文本中出现频率较高的“关键词”予以视觉上的突出,形成“关键词云层”或“关键词渲染”,从而过 ...
- Python实例---简单购物车Demo
简单购物车Demo # version: python3.2.5 # author: 'FTL1012' # time: 2017/12/7 09:16 product_list = ( ['Java ...
- python spark 决策树 入门demo
Refer to the DecisionTree Python docs and DecisionTreeModel Python docs for more details on the API. ...
- Python 2.7.9 Demo - 获取调用的参数
#coding=utf-8 #!/usr/bin/python import sys; print("The command line parameters are : "); f ...
- Python 2.7.9 Demo - ini文件的读、写
ini文件 [weixin_info] hello = Nick Huang #coding=utf-8 #!/usr/bin/python import ConfigParser; cp = Con ...
随机推荐
- Python金融量化
Python股票数据分析 最近在学习基于python的股票数据分析,其中主要用到了tushare和seaborn.tushare是一款财经类数据接口包,国内的股票数据还是比较全的 官网地址:http: ...
- Html Ajax上传文件,form表单下载文件
Html中的代码: <!DOCTYPE html> <html> <head> <meta http-equiv="Content-Type&quo ...
- Linux下实现视频读取
V4L(video4linux是一些视频系统,视频软件.音频软件的基础,经常时候在需要采集图像的场合,如视频监控,webcam,可视电话,经常使用在embedded linux中是linux嵌入式开发 ...
- jQuery操作DOM知识总结
jquery操作DOM(节点) 1.创建元素 //$(htmlStr) //htmlStr:html格式的字符串 $("<span>这是一个span元素</span> ...
- poj1111 Image Perimeters 广搜
题目大意: 输入一个矩阵,再输入其中一个“X”的位置(从1开始).从该位置向八个方向扩展,如果是“X”就可以并在一起.问最后得到的模块的周长是多少. 解题思路: 按照广搜的思路来做.用一个二维的数组标 ...
- aes加密算法的一个问题
百度“delphi aes”出来的结果,千篇一律,都是相互转载,但是没有人发现EldoS, Alexander Ionov于1998-2001写的ElAes.pas代码,存在一个问题. 相同的key和 ...
- DataFrame与数据库的相互转化
在Spark中,Dataframe简直可以称为内存中的文本文件. 就像在电脑上直接操作txt. csv. json文件一样简单. val sparkConf = new SparkConf().set ...
- sql变量需要加小括号
declare @num int select top (@num) * from A --注意,使用变量来查询的时候,单个变量需要使用()
- VTK资料收集
使用Qt Creator开发VTK 原文链接:http://blog.csdn.net/numit/article/details/10200507 VTK应用系列:非常强大!非常善良 05-VTK在 ...
- K8s的工作原理
title: Kubernetes之初探 subtitle: K8s的工作原理 date: 2018-09-18 18:26:37 --- K8s概述 我清晰地记得曾经读到过的一篇博文,上面是这样写的 ...