使用latex绘制多层神经网络结构图
1,使用Tikz包;
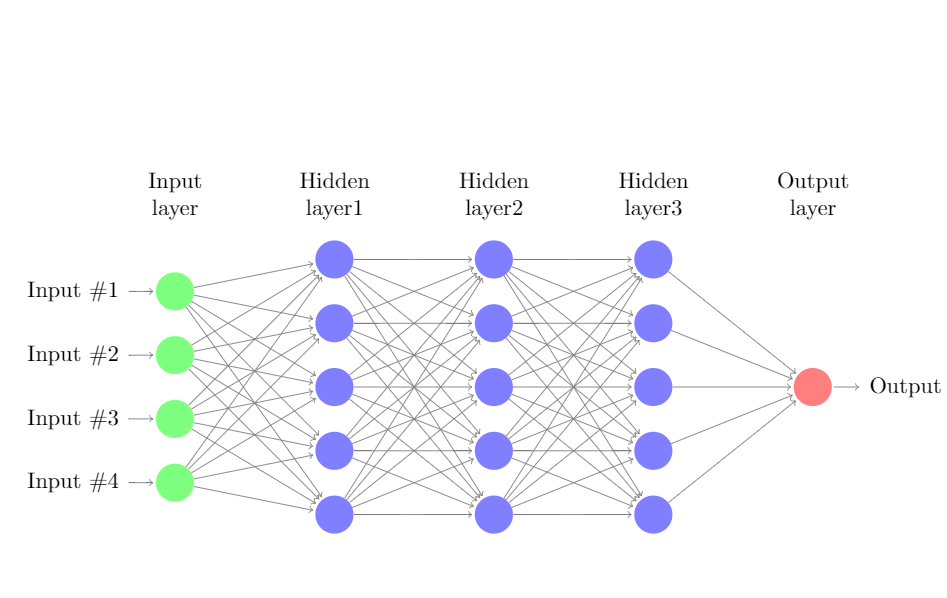
2,参考官方例程单层神经网络结构,绘制了一个含有3隐藏层的BP神经网络节点图
代码如下:
 \documentclass{article}

 \usepackage{tikz}

 \begin{document}

 \pagestyle{empty}

 \def\layersep{2.5cm}

 \begin{tikzpicture}[shorten >=1pt,->,draw=black!50, node distance=\layersep]

     \tikzstyle{every pin edge}=[<-,shorten <=1pt]

     \tikzstyle{neuron}=[circle,fill=black!25,minimum size=17pt,inner sep=0pt]

     \tikzstyle{input neuron}=[neuron, fill=green!50];

     \tikzstyle{output neuron}=[neuron, fill=red!50];

     \tikzstyle{hidden neuron1}=[neuron, fill=blue!50];

     \tikzstyle{hidden neuron2}=[neuron, fill=blue!50];

     \tikzstyle{hidden neuron3}=[neuron, fill=blue!50];

     \tikzstyle{annot} = [text width=4em, text centered]

     % Draw the input layer nodes

     \foreach \name / \y in {1,...,4}

     % This is the same as writing \foreach \name / \y in {1/1,2/2,3/3,4/4}

         \node[input neuron, pin=left:Input \#\y] (I-\name) at (0,-\y) {};

     % Draw the hidden layer1 nodes

     \foreach \name / \y in {1,...,5}

         \path[yshift=0.5cm]

             node[hidden neuron1] (H1-\name) at (\layersep,-\y cm) {};

    %Draw the hidden layer2 nodes

     \foreach \name / \y in {1,...,5}

         \path[yshift=0.5cm]

             node[hidden neuron2,right of=H1] (H2-\name) at (\layersep,-\y cm){};

     %Draw the hidden layer3 nodes

     \foreach \name / \y in {1,...,5}

         \path[yshift=0.5cm]

             node[hidden neuron3,right of=H2] (H3-\name) at (2*\layersep,-\y cm){};

     % Draw the output layer node

     \node[output neuron,pin={[pin edge={->}]right:Output}, right of=H3-3] (O) {};

     % Connect every node in the input layer with every node in the

     % hidden layer.

     \foreach \source in {1,...,4}

         \foreach \dest in {1,...,5}

             \path (I-\source) edge (H1-\dest);

     %

     \foreach \source in {1,...,5}

         \foreach \dest in {1,...,5}

             \path (H1-\source) edge (H2-\dest);

     %

     \foreach \source in {1,...,5}

         \foreach \dest in {1,...,5}

             \path (H2-\source) edge (H3-\dest);

     % Connect every node in the hidden layer with the output layer

     \foreach \source in {1,...,5}

         \path (H3-\source) edge (O);

     % Annotate the layers

     \node[annot,above of=H1-1, node distance=1cm] (hl) {Hidden layer1};

     \node[annot,left of=hl] {Input layer};

     \node[annot,right of=hl] (h2){Hidden layer2};

     \node[annot,right of=h2] (h3){Hidden layer3};

     \node[annot,right of=h3] {Output layer};

 \end{tikzpicture}

 % End of code

 \end{document}
效果如图:
使用latex绘制多层神经网络结构图的更多相关文章
- 使用NetworkX模块绘制深度神经网络(DNN)结构图
本文将展示如何利用Python中的NetworkX模块来绘制深度神经网络(DNN)结构图. 在文章Keras入门(一)搭建深度神经网络(DNN)解决多分类问题中,我们创建的DNN结构图如下: ...
- 用Tensorflow实现多层神经网络
用Tensorflow实现多层神经网络 觉得有用的话,欢迎一起讨论相互学习~Follow Me 参考文献 Tensorflow机器学习实战指南 源代码请点击下方链接欢迎加星 ReLU激活函数/L1范数 ...
- 多层神经网络BP算法 原理及推导
首先什么是人工神经网络?简单来说就是将单个感知器作为一个神经网络节点,然后用此类节点组成一个层次网络结构,我们称此网络即为人工神经网络(本人自己的理解).当网络的层次大于等于3层(输入层+隐藏层(大于 ...
- TensorFlow 训练MNIST数据集(2)—— 多层神经网络
在我的上一篇随笔中,采用了单层神经网络来对MNIST进行训练,在测试集中只有约90%的正确率.这次换一种神经网络(多层神经网络)来进行训练和测试. 1.获取MNIST数据 MNIST数据集只要一行代码 ...
- Spark2.0机器学习系列之7: MLPC(多层神经网络)
Spark2.0 MLPC(多层神经网络分类器)算法概述 MultilayerPerceptronClassifier(MLPC)这是一个基于前馈神经网络的分类器,它是一种在输入层与输出层之间含有一层 ...
- ufldl学习笔记与编程作业:Multi-Layer Neural Network(多层神经网络+识别手写体编程)
ufldl学习笔记与编程作业:Multi-Layer Neural Network(多层神经网络+识别手写体编程) ufldl出了新教程,感觉比之前的好,从基础讲起,系统清晰,又有编程实践. 在dee ...
- ubuntu 绘制lenet网络结构图遇到的问题汇总
Couldn't import dot_parser, loading of dot files will not be possible的问题 1 .sudo pip uninstall pypar ...
- 使用Graphviz和Pyreverse绘制Python项目结构图
使用Graphviz和Pyreverse绘制Python项目结构图 简介 Graphviz开源的图形绘制工具包 Pyreverse分析Python代码和类关系的工具 安装 安装Graphviz 官网下 ...
- 学习笔记TF011:多层神经网络
线性回归.对数几率回归模型,本质上是单个神经元.计算输入特征加权和.偏置视为每个样本输入特征为1权重,计算特征线性组合.激活(传递)函数 计算输出.线性回归,恒等式(值不变).对数几率回归,sigmo ...
随机推荐
- chromedriver安装报错
解决方法: 可以使用 npm init -f命令生成package.json,package.json中缺少的字段可以参照模板 package.json进行填充,package.json中的字段 ...
- B. pSort
题目链接: http://codeforces.com/problemset/problem/28/B 题意: 给一个n,原本有个1到n按顺序排列的序列,给一个序列问,在给一个数组,表示这个位置的数可 ...
- 第6章 RPC之道
6.1 认识RPC 分布式.微服务的架构思维中都不能缺少 RPC 的影子 RPC(Remote Procedure Call)远程过程调用.通过网络在跨进程的两台服务器之间传输信息,我们使用的时候不用 ...
- CentOS中svn的搭建
1:使用yum源进行安装 # rpm -qa subversion //检查是否自带了低版本的svn #yum remove subversion //卸载低版本的svn #Yum install s ...
- Java中的动态代理(jdk和cglib)
JAVA的动态代理 代理模式 代理模式是常用的java设计模式,他的特征是代理类与委托类有同样的接口,代理类主要负责为委托类预处理消息.过滤消息.把消息转发给委托类,以及事后处理消息等.代理类与委托类 ...
- 用C实现基本的输出参数个数与参数内容
开发环境为 centos7 和 gcc4.8.5,代码如下: /** * 用C实现基本的输出参数个数与参数内容 */ #include <stdio.h> int main(int arg ...
- go语言从例子开始之Example6.if/else
if 和 else 分支结构在 Go 中当然是直接了当的了. package main import "fmt" func main() { 这里是一个基本的例子. if 7%2 ...
- 在eclipse中添加svn插件
1.点击菜单栏中的help选项,然后选择Install New Software,然后点击ADD,输入: name:subclipse url:http://subclipse.tigris. ...
- StarUML 破解方法2.X(转)
下载地址:https://www.jb51.net/softs/558248.html#download 在安装目录的:StarUML\www\license\node 找到LicenseManage ...
- Java运行显示无待入值
忘记添加@Param()