本篇文章给大家带来的内容是关于Laravel框架下路由的使用(源码解析),有一定的参考价值,有需要的朋友可以参考一下,希望对你有所帮助。

前言

我的解析文章并非深层次多领域的解析攻略。但是参考着开发文档看此类文章会让你在日常开发中更上一层楼。

废话不多说,我们开始本章的讲解。

入口

Laravel启动后,会先加载服务提供者、中间件等组件,在查找路由之前因为我们使用的是门面,所以先要查到Route的实体类。

注册

第一步当然还是通过服务提供者,因为这是laravel启动的关键,在 RouteServiceProvider 内加载路由文件。

1

2

3

4

5

6

7

protected function mapApiRoutes()

{

    Route::prefix('api')

         ->middleware('api')

         ->namespace($this->namespace// 设置所处命名空间

         ->group(base_path('routes/api.php'));  //所得路由文件绝对路径

}

首先require是不可缺少的。因路由文件中没有命名空间。 Illuminate\Routing\Router 下方法

1

2

3

4

5

6

7

8

9

10

protected function loadRoutes($routes)

{

    if ($routes instanceof Closure) {

        $routes($this);

    } else {

        $router = $this;

        require $routes;

    }

}

随后通过路由找到指定方法,依旧是 Illuminate\Routing\Router 内有你所使用的所有路由相关方法,例如get、post、put、patch等等,他们都调用了统一的方法 addRoute

1

2

3

4

public function addRoute($methods, $uri, $action)

{

    return $this->routes->add($this->createRoute($methods, $uri, $action));

}

之后通过 Illuminate\Routing\RouteCollection addToCollections 方法添加到集合中

1

2

3

4

5

6

7

8

9

10

protected function addToCollections($route)

{

    $domainAndUri = $route->getDomain().$route->uri();

    foreach ($route->methods() as $method) {

        $this->routes[$method][$domainAndUri] = $route;

    }

    $this->allRoutes[$method.$domainAndUri] = $route;

}

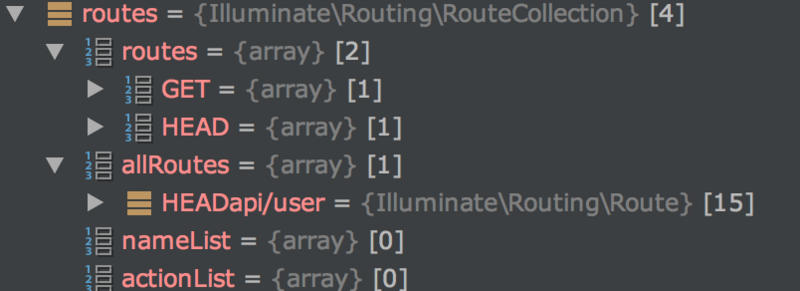
添加后的结果如下图所示

调用

通过 Illuminate\Routing\Router 方法开始运行路由实例化的逻辑

1

2

3

4

5

6

7

8

9

10

11

12

13

14

15

16

17

18

19

20

21

22

23

24

25

26

27

28

29

protected function runRoute(Request $request, Route $route)

{

    $request->setRouteResolver(function () use ($route) {


        return $route;

    });

    $this->events->dispatch(new Events\RouteMatched($route, $request));

    return $this->prepareResponse($request,

        $this->runRouteWithinStack($route, $request)

    );

}

....

protected function runRouteWithinStack(Route $route, Request $request)

{

    $shouldSkipMiddleware = $this->container->bound('middleware.disable') &&

                            $this->container->make('middleware.disable') === true;

    $middleware = $shouldSkipMiddleware ? [] : $this->gatherRouteMiddleware($route);

    return (new Pipeline($this->container))

                    ->send($request)

                    ->through($middleware)

                    ->then(function ($request) use ($route) {

                        return $this->prepareResponse(

                            $request, $route->run() // 此处调用run方法

                        );

                    });

}

在 Illuminate\Routing\Route 下 run 方用于执行控制器的方法

1

2

3

4

5

6

7

8

9

10

11

12

13

14

public function run()

{

    $this->container = $this->container ?: new Container;

    try {

        if ($this->isControllerAction()) {

            return $this->runController(); //运行一个路由并作出响应

        }


        return $this->runCallable();

    } catch (HttpResponseException $e) {

        return $e->getResponse();

    }

}

从上述方法内可以看出 runController 是运行路由的关键,方法内运行了一个调度程序,将控制器 $this->getController() 和控制器方法 $this->getControllerMethod() 传入到 dispatch 调度方法内

1

2

3

4

5

6

7

protected function runController()

{


    return $this->controllerDispatcher()->dispatch(

        $this, $this->getController(), $this->getControllerMethod()

    );

}

这里注意 getController() 才是真正的将控制器实例化的方法

1

2

3

4

5

6

7

8

9

10

public function getController()

{


    if (! $this->controller) {

        $class = $this->parseControllerCallback()[0]; // 0=>控制器 xxController 1=>方法名 index

        $this->controller = $this->container->make(ltrim($class, '\\')); // 交给容器进行反射

    }

    return $this->controller;

}

链接:https://pan.baidu.com/s/1v5gm7n0L7TGyejCmQrMh2g 提取码:x2p5

免费分享,但是X度限制严重,如若链接失效点击链接或搜索加群 群号518475424

实例化

依旧通过反射加载路由指定的控制器,这个时候build的参数$concrete = App\Api\Controllers\XxxController

1

2

3

4

5

6

7

8

9

10

11

12

13

14

15

16

17

18

19

20

21

22

23

24

25

26

27

28

29

30

31

32

33

34

35

36

37

38

39

40

41

42

43

public function build($concrete)

{

    // If the concrete type is actually a Closure, we will just execute it and

    // hand back the results of the functions, which allows functions to be

    // used as resolvers for more fine-tuned resolution of these objects.

    if ($concrete instanceof Closure) {

        return $concrete($this, $this->getLastParameterOverride());

    }


    $reflector = new ReflectionClass($concrete);

    // If the type is not instantiable, the developer is attempting to resolve

    // an abstract type such as an Interface of Abstract Class and there is

    // no binding registered for the abstractions so we need to bail out.

    if (! $reflector->isInstantiable()) {

        return $this->notInstantiable($concrete);

    }


    $this->buildStack[] = $concrete;

    $constructor = $reflector->getConstructor();

    // If there are no constructors, that means there are no dependencies then

    // we can just resolve the instances of the objects right away, without

    // resolving any other types or dependencies out of these containers.

    if (is_null($constructor)) {


            array_pop($this->buildStack);


            return new $concrete;

    }

    $dependencies = $constructor->getParameters();

    // Once we have all the constructor's parameters we can create each of the

    // dependency instances and then use the reflection instances to make a

    // new instance of this class, injecting the created dependencies in.

    $instances = $this->resolveDependencies(

        $dependencies

    );

    array_pop($this->buildStack);


    return $reflector->newInstanceArgs($instances);

}

这时将返回控制器的实例,下面将通过url访问指定方法,一般控制器都会继承父类 Illuminate\Routing\Controller ,laravel为其设置了别名 BaseController

1

2

3

4

5

6

7

8

9

10

11

12

13

14

public function dispatch(Route $route, $controller, $method)

{


    $parameters = $this->resolveClassMethodDependencies(

        $route->parametersWithoutNulls(), $controller, $method

    );

    if (method_exists($controller, 'callAction')) {

            return $controller->callAction($method, $parameters);

    }


    return $controller->{$method}(...array_values($parameters));

}

Laravel通过controller继承的callAction去调用子类的指定方法,也就是我们希望调用的自定义方法。

1

2

3

4

public function callAction($method, $parameters)

{

    return call_user_func_array([$this, $method], $parameters);

}

Laravel框架下路由的使用(源码解析)的更多相关文章

  1. Java集合框架——jdk 1.8 ArrayList 源码解析

    前言:作为菜鸟,需要经常回头巩固一下基础知识,今天看看 jdk 1.8 的源码,这里记录 ArrayList 的实现. 一.简介 ArrayList 是有序的集合: 底层采用数组实现对数据的增删查改: ...

  2. Spring核心框架 - AOP的原理及源码解析

    一.AOP的体系结构 如下图所示:(引自AOP联盟) 层次3语言和开发环境:基础是指待增加对象或者目标对象:切面通常包括对于基础的增加应用:配置是指AOP体系中提供的配置环境或者编织配置,通过该配置A ...

  3. 通讯框架 t-io 学习——websocket 部分源码解析

    前言 前端时间看了看t-io的websocket部分源码,于是抽时间看了看websocket的握手和他的通讯机制.本篇只是简单记录一下websocket握手部分. WebSocket握手 好多人都用过 ...

  4. Java集合框架之二:LinkedList源码解析

    版权声明:本文为博主原创文章,转载请注明出处,欢迎交流学习! LinkedList底层是通过双向循环链表来实现的,其结构如下图所示: 链表的组成元素我们称之为节点,节点由三部分组成:前一个节点的引用地 ...

  5. laravel源码解析

    本专栏系列文章已经收录到 GitBooklaravel源码解析 Laravel Passport——OAuth2 API 认证系统源码解析(下)laravel源码解析 Laravel Passport ...

  6. [源码解析] 深度学习分布式训练框架 horovod (4) --- 网络基础 & Driver

    [源码解析] 深度学习分布式训练框架 horovod (4) --- 网络基础 & Driver 目录 [源码解析] 深度学习分布式训练框架 horovod (4) --- 网络基础 & ...

  7. [源码解析] 深度学习分布式训练框架 horovod (8) --- on spark

    [源码解析] 深度学习分布式训练框架 horovod (8) --- on spark 目录 [源码解析] 深度学习分布式训练框架 horovod (8) --- on spark 0x00 摘要 0 ...

  8. [源码解析] 深度学习分布式训练框架 horovod (10) --- run on spark

    [源码解析] 深度学习分布式训练框架 horovod (10) --- run on spark 目录 [源码解析] 深度学习分布式训练框架 horovod (10) --- run on spark ...

  9. [源码解析] 深度学习分布式训练框架 horovod (11) --- on spark --- GLOO 方案

    [源码解析] 深度学习分布式训练框架 horovod (11) --- on spark --- GLOO 方案 目录 [源码解析] 深度学习分布式训练框架 horovod (11) --- on s ...

随机推荐

  1. C 结构体、位域

    参考链接:https://www.runoob.com/cprogramming/c-structures.html 结构体是干啥的 例如数组可以用来存储多个相同数据类型的数据项,结构体也是一种数据类 ...

  2. python算法题 python123网站单元四题目

    目录 一:二分法求平方根 二:Collatz猜想 三:算24(只考虑满足,不考虑把所有情况找出来)   下面向大家介绍几个python算法题. 一:二分法求平方根 1.题目要求为 2.输入输出格式为 ...

  3. ios开发之--为父view上的子view添加阴影

    项目中碰到一个问题,在tableview的headerview里面有很一个子view,设计师的要求是在下方添加一个阴影,效果如下: 以前的实现思路就是,代码如下: 添加阴影 调用视图的 layer C ...

  4. ios官方demo

    http://developer.apple.com/iphone/library/samplecode/Reachability/Reachability.ziphttp://developer.a ...

  5. tcpdump 介绍

    tcpdump 是一款强大的网络抓包工具,dump the traffice on anetwork,对网络上的数据包进行截获的包分析工具.熟练掌握 tcpdump 可以方便我们跟踪解决网络丢包,重传 ...

  6. Microsoft Surface 2019新品发布会汇总

    Microsoft Surface 2019 新品发布会汇总 10月2日晚,微软举行了Microsoft Surface 2019秋季新品发布会,本次发布会涉及如下设备内容等: SurfaceLapt ...

  7. 基于Arduino和python的串口通信和上位机控制

    引言 经常的时候我们要实现两个代码之间的通信,比如说两个不同不同人写的代码要对接,例如将python指令控制Arduino控件的开关,此处使用串口通信是非常方便的,下面笔者将结合自己踩过的坑来讲述下自 ...

  8. 【面试题】了解session和cookie吗?

    问题:SESSION与COOKIE的区别? 1.cookie数据存放在客户的浏览器上,session数据放在服务器上. 2.cookie不是很安全,别人可以分析存放在本地的COOKIE并进行COOKI ...

  9. [数据结构与算法] 字符串匹配 - BF算法

    BF(Brute Force)算法 又称暴力匹配算法,是一种朴素的模式匹配算法 给定主串 S : Bilibili 和子串 T :Bilididi 步骤: 1. 主串 S 第一位开始与子串 T 第一位 ...

  10. 使用angularJS接收json数据并进行数据的显示

    1.引入JS <script type="text/javascript" src="../plugins/angularjs/angular.min.js&quo ...