mask-rcnn代码解读(六):resize_image()函数的解析
我已经根据resize_image()函数的解析对原图像与resize图像进行了解析,
若有读者想对原图像与目标图像不同尺寸验证,可根据以下代码,调整函数参数,
其细节如下:
import cv2 as cv
import numpy as np
img=cv.imread('D:\\MASKRCNN\\mask-rcnn-me\\MASKRCNN_myself\\0.bmp')
def resize_image(image, min_dim=230, max_dim=220, min_scale=2, mode="square"):
"""Resizes an image keeping the aspect ratio unchanged. min_dim: if provided, resizes the image such that it's smaller dimension == min_dim
max_dim: if provided, ensures that the image longest side doesn't exceed this value.
min_scale: if provided, ensure that the image is scaled up by at least
this percent even if min_dim doesn't require it.
mode: Resizing mode.
none: No resizing. Return the image unchanged.
square: Resize and pad with zeros to get a square image of size [max_dim, max_dim].
pad64: Pads width and height with zeros to make them multiples of 64.
If min_dim or min_scale are provided, it scales the image up
before padding. max_dim is ignored in this mode.
The multiple of 64 is needed to ensure smooth scaling of feature
maps up and down the 6 levels of the FPN pyramid (2**6=64).
crop: Picks random crops from the image. First, scales the image based
on min_dim and min_scale, then picks a random crop of
size min_dim x min_dim. Can be used in training only.
max_dim is not used in this mode. Returns:
image: the resized image
window: (y1, x1, y2, x2). If max_dim is provided, padding might
be inserted in the returned image. If so, this window is the
coordinates of the image part of the full image (excluding
the padding). The x2, y2 pixels are not included.
scale: The scale factor used to resize the image
padding: Padding added to the image [(top, bottom), (left, right), (0, 0)]
"""
# Keep track of image dtype and return results in the same dtype
image_dtype = image.dtype
print('original_image_shape=',image.shape)
# Default window (y1, x1, y2, x2) and default scale == 1.
h, w = image.shape[:2]
window = (0, 0, h, w)
scale = 1
padding = [(0, 0), (0, 0), (0, 0)]
crop = None if mode == "none":
return image, window, scale, padding, crop # Scale?
if min_dim:
# Scale up but not down
scale = max(1, min_dim / min(h, w)) # h, w是原始图片的高与宽
if min_scale and scale < min_scale: # min_scale是最小填充倍数的,至少要大于它
scale = min_scale # Does it exceed max dim?
if max_dim and mode == "square":
image_max = max(h, w)
if round(image_max * scale) > max_dim: # 最终原图片最大边扩充不能超过最大max_dim维度,否则重新选择scale
scale = max_dim / image_max # Resize image using bilinear interpolation
print('scale=',scale)
if scale != 1:
image = cv.resize(image, (round(h * scale), round(w * scale)))
print('resize_image=',image.shape)
# 上一行代码对图像做了resize,那么会改变图像的尺寸,这是我不愿意看到的,我觉的这样会对缺陷特征有损失,
# 或者出现变异,因此小心这里的变化
# Need padding or cropping?
if mode == "square":
# Get new height and width
h, w = image.shape[:2] # 此时已经将原图按照scale进行了改变
top_pad = (max_dim - h) // 2
bottom_pad = max_dim - h - top_pad
left_pad = (max_dim - w) // 2
right_pad = max_dim - w - left_pad
padding = [(top_pad, bottom_pad), (left_pad, right_pad), (0, 0)]
print('padding=',padding)
print('before_pad.shape=',image.shape)
image = np.pad(image, padding, mode='constant', constant_values=0) # 将改变的图片进行了填充
print('after_pad.shape=', image.shape) window = (top_pad, left_pad, h + top_pad, w + left_pad) # 保存经过resize后图片的真实大小
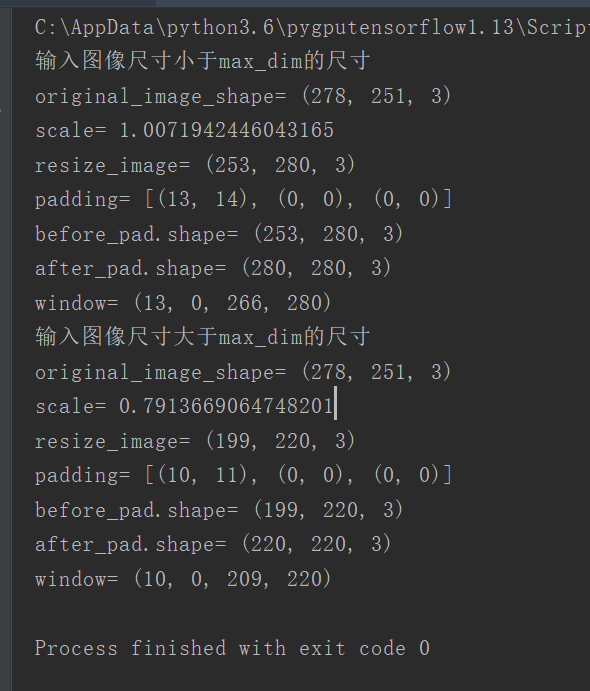
print('window=',window) return image.astype(image_dtype), window, scale, padding print('输入图像尺寸小于max_dim的尺寸')
resize_image(img, min_dim=230, max_dim=280, min_scale=2, mode="square") print('输入图像尺寸大于max_dim的尺寸')
resize_image(img, min_dim=200, max_dim=220, min_scale=2, mode="square") 结果如下:
mask-rcnn代码解读(六):resize_image()函数的解析的更多相关文章
- 使用colab运行深度学习gpu应用(Mask R-CNN)实践
1,目的 Google Colaboratory(https://colab.research.google.com)是谷歌开放的一款研究工具,主要用于机器学习的开发和研究.这款工具现在可以免费使用, ...
- [代码解析]Mask R-CNN介绍与实现(转)
文章来源 DFann 版权声明:如果你觉得写的还可以,可以考虑打赏一下.转载请联系. https://blog.csdn.net/u011974639/article/details/78483779 ...
- 论文阅读笔记三十六:Mask R-CNN(CVPR2017)
论文源址:https://arxiv.org/pdf/1703.06870.pdf 开源代码:https://github.com/matterport/Mask_RCNN 摘要 Mask R-CNN ...
- CVPR2019 | Mask Scoring R-CNN 论文解读
Mask Scoring R-CNN CVPR2019 | Mask Scoring R-CNN 论文解读 作者 | 文永亮 研究方向 | 目标检测.GAN 推荐理由: 本文解读的是一篇发表于CVPR ...
- Mask R-CNN用于目标检测和分割代码实现
Mask R-CNN用于目标检测和分割代码实现 Mask R-CNN for object detection and instance segmentation on Keras and Tenso ...
- 目标检测论文解读11——Mask R-CNN
目的 让Faster R-CNN能做实例分割的任务. 方法 模型的结构图如下. 与Faster R-CNN相比,主要有两点变化. (1) 用RoI Align替代RoI Pool. 首先回顾一下RoI ...
- 论文笔记:Mask R-CNN
之前在一次组会上,师弟诉苦说他用 UNet 处理一个病灶分割的任务,但效果极差,我看了他的数据后发现,那些病灶区域比起整张图而言非常的小,而 UNet 采用的损失函数通常是逐像素的分类损失,如此一来, ...
- Mask RCNN 源码阅读(update)
之前看了Google官网的object_dectect 的源码,感觉Google大神写的还不错.最近想玩下Mask RCNN,就看了下源码,这里刚好当做总结和梳理.链接如下: Google官网的obj ...
- Mask RCNN 学习笔记
下面会介绍基于ResNet50的Mask RCNN网络,其中会涉及到RPN.FPN.ROIAlign以及分类.回归使用的损失函数等 介绍时所采用的MaskRCNN源码(python版本)来源于GitH ...
随机推荐
- kali linux maltego-情报收集工具
Maltego是一个交互式数据挖掘工具,它为链接分析呈现有向图.该工具用于在线调查,以发现互联网上各种来源的信息片段之间的关系. 注册Maltego账号,注册地址:https://www.paterv ...
- 工具类ToastUtil 避免在子线程中使用抛异常 "Can't create handler inside thread that has not called Looper.prepare()"
package com.example.kbr.utils; import android.view.Gravity; import android.widget.Toast; import io.r ...
- emacs require和provide
Emacs的默认配置文件是.emacs,Emacs启动时会读取并执行.emacs中的LISP代码,用户使用.emacs达到自己的Emacs初始化配置目的. 不过单独使用.emacs有一个问题,因为时间 ...
- ntp服务设置开机自启动失败
设置了ntpd开机自启动,重启服务器ntpd没有自启动 1.需要禁掉chronyd.service: systemctl disable chronyd.service 2.手动启动ntpd: sys ...
- c# WF 第7节 对控件的基本操作
本节内容: 1:修改控件的大小 2:控件的顺序 3:控件的对齐 4:移动button实例 1: 修改控件的大小 第一种: 第二种 : 一次操作多个控件: 选择一个控件.按住ctrl -- 再选择一个控 ...
- window系统下的pycharm对虚拟机中的Ubuntu系统操作MySQL数据库
问题:程序员和数据库的爱情故事:程序为了追一个叫MySQL数据库的姑娘,先苦练功夫,自己模拟泡妹过程积累经验,于是想到一个解决方法:[解决虚拟机跑需要连接数据库的程序卡的问题,通过在物理机Window ...
- base46+url编码
base64解密+unquote url编码 html = ''' JTdCJTIyc3RvcmUlMjIlM0ElN0IlMjJnYW1lTGlicmFyeSUyMiUzQSU3QiUyMmRpc2 ...
- day59_9_25中间键与登录认证
一.django中间件简介. 在django中,有这样的生命周期: 中间件就是处于wsgiref和urls模块中间,可以拦截所有的请求,其中有7个默认中间件: MIDDLEWARE = [ 'djan ...
- 使用python发邮件:
import smtplibfrom email.mime.text import MIMETextfrom email.utils import formataddr#定义发送的内容:msg = M ...
- 剑指Offer-24.二叉树中和为某一值的路径(C++/Java)
题目: 输入一颗二叉树的跟节点和一个整数,打印出二叉树中结点值的和为输入整数的所有路径.路径定义为从树的根结点开始往下一直到叶结点所经过的结点形成一条路径.(注意: 在返回值的list中,数组长度大的 ...