
Prometheus从入门到精通:一、部署
一、Prometheus是什么?
prometheus是一个开源指标监控解决方案,指标就是指的CPU的使用率、内存使用率等数据。
二、Prometheus的架构
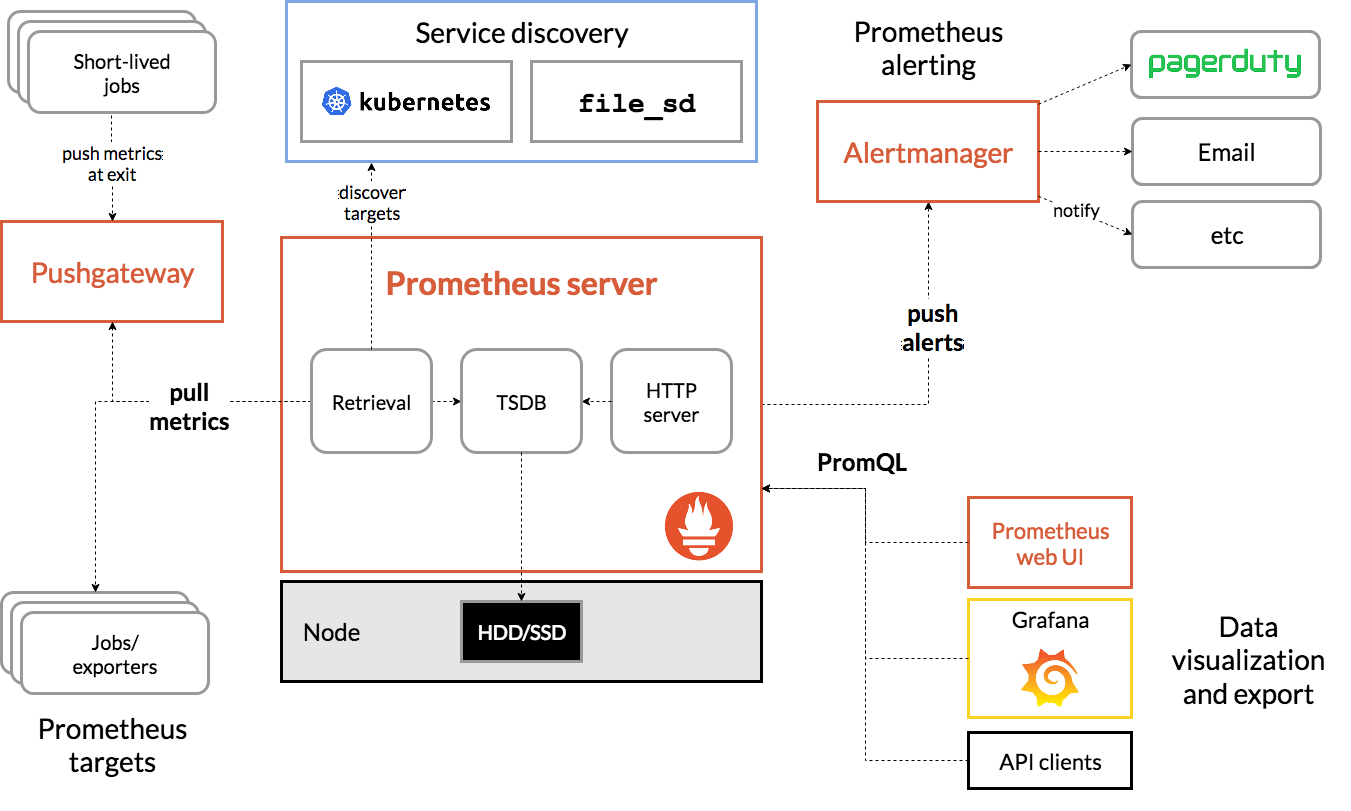
这里直接粘贴官网的架构图:
三、安装
这里采用docker的方式来安装,如果需要使用其他方式的,可以参考官网。
3.1、设置配置文件
个人使用的配置文件:
# my global config

global:

  scrape_interval:     15s # Set the scrape interval to every 15 seconds. Default is every 1 minute.

  evaluation_interval: 15s # Evaluate rules every 15 seconds. The default is every 1 minute.

  # scrape_timeout is set to the global default (10s).

# Alertmanager configuration

alerting:

  alertmanagers:

  - static_configs:

    - targets:

      # - alertmanager:9093

# Load rules once and periodically evaluate them according to the global 'evaluation_interval'.

rule_files:

  # - "first_rules.yml"

  # - "second_rules.yml"

# A scrape configuration containing exactly one endpoint to scrape:

# Here it's Prometheus itself.

scrape_configs:

  # The job name is added as a label `job=<job_name>` to any timeseries scraped from this config.

  - job_name: 'prometheus'

    metrics_path: '/webUI/prometheus/metrics'

    # metrics_path defaults to '/metrics'

    # scheme defaults to 'http'.

    static_configs:

    - targets: ['localhost:9090']

  - job_name: 'example'

    metrics_path: '/example/metrics'

    static_configs:

    - targets: ['example.com']
Prometheus的配置文件使用的yaml格式,如果对yaml不熟悉的可以搜一下相关的资料了解一下;这里先简单介绍一下其中的scrape_configs下的job,job就是Prometheus会定时从它配置的target抓取数据;这个示例中配置了两个job,第一个是Prometheus自己的metrics,第二个是一个示例;这里需要着重介绍一下metrics_path,它的作用是指定抓取metrics数据的路径,默认是targets+'/metrics',如果我们的metrics路径不是这个,那么就需要通过该参数额外指定。
3.2、启动容器
参考:https://prometheus.io/docs/prometheus/latest/installation/#using-docker
1、官方示例方式
docker run \

    -p 9090:9090 \

    -v /path/to/prometheus.yml:/etc/prometheus/prometheus.yml \

    prom/prometheus
这个命令是前端运行的方式启动的,可以用来一开始做测试使用,一旦当前窗口关闭,则该docker容器也会被关闭掉。
2、个人推荐方式
docker run \

    -d \

    --name prometheus \

    --network host \

    -v /data1/prometheus/prometheus.yml:/etc/prometheus/prometheus.yml \

    prom/prometheus --web.listen-address="127.0.0.1:9090" --web.external-url=http://localhost:9090/webUI/prometheus/ --config.file=/etc/prometheus/prometheus.yml
个人推荐使用这个命令,这里简单介绍一个和官网示例不同的地方:
- -d:该选项的作用是让docker以daemon的方式运行,也就是后台运行,关闭当前窗口不影响容器。
- --name:指定容器的名字,默认是以一个随机字符串来作为容器的名字的,不方便后续观察容器的状态,因为后续对容器的操作都需要以容器名作为参数。
- --network:指定容器使用的网络方式,表示容器不需要网络隔离,和宿主机在一个网络中运行;如果想要使用其他方式的话,请确保宿主机已经安装了相应的driver;我个人在刚开始使用时就未指定该参数,使用了默认的bridge方式,但是发现-p设置端口映射不生效,排查了许久发现是因为没有安装bridge的driver。
- -v:映射文件到容器中,冒号前面是宿主机路径,冒号后面是容器中的路径;前面根据你的实际情况而定,后台的值和Prometheus启动参数--config.file有关,默认是/etc/prometheus/prometheus.yml。
- prom/prometheus:镜像名字
- --web.listen-address:指定Prometheus的web页面监听的地址,这里建议监听本地,然后通过nginx做转发。
- --web.external-url:指定Prometheus暴露出来的基础地址,这个在需要用nginx做转发时会用到;如果是直接访问Prometheus的web页面,则不需要。
- --config.file:指定Prometheus的配置文件路径。
执行完上面的命令后使用docker logs prometheus查看一下日志,如果是正确运行了,日志会像下面这样:
level=info ts=2020-12-25T11:07:34.247Z caller=main.go:322 msg="No time or size retention was set so using the default time retention" duration=15d

level=info ts=2020-12-25T11:07:34.247Z caller=main.go:360 msg="Starting Prometheus" version="(version=2.23.0, branch=HEAD, revision=26d89b4b0776fe4cd5a3656dfa520f119a375273)"

level=info ts=2020-12-25T11:07:34.247Z caller=main.go:365 build_context="(go=go1.15.5, user=root@37609b3a0a21, date=20201126-10:56:17)"

level=info ts=2020-12-25T11:07:34.247Z caller=main.go:366 host_details="(Linux 3.10.107-1-tlinux2-0048 #1 SMP Wed Feb 27 14:30:34 CST 2019 x86_64 CMS-154864507 (none))"

level=info ts=2020-12-25T11:07:34.247Z caller=main.go:367 fd_limits="(soft=1048576, hard=1048576)"

level=info ts=2020-12-25T11:07:34.247Z caller=main.go:368 vm_limits="(soft=unlimited, hard=unlimited)"

level=info ts=2020-12-25T11:07:34.250Z caller=main.go:722 msg="Starting TSDB ..."

level=info ts=2020-12-25T11:07:34.250Z caller=web.go:528 component=web msg="Start listening for connections" address=127.0.0.1:9090

level=info ts=2020-12-25T11:07:34.250Z caller=web.go:550 component=web msg="Router prefix" prefix=/webUI/prometheus

level=info ts=2020-12-25T11:07:34.255Z caller=head.go:645 component=tsdb msg="Replaying on-disk memory mappable chunks if any"

level=info ts=2020-12-25T11:07:34.255Z caller=head.go:659 component=tsdb msg="On-disk memory mappable chunks replay completed" duration=8.196µs

level=info ts=2020-12-25T11:07:34.255Z caller=head.go:665 component=tsdb msg="Replaying WAL, this may take a while"

level=info ts=2020-12-25T11:07:34.256Z caller=head.go:717 component=tsdb msg="WAL segment loaded" segment=0 maxSegment=0

level=info ts=2020-12-25T11:07:34.256Z caller=head.go:722 component=tsdb msg="WAL replay completed" checkpoint_replay_duration=28.503µs wal_replay_duration=1.160856ms total_replay_duration=1.217683ms

level=info ts=2020-12-25T11:07:34.258Z caller=main.go:742 fs_type=EXT4_SUPER_MAGIC

level=info ts=2020-12-25T11:07:34.258Z caller=main.go:745 msg="TSDB started"

level=info ts=2020-12-25T11:07:34.258Z caller=main.go:871 msg="Loading configuration file" filename=/etc/prometheus/prometheus.yml

level=info ts=2020-12-25T11:07:34.258Z caller=main.go:902 msg="Completed loading of configuration file" filename=/etc/prometheus/prometheus.yml totalDuration=873.002µs remote_storage=6.228µs web_handler=850ns query_engine=2.311µs scrape=351.488µs scrape_sd=50.71µs notify=22.741µs notify_sd=10.615µs rules=2.97µs

level=info ts=2020-12-25T11:07:34.258Z caller=main.go:694 msg="Server is ready to receive web requests."
然后执行curl curl 127.0.0.1:9090/webUI/prometheus/metrics/,正常情况下会展示Prometheus默认的metrics数据,这里仅展示前几行:
# TYPE go_gc_duration_seconds summary

go_gc_duration_seconds{quantile="0"} 9.755e-05

go_gc_duration_seconds{quantile="0.25"} 0.000129779

go_gc_duration_seconds{quantile="0.5"} 0.000154338

go_gc_duration_seconds{quantile="0.75"} 0.000199801

go_gc_duration_seconds{quantile="1"} 0.000343164

go_gc_duration_seconds_sum 0.008667863

go_gc_duration_seconds_count 50

# HELP go_goroutines Number of goroutines that currently exist.

# TYPE go_goroutines gauge

go_goroutines 34

# HELP go_info Information about the Go environment.

# TYPE go_info gauge

go_info{version="go1.15.5"} 1

# HELP go_memstats_alloc_bytes Number of bytes allocated and still in use.

# TYPE go_memstats_alloc_bytes gauge

go_memstats_alloc_bytes 3.2321096e+07

# HELP go_memstats_alloc_bytes_total Total number of bytes allocated, even if freed.

# TYPE go_memstats_alloc_bytes_total counter

go_memstats_alloc_bytes_total 2.79534016e+08
3.3、配置nginx转发
个人建议通过nginx做转发来实现Prometheus的web页面访问,具体配置如下:
location ^~ /webUI/prometheus/ {

      proxy_pass http://127.0.0.1:9090/webUI/prometheus/;

}
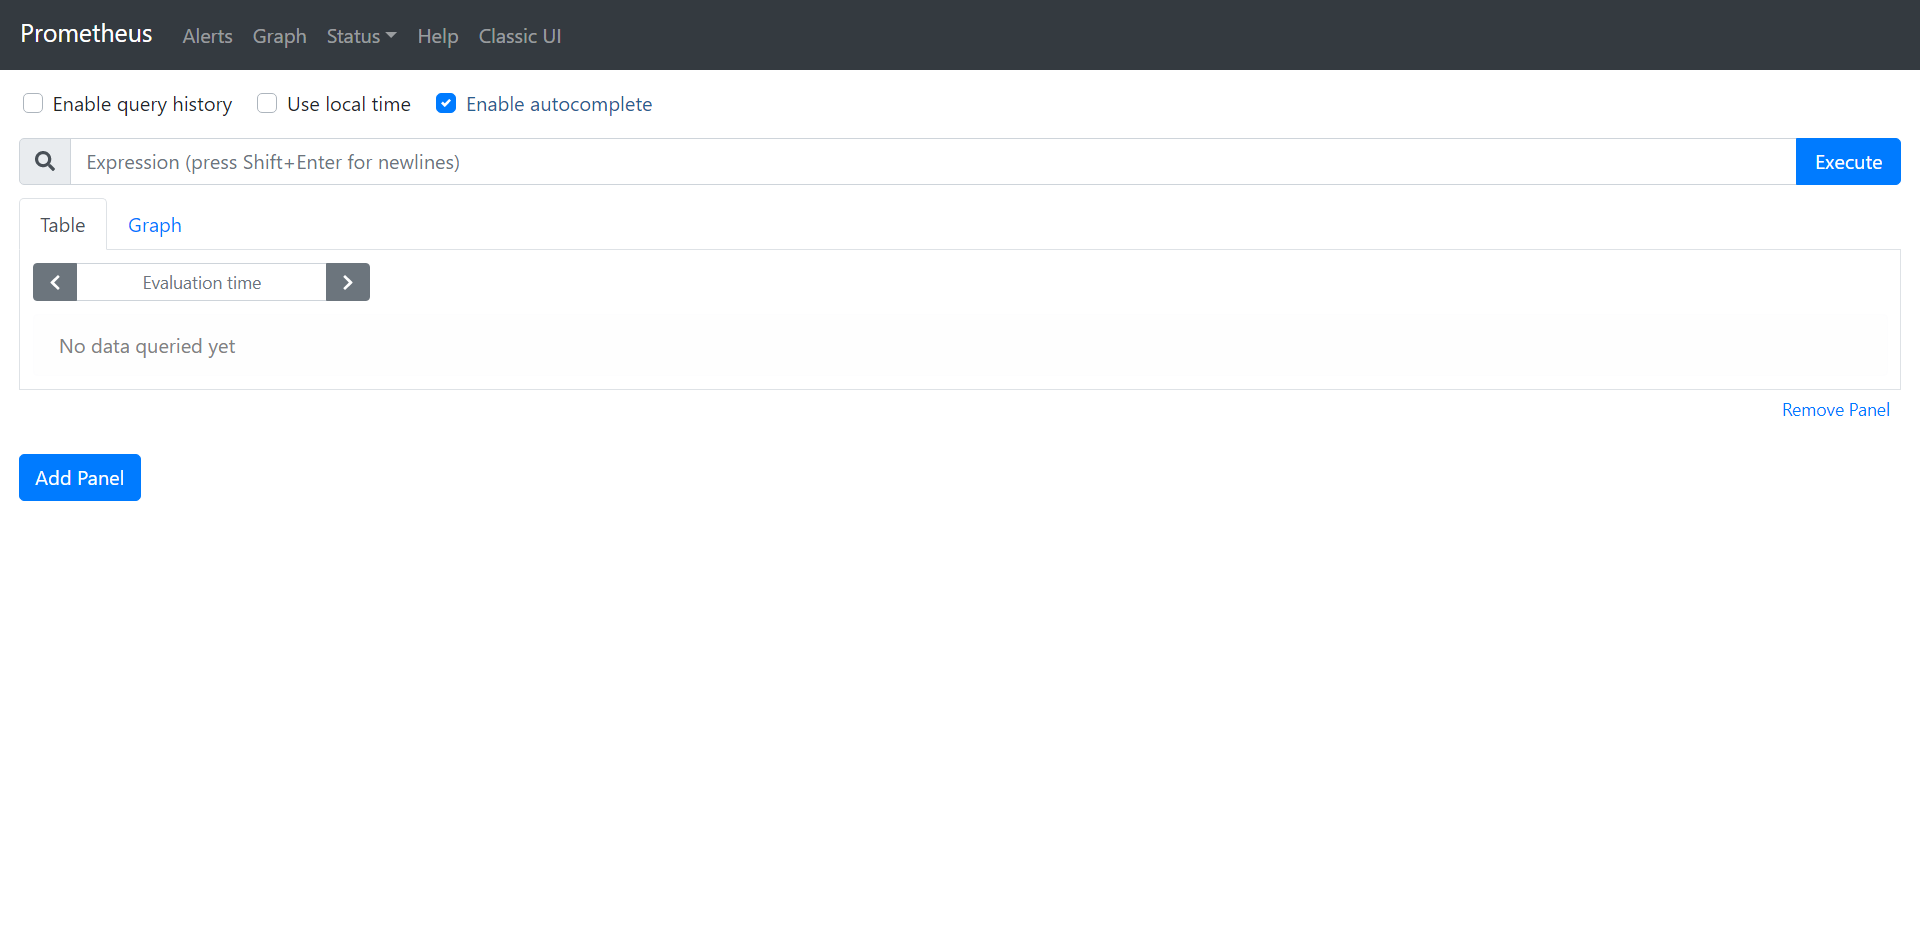
然后执行sbin/nginx -c config/nginx.conf -s reload使新增的路由生效,然后就可以通过www.example.com/webUI/prometheus/来查看Prometheus的web页面了,如下图所示:
四、Prometheus可视化页面
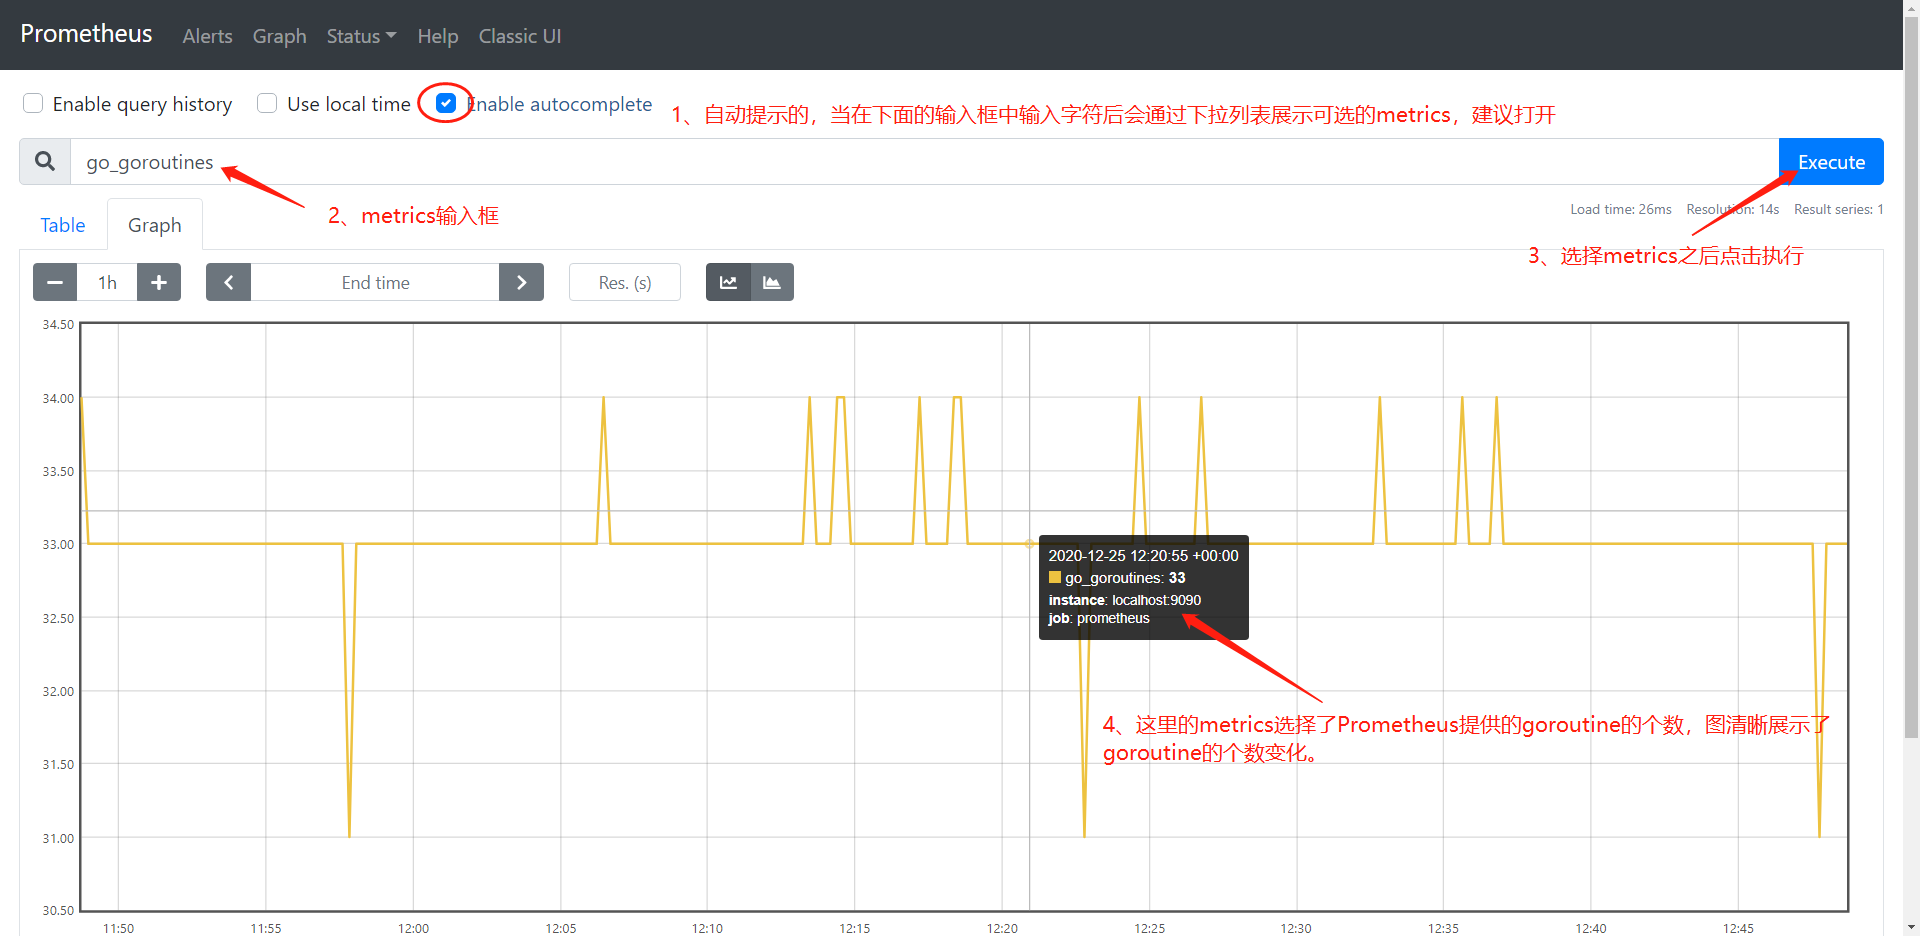
Prometheus的界面比较简洁,这里简单介绍一下如何根据Prometheus提供的goroutine的个数变化配置一个图表:
五、配置grafana
Prometheus提供的可视化图表比较简单,因此这里引入grafana作为metrics的可视化展示界面,下面仍然使用goroutine的个数变化展示如何在grafana配置一个图表:
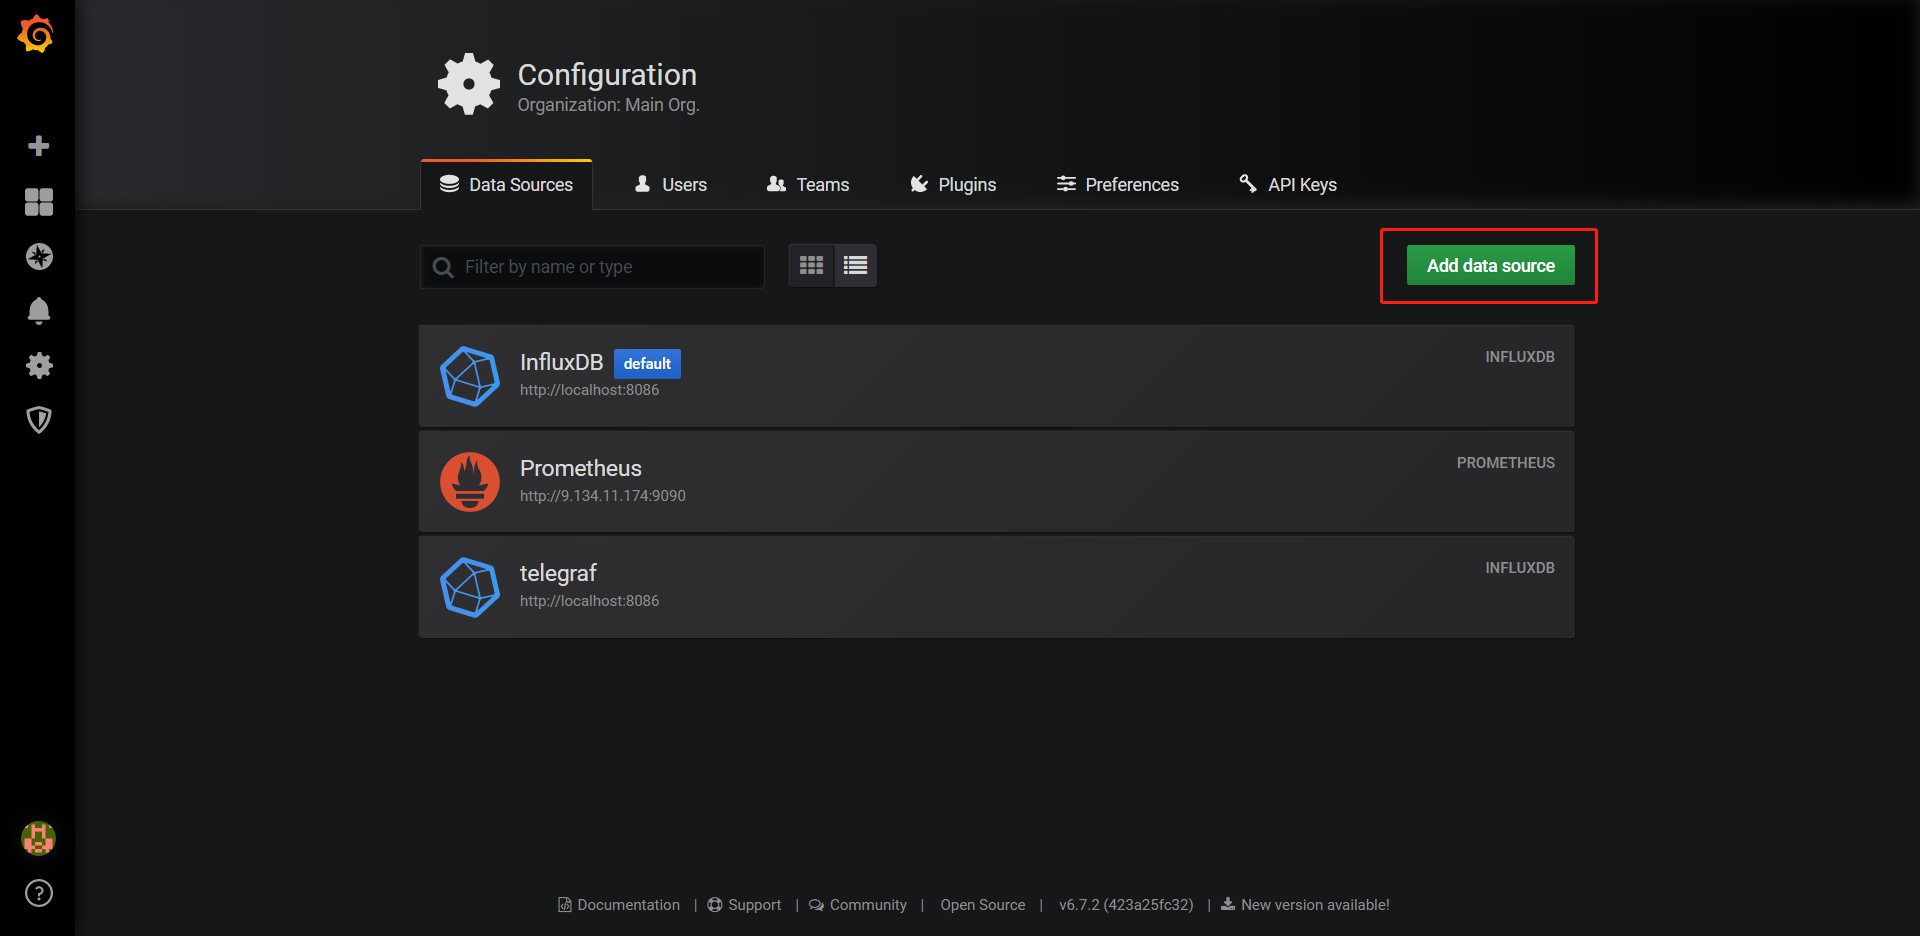
5.1、Configration->Data Sources,然后点击Add Data Source
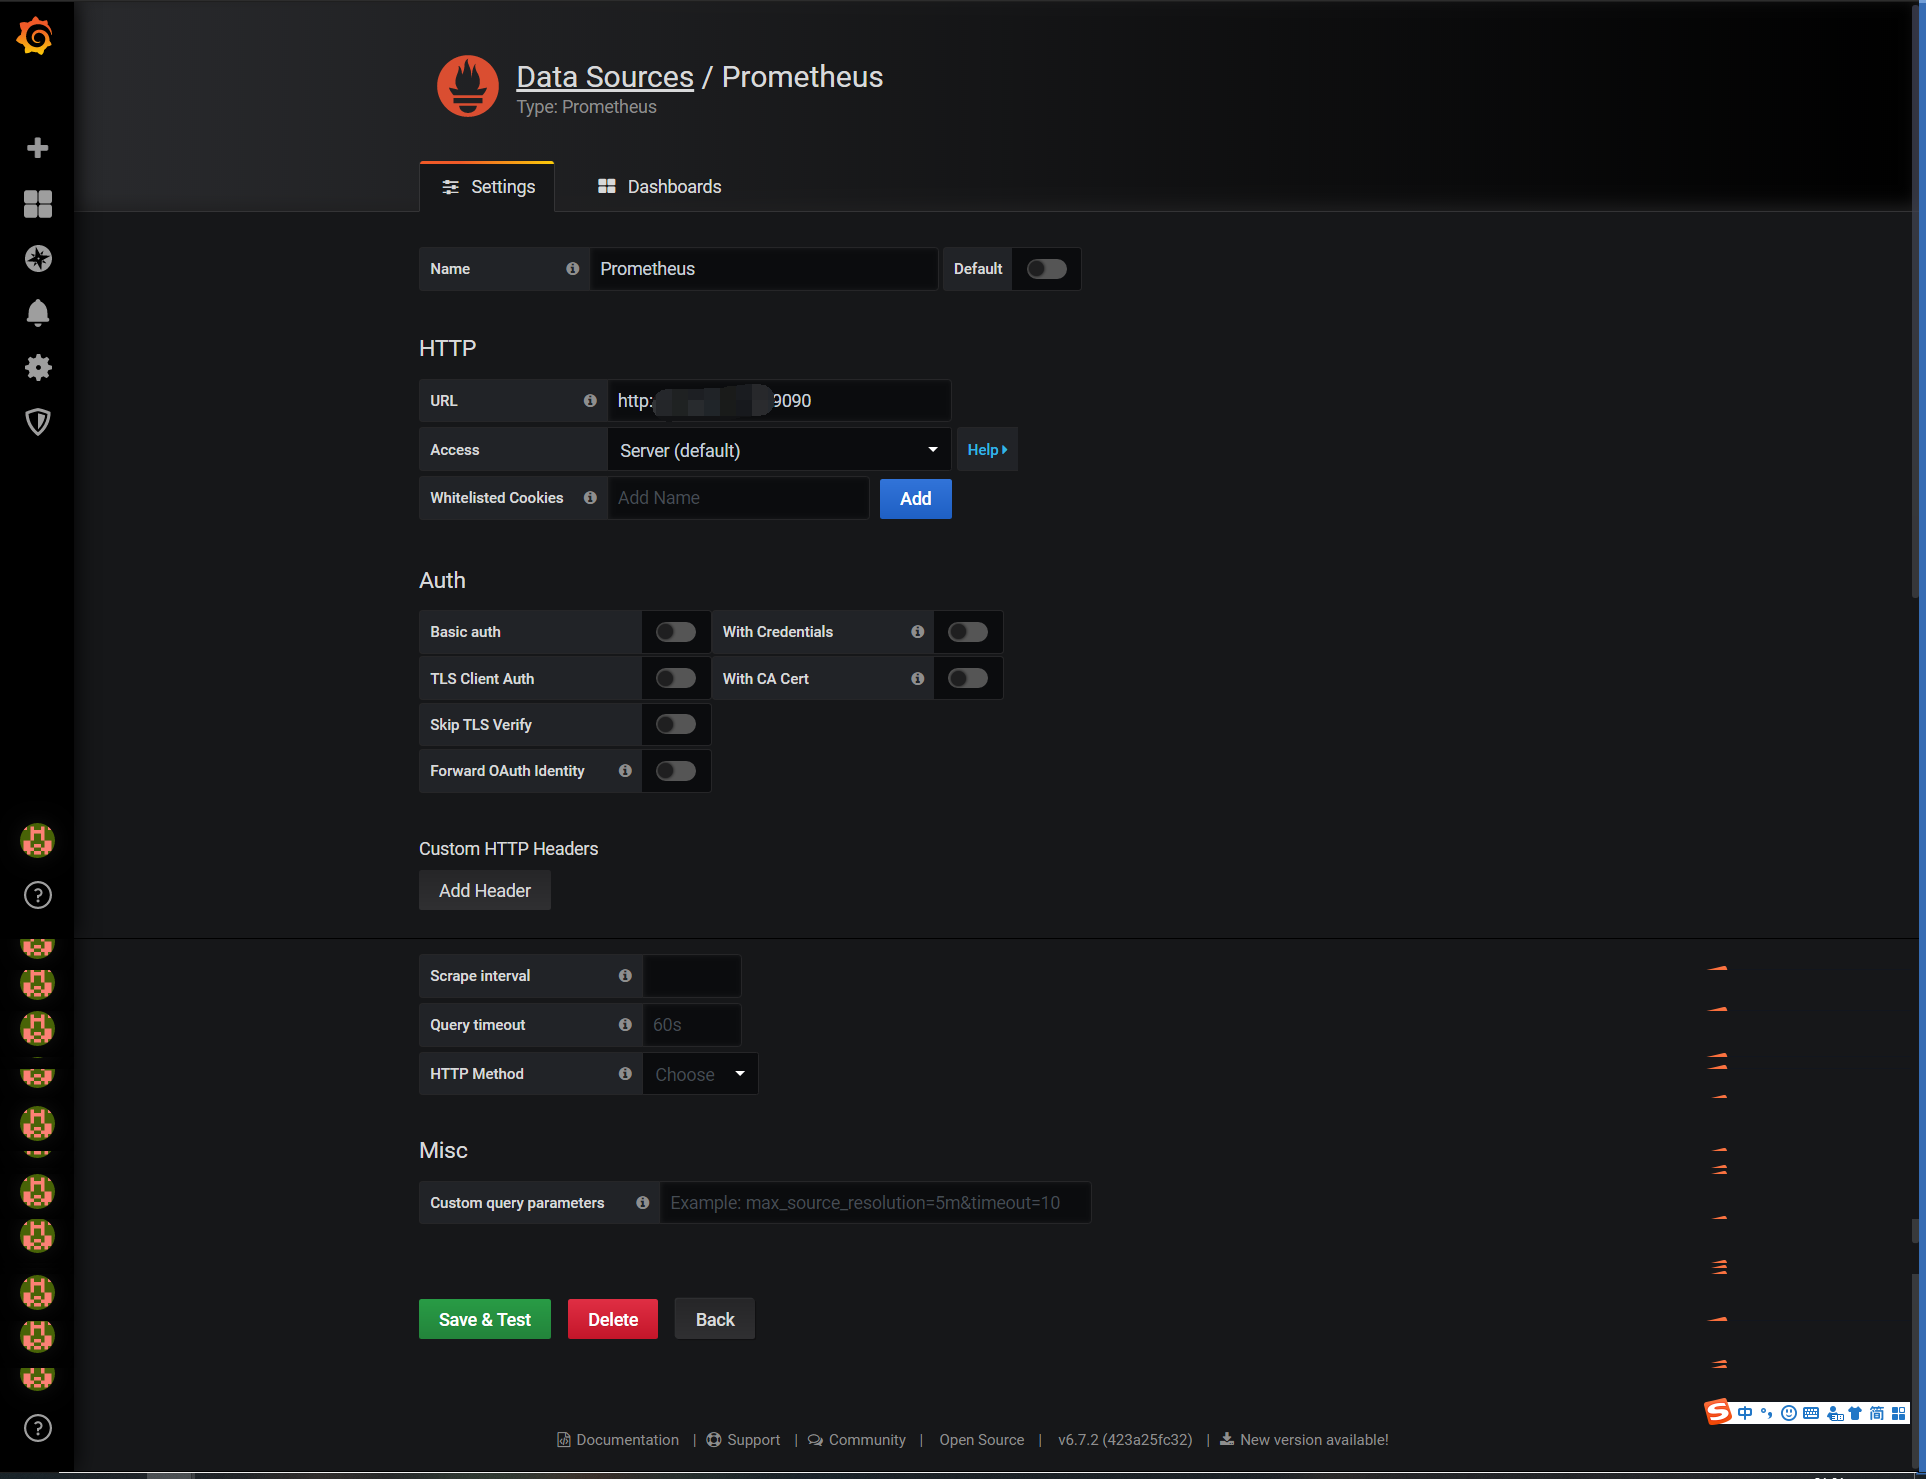
5.2、配置Prometheus
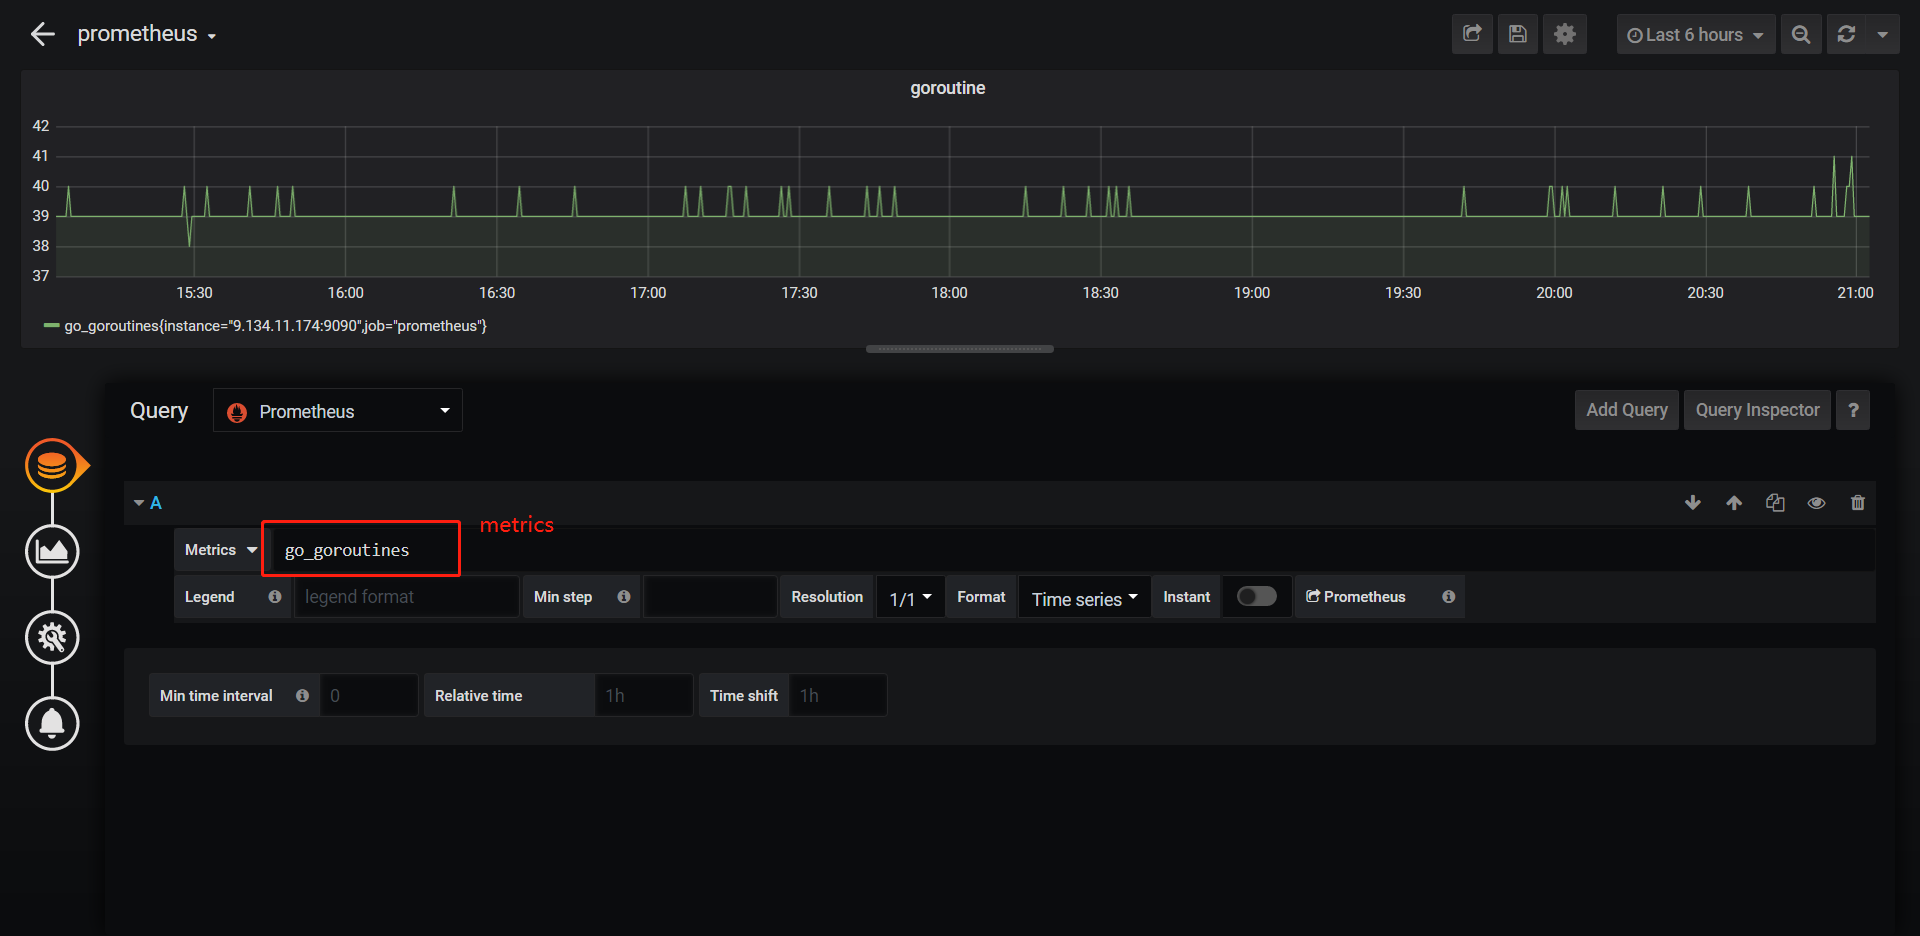
5.3、配置goroutine图表
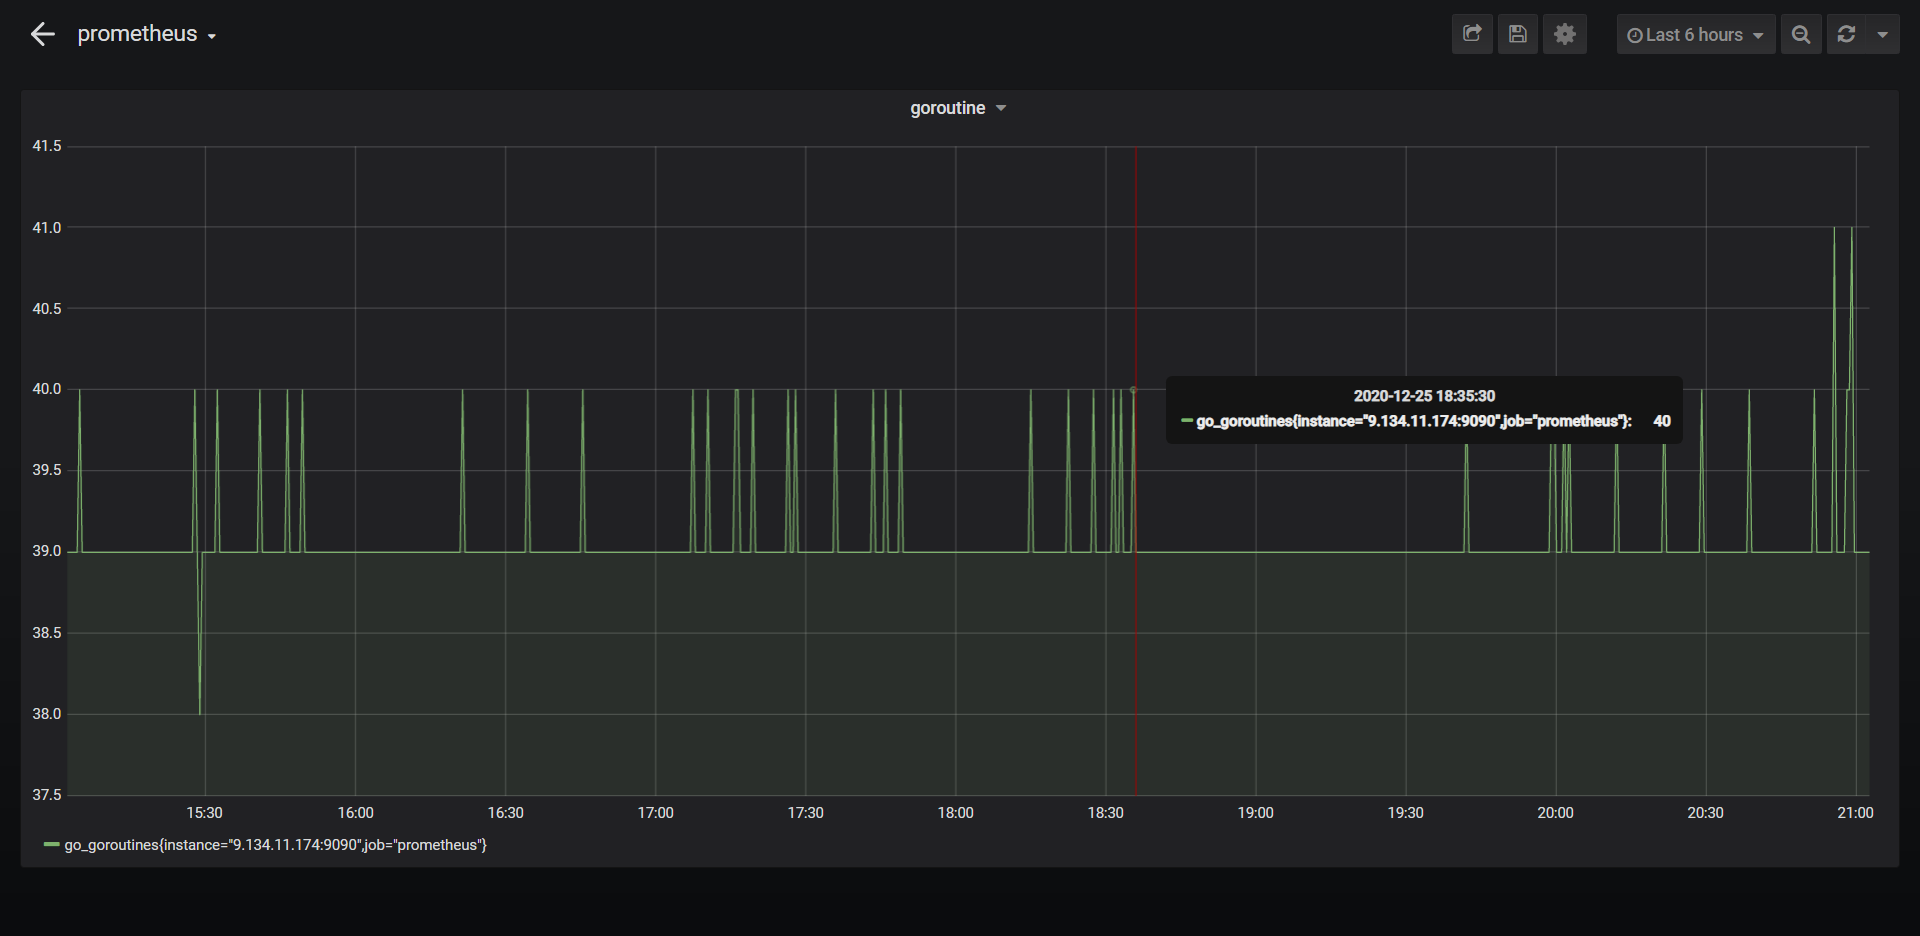
5.4、效果
六、总结
到这里就把Prometheus的部署介绍完了,Prometheus的更高级用法以及具体实践,例如生产环境如何在代码中使用这些会留待后续介绍。
Prometheus从入门到精通:一、部署的更多相关文章
- Provisioning Services 7.6 入门到精通系列之一:PVS前期规划
1. Provisioning Services 产品概述 Provisioning Services (简称PVS)采用了一种与传统映像解决方案截然不同的方法,从根本上改变了硬件与依托硬件而运行的 ...
- Nginx开发从入门到精通 学习目录分享学习 (阿里著作)
Nginx开发从入门到精通 缘起 nginx由于出色的性能,在世界范围内受到了越来越多人的关注,在淘宝内部它更是被广泛的使用,众多的开发以及运维同学都迫切的想要了解nginx模块的开发以及它的内部 ...
- 2015年新版C#从入门到精通(第2版)视频教学录像【无水印版】
<c#从入门到精通(第2版)>以零基础讲解为宗旨,用实例引导读者学习,深入浅出地介绍了c#的相关知识和实战技能.<c#从入门到精通(第2版)>第1篇[c#语言基础]主要讲解c# ...
- Java入门-浅析Java学习从入门到精通【转】
一. JDK (Java Development Kit) JDK是整个Java的核心,包括了Java运行环境(Java Runtime Envirnment),一堆Java工具和Java基础的类库 ...
- 大数据应用之:MongoDB从入门到精通你不得不知的21个为什么?
一.引言: 互联网的发展和电子商务平台的崛起,催生了大数据时代的来临,作为大数据典型开发框架的MongoDB成为了No-sql数据库的典型代表.MongoDB从入门到精通你不得不知的21个为什么专为大 ...
- (升级版)Spark从入门到精通(Scala编程、案例实战、高级特性、Spark内核源码剖析、Hadoop高端)
本课程主要讲解目前大数据领域最热门.最火爆.最有前景的技术——Spark.在本课程中,会从浅入深,基于大量案例实战,深度剖析和讲解Spark,并且会包含完全从企业真实复杂业务需求中抽取出的案例实战.课 ...
- 2017最新技术java高级架构、千万高并发、分布式集群、架构师入门到精通视频教程
* { font-family: "Microsoft YaHei" !important } h1 { color: #FF0 } 15套java架构师.集群.高可用.高可扩展. ...
- kibana从入门到精通-Kibana安装
作者其他ELK快速入门系列文章 Elasticsearch从入门到精通 logstash快速入门实战指南 简介 Kibana 是一款开源的数据分析和可视化平台,它是 Elastic Stack 成员之 ...
- SQL Server2008从入门到精通pdf
下载地址:网盘下载 内容介绍 编辑 <SQL Server 从入门到精通>从初学者的角度出发,通过通俗易懂的语言.丰富多彩的实例,详细地介绍了SQLServer2008开发应该掌握的各方面 ...
随机推荐
- Java反射——根据配置文件,实例化对象
案例:根据配置文件,实例化对象 src下创建一个"配置文件"config.txt,内容如下: className=ahjava.p07reflect.Cat package ahj ...
- serialVersionUID作用是什么以及如何生成的?
目录 正常不设置serialVersionUID 的序列化和反序列化 序列化之后,类文件增加了字段,反序列化会怎么样? 指定serialVersionUID,减少或者增加字段会发生什么? serial ...
- lambda表达式中无法抛出受检异常!
抛出受检异常的时候,我们的接口应该带上throw关键字,但通过lambda表达式实现的Consumer的accept方法并不带有关键字,因此在lambda表达式中不能抛出受检异常必须把它吃掉
- 课时一:JS操作数据
课时一:JS操作数据 JSAPI请求头 xmlhttp.setRequestHeader("Content-Type", "application/json; chars ...
- 《Machine Learning in Action》—— 白话贝叶斯,“恰瓜群众”应该恰好瓜还是恰坏瓜
<Machine Learning in Action>-- 白话贝叶斯,"恰瓜群众"应该恰好瓜还是恰坏瓜 概率论,可以说是在机器学习当中扮演了一个非常重要的角色了.T ...
- CentOS下搭建文件共享服务
nfs部署以及优化 Server端配置 安装rpm服务包 yum install -y nfs-utils 创建数据挂载点 mkdir -p /data 编辑exports文件 vi /etc/exp ...
- CentOS硬软链接
硬软链接说明 软链接: 1.软链接,以路径的形式存在.类似于Windows操作系统中的快捷方式 2.软链接可以 跨文件系统 ,硬链接不可以 3.软链接可以对一个不存在的文件名进行链接 4.软链接可以对 ...
- 推荐系统实践 0x09 基于图的模型
用户行为数据的二分图表示 用户的购买行为很容易可以用二分图(二部图)来表示.并且利用图的算法进行推荐.基于邻域的模型也可以成为基于图的模型,因为基于邻域的模型都是基于图的模型的简单情况.我们可以用二元 ...
- Jmeter-BeanShell断言的运用二(不同Json格式的字段提取和断言判断)
前言 为了更加熟悉BeanShell,所以用几个实例来记录说明下,不同的Json格式是怎么提取相应字段和判断断言的.(会持续更新...) 一.第一种Json格式 1.Json响应数据内容如下: { & ...
- MySQL下载及使用
MySQL下载及使用 在下载MySQL的过程当中一般都不会下载最新版本的软件,因为最新版本的MySQL可能会出现各种问题,也不推荐在原来的版本上更新到最新版本,因为这样可能导致原本项目能正常运行,更新 ...