通过声明Attribute属性改变不同类的输出效果
ConsoleApplication--控制台应用程序
首先创建基类:
using System;

using System.Collections.Generic;

using System.Linq;

using System.Text;

using System.Threading.Tasks;

namespace Attribute_Exercise

{

    /// <summary>

    /// 此处的注释不影响编译和运行,只是给开发者提供帮助

    /// </summary>

    //[some Attribute]  e.g.

    [Obsolete] //[Obsolete]、[Obsolete("")]、[Obsolete("",true/false)]  Obsolete的构造函数 F12查看

    [Serializable]

    public class BasicClass

    {

        //基类属性、字段

        public int ID { set; get; }

        public string Name { set; get; }

    }

    public class AClass:BasicClass

    {

    }

    public class BClass : BasicClass

    {

    }

    public class CClass : BasicClass

    {

    }

}
其次自定义一个Attribute:
using System;

using System.Collections.Generic;

using System.Linq;

using System.Text;

using System.Threading.Tasks;

namespace Attribute_Exercise

{

    /// <summary>

    /// 自定义一个Attribute:somename+Attribute

    /// 使用时:[somename]

    /// </summary>

    public class CustomizedAttribute:Attribute

    {

        //以下是构造函数

        public CustomizedAttribute()

        {

           //空

        }

        public CustomizedAttribute(string msg)

        {

        }

        public CustomizedAttribute(string msg, bool err)

        {

        }

        //字段

        public string Msg;

        public bool Err;

    }

    public class esleCusomizedAttribute : Attribute

    {

    }

}
在主入口中:
using System;

using System.Collections.Generic;

using System.Linq;

using System.Text;

using System.Threading.Tasks;

namespace Attribute_Exercise

{

    class Program

    {

        static void Main(string[] args)

        {

            //主要运用了继承的机制

            BasicClass bc = new BasicClass() { ID=,Name="基类1"};

            Console.WriteLine("基类ID:{0}  ;基类类名:{1}",bc.ID,bc.Name);

            Console.ReadLine();

        }

    }

}
先看看基类的效果:
下面进入主题--如何在不改变基类及其继承类的对象的情况下,仅仅通过声明Attribute,使得这些继承类具有不同的行为或者效果?
1.声明Attribute:在BasicClass.cs Line 23处增加 [Customized] ;
2.增加相应Attribute的方法:
using System;

using System.Collections.Generic;

using System.Linq;

using System.Reflection;//反射

using System.Text;

using System.Threading.Tasks;

namespace Attribute_Exercise

{

    public class AttributeActivities

    {

        public static void OutPut<T>(T t) where T : BasicClass

        {

            Type type=t.GetType();

            Attribute attribute = type.GetCustomAttribute(typeof(CustomizedAttribute));//注意  using System.Reflection;

            if (attribute != null && attribute is CustomizedAttribute)

            {

                CustomizedAttribute customizedAttr = attribute as CustomizedAttribute;

                Console.WriteLine("当前类额外的Attribute:{0}",

                    customizedAttr.ToString().Substring(customizedAttr.ToString().IndexOf(".")+));

                Console.WriteLine("+++++++++++++++++++++++++++++++++++++++++++++++++");

            }

        }

    }

}
3.在程序主入口调用方法:
using System;

using System.Collections.Generic;

using System.Linq;

using System.Text;

using System.Threading.Tasks;

namespace Attribute_Exercise

{

    class Program

    {

        static void Main(string[] args)

        {

            //主要运用了继承的机制

            BasicClass bc = new BasicClass() { ID=,Name="基类1"};

            Console.WriteLine("基类ID:{0}  ;基类类名:{1}",bc.ID,bc.Name);

            Console.WriteLine("*************************************************");

            AttributeActivities.OutPut<AClass>(new AClass()

            {

                ID=,

                Name="AClass"

            });

            Console.WriteLine("*************************************************");

            AttributeActivities.OutPut<BClass>(new BClass()

            {

                ID = ,

                Name = "BClass"

            });

            Console.WriteLine("*************************************************");

            AttributeActivities.OutPut<CClass>(new CClass()

            {

                ID = ,

                Name = "CClass"

            });

            Console.ReadLine();

        }

    }

}
结果截图:
是不是感觉很神奇呢? 并没有对这个继承类做任何修改,只是多了个声明,然后附加相应的方法就实现了拥有不同Attribute的类具有不同的效果。
读者也可以自己扩展其它的方法试试哦。。。
补充:
Attribute里增加:
using System;

using System.Collections.Generic;

using System.Linq;

using System.Text;

using System.Threading.Tasks;

namespace Attribute_Exercise

{

    /// <summary>

    /// 自定义一个Attribute:somename+Attribute

    /// 使用时:[somename]

    /// </summary>

    public class CustomizedAttribute:Attribute

    {

        //以下是构造函数

        public CustomizedAttribute()

        {

           //空

        }

        public CustomizedAttribute(string msg)

        {

        }

        public CustomizedAttribute(string msg, bool err)

        {

        }

        //字段

        public string Msg;

        public bool Err;

        //增加部分

        //扩展方法

        public int Number;

        public void DoSomeThing(string msg)

        {

            if (Err)

            {

                Console.WriteLine("{0}--{1}",msg,DateTime.Now);

            }

        }

        public CustomizedAttribute(string msg, int number, bool err)

        {

            this.Msg = msg;

            this.Number = number;

            this.Err = err;

        }

    }

    public class esleCusomizedAttribute : Attribute

    {

    }

}
方法调用:
using System;

using System.Collections.Generic;

using System.Linq;

using System.Reflection;//反射

using System.Text;

using System.Threading.Tasks;

namespace Attribute_Exercise

{

    public class AttributeActivities

    {

        public static void OutPut<T>(T t) where T : BasicClass

        {

            Type type=t.GetType();

            Attribute attribute = type.GetCustomAttribute(typeof(CustomizedAttribute));//注意  using System.Reflection;

            if (attribute != null && attribute is CustomizedAttribute)

            {

                CustomizedAttribute customizedAttr = attribute as CustomizedAttribute;

                Console.WriteLine("当前类额外的Attribute:{0}",

                    customizedAttr.ToString().Substring(customizedAttr.ToString().IndexOf(".")+));

                Console.WriteLine("+++++++++++++++++++++++++++++++++++++++++++++++++");

                //调用扩展方法

                customizedAttr.DoSomeThing(t.Name);

            }

        }

    }

}
在继承类前声明Attribute:
using System;

using System.Collections.Generic;

using System.Linq;

using System.Text;

using System.Threading.Tasks;

namespace Attribute_Exercise

{

    /// <summary>

    /// 此处的注释不影响编译和运行,只是给开发者提供帮助

    /// </summary>

    //[some Attribute]  e.g.

    [Obsolete] //[Obsolete]、[Obsolete("")]、[Obsolete("",true/false)]  Obsolete的构造函数 F12查看

    [Serializable]

    public class BasicClass

    {

        //基类属性、字段

        public int ID { set; get; }

        public string Name { set; get; }

    }

     //声明Attribute

    [Customized]

    public class AClass:BasicClass

    {

    }

    //声明扩展Attribute的构造函数

    [Customized("",,true)]

    public class BClass : BasicClass

    {

    }

    public class CClass : BasicClass

    {

    }

}
结果: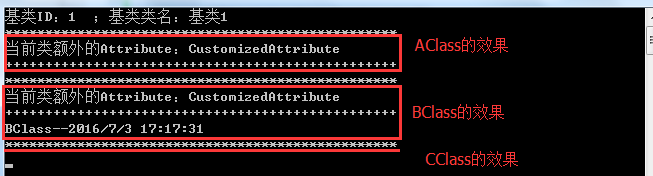
注:未经作者同意,禁止转载!转载请说明出处!请尊重知识产权。
通过声明Attribute属性改变不同类的输出效果的更多相关文章
- 【ASP.NET】DataContract序列化,反序列化对象中包含用接口声明的属性时的处理方法
为此对象添加KnownType属性(Attribute).类型为用接口声明的属性(Property)的所有可能类型. 示例如下: public interface IKey { [DataMembe ...
- iOS 使用COPY声明NSSTRING属性
使用COPY声明NSSTRING属性 2014/05/29 JACE 发表回复 声明一个NSString属性使用copy要优于使用strong.这同样适用于遵守NSCoding协议的不可变类(immu ...
- WPF——数据绑定及属性改变事件
一.首先需要封装一下文本框的属性,并且在实体类中添加一个实体类的属性改变函数 public class User : INotifyPropertyChanged //INotifyPropertyC ...
- python类内init外声明的属性与init内声明的对象属性的访问和操作区别
python类内init外声明的属性与init内声明的对象属性的访问和操作区别(面试题) 1.在ipython中输入以下代码,其输出会是什么? In [1]: class ClassOut: ...: ...
- PHP使用static关键字声明静态属性和静态方法
PHP使用static关键字声明静态属性和静态方法 在PHP中,通过static关键字修饰的成员属性和成员方法被称为静态属性和静态方法. 静态属性和静态方法不需要在被类实例化的情况下就可以直接使用. ...
- 借助JavaScript中的Dom属性改变Html中Table边框的颜色
借助JavaScript中的Dom属性改变Html中Table边框的颜色 -------------------- <html> <head> <title>我是页 ...
- C#里Attribute属性
系统内置属性 系统内置的Attribute属性Obsolete,被个这属性标记的方法在别的地方被调用的时候会有警告提示; 这个属性还可以指定第二个布尔参数,设置编译时是否报错; 例: [Obsolet ...
- OC中在.h和.m中声明的属性和成员变量有何区别?
相比Swift而言,OC规矩太多. 差不多,.h中声明的属性和成员变量均可以在子类中访问到.而.m则不可.而属性其实也就是成员变量的一种简写,其内部自动包含了getter和setter方法. 如图:V ...
- silverlight属性改变事件通知
工作中遇到silverlight本身没有提供的某些属性改变事件,但又需要在属性改变时得到通知,Google搬运stack overflow,原地址 /// Listen for change of t ...
随机推荐
- C# 必看书籍
C# in Depth:讲的是C#的东西.CLR via C#:讲的是运行时的东西.Framework Design Guideline:讲的是你要如何设计一个类库才能跟.NET浑然一体.——“赵三本 ...
- CSS3 选择器——基本选择器
CSS的选择器,我想大家并不会陌生吧,因为天天在使用,但对于CSS3的选择器,要运用的灵活到位,我想对很多朋友还是一定的难度,特别是CSS3中的:nth选择器.那么从现在开始我们先丢开他们版本的区别, ...
- 微信内嵌浏览器sessionid丢失问题,nginx ip_hash将所有请求转发到一台机器
现象微信中打开网页,图形验证码填写后,经常提示错误,即使填写正确也会提示错误,并且是间歇性出现. 系统前期,用户使用主要集中在pc浏览器中,一直没有出现这样的问题.近期有部分用户是在微信中访问的,才出 ...
- javascript 提取表单元素生成用于提交的对象(序列化 html 表单)
function serialize(f) { var o = {}; var s = f.getElementsByTagName("select"); for (var i = ...
- WDA导出文件XLS,WORD
METHOD ONACTIONEXCEL . DATA: LO_NODE TYPE REF TO IF_WD_CONTEXT_NODE, "Node LO_ELEM TYPE REF TO ...
- linq 日期分组统计
#region string Condition(DateTime date, string type) { if (date == null) ...
- 编辑美化图片,保存至本地,Adobe出品(支持IOS,android,web调用)免费插件
本例以web调用做为例子,本插件支持主流浏览器,IE要9以上,移动设备,触屏设备也支持,能自适应屏幕大小. 使用效果: 工具还是很丰富的,编辑完成之后,可以保存图片至本地目录. 使用说明: 1,需要在 ...
- SPI 驱动分析
断更博客两个月后我又回来了,眯着躺倒就能睡熟的小眼睛,在这儿敲键盘.这篇文章给你快乐,你有没有爱上我! SPI驱动由三部分组成,分别为drivers.core.device.通过bus总线连接.困了不 ...
- 限制textarea输入内容长度(多浏览器兼容、鼠标操作可控)
限制textarea的输入内容长度,当从键盘输入,内容长度达到最大值时,只有输入Backspace.Delete.左移动.右移动有效,当用鼠标粘贴内容,则只保留最大值长度的内容.从而控制textare ...
- Visual Studio Code中文文档(一)-快速入门
Visual Studio Code是一个轻量级但是十分强大的源代码编辑器,重要的是它在Windows, OS X 和Linux操作系统的桌面上均可运行.Visual Studio Code内置了对J ...