WPF创建自定义控件并运用
此项目源码:https://github.com/lizhiqiang0204/WpfCustomControlLibrary1
首先创建自定义控件库项目

项目名称命名为:WpfCustomControlLibrary

在CustomControl1.cs文件中添加新控件类BulletCheckBox
/// <summary>

    /// BulletCheckBox.xaml 的交互逻辑

    /// </summary>

    public class BulletCheckBox : CheckBox

    {

        public static readonly DependencyProperty TextProperty = DependencyProperty.Register(

            "Text", typeof(string), typeof(BulletCheckBox), new PropertyMetadata("Off"));

        /// <summary>

        /// 默认文本(未选中)

        /// </summary>

        public string Text

        {

            get { return (string)GetValue(TextProperty); }

            set { SetValue(TextProperty, value); }

        }

        public static readonly DependencyProperty CheckedTextProperty = DependencyProperty.Register(

            "CheckedText", typeof(string), typeof(BulletCheckBox), new PropertyMetadata("On"));

        /// <summary>

        /// 选中状态文本

        /// </summary>

        public string CheckedText

        {

            get { return (string)GetValue(CheckedTextProperty); }

            set { SetValue(CheckedTextProperty, value); }

        }

        public static readonly DependencyProperty CheckedForegroundProperty =

            DependencyProperty.Register("CheckedForeground", typeof(Brush), typeof(BulletCheckBox), new PropertyMetadata(Brushes.WhiteSmoke));

        /// <summary>

        /// 选中状态前景样式

        /// </summary>

        public Brush CheckedForeground

        {

            get { return (Brush)GetValue(CheckedForegroundProperty); }

            set { SetValue(CheckedForegroundProperty, value); }

        }

        public static readonly DependencyProperty CheckedBackgroundProperty =

            DependencyProperty.Register("CheckedBackground", typeof(Brush), typeof(BulletCheckBox), new PropertyMetadata(Brushes.LimeGreen));

        /// <summary>

        /// 选中状态背景色

        /// </summary>

        public Brush CheckedBackground

        {

            get { return (Brush)GetValue(CheckedBackgroundProperty); }

            set { SetValue(CheckedBackgroundProperty, value); }

        }

        static BulletCheckBox()

        {

            DefaultStyleKeyProperty.OverrideMetadata(typeof(BulletCheckBox), new FrameworkPropertyMetadata(typeof(BulletCheckBox)));

        }

    }
为BulletCheckBox这个控件增加样式
    <Style TargetType="{x:Type local:BulletCheckBox}">

        <Setter Property="Background" Value="#FF4A9E4A"></Setter>

        <Setter Property="Foreground" Value="#DDE8E1"></Setter>

        <Setter Property="CheckedForeground" Value="White"></Setter>

        <Setter Property="CheckedBackground" Value="#FF0CC50C"></Setter>

        <Setter Property="FontSize" Value=""></Setter>

        <Setter Property="Cursor" Value="Hand"></Setter>

        <Setter Property="Width" Value=""></Setter>

        <Setter Property="Height" Value=""></Setter>

        <Setter Property="Margin" Value=""></Setter>

        <Setter Property="Template">

            <Setter.Value>

                <!--控件模板-->

                <ControlTemplate TargetType="{x:Type local:BulletCheckBox}">

                    <Viewbox Stretch="Uniform"  VerticalAlignment="Center" HorizontalAlignment="Center">

                        <Border x:Name="border" Width="" Height="" Background="{TemplateBinding Background}" SnapsToDevicePixels="True"

                                Margin="{TemplateBinding Margin}" CornerRadius="">

                            <StackPanel Orientation="Horizontal">

                                <!--状态球-->

                                <Border x:Name="state" Width="" Height="" Margin="3,2,1,2" CornerRadius="" SnapsToDevicePixels="True"

                                    Background="{TemplateBinding Foreground}">

                                    <Border.RenderTransform>

                                        <TranslateTransform x:Name="transState" X=""></TranslateTransform>

                                    </Border.RenderTransform>

                                </Border>

                                <!--文本框-->

                                <TextBlock Width="" Foreground="{TemplateBinding Foreground}" x:Name="txt" Text="{TemplateBinding Text}" VerticalAlignment="Center" TextAlignment="Center">

                                    <TextBlock.RenderTransform>

                                        <TranslateTransform x:Name="transTxt" X=""></TranslateTransform>

                                    </TextBlock.RenderTransform>

                                </TextBlock>

                            </StackPanel>

                        </Border>

                    </Viewbox>

                    <!--触发器:设置选中状态符号-->

                    <ControlTemplate.Triggers>

                        <Trigger Property="IsChecked" Value="True">

                            <Setter Property="Text" Value="{Binding RelativeSource={RelativeSource Mode=TemplatedParent}, Path=CheckedText}" TargetName="txt"/>

                            <Setter Property="Background" Value="{Binding RelativeSource={RelativeSource Mode=TemplatedParent}, Path=CheckedForeground}" TargetName="state"/>

                            <Setter Property="Foreground" Value="{Binding RelativeSource={RelativeSource Mode=TemplatedParent}, Path=CheckedForeground}" TargetName="txt"/>

                            <Setter Property="Background" Value="{Binding RelativeSource={RelativeSource Mode=TemplatedParent}, Path=CheckedBackground}" TargetName="border"/>

                            <Trigger.EnterActions>

                                <BeginStoryboard>

                                    <Storyboard>

                                        <DoubleAnimation Storyboard.TargetName="transState" Storyboard.TargetProperty="X" To="" Duration="0:0:0.2" />

                                        <DoubleAnimation Storyboard.TargetName="transTxt" Storyboard.TargetProperty="X" To="-24" Duration="0:0:0.2" />

                                    </Storyboard>

                                </BeginStoryboard>

                            </Trigger.EnterActions>

                            <Trigger.ExitActions>

                                <BeginStoryboard>

                                    <Storyboard>

                                        <DoubleAnimation Storyboard.TargetName="transState" Storyboard.TargetProperty="X" To="" Duration="0:0:0.2" />

                                        <DoubleAnimation Storyboard.TargetName="transTxt" Storyboard.TargetProperty="X" To="" Duration="0:0:0.2" />

                                    </Storyboard>

                                </BeginStoryboard>

                            </Trigger.ExitActions>

                        </Trigger>

                        <Trigger Property="IsEnabled" Value="false">

                            <Setter Property="Opacity" Value="{StaticResource DisableOpacity}" TargetName="border"/>

                        </Trigger>

                    </ControlTemplate.Triggers>

                </ControlTemplate>

            </Setter.Value>

        </Setter>

    </Style>
编译项目得到DLL控件库文件

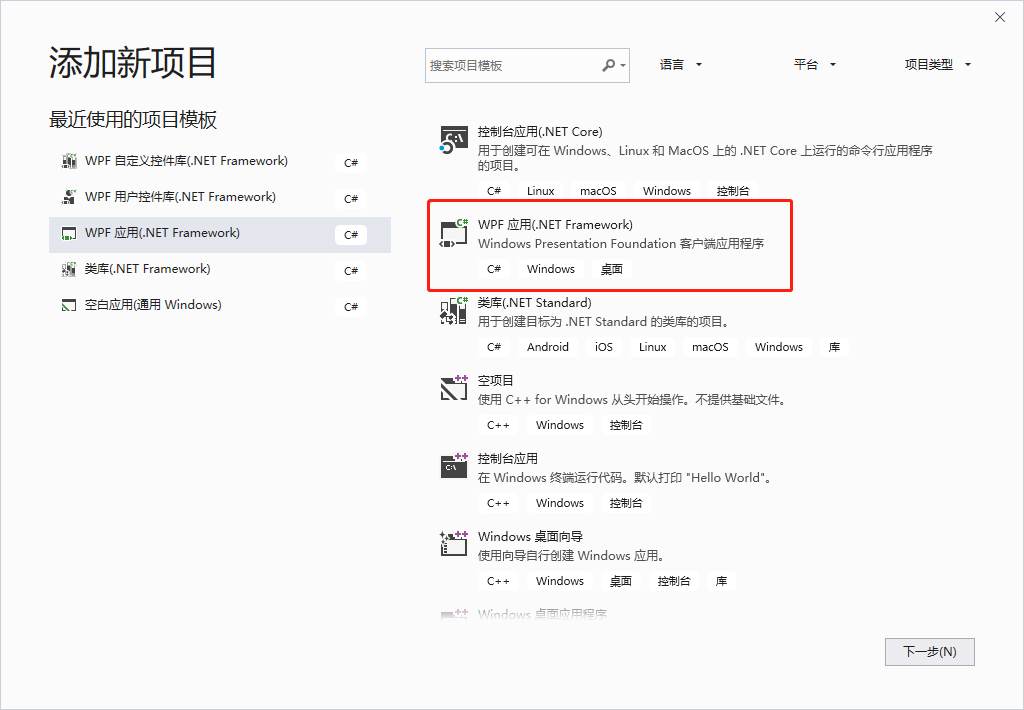
自定义控件库生成完后,就可以创建WPF应用程序来调用它了,右击解决方案->添加->新建项目->WPF应用
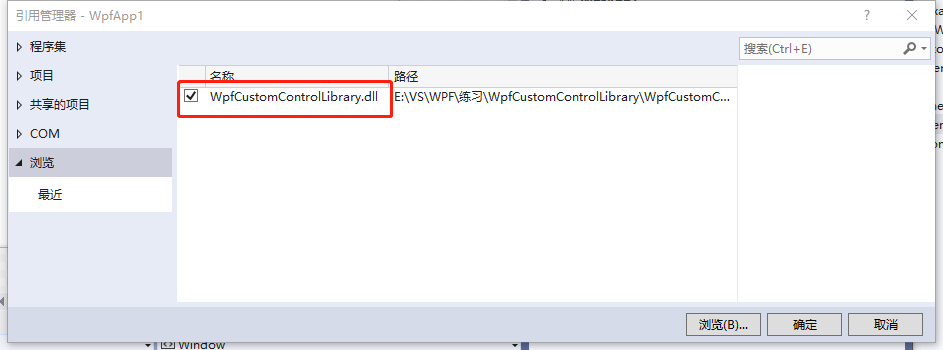
右击WpfApp1项目设为启动项目,右击该项目下的引用,添加引用

从浏览中找到我们刚才生成的DLL控件库文件
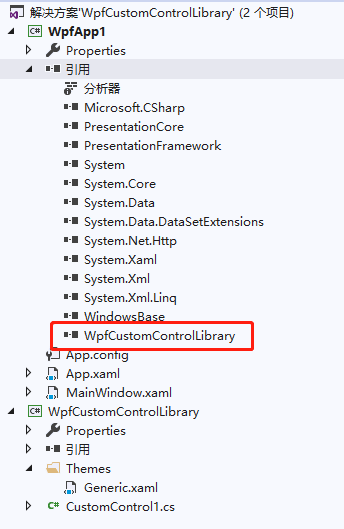
此时展开引用就可以看到刚才生成的控件库已经加载进来了
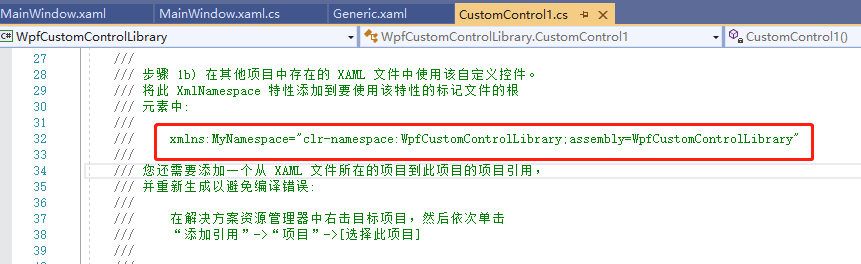
打开MainWindow.xaml,添加引用xmlns:MyNamespace="clr-namespace:WpfCustomControlLibrary;assembly=WpfCustomControlLibrary"
这句引用是在CustomControl1.cs文件中复制而来的,其中xmlns:MyNamespace是可以更改的
后台文件不用改动,整个MainWindow.xaml文件如下:
<Window x:Class="WpfApp1.MainWindow"
xmlns="http://schemas.microsoft.com/winfx/2006/xaml/presentation"
xmlns:x="http://schemas.microsoft.com/winfx/2006/xaml"
xmlns:d="http://schemas.microsoft.com/expression/blend/2008"
xmlns:mc="http://schemas.openxmlformats.org/markup-compatibility/2006"
xmlns:MyNamespace="clr-namespace:WpfCustomControlLibrary;assembly=WpfCustomControlLibrary"
xmlns:local="clr-namespace:WpfApp1"
mc:Ignorable="d"
Title="MainWindow" Height="" Width="">
<Grid>
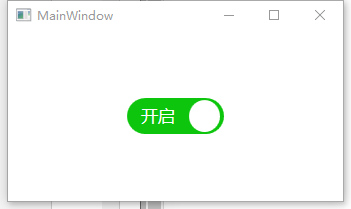
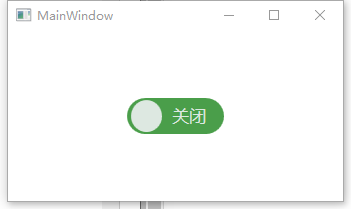
<MyNamespace:BulletCheckBox Text="关闭" CheckedText="开启" IsChecked="True" Width="" Height="" />
</Grid>
</Window>
最后运行程序:
WPF创建自定义控件并运用的更多相关文章
- WPF 创建自定义控件及自定义事件
1 创建自定义控件及自定义事件 /// <summary> /// 演示用的自定义控件 /// </summary> public class ExtButton : Butt ...
- WPF设计自定义控件
在实际工作中,WPF提供的控件并不能完全满足不同的设计需求.这时,需要我们设计自定义控件. 这里LZ总结一些自己的思路,特性如下: Coupling UITemplate Behaviour Func ...
- [翻译]使用Swift在Xcode中创建自定义控件
使用Swift在Xcode中创建自定义控件 原文 IBDesignable and IBInspectable With IBDesignable and IBInspectable, develop ...
- 利用WPF创建含多种交互特性的无边框窗体
咳咳,标题一口气读下来确实有点累,让我先解释一下.另外文章底部有演示程序的下载. 本文介绍利用WPF创建一个含有以下特性的窗口: 有窗口阴影,比如QQ窗口外围只有几像素的阴影: 支持透明且无边框,为了 ...
- Android学习之基础知识五—创建自定义控件
下面是控件和布局的继承关系: 从上面我们看到: 1.所有控件都是直接或间接继承View,所有的布局都是直接或间接继承ViewGroup 2.View是Android中最基本的UI组件,各种组件其实就是 ...
- 在WPF中自定义控件
一, 不一定需要自定义控件在使用WPF以前,动辄使用自定义控件几乎成了惯性思维,比如需要一个带图片的按钮,但在WPF中此类任务却不需要如此大费周章,因为控件可以嵌套使用以及可以为控件外观打造一套新的样 ...
- 在WPF中自定义控件(3) CustomControl (上)
原文:在WPF中自定义控件(3) CustomControl (上) 在WPF中自定义控件(3) CustomControl (上) 周银辉 ...
- 在WPF中自定义控件(3) CustomControl (下)
原文:在WPF中自定义控件(3) CustomControl (下) 在WPF中自定义控件(3) CustomControl (下) ...
- 在WPF中自定义控件(1)
原文:在WPF中自定义控件(1) 在WPF中自定义控件(1):概述 周银辉一, 不一定需要自定 ...
随机推荐
- shell脚本编程及bash特性
bash特性及bash脚本编程初步 终端,附着在终端的接口程序; GUI: KDE,GNome,Xfce CLI: /etc/shells bash的特性: 命令行展开: ~,{} 命令别名: ali ...
- 3.IDEA+Maven+Spring注解+Servlet+MyBatis
1.创建项目模块 2. 选择创建的项目类型,maven的web项目 3.输入项目名 4.选择自己配置的本地maven库 5.创建项目 6.查看项目结构 7.配置项目的依赖pom.xml <?xm ...
- 3.SpringBoot整合Thymeleaf模板
一.前言 SrpingBoot支持如JSP.Thymeleaf.FreeMarker.Mustache.Velocity等各种模板引擎,同时还为开发者提供了自定义模板扩展的支持. 使用嵌入式Servl ...
- 【[Offer收割]编程练习赛10 B】出勤记录II
[题目链接]:http://hihocoder.com/problemset/problem/1482 [题意] [题解] 递推题. 每次增加3个字符中的一个;然后根据下面这个数组递推; 递推方式看程 ...
- lucene_03_索引的增删改查
lucene索引的添加见 http://www.cnblogs.com/getchen/p/8615276.html 入门代码. 公共代码 public <T extends Query> ...
- Spring Cloud Stream(十三)
说明 对Spring Boot 和 Spring Integration的整合,通过Spring Cloud Stream能够简化消息中间件使用的复杂难度!让业务人员更多的精力能够花在业务层面 简单例 ...
- 洛谷 P1768 天路
P1768 天路 题目描述 “那是一条神奇的天路诶~,把第一个神犇送上天堂~”,XDM先生唱着这首“亲切”的歌曲,一道猥琐题目的灵感在脑中出现了. 和C_SUNSHINE大神商量后,这道猥琐的题目终于 ...
- 事务 ACID
A C I D A:ATOMICITY REDO C:CONSTENCY UNDO I :ISOLATION LOCK D :Durable redo & undo
- NEFU 115
刚开始,做了水题 #include <iostream> #include <cstdio> #include <algorithm> using namespac ...
- Android訪问网络,使用HttpURLConnection还是HttpClient?
原文地址:http://android-developers.blogspot.com/2011/09/androids-http-clients.html 大多数的Android应用程序都会使用HT ...