
树莓派使用Samba共享文件夹
转载自:http://raspberrypihq.com/how-to-share-a-folder-with-a-windows-computer-from-a-raspberry-pi/
Sharing files over the network is often very useful. Whether you need to transfer media files to the Raspberry Pi or you want to use the raspberry as a simple Network-Attached Storage (NAS) device, this guide will show you how to enable file sharing of a folder on the Raspberry Pi running the Raspbian OS.
Prerequisites & Equipment
You are going to need the following:
- A Raspberry Pi (Buy here)
- A SD Card flashed with the Raspbian OS (Here is a guide if you need)
- Access to the Raspberry either via keyboard and a monitor or remotely
- A home network
- A Windows computer (for this guide we will be running Windows 7)
Install and configure required software
To share network folders to a Windows computer we need to install some special software on the Raspberry Pi. The software providing the secret sauce this time is called Samba. The Samba software package implements the SMB protocol and provides support for the Windows naming service (WINS) and for joining a Windows Workgroup.
Installing the software is easy – login to your Raspberry Pi and run:
sudo apt-get install samba samba-common-bin
After installation configure the software by opening the file /etc/samba/smb.conf using the command:
sudo nano /etc/samba/smb.conf
Read through the file and make sure you have the following parameters set:
workgroup = WORKGROUP

wins support = yes
You can use anything as your workgroup name as long as it is alphanumerical and matches the workgroup you would like to join. The default workgroup in Windows 7 is WORKGROUP.
Setup folder to share
Next step is to create the folder you would like to share. To create a folder called “share” in your home directory do the following:
mkdir ~/share
With the folder created we can now tell the Samba software to share it on the network. Open the file /etc/samba/smb.conf using the command:
sudo nano /etc/samba/smb.conf
Scroll to the bottom and add the following:
[PiShare]

 comment=Raspberry Pi Share

 path=/home/pi/share

 browseable=Yes

 writeable=Yes

 only guest=no

 create mask=0777

 directory mask=0777

 public=no
Notice how we tell Samba that public access is not allowed via “public=no” – this means that anyone wanting to access the shared folder must login with a valid user.
In this case the valid user is the user called “pi”. To let Samba know that “pi” is a network user run the command:
sudo smbpasswd -a pi
And enter pi’s password twice (default: raspberry).
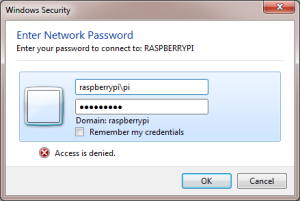
At this point we can now login to the share from our Windows computer – use Domain: raspberrypi, User: pi and Password: raspberry (unless you changed the password) as you can see below:
If you do not want to deal with logging in you can always make the share publicly available by changing the config file to say:
public=yes
However please note that this is extremely dangerous since anyone will be able to access, modify and delete your files.
树莓派使用Samba共享文件夹的更多相关文章
- 常见企业IT支撑【2、samba共享文件夹】
samba共享文件夹,较Window自带的比较:开源,安全 建议安装samba4,兼容性好 1.安装samba #yum -y install samba4 samba4-client 2.备份sam ...
- 使用samba共享文件夹,提供给window访问
1. 下载yumdownloader yum install -y yum-utils 2. 下载samba mkdir samba cd samba yumdownloader --resolve ...
- samba共享文件夹设置
sudo apt-get install samba(4) mkdir /home/用户名/share (新建share文件夹) sudo cp /etc/samba/smb.conf /etc/sa ...
- ubuntu 安装samba共享文件夹
安装samba sudo apt-get install samba smbclient 配置samba sudo cp /etc/samba/smb.conf /etc/samba/smb.conf ...
- cetos6 安装samba共享文件夹
yum方式安装 yum install samba 修改配置文件 vim /etc/samba/smb.conf [global] comment = global workgroup = QFpay ...
- Linux使用mount挂载samba共享文件夹
挂载smb的目录,使用读写644权限 mount -t cifs -o "rw,dir_mode=0644,file_mode=0644,username=username,password ...
- Ubuntu 配置、使用samba共享文件夹
安装库 sudo apt install smbclient samba samba-common 启动samba sudo /etc/init.d/samba start 备份配置文件 sudo c ...
- debian 11 开启 samba 共享文件夹
安装 apt-get install samba 安装时,提示搜索不到 此包时 解决办法1:apt-get update 更新源 解决办法2:更改镜像源,可以采用阿里云,网易云等镜像站里提供的镜 ...
- [Z] 将samba共享文件夹映射到linux的目录下
Linux系统下访问远程共享资源 使用mount加载共享目录: -把WinXP机器192.168.16.249上的共享目录test001映射到本地目录/wdl/下. -把Linux机器192.168. ...
随机推荐
- SIG蓝牙mesh笔记3_网络结构
目录 3. Mesh Networking 3.1 Bearers 承载层 3.2 Network Layer 网络层 3.2.3 Address validity 地址有效性 3.2.4 Netwo ...
- 二:HDFS 命令指南
命令具体选项请参考: http://hadoop.apache.org/docs/r2.6.3/hadoop-project-dist/hadoop-hdfs/HDFSCommands.html ...
- 测试下markdown!
目录 目的 代码 目的 测试markdown 代码 void static void main(args String[]){ System.out.println("hollw" ...
- codeforces 295C Greg and Friends(BFS+DP)
One day Greg and his friends were walking in the forest. Overall there were n people walking, includ ...
- Thunder团队第五周 - Scrum会议1
Scrum会议1 小组名称:Thunder 项目名称:i阅app Scrum Master:杨梓瑞 工作照片: 邹双黛在照相,所以图片中没有该同学. 参会成员: 王航:http://www.cnblo ...
- LintCode-112.删除排序链表中的重复元素
删除排序链表中的重复元素 给定一个排序链表,删除所有重复的元素每个元素只留下一个. 样例 给出 1->1->2->null,返回 1->2->null 给出 1-> ...
- JDK源码分析 – ArrayList
ArrayList类的申明 ArrayList是一个支持泛型的,底层通过数组实现的一个可以存任意类型的数据结构,源码中的定义如下: public class ArrayList<E> ex ...
- Qt-排序
1.要求传入起始指针,总长度,单元素空间占用大小(sizeof(A[i])),判断函数. 判断函数参数类型为const void *,使用需要在函数内自行转换为对应类型, 返回值为整数型,升序排序时正 ...
- Python2爬虫获取的数据存储到MySQL中时报错"Incorrect string value: '\\xE6\\x96\\xB0\\xE9\\x97\\xBB' for column 'new' at row 1"的解决办法
由于一直使用python3进行编码,在使用Python2时,将爬虫数据连接数据库进行存储时,出现如上的报错,经查资料 是数据库编码问题. 如下转自:http://www.cnblogs.com/liu ...
- isset、is_null、empty的区别
版本:PHP 5.4 1.isset() :检测变量是否存在,测试如下: $a = false; $b = null; $c; $d = 0; $e = true; var_dump(isset($a ...