
Nginx+Tomcat+Memcached部署
环境清单列表:(因为只有三台电脑,所有把Nginx和memcached放到一起)
应用服务器1:192.168.51.10;
应用服务器2:192.168.55.110;
memcached服务器:192.168.51.75;
Nginx地址:192.168.51.75
一、安装tomcate
1、下载tomcate7.0,下载地址:链接: https://pan.baidu.com/s/1dxiE9w 密码: nba7,把压缩包放在/home/ump/tomcat目录下。
先按照55.110上的tomcate
2、解压压缩包到/usr/local目录下,并进入到安装目录,命令:
unzip apache-tomcat-7.0.-windows-x64.zip -d /usr/local
cd /usr/local/apache-tomcat-7.0.77
3、修改conf/server.xml文件,因为192.168.55.110上面已经装有一个应用服务器,所以需要修改对应的端口,修改server端口,修改连接器的端口,修改后的内容如下:
<?xml version='1.0' encoding='utf-8'?>
<!--
Licensed to the Apache Software Foundation (ASF) under one or more
contributor license agreements. See the NOTICE file distributed with
this work for additional information regarding copyright ownership.
The ASF licenses this file to You under the Apache License, Version 2.0
(the "License"); you may not use this file except in compliance with
the License. You may obtain a copy of the License at http://www.apache.org/licenses/LICENSE-2.0 Unless required by applicable law or agreed to in writing, software
distributed under the License is distributed on an "AS IS" BASIS,
WITHOUT WARRANTIES OR CONDITIONS OF ANY KIND, either express or implied.
See the License for the specific language governing permissions and
limitations under the License.
-->
<!-- Note: A "Server" is not itself a "Container", so you may not
define subcomponents such as "Valves" at this level.
Documentation at /docs/config/server.html
-->
<Server port="" shutdown="SHUTDOWN">
<Listener className="org.apache.catalina.startup.VersionLoggerListener" />
<!-- Security listener. Documentation at /docs/config/listeners.html
<Listener className="org.apache.catalina.security.SecurityListener" />
-->
<!--APR library loader. Documentation at /docs/apr.html -->
<Listener className="org.apache.catalina.core.AprLifecycleListener" SSLEngine="on" />
<!--Initialize Jasper prior to webapps are loaded. Documentation at /docs/jasper-howto.html -->
<Listener className="org.apache.catalina.core.JasperListener" />
<!-- Prevent memory leaks due to use of particular java/javax APIs-->
<Listener className="org.apache.catalina.core.JreMemoryLeakPreventionListener" />
<Listener className="org.apache.catalina.mbeans.GlobalResourcesLifecycleListener" />
<Listener className="org.apache.catalina.core.ThreadLocalLeakPreventionListener" /> <!-- Global JNDI resources
Documentation at /docs/jndi-resources-howto.html
-->
<GlobalNamingResources>
<!-- Editable user database that can also be used by
UserDatabaseRealm to authenticate users
-->
<Resource name="UserDatabase" auth="Container"
type="org.apache.catalina.UserDatabase"
description="User database that can be updated and saved"
factory="org.apache.catalina.users.MemoryUserDatabaseFactory"
pathname="conf/tomcat-users.xml" />
</GlobalNamingResources> <!-- A "Service" is a collection of one or more "Connectors" that share
a single "Container" Note: A "Service" is not itself a "Container",
so you may not define subcomponents such as "Valves" at this level.
Documentation at /docs/config/service.html
-->
<Service name="Catalina"> <!--The connectors can use a shared executor, you can define one or more named thread pools-->
<!--
<Executor name="tomcatThreadPool" namePrefix="catalina-exec-"
maxThreads="150" minSpareThreads="4"/>
--> <!-- A "Connector" represents an endpoint by which requests are received
and responses are returned. Documentation at :
Java HTTP Connector: /docs/config/http.html (blocking & non-blocking)
Java AJP Connector: /docs/config/ajp.html
APR (HTTP/AJP) Connector: /docs/apr.html
Define a non-SSL HTTP/1.1 Connector on port 8080
-->
<Connector port="9090" protocol="HTTP/1.1"
connectionTimeout="20000"
redirectPort="9443" />
<!-- A "Connector" using the shared thread pool-->
<!--
<Connector executor="tomcatThreadPool"
port="8080" protocol="HTTP/1.1"
connectionTimeout="20000"
redirectPort="8443" />
-->
<!-- Define a SSL HTTP/1.1 Connector on port 8443
This connector uses the BIO implementation that requires the JSSE
style configuration. When using the APR/native implementation, the
OpenSSL style configuration is required as described in the APR/native
documentation -->
<!--
<Connector port="8443" protocol="org.apache.coyote.http11.Http11Protocol"
maxThreads="150" SSLEnabled="true" scheme="https" secure="true"
clientAuth="false" sslProtocol="TLS" />
--> <!-- Define an AJP 1.3 Connector on port 8009 -->
<Connector port="9009" protocol="AJP/1.3" redirectPort="9443" /> <!-- An Engine represents the entry point (within Catalina) that processes
every request. The Engine implementation for Tomcat stand alone
analyzes the HTTP headers included with the request, and passes them
on to the appropriate Host (virtual host).
Documentation at /docs/config/engine.html --> <!-- You should set jvmRoute to support load-balancing via AJP ie :
<Engine name="Catalina" defaultHost="localhost" jvmRoute="jvm1">
-->
<Engine name="Catalina" defaultHost="localhost"> <!--For clustering, please take a look at documentation at:
/docs/cluster-howto.html (simple how to)
/docs/config/cluster.html (reference documentation) -->
<!--
<Cluster className="org.apache.catalina.ha.tcp.SimpleTcpCluster"/>
--> <!-- Use the LockOutRealm to prevent attempts to guess user passwords
via a brute-force attack -->
<Realm className="org.apache.catalina.realm.LockOutRealm">
<!-- This Realm uses the UserDatabase configured in the global JNDI
resources under the key "UserDatabase". Any edits
that are performed against this UserDatabase are immediately
available for use by the Realm. -->
<Realm className="org.apache.catalina.realm.UserDatabaseRealm"
resourceName="UserDatabase"/>
</Realm> <Host name="localhost" appBase="webapps"
unpackWARs="true" autoDeploy="true"> <!-- SingleSignOn valve, share authentication between web applications
Documentation at: /docs/config/valve.html -->
<!--
<Valve className="org.apache.catalina.authenticator.SingleSignOn" />
--> <!-- Access log processes all example.
Documentation at: /docs/config/valve.html
Note: The pattern used is equivalent to using pattern="common" -->
<Valve className="org.apache.catalina.valves.AccessLogValve" directory="logs"
prefix="localhost_access_log." suffix=".txt"
pattern="%h %l %u %t "%r" %s %b" /> </Host>
</Engine>
</Service>
</Server>
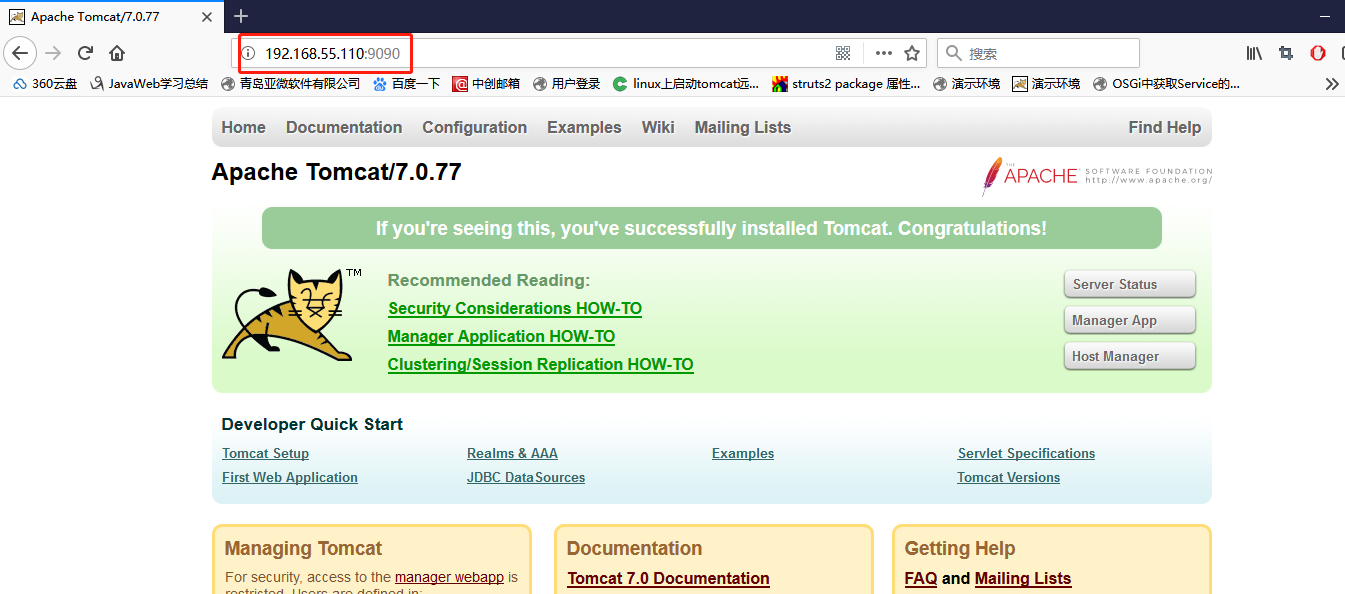
4、启动tomcate,访问:http://192.168.55.110:9090,如果出现tomcate管理界面,说明tamcate安装成功。
5、用同样的方法,部署另一个tomcate到192.168.51.10,因为192.168.51.10上不存在端口冲突,所以server.xml不需要修改,解压后,启动,可以通过:http://192.168.51.10:8080/访问到tomcate管理控制台。
二、创建一个动态web工程,并部署到tomcate上
1、eclipse创建一个动态web工程,并新建一个index.jsp,内容如下:
<%@ page language="java" contentType="text/html; charset=UTF-8"

    pageEncoding="UTF-8"%>

<!DOCTYPE html PUBLIC "-//W3C//DTD HTML 4.01 Transitional//EN" "http://www.w3.org/TR/html4/loose.dtd">

<html>

<head>

<meta http-equiv="Content-Type" content="text/html; charset=UTF-8">

<title>Cluster Web Test</title>

</head>

<body>

    <h1>sessionID:<%=session.getId() %></h1>

    <h1>长度:<%=session.getId().length() %></h1>

    <p>this is Web 1</p>

</body>

</html>
2、把创建的动态工程导出为war包。下载地址:链接: https://pan.baidu.com/s/1c2Waok4 密码: 2jaf
3、创建存放工程的目录,命令:
mkdir /home/ump/www
4、把ClusterProject.war解压到ClusterProject文件夹,把ClusterProject文件夹放入道/home/ump/www目录下,修改server.xml,添加ClusterProject工程,内容如下:
<?xml version='1.0' encoding='utf-8'?>
<!--
Licensed to the Apache Software Foundation (ASF) under one or more
contributor license agreements. See the NOTICE file distributed with
this work for additional information regarding copyright ownership.
The ASF licenses this file to You under the Apache License, Version 2.0
(the "License"); you may not use this file except in compliance with
the License. You may obtain a copy of the License at http://www.apache.org/licenses/LICENSE-2.0 Unless required by applicable law or agreed to in writing, software
distributed under the License is distributed on an "AS IS" BASIS,
WITHOUT WARRANTIES OR CONDITIONS OF ANY KIND, either express or implied.
See the License for the specific language governing permissions and
limitations under the License.
-->
<!-- Note: A "Server" is not itself a "Container", so you may not
define subcomponents such as "Valves" at this level.
Documentation at /docs/config/server.html
-->
<Server port="9005" shutdown="SHUTDOWN">
<Listener className="org.apache.catalina.startup.VersionLoggerListener" />
<!-- Security listener. Documentation at /docs/config/listeners.html
<Listener className="org.apache.catalina.security.SecurityListener" />
-->
<!--APR library loader. Documentation at /docs/apr.html -->
<Listener className="org.apache.catalina.core.AprLifecycleListener" SSLEngine="on" />
<!--Initialize Jasper prior to webapps are loaded. Documentation at /docs/jasper-howto.html -->
<Listener className="org.apache.catalina.core.JasperListener" />
<!-- Prevent memory leaks due to use of particular java/javax APIs-->
<Listener className="org.apache.catalina.core.JreMemoryLeakPreventionListener" />
<Listener className="org.apache.catalina.mbeans.GlobalResourcesLifecycleListener" />
<Listener className="org.apache.catalina.core.ThreadLocalLeakPreventionListener" /> <!-- Global JNDI resources
Documentation at /docs/jndi-resources-howto.html
-->
<GlobalNamingResources>
<!-- Editable user database that can also be used by
UserDatabaseRealm to authenticate users
-->
<Resource name="UserDatabase" auth="Container"
type="org.apache.catalina.UserDatabase"
description="User database that can be updated and saved"
factory="org.apache.catalina.users.MemoryUserDatabaseFactory"
pathname="conf/tomcat-users.xml" />
</GlobalNamingResources> <!-- A "Service" is a collection of one or more "Connectors" that share
a single "Container" Note: A "Service" is not itself a "Container",
so you may not define subcomponents such as "Valves" at this level.
Documentation at /docs/config/service.html
-->
<Service name="Catalina"> <!--The connectors can use a shared executor, you can define one or more named thread pools-->
<!--
<Executor name="tomcatThreadPool" namePrefix="catalina-exec-"
maxThreads="150" minSpareThreads="4"/>
--> <!-- A "Connector" represents an endpoint by which requests are received
and responses are returned. Documentation at :
Java HTTP Connector: /docs/config/http.html (blocking & non-blocking)
Java AJP Connector: /docs/config/ajp.html
APR (HTTP/AJP) Connector: /docs/apr.html
Define a non-SSL HTTP/1.1 Connector on port 8080
-->
<Connector port="9090" protocol="HTTP/1.1"
connectionTimeout="20000"
redirectPort="9443" />
<!-- A "Connector" using the shared thread pool-->
<!--
<Connector executor="tomcatThreadPool"
port="8080" protocol="HTTP/1.1"
connectionTimeout="20000"
redirectPort="8443" />
-->
<!-- Define a SSL HTTP/1.1 Connector on port 8443
This connector uses the BIO implementation that requires the JSSE
style configuration. When using the APR/native implementation, the
OpenSSL style configuration is required as described in the APR/native
documentation -->
<!--
<Connector port="8443" protocol="org.apache.coyote.http11.Http11Protocol"
maxThreads="150" SSLEnabled="true" scheme="https" secure="true"
clientAuth="false" sslProtocol="TLS" />
--> <!-- Define an AJP 1.3 Connector on port 8009 -->
<Connector port="9009" protocol="AJP/1.3" redirectPort="9443" /> <!-- An Engine represents the entry point (within Catalina) that processes
every request. The Engine implementation for Tomcat stand alone
analyzes the HTTP headers included with the request, and passes them
on to the appropriate Host (virtual host).
Documentation at /docs/config/engine.html --> <!-- You should set jvmRoute to support load-balancing via AJP ie :
<Engine name="Catalina" defaultHost="localhost" jvmRoute="jvm1">
-->
<Engine name="Catalina" defaultHost="localhost"> <!--For clustering, please take a look at documentation at:
/docs/cluster-howto.html (simple how to)
/docs/config/cluster.html (reference documentation) -->
<!--
<Cluster className="org.apache.catalina.ha.tcp.SimpleTcpCluster"/>
--> <!-- Use the LockOutRealm to prevent attempts to guess user passwords
via a brute-force attack -->
<Realm className="org.apache.catalina.realm.LockOutRealm">
<!-- This Realm uses the UserDatabase configured in the global JNDI
resources under the key "UserDatabase". Any edits
that are performed against this UserDatabase are immediately
available for use by the Realm. -->
<Realm className="org.apache.catalina.realm.UserDatabaseRealm"
resourceName="UserDatabase"/>
</Realm> <Host name="localhost" appBase="webapps"
unpackWARs="true" autoDeploy="true"> <Context path="ClusterProject" docBase="/home/ump/www/ClusterProject" reloadable="true"> </Context> <!-- SingleSignOn valve, share authentication between web applications
Documentation at: /docs/config/valve.html -->
<!--
<Valve className="org.apache.catalina.authenticator.SingleSignOn" />
--> <!-- Access log processes all example.
Documentation at: /docs/config/valve.html
Note: The pattern used is equivalent to using pattern="common" -->
<Valve className="org.apache.catalina.valves.AccessLogValve" directory="logs"
prefix="localhost_access_log." suffix=".txt"
pattern="%h %l %u %t "%r" %s %b" /> </Host>
</Engine>
</Service>
</Server>
主要是添加绿色背景的语句。
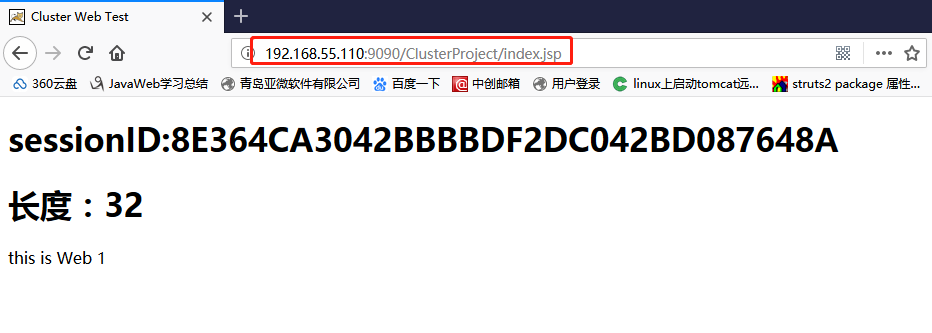
5、重启Tomcat,并访问:http://192.168.55.110:9090/ClusterProject/index.jsp,如果出现下图,说明应用安装成功。
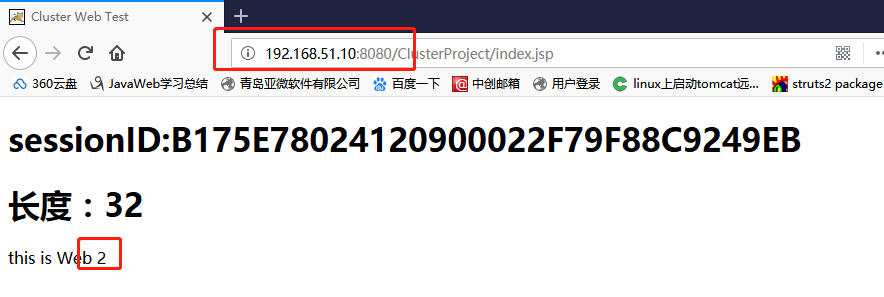
4、把ClusterProject.war安装同样的方法,部署到192.168.51.10上。为了与192.168.55.110上的应用区分,修改index.jsp中
<p>this is Web 1</p>为<p>this is Web </p>
5、访问:http://192.168.51.10:8080/ClusterProject/index.jsp,如下图所示
至此,应用部署完毕。
三、安装Nginx,并配置负载均衡。(192.168.51.75)
1、Nginx的安装过程参考其他文章,不在赘述。
2、修改Nginx的配置文件,/etc/nginx/nginx.conf,修改内容如下:
# For more information on configuration, see:

#   * Official English Documentation: http://nginx.org/en/docs/

#   * Official Russian Documentation: http://nginx.org/ru/docs/

user  nginx;

worker_processes  1;

error_log  /var/log/nginx/error.log;

#error_log  /var/log/nginx/error.log  notice;

#error_log  /var/log/nginx/error.log  info;

pid        /run/nginx.pid;

events {

    worker_connections  1024;

}

http {

    include       /etc/nginx/mime.types;

    default_type  application/octet-stream;

    log_format  main  '$remote_addr - $remote_user [$time_local] "$request" '

                      '$status $body_bytes_sent "$http_referer" '

                      '"$http_user_agent" "$http_x_forwarded_for"';

    access_log  /var/log/nginx/access.log  main;

    sendfile        on;

    #tcp_nopush     on;

    #keepalive_timeout  0;

    keepalive_timeout  65;

    #gzip  on;

    index   index.html index.htm;

    # Load modular configuration files from the /etc/nginx/conf.d directory.

    # See http://nginx.org/en/docs/ngx_core_module.html#include

    # for more information.

    include /etc/nginx/conf.d/*.conf;

    upstream myweb{

        server 192.168.51.10:8080;

        server 192.168.55.110:9090;

    }

    server {

        listen       80 default_server;

        server_name  localhost;

        root         /usr/share/nginx/html;

        #charset koi8-r;

        #access_log  /var/log/nginx/host.access.log  main;

        # Load configuration files for the default server block.

        include /etc/nginx/default.d/*.conf;

        location / {

        proxy_pass http://myweb;

        }

        # redirect server error pages to the static page /40x.html

        #

        error_page  404              /404.html;

        location = /40x.html {

        }

        # redirect server error pages to the static page /50x.html

        #

        error_page   500 502 503 504  /50x.html;

        location = /50x.html {

        }

    }

}
只需要添加红色字体部分。
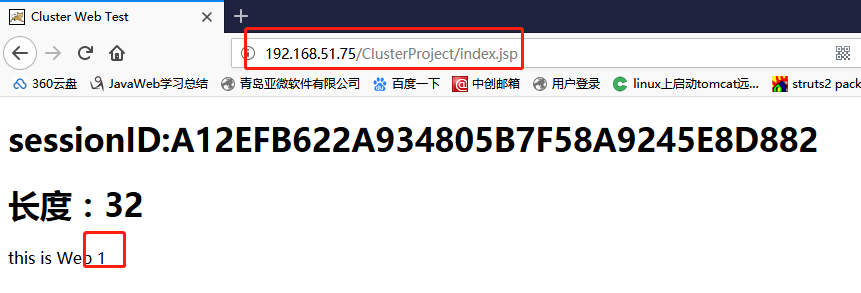
3、访问Nginx:http://192.168.51.75/ClusterProject/index.jsp,第一次访问显示图一,刷新显示图二,说明第一次访问192.168.51.10,第二次访问192.168.55.110
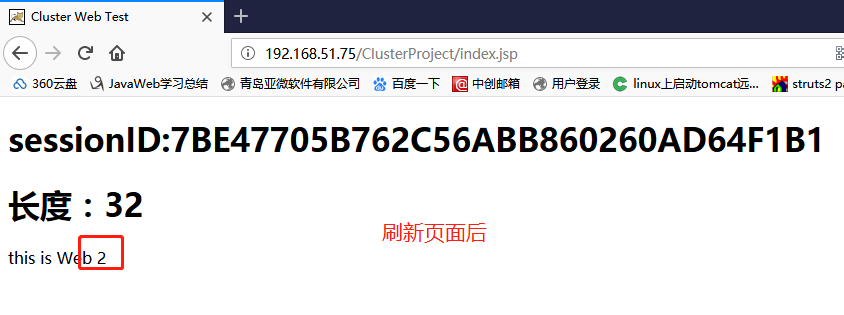
至此负载均衡搭建完毕。
四、安装memcached,安装过程参考其他文档,不在赘述。
memcached配置信息如下:
五、基于memcached配置tomcate,共享session
1、启动memcached,memcached -d -c 10240 -m 1024 -u root
2、下载memcached相关jar包和序列化对应的jar包,这里session序列化采用kryo,所有的jar包下载地址:链接: https://pan.baidu.com/s/1htV2vnm 密码: hkiy
3、把下载的所有jar,放入到tomcate安装目录的lib下面。
4、修改tomcate,server.xml,添加session管理。
<?xml version='1.0' encoding='utf-8'?>
<!--
Licensed to the Apache Software Foundation (ASF) under one or more
contributor license agreements. See the NOTICE file distributed with
this work for additional information regarding copyright ownership.
The ASF licenses this file to You under the Apache License, Version 2.0
(the "License"); you may not use this file except in compliance with
the License. You may obtain a copy of the License at http://www.apache.org/licenses/LICENSE-2.0 Unless required by applicable law or agreed to in writing, software
distributed under the License is distributed on an "AS IS" BASIS,
WITHOUT WARRANTIES OR CONDITIONS OF ANY KIND, either express or implied.
See the License for the specific language governing permissions and
limitations under the License.
-->
<!-- Note: A "Server" is not itself a "Container", so you may not
define subcomponents such as "Valves" at this level.
Documentation at /docs/config/server.html
-->
<Server port="9005" shutdown="SHUTDOWN">
<Listener className="org.apache.catalina.startup.VersionLoggerListener" />
<!-- Security listener. Documentation at /docs/config/listeners.html
<Listener className="org.apache.catalina.security.SecurityListener" />
-->
<!--APR library loader. Documentation at /docs/apr.html -->
<Listener className="org.apache.catalina.core.AprLifecycleListener" SSLEngine="on" />
<!--Initialize Jasper prior to webapps are loaded. Documentation at /docs/jasper-howto.html -->
<Listener className="org.apache.catalina.core.JasperListener" />
<!-- Prevent memory leaks due to use of particular java/javax APIs-->
<Listener className="org.apache.catalina.core.JreMemoryLeakPreventionListener" />
<Listener className="org.apache.catalina.mbeans.GlobalResourcesLifecycleListener" />
<Listener className="org.apache.catalina.core.ThreadLocalLeakPreventionListener" /> <!-- Global JNDI resources
Documentation at /docs/jndi-resources-howto.html
-->
<GlobalNamingResources>
<!-- Editable user database that can also be used by
UserDatabaseRealm to authenticate users
-->
<Resource name="UserDatabase" auth="Container"
type="org.apache.catalina.UserDatabase"
description="User database that can be updated and saved"
factory="org.apache.catalina.users.MemoryUserDatabaseFactory"
pathname="conf/tomcat-users.xml" />
</GlobalNamingResources> <!-- A "Service" is a collection of one or more "Connectors" that share
a single "Container" Note: A "Service" is not itself a "Container",
so you may not define subcomponents such as "Valves" at this level.
Documentation at /docs/config/service.html
-->
<Service name="Catalina"> <!--The connectors can use a shared executor, you can define one or more named thread pools-->
<!--
<Executor name="tomcatThreadPool" namePrefix="catalina-exec-"
maxThreads="150" minSpareThreads="4"/>
--> <!-- A "Connector" represents an endpoint by which requests are received
and responses are returned. Documentation at :
Java HTTP Connector: /docs/config/http.html (blocking & non-blocking)
Java AJP Connector: /docs/config/ajp.html
APR (HTTP/AJP) Connector: /docs/apr.html
Define a non-SSL HTTP/1.1 Connector on port 8080
-->
<Connector port="9090" protocol="HTTP/1.1"
connectionTimeout="20000"
redirectPort="9443" />
<!-- A "Connector" using the shared thread pool-->
<!--
<Connector executor="tomcatThreadPool"
port="8080" protocol="HTTP/1.1"
connectionTimeout="20000"
redirectPort="8443" />
-->
<!-- Define a SSL HTTP/1.1 Connector on port 8443
This connector uses the BIO implementation that requires the JSSE
style configuration. When using the APR/native implementation, the
OpenSSL style configuration is required as described in the APR/native
documentation -->
<!--
<Connector port="8443" protocol="org.apache.coyote.http11.Http11Protocol"
maxThreads="150" SSLEnabled="true" scheme="https" secure="true"
clientAuth="false" sslProtocol="TLS" />
--> <!-- Define an AJP 1.3 Connector on port 8009 -->
<Connector port="9009" protocol="AJP/1.3" redirectPort="9443" /> <!-- An Engine represents the entry point (within Catalina) that processes
every request. The Engine implementation for Tomcat stand alone
analyzes the HTTP headers included with the request, and passes them
on to the appropriate Host (virtual host).
Documentation at /docs/config/engine.html --> <!-- You should set jvmRoute to support load-balancing via AJP ie :
<Engine name="Catalina" defaultHost="localhost" jvmRoute="jvm1">
-->
<Engine name="Catalina" defaultHost="localhost"> <!--For clustering, please take a look at documentation at:
/docs/cluster-howto.html (simple how to)
/docs/config/cluster.html (reference documentation) -->
<!--
<Cluster className="org.apache.catalina.ha.tcp.SimpleTcpCluster"/>
--> <!-- Use the LockOutRealm to prevent attempts to guess user passwords
via a brute-force attack -->
<Realm className="org.apache.catalina.realm.LockOutRealm">
<!-- This Realm uses the UserDatabase configured in the global JNDI
resources under the key "UserDatabase". Any edits
that are performed against this UserDatabase are immediately
available for use by the Realm. -->
<Realm className="org.apache.catalina.realm.UserDatabaseRealm"
resourceName="UserDatabase"/>
</Realm> <Host name="localhost" appBase="webapps"
unpackWARs="true" autoDeploy="true"> <Context path="ClusterProject" docBase="/home/ump/www/ClusterProject" reloadable="true">
<Manager
className="de.javakaffee.web.msm.MemcachedBackupSessionManager"
memcachedNodes="n1:192.168.51.75:11211"
sticky="false"
sessionBackupAsync="false"
lockingMode="uriPattern:/path1|/path2"
requestUriIgnorePattern=".*\.(ico|png|gif|jpg|css|js)$"
transcoderFactoryClass="de.javakaffee.web.msm.serializer.kryo.KryoTranscoderFactory"/>
</Context> <!-- SingleSignOn valve, share authentication between web applications
Documentation at: /docs/config/valve.html -->
<!--
<Valve className="org.apache.catalina.authenticator.SingleSignOn" />
--> <!-- Access log processes all example.
Documentation at: /docs/config/valve.html
Note: The pattern used is equivalent to using pattern="common" -->
<Valve className="org.apache.catalina.valves.AccessLogValve" directory="logs"
prefix="localhost_access_log." suffix=".txt"
pattern="%h %l %u %t "%r" %s %b" /> </Host>
</Engine>
</Service>
</Server>
5、同样,修改192.168.51.10上server.xml添加该session存储到memcached中。重启tomcate1和tomcate2。
6、访问http://192.168.51.75/ClusterProject/index.jsp,并刷新界面,如下图所示
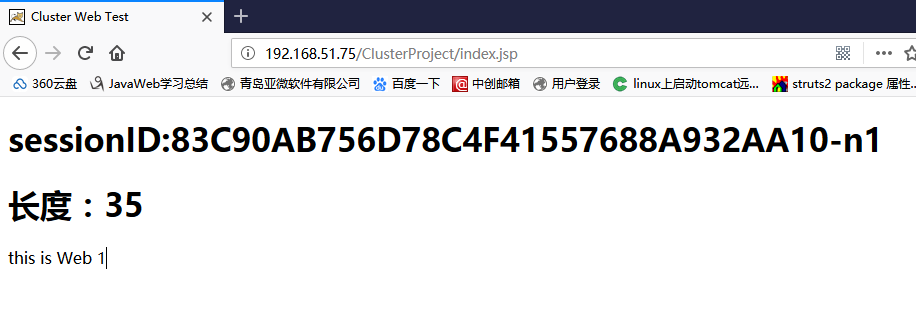
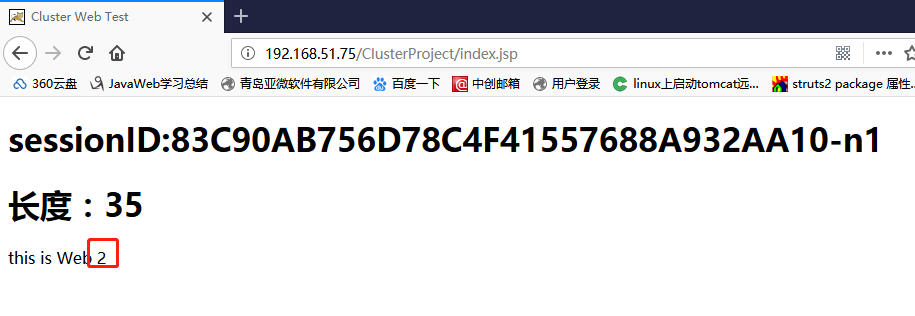
可以看到this is Web1变成this is web2,说明刷新访问了tomcate1和tomcate2,但是上面的sessionId没有变化,说明,实现了session共享。
至此,tomcate+Nginx+memcached,搭建的session共享集群完毕。
Nginx+Tomcat+Memcached部署的更多相关文章
- Nginx+Tomcat+Memcached 实现集群部署时Session共享
Nginx+Tomcat+Memcached 实现集群部署时Session共享 一.简介 我们系统经常要保存用户登录信息,有Cookie和Session机制,Cookie客户端保存用户信息,Sessi ...
- Nginx+Tomcat+Memcached负载均衡集群服务搭建
操作系统:CentOS6.5 本文档主要讲解,如何在CentOS6.5下搭建Nginx+Tomcat+Memcached负载均衡集群服务器,Nginx负责负载均衡,Tomcat负责实际服务,Memc ...
- Nginx+Tomcat+Memcached实现session共享
实验环境: server1:nginx tomcat memcached server2:tomcat memcached Session是指一个终端用户与交互系统进行通信的时间间隔,通常指从注册进入 ...
- 【转】Nginx+Tomcat+Memcached集群Session共享
cookie是怎样工作的? 例 如,我们创建了一个名字为login的Cookie来包含访问者的信息,创建Cookie时,服务器端的Header如下面所示,这里假设访问者的注册名 是“Michael J ...
- Nginx+Tomcat+Memcached 集群
写过一篇 Apache Httpd+Tomcat 的集群, 现在来看看Nginx+Tomcat+Memcached是怎么集群的. 先看看用的版本和工具: Nginx: nginx-1.8.1 Tomc ...
- session服务器Nginx+Tomcat+Memcached集群Session共享
cookie是怎样工作的? 例如,我们创立了一个名字为login的Cookie来包含访问者的信息,创立Cookie时,服务器端的Header如下面所示,这里假设访问者的注册名是“Michael Jor ...
- Nginx+Tomcat+MemCached 集群配置手册
系统实施文档 Nginx+Tomcat+MemCached 集群配置手册 目 录 第1章 概述 1.1 目标 互联网的快速发展带来了互联网系统的高负载和高可用性, 这要求我们在设计系统架 ...
- nginx tomcat 自动部署python脚本【转】
#!/usr/bin/env python #--coding:utf8-- import sys,subprocess,os,datetime,paramiko,re local_path='/ho ...
- Nginx+Tomcat+memcached高可用会话保持
Nginx+Tomcat+memcached高可用会话保持 文章来源dyc2005 一.概述 之前文章已经描述了企业高可用负载相关的架构及实现,其中常用的nginx或haproxy,LVS结合ke ...
随机推荐
- 在 Android 手机上运行 Python 程序
- 【PAT】B1036 跟奥巴马一起编程(15)(15 分
#include<stdio.h> int main() { int row,col; char c; scanf("%d %c",&col,&c); ...
- January 02nd, 2018 Week 01st Tuesday
I dream my painting, and then I paint my dream. 我梦见我的画,然后我画我的梦. It was a long time after I had a goo ...
- 学生与部门管理app-产品功能与界面的简单设计
学生与部门管理app-产品功能与界面的简单设计 1. 结对成员学号 我:********* 大佬:*******10 2. 需求分析(NABCD模型) 2.1 N-需求 各个部门在开学初占据学校青春广 ...
- pandas中DataFrame对象to_csv()方法中的encoding参数
当使用pd.read_csv()方法读取csv格式文件的时候,常常会因为csv文件中带有中文字符而产生字符编码错误,造成读取文件错误,在这个时候,我们可以尝试将pd.read_csv()函数的enco ...
- nginx与location语法详解
Location语法优先级排列 匹配符 匹配规则 优先级 = 精确匹配 ^~ 以某个字符串开头 ~ 区分大小写的正则匹配 ~* 不区分大小写的正则匹配 !~ 区分大小写不匹配的正则 !~* 不区分大小 ...
- python之面向对象进阶
接口类 抽象类 钻石继承 多态 鸭子类型 接口类 接口类 继承有两种用途: 一:继承基类的方法,并且做出自己的改变或者扩展(代码重用) 二:声明某个子类兼容于某基类,定义一个接口类Interface, ...
- centos7下安装docker(12.5容器在单个host上的网络总结)
单个host上的容器的网络:通过本章的学习,我们知道docker默认有三种网络,可以通过docker network ls查看: none:封闭的网络,通过--network=none来指定: hos ...
- heap堆算法的使用分析
新生代 --复制算法 老年代 --标记压缩清除算法 分代 分区思想 垃圾回收的任务是识别和回收垃圾对象进行内存清理,为了让垃圾回收器可以高效的执行,大部分情况下,会要求系统进入一个停顿的状态. 停顿 ...
- 使用systemctl报错(centos 7)
服务器运行210多天,今天使用systemctl准备重启下sshd发现报错,如上图. systemctl restart.stop.status.start等所有操作都报错.原因未知. 在此之前有内存 ...