cocos2dx游戏开发——捕鱼达人mini版学习笔记(二)——MainMenu的搭建
一、创建文件~
MainMenuScene.h MainMenuScene.cpp MainMenuLayer.h MainMenuLayer.cpp
那个场景的搭建就不多说了,那个我的打飞机还有别踩白块的学习笔记里有~
二、How to do?
1、initBackground(),创建背景~
(1)在init中先获得屏幕的大小,还有加入图片进入缓存
visibleSize = Director::getInstance()->getVisibleSize();

    origin = Director::getInstance()->getVisibleOrigin();

    //add texture to cache

    SpriteFrameCache::getInstance()->addSpriteFramesWithFile("MainMenu/UI_GameMenuText_cn-hd.plist");

    SpriteFrameCache::getInstance()->addSpriteFramesWithFile("MainMenu/UI_GameStartMenuLayer-hd.plist");

    SpriteFrameCache::getInstance()->addSpriteFramesWithFile("MainMenu/FishActor-Small-hd.plist");

    SpriteFrameCache::getInstance()->addSpriteFramesWithFile("MainMenu/FishActor-Marlin-hd.plist");
(2)实现方法~
void MainMenuLayer::initBackground()

{

    //set background

    auto ui_background = Sprite::create("MainMenu/ui_background_normal-hd.png");

    ui_background->setAnchorPoint(Vec2::ZERO);

    ui_background->setPosition(Vec2::ZERO);

    this->addChild(ui_background);

    //Set game logo

    auto ui_Logo = Sprite::create("MainMenu/main_ui_title_cn-hd.png");

    ui_Logo->setPosition(Vec2(visibleSize.width / 2.0f, visibleSize.height / 1.35f));

    this->addChild(ui_Logo, );

}
记得最后要加入到init里面去哦~
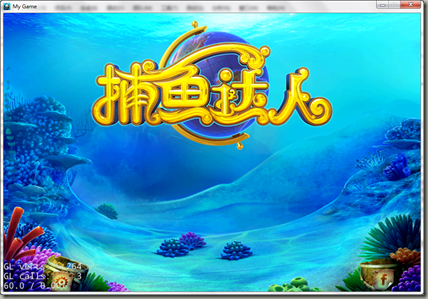
(3)效果图~
2、加入按钮~
(1)方法实现~
//Create the start button of the game

    auto startGameBtn = Sprite::createWithSpriteFrameName("ui_button_box02_02.png");

    auto startGameBtnPush = Sprite::createWithSpriteFrameName("ui_button_box02_01.png");

    auto startGameFont = Sprite::createWithSpriteFrameName("ui_2p_010.png");

    //Create the scene choose button

    auto sceneChooseBtn = Sprite::createWithSpriteFrameName("ui_button_box01_02.png");

    auto sceneChooseBtnPush = Sprite::createWithSpriteFrameName("ui_button_box01_01.png");

    auto sceneChooseFont = Sprite::createWithSpriteFrameName("button_other_014.png");

    //Create the menu

    auto startGameMenuItem = MenuItemSprite::create(startGameBtn, startGameBtnPush, CC_CALLBACK_1(MainMenuLayer::startGameEvent, this));

    auto sceneChooseMenuItem = MenuItemSprite::create(sceneChooseBtn, sceneChooseBtnPush, CC_CALLBACK_1(MainMenuLayer::sceneChoose, this));

    sceneChooseMenuItem->setPosition(Point(startGameMenuItem->getPosition().x, startGameMenuItem->getPosition().y - ));

    auto startGameMenu = Menu::create(startGameMenuItem, sceneChooseMenuItem, NULL);

    //Set the posiiton of menu

    startGameMenu->setPosition(Point(visibleSize.width / 2.0f, visibleSize.height / 1.35f-));

    startGameFont->setPosition(Point(visibleSize.width / 2.0f, visibleSize.height / 1.35f-));

    sceneChooseFont->setPosition(Point(visibleSize.width / 2.0f, visibleSize.height / 1.35f-));

    //Add the menu into the scene

    this->addChild(startGameMenu, );

    this->addChild(startGameFont, );

    this->addChild(sceneChooseFont, );
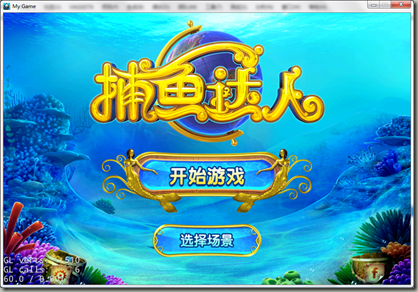
(2)效果图~

3、加入泡泡~
(1)粒子效果的加入~
ParticleSystemQuad* MainMenuLayer::createPaopao(Vec2 position)

{

    //Create the paraticle of bubble

    auto paopao = ParticleSystemQuad::create("MainMenu/lizhi_qipao.plist");

    //Set the bubble position type form the ground

    paopao->setPositionType(ParticleSystemQuad::PositionType::RELATIVE);

    paopao->setPosition(position);

    paopao->setScale(2.0f);

    return paopao;

}
在这里大家看到粒子特效的文件是已经完成的,存在一个plist文件里面而已,所以我们以后可以通过一些辅助的软件进行制作,
(2)创建泡泡
void MainMenuLayer::initBubble()

{

    auto paopaoLeft = createPaopao(Vec2(, ));

    this->addChild(paopaoLeft, );

    //Create the bubble on the lower right corner

    auto paopaoRight = createPaopao(Vec2(visibleSize.width, ));

    this->addChild(paopaoRight, );

}
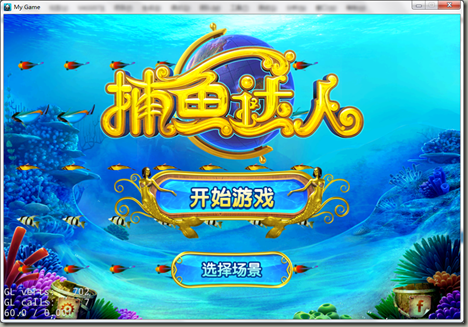
(3)上效果图
4、上鱼群~
(1)鱼群的动作的创建~
a.一群小鱼~
ActionInterval* MainMenuLayer::createFishMoveAction(FishActor *fish)

{

    //Let the matrix of fishes move back and forth

    return RepeatForever::create(

        Sequence::create(

        MoveTo::create(, Point(fish->getPositionX() - , fish->getPositionY())), CallFunc::create(CC_CALLBACK_0(MainMenuLayer::turnBack, this, fish)),

        MoveTo::create(, Point(fish->getPositionX() + , fish->getPositionY())), CallFunc::create(CC_CALLBACK_0(MainMenuLayer::turnBack, this, fish)), NULL));

}
void MainMenuLayer::turnBack(Node* sender)

{

    if (sender->getRotation() == 0.0f)

    {

        sender->setRotation(180.00f);

    }

    else

    {

        sender->setRotation(0.00f);

    }

}
上面就是创建一个鱼从右游到左,再从左移到右的动画~
b、大鱼
大鱼的动画就是看到的只有从左到右~
ActionInterval* MainMenuLayer::createMarlinMoveAction(MarlinsFishActor *fish)

{

    //Let the marlin fis move behind the matrix of fishes

    return RepeatForever::create(

        Sequence::create(

        MoveTo::create(, Point(fish->getPositionX() - , fish->getPositionY())), CallFunc::create(CC_CALLBACK_0(MainMenuLayer::marlinTurnBack, this, fish)),

        MoveTo::create(, Point(fish->getPositionX() + , fish->getPositionY())), CallFunc::create(CC_CALLBACK_0(MainMenuLayer::marlinTurnBack, this, fish)), NULL));

}
void MainMenuLayer::marlinTurnBack(Node *sender)

{

    if (sender->getRotation() == 0.0f)

    {

        sender->setVisible(true);

        sender->setRotation(180.00f);

    }

    else

    {

        sender->setVisible(false);

        sender->setRotation(0.00f);

    }

}
(2)上鱼群
void MainMenuLayer::fishActorsInital()

{

    //Create fishes

    for (int fishIndex = ; fishIndex < ; fishIndex++) {//同种类鱼的条数

        auto smallFishActor = FishActor::createWithType(FishActor::FishActorType::SmallFish);

        auto angelFishActor = FishActor::createWithType(FishActor::FishActorType::AngelFish);

        auto croakerFishActor = FishActor::createWithType(FishActor::FishActorType::Croaker);

        auto amphiprionFishActor = FishActor::createWithType(FishActor::FishActorType::Bream);

        auto breamFishActor = FishActor::createWithType(FishActor::FishActorType::SmallFish);

        //Set the position of the fishes like a matrix

        smallFishActor->setPosition(Vec2( - visibleSize.width /  * (fishIndex + ), visibleSize.height / ));

        angelFishActor->setPosition(Vec2( - visibleSize.width /  * (fishIndex + ),  visibleSize.height /  * ));

        croakerFishActor->setPosition(Vec2( - visibleSize.width /  * (fishIndex + ), visibleSize.height /  * ));

        amphiprionFishActor->setPosition(Vec2( - visibleSize.width /  * (fishIndex + ), visibleSize.height /  * ));

        breamFishActor->setPosition(Vec2( - visibleSize.width /  * (fishIndex + ), visibleSize.height /  * ));

        smallFishActor->runAction(createFishMoveAction(smallFishActor));

        angelFishActor->runAction(createFishMoveAction(angelFishActor));

        croakerFishActor->runAction(createFishMoveAction(croakerFishActor));

        amphiprionFishActor->runAction(createFishMoveAction(amphiprionFishActor));

        breamFishActor->runAction(createFishMoveAction(breamFishActor));

        //Add the fishes into the scene

        this->addChild(smallFishActor, );

        this->addChild(angelFishActor, );

        this->addChild(croakerFishActor, );

        this->addChild(amphiprionFishActor, );

        this->addChild(breamFishActor, );

    }

    auto marlin = FishActor::createWithType(FishActor::FishActorType::MarlinsFish);

    marlin->setVisible(false);

    marlin->setPosition(Vec2(, visibleSize.height / ));

    marlin->runAction(MainMenuLayer::createMarlinMoveAction((MarlinsFishActor*)marlin));

    this->addChild(marlin, );

}
(3)上效果图~
cocos2dx游戏开发——捕鱼达人mini版学习笔记(二)——MainMenu的搭建的更多相关文章
- cocos2dx游戏开发——捕鱼达人mini版学习笔记(一)——FishAchor的搭建
一.创建文件· FishAchor.h还有FishAchor.cpp. 主要就是创建每种鱼的类,方便以后的取用~,很多是重复性的操作,然后我们是mini版,暂时也就加入大概6钟鱼就好= =,然后我们现 ...
- 《Cocos2d-x游戏开发实战精解》学习笔记4--实战一个简单的钢琴
上一节学习了使用Cocos2d-x播放音乐的方法,但是那种方法一般只适合于播放较大的音乐,而一般比较短小的音乐(如游戏中的打斗.按键音效等)则要通过playEffect来播放.本节使用该方法以及之前学 ...
- 《Cocos2d-x游戏开发实战精解》学习笔记3--在Cocos2d-x中播放声音
<Cocos2d-x游戏开发实战精解>学习笔记1--在Cocos2d中显示图像 <Cocos2d-x游戏开发实战精解>学习笔记2--在Cocos2d-x中显示一行文字 之前的内 ...
- 《Cocos2d-x游戏开发实战精解》学习笔记1--在Cocos2d中显示图像
Cocos2d-x中的图像是通过精灵类来显示的.在Cocos2d-x中游戏中的每一个角色.怪物.道具都可以理解成是一个精灵,游戏背景作为一种特殊的单位将其理解成是一个精灵也没有什么不妥.在源文件本章目 ...
- cocos2dx游戏开发——别踩白块学习笔记(二)——经典模式的实现
一.创建GameScene以及GameLayer 就是简单创建一个Scene而已,在此就不多说啦~,可以参照我的打飞机的学习笔记(2). 二.添加一个开始栏 很简单,就是调用Block中的create ...
- 《Cocos2d-x游戏开发实战精解》学习笔记2--在Cocos2d-x中显示一行文字
在Cocos2d-x中要显示文字就需要用到Label控件.在3.x版本的Cocos2d中,舍弃了之前版本所使用的LabelTTF.LabelAtlas.LabelBMFont 3个用于显示文字的类,而 ...
- cocos2dx游戏开发——别踩白块学习笔记(一)——Block类
一.Block类介绍 当然啦,Block类在这个游戏里就是必需品= =,因为整体都是由这个搞出来的,所以我们可以把游戏需要实现的功能都放在这里. 主要有下面这些功能(经典模式): 1.创建一个Bloc ...
- 【原】Learning Spark (Python版) 学习笔记(二)----键值对、数据读取与保存、共享特性
本来应该上周更新的,结果碰上五一,懒癌发作,就推迟了 = =.以后还是要按时完成任务.废话不多说,第四章-第六章主要讲了三个内容:键值对.数据读取与保存与Spark的两个共享特性(累加器和广播变量). ...
- PMBOK(第五版)学习笔记二-十大知识领域(P87)
五大项目管理过程组:启动.规划.执行.监控.收尾过程组 十大知识领域是:项目整合管理.项目范围管理.项目时间管理.项目成本管理.项目质量管理.项目人力资源管理.项目沟通管理.项目风险管理.项目采购管理 ...
随机推荐
- linux find 命令详解
Linux下 利用find命令删除所有vssver2.scc文件 删除所有vssver2.scc文件 这是我当初查找 Linux find 命令的目的所在 1) find / -name ‘vssv ...
- SpringMVC利用拦截器防止SQL注入
引言 随着互联网的发展,人们在享受互联网带来的便捷的服务的时候,也面临着个人的隐私泄漏的问题.小到一个拥有用户系统的小型论坛,大到各个大型的银行机构,互联网安全问题都显得格外重要.而这些网站的背后,则 ...
- Linux常用热键(持续更新)
(这些文章都是从我的个人主页上粘贴过来的,大家也可以访问我的主页 www.iwangzheng.com) --圣诞节怎么过, --略过. 今天装ubuntu的时候把windows覆盖了, 凌乱,TX童 ...
- 三款SDR平台对比:HackRF,bladeRF和USRP
这篇文章是Taylor Killian今年8月发表在自己的博客上的.他对比了三款平价的SDR平台,认为这三款产品将是未来一年中最受欢迎的SDR平台.我觉得这篇文章很有参考价值,简单翻译一份转过来.原文 ...
- HDU 1506 Largest Rectangle in a Histogram (dp左右处理边界的矩形问题)
E - Largest Rectangle in a Histogram Time Limit:1000MS Memory Limit:32768KB 64bit IO Format: ...
- 用JAVA代码实现验证邮箱地址是否符合
public class Test{ public static void main(String[] args){ Test t = new Test(); String email = " ...
- 【SpringMVC】SpringMVC系列8之Servlet API 作为入参
8.Servlet API 作为入参 8.1.概述 MVC 的 Handler 方法可以接受哪些 ServletAPI 类型的参数: HttpServletRequest HttpServletRes ...
- Timer1控件的属性
- 取出type="button" 和type="text" 里面的值显示在页面
<script type="text/JavaScript> function changeLink() { document.getElementById("nod ...
- ext上传文件到mysql上
不废话,上代码: controller如下: /** * 上传附件 * @param request * @param baseBlob * @param response */ @RequestMa ...