20165230 《Java程序设计》实验四 Android程序设计实验报告
20165230 《Java程序设计》实验四 Android程序设计实验报告
一、实验报告封面
课程:Java程序设计 班级:1652班 姓名:田坤烨 学号:20165230 成绩:
指导教师:娄嘉鹏 实验日期:2018年5月14日
实验时间:13:45 - 15:25
实验序号:实验四 实验名称:Android程序设计
实验内容:
- 修改res目录中的内容,显示自己的学号
- 在ThirdActivity中显示自己的学号,修改代码让MainActivity启动ThirdActivity
- 修改教材代码让Toast消息中显示自己的学号信息
- 修改布局让P290页的界面与教材不同
- 构建项目,运行教材相关代码
实验要求:
- 没有Linux基础的同学建议先学习《Linux基础入门(新版)》《Vim编辑器》 课程;
- 完成实验、撰写实验报告,注意实验报告重点是运行结果,遇到的问题(工具查找,安装,使用,程序的编辑,调试,运行等)、解决办法(空洞的方法如“查网络”、“问同学”、“看书”等一律得0分)以及分析(从中可以得到什么启示,有什么收获,教训等);
- 实验报告中统计自己的PSP(Personal Software Process)时间;
- 严禁抄袭。
二、实验内容及步骤
(一)完成Hello World
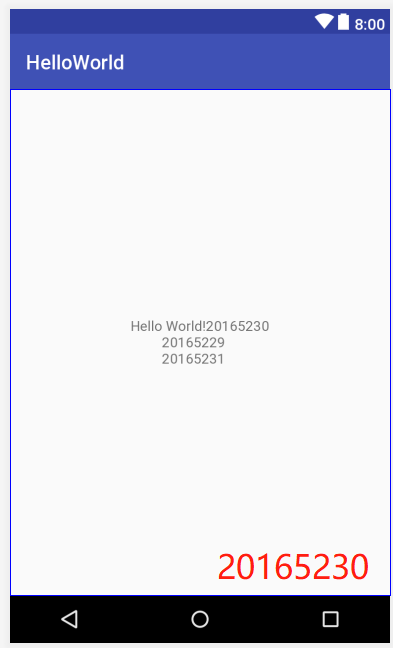
- 要求修改res目录中的内容,Hello World后要显示自己的学号,自己学号前后一名同学的学号
- 将activity_main.xml中的
android:text="Hello World!"改成android:text="Hello World!20165230 20165229 20165231" - 代码如下
<?xml version="1.0" encoding="utf-8"?>

<android.support.constraint.ConstraintLayout xmlns:android="http://schemas.android.com/apk/res/android"

    xmlns:app="http://schemas.android.com/apk/res-auto"

    xmlns:tools="http://schemas.android.com/tools"

    android:layout_width="match_parent"

    android:layout_height="match_parent"

    tools:context=".MainActivity">

    <TextView

        android:layout_width="wrap_content"

        android:layout_height="wrap_content"

        android:text="Hello World!20165230

         20165229

         20165231"

        app:layout_constraintBottom_toBottomOf="parent"

        app:layout_constraintLeft_toLeftOf="parent"

        app:layout_constraintRight_toRightOf="parent"

        app:layout_constraintTop_toTopOf="parent" />

</android.support.constraint.ConstraintLayout>
- 运行截图
(二) 创建 ThirdActivity
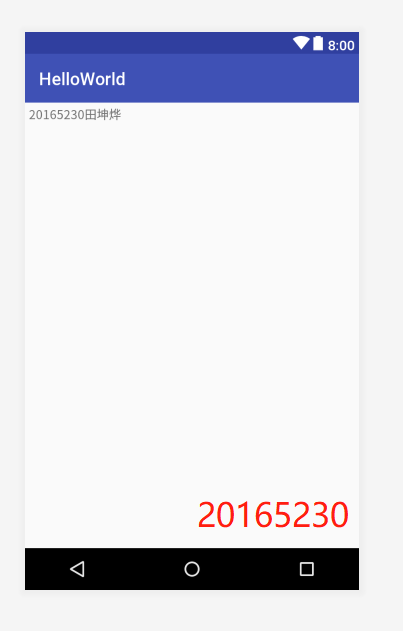
- 在ThirdActivity中显示自己的学号,修改代码让MainActivity启动ThirdActivity
- 在MainActivity.java中调用
startActivity方法,使其启动ThirdActivity - 代码如下
import android.app.Activity;

import android.content.Intent;

import android.os.Bundle;

import android.app.Activity;

import android.content.Intent;

import android.view.Menu;

import android.view.MotionEvent;

import android.view.View;

import android.view.View.OnTouchListener;

import android.widget.TextView;

public class MainActivity extends Activity implements

    OnTouchListener {

    @Override

    protected void onCreate(Bundle savedInstanceState) {

        super.onCreate(savedInstanceState);

        setContentView(R.layout.activity_main);

        TextView tv = (TextView) findViewById(R.id.textView1);

        tv.setOnTouchListener(this);

    }

    @Override

    public boolean onCreateOptionsMenu(Menu menu) {

// Inflate the menu; this adds items to the action bar if it

// is present.

        getMenuInflater().inflate(R.menu.menu_main, menu);

        return true;

    }

    @Override

    public boolean onTouch(View arg0, MotionEvent event) {

        Intent intent = new Intent(this, ThirdActivity.class);

        intent.putExtra("message", "20165230田坤烨");

        startActivity(intent);

        return true;

    }

}
- 运行截图
(三)修改代码让Toast消息中显示自己的学号信息
- 代码如下
activity_main
<LinearLayout

    xmlns:android="http://schemas.android.com/apk/res/android"

    xmlns:tools="http://schemas.android.com/tools"

    android:layout_width="match_parent"

    android:layout_height="match_parent"

    android:layout_gravity="center"

    android:gravity="center_horizontal"

    android:orientation="vertical"

    android:padding="120dp"

    tools:context=".MainActivity" >

    <EditText

        android:id="message"

        android:layout_width="match_parent"

        android:layout_height="wrap_content"

        android:hint="@string/prompt_email"

        android:inputType="textEmailAddress"

        android:maxLines="1"

        android:singleLine="true" />

    <EditText

        android:id="password"

        android:layout_width="match_parent"

        android:layout_height="wrap_content"

        android:hint="@string/prompt_password"

        android:imeActionId="@+id/login"

        android:imeOptions="actionUnspecified"

        android:inputType="textPassword"

        android:maxLines="1"

        android:singleLine="true" />

    <Button

        android:id="@+id/btn1"

        android:layout_width="wrap_content"

        android:layout_height="wrap_content"

        android:layout_gravity="right"

        android:layout_marginTop="16dp"

        android:paddingLeft="32dp"

        android:paddingRight="32dp"

        android:text="@string/action_sign_in" />

</LinearLayout>
MainActivity.java
import android.content.Context;

import android.support.v7.app.AppCompatActivity;

import android.os.Bundle;

import android.app.Activity;

import android.util.AttributeSet;

import android.view.Menu;

import android.view.MenuItem;

import android.view.View;

import android.widget.Button;

import android.widget.Toast;

public class MainActivity extends AppCompatActivity {

    @Override

    protected void onCreate(Bundle savedInstanceState) {

        super.onCreate(savedInstanceState);

        setContentView(R.layout.activity_main);

        Button btnshow1=(Button) findViewById(R.id.btn1);

        btnshow1.setOnClickListener(new View.OnClickListener()

        {

            @Override

            public void onClick(View v){

                Toast toast = Toast.makeText(MainActivity.this,"20165230田坤烨", Toast.LENGTH_LONG);

                toast.show();

            }

        });

    }
- 运行截图

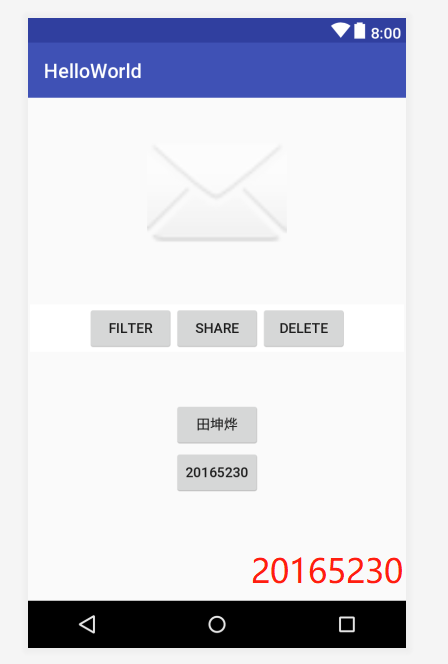
(四)修改布局让P290页的界面与教材不同
- 代码如下
activity_main.xml
<RelativeLayout

    xmlns:android="http://schemas.android.com/apk/res/android"

    xmlns:tools="http://schemas.android.com/tools"

    android:layout_width="match_parent"

    android:layout_height="match_parent"

    android:paddingLeft="2dp"

    android:paddingRight="2dp">

    <Button

        android:id="@+id/cancelButton"

        android:layout_width="wrap_content"

        android:layout_height="wrap_content"

        android:text="20165230"

        android:layout_marginTop="70dp"

        android:layout_alignParentTop="true"

        android:layout_centerHorizontal="true" />

    <Button

        android:id="@+id/saveButton"

        android:layout_width="wrap_content"

        android:layout_height="wrap_content"

        android:text="田坤烨"

        android:layout_below="@+id/cancelButton"

        android:layout_alignLeft="@+id/cancelButton"

        android:layout_alignStart="@+id/cancelButton"

        android:layout_marginTop="23dp" />

    <ImageView

        android:layout_width="150dp"

        android:layout_height="150dp"

        android:layout_marginTop="45dp"

        android:padding="4dp"

        android:src="@android:drawable/ic_dialog_email"

        android:id="@+id/imageView"

        android:layout_below="@+id/saveButton"

        android:layout_centerHorizontal="true" />

    <LinearLayout

        android:id="@+id/filter_button_container"

        android:layout_width="match_parent"

        android:layout_height="wrap_content"

        android:layout_alignParentBottom="true"

        android:gravity="center|bottom"

        android:background="@android:color/white"

        android:orientation="horizontal" >

        <Button

            android:id="@+id/filterButton"

            android:layout_width="wrap_content"

            android:layout_height="fill_parent"

            android:text="Filter" />

        <Button

            android:id="@+id/shareButton"

            android:layout_width="wrap_content"

            android:layout_height="fill_parent"

            android:text="Share" />

        <Button

            android:id="@+id/deleteButton"

            android:layout_width="wrap_content"

            android:layout_height="fill_parent"

            android:text="Delete" />

    </LinearLayout>

</RelativeLayout>
- 运行截图
(五)构建项目,运行教材相关代码
- 代码如下:
AndroidManifest.xml
<?xml version="1.0" encoding="utf-8"?>

<manifest xmlns:android="http://schemas.android.com/apk/res/android"

    package="com.example.dell1.helloworld"

    android:versionCode="1"

    android:versionName="1.0">

    <uses-sdk

        android:minSdkVersion="8"

        android:targetSdkVersion="17" />

    <application

        android:allowBackup="true"

        android:label="@string/app_name"

        android:theme="@style/AppTheme">

        <activity

            android:name="com.example.dell1.helloworld.MainActivity"

            android:label="@string/app_name">

            <intent-filter>

                <action android:name="android.intent.action.MAIN" />

                <category android:name="android.intent.category.LAUNCHER" />

            </intent-filter>

        </activity>

    </application>

</manifest>
- 运行截图

三、实验遇到的问题
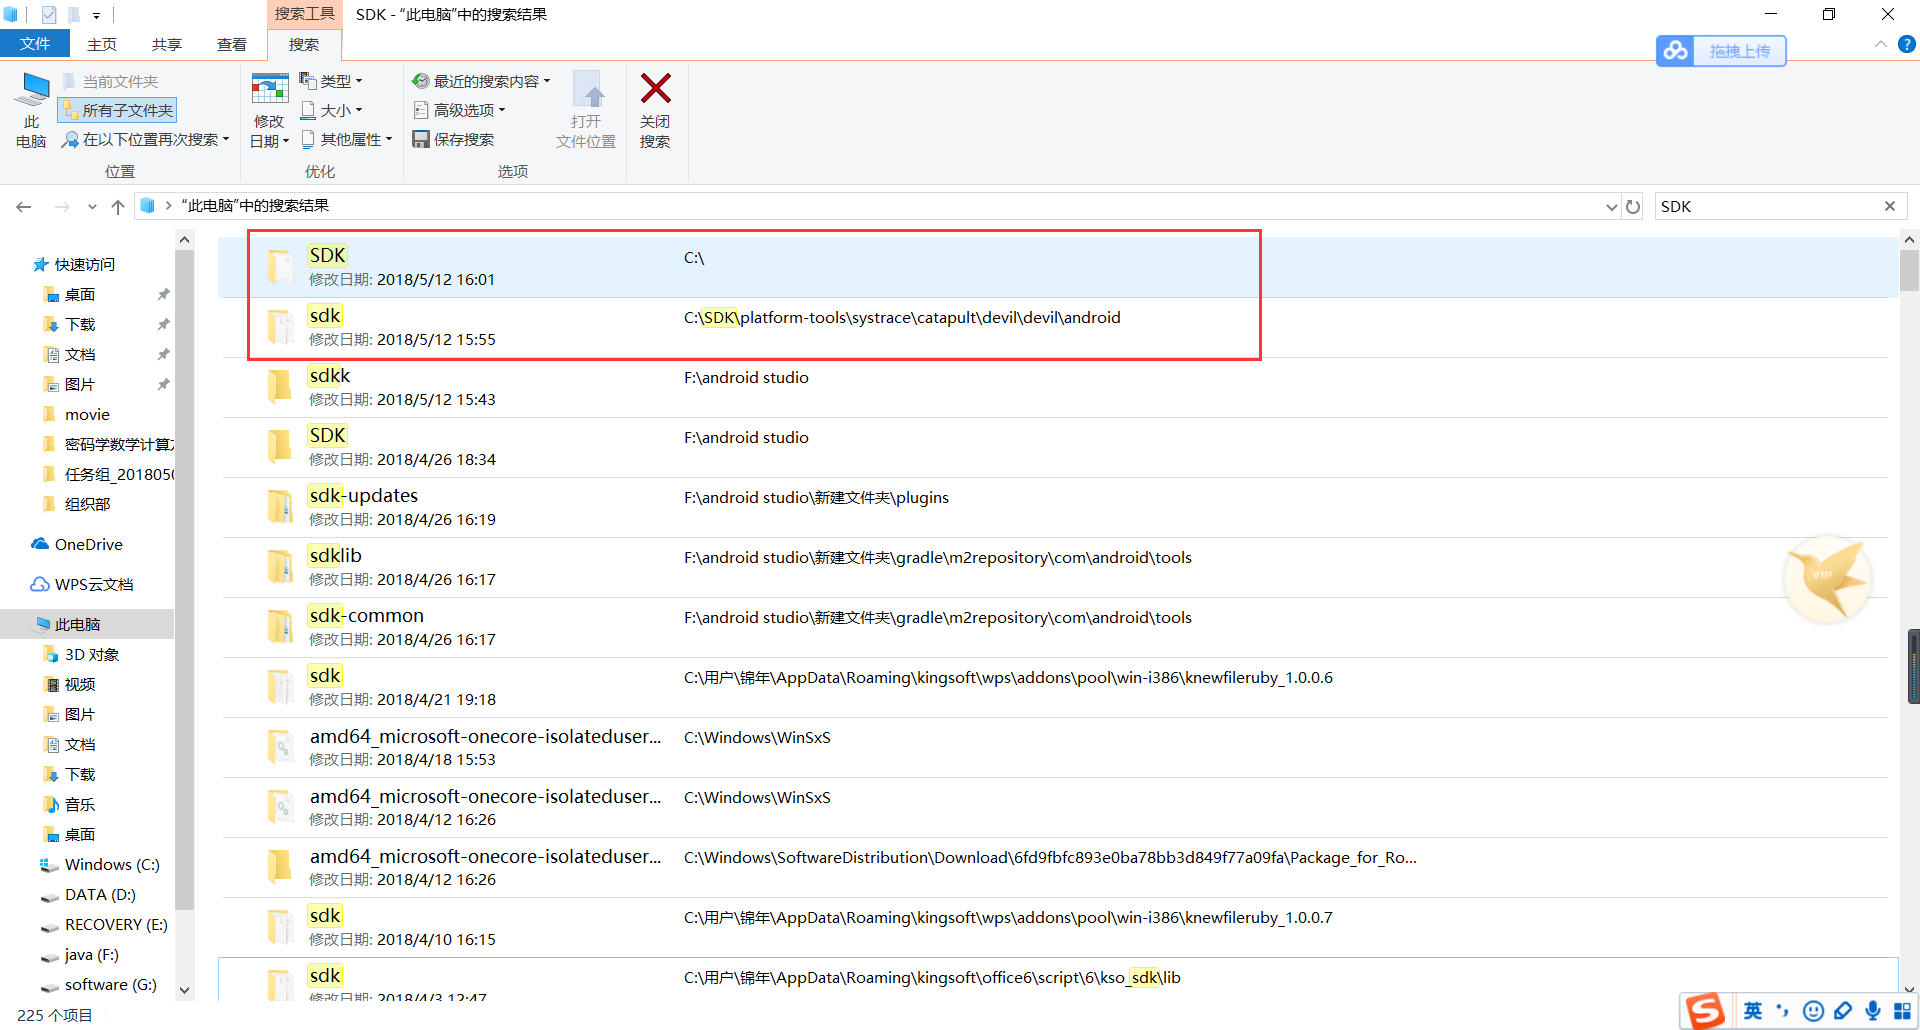
问题1:由于android-stdio在两星期之前下载完成,忘记将sdk下载路径,导致sdk配置失败
问题1解决方案:运用电脑中的搜索工具“sdk”显示出我直接安装到了c盘sdk文件夹下,于是选择该路径,成功配置。
问题2:配置完sdk以后,无法正常编译,显示如下图所示的异常
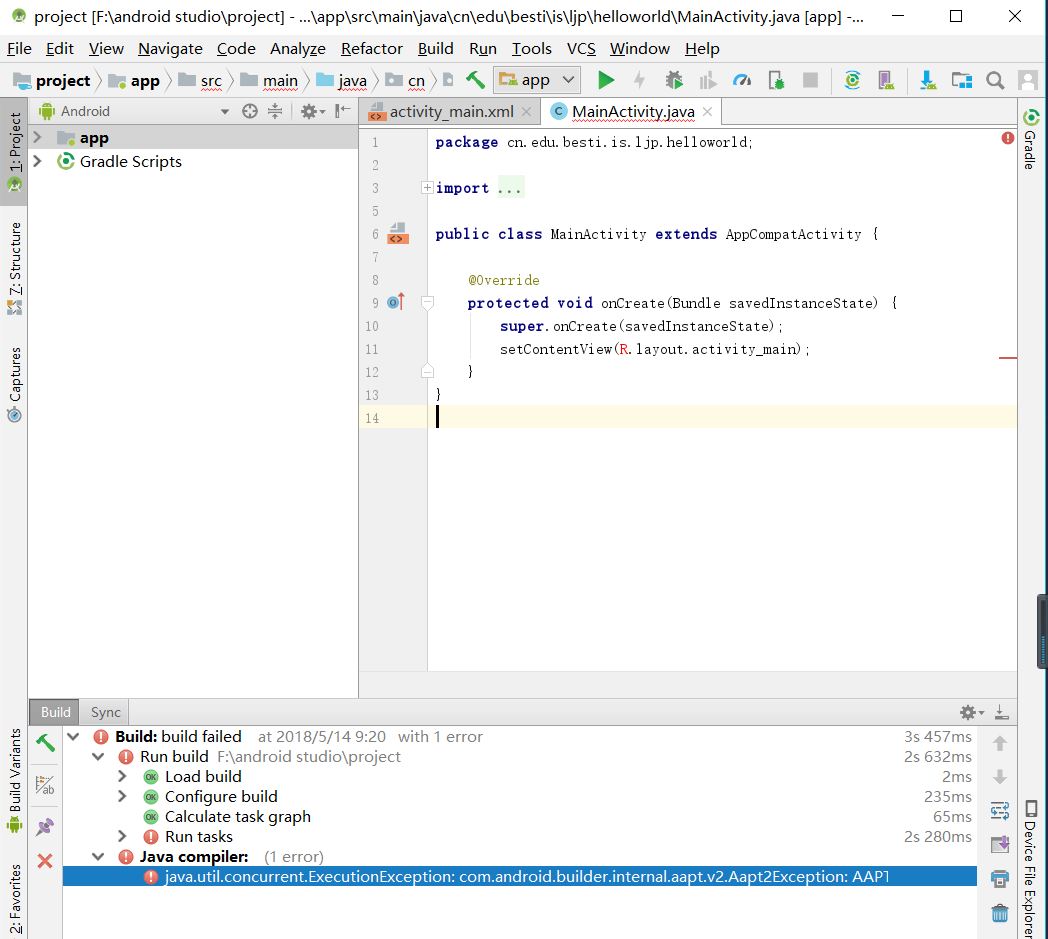
问题2解决方案:通过查找csdn博客,找到了解决方法:在
gradle.properties文件中添加android.enableAapt2=false语句即可
四、PSP时间
| 步骤 | 耗时 | 百分比 |
|---|
   |需求分析           |   30min           | 12%            |

       |  设计         | 40min            |     15%   |

| 代码实现          |   90min          | 34%             |

|测试          |   45min          | 17%            |

  |分析总结          |   60min          |23%            |
六、代码链接
七、参考资料
- Android开发简易教程
- AAPI异常问题解决方法
- [Java和Android开发学习指南(第二版)(EPUBIT,Java for Android 2nd)](file:///F:/android%20studio/JAVA和ANDROID开发学习指南%20%20第2版.pdf)
20165230 《Java程序设计》实验四 Android程序设计实验报告的更多相关文章
- 20165205 2017-2018-2 《Java程序设计》实验四 Android程序设计
20165205 2017-2018-2 <Java程序设计>实验四 Android程序设计 实验内容 实验四 Android程序设计-1 Android Stuidio的安装测试: 参考 ...
- 20155205 《Java程序设计》实验四 Android程序设计
20155205 <Java程序设计>实验四 Android程序设计 一.实验内容及步骤 (一) Android Stuidio的安装测试 参考<Java和Android开发学习指南 ...
- 20155314 2016-2017-2 《Java程序设计》实验四 Android程序设计
20155314 2016-2017-2 <Java程序设计>实验四 Android程序设计 实验任务 基于Android Studio开发简单的Android应用并部署测试 了解Andr ...
- 20155211 《Java程序设计》实验四 Android程序设计
20155211 <Java程序设计>实验四 Android程序设计 一.实验内容及步骤 1.Android Stuidio的安装测试: 安装 Android Stuidio 完成Hell ...
- 《JAVA程序设计》 20155208 实验四 Android程序设计
<JAVA程序设计> 20155208 实验四 Android程序设计 实验一: 实验要求: Android Stuidio的安装测试: 参考<Java和Android开发学习指南( ...
- 2016-2017-2 20155339《 java面向对象程序设计》实验四Android程序设计
2016-2017-2 20155339< java面向对象程序设计>实验四Android程序设计 实验内容 1.Android Stuidio的安装测试: 参考<Java和Andr ...
- 20165324 Java实验四 Android程序设计
20165324 Java实验四 Android程序设计 一.实验报告封面 课程:Java程序设计 班级:1653班 姓名:何春江 学号:20165324 指导教师:娄嘉鹏 实验日期:2018年5月1 ...
- 实验四 Android程序设计 实验报告
实验四 Android程序设计 实验报告 目录 代码托管地址 Android程序设计-1 Android程序设计-2 Android程序设计-3 Android程序设计-4 Android程序设计-5 ...
- 第十四周实验报告:实验四 Android程序设计
20162317袁逸灏 第十四周实验报告:实验四 Android程序设计 实验内容 Android Studio 实验要求 学会使用Android Studio 学习 活动 以及相关知识内容 学习 U ...
随机推荐
- mybatis中@Param的使用
@Param:当映射器方法需要多个参数时,这个注解可以被用于:给映射器方法中的每个参数来取一个名字.否则,多参数将会以它们的顺序位置和SQL语句中的表达式进行映射,这是默认的. 语法要求:若使用 ...
- Python学习---日期时间
在Python里面日期时间的功能主要由几个模块提供:time,calendar,datetime,date等 time主要用到的功能函数: #!/usr/bin/python3 # coding:ut ...
- Trailing Zeroes (I) LightOJ - 1028(求因子个数)
题意: 给出一个N 求N有多少个别的进制的数有后导零 解析: 对于一个别的进制的数要转化为10进制 (我们暂且只分析二进制就好啦) An * 2^(n-1) + An-1 * 2^(n-2) + `` ...
- 51nod 1208 窗上的星星 | 线段树 扫描线
51nod 1208 Stars In Your Window 题面 整点上有N颗星星,每颗星星有一个亮度.用一个平行于x轴和y轴,宽为W高为H的方框去套星星.套住的所有星星的亮度之和为S(包括边框上 ...
- USACO Section 2.1 Ordered Fractions 解题报告
题目 题目描述 给定一个数N(1<=N<=160),需要产生所有的分数,这些分数的值必须要在0~1之间.而且每个分数的分母不能超过N.如下例所示: N = 5 产生所有的分数:0/1 1/ ...
- 解题:CEOI 2017 Mousetrap
题外话: 这是制杖yd的交流题目 题面 首先把捕鼠夹所在的点提出来当根,然后这变成了一棵有根树,我们先来看耗子移动的影响 可以发现耗子往下走就回不来了,而且最后还会被困在一个叶子上,那么这个时候我们把 ...
- BZOJ 2140 稳定婚姻
2140: 稳定婚姻 Description 我国的离婚率连续7年上升,今年的头两季,平均每天有近5000对夫妇离婚,大城市的离婚率上升最快,有研究婚姻问题的专家认为,是与简化离婚手续有关. 25岁的 ...
- 【DSU on tree】【CF741D】Arpa’s letter-marked tree and Mehrdad’s Dokhtar-kosh paths
Description 给定一棵 \(n\) 个节点的树,每条边上有一个字符,字符集大小 \(22\),求每个节点的子树内最长的简单路径使得路径上的字符经过重排后构成回文串. Limitation \ ...
- 不知道怎么改的尴尬R语言的ARIMA模型预测
数据还有很多没弄好,程序还没弄完全好. > read.xlsx("H:/ProjectPaper/论文/1.xlsx","Sheet1") > it ...
- PhantomJS的替代品--无头浏览器(Headless Chrome)
在使用PhantomJS时候,出现提示: UserWarning: Selenium support for PhantomJS has been deprecated, please use hea ...