钉钉企业应用C#开发笔记之一(免登)
关于钉钉
钉钉是阿里推出的企业移动OA平台,本身提供了丰富的通用应用,同时其强大的后台API接入能力让企业接入自主开发的应用成为可能,可以让开发者实现几乎任何需要的功能。
近期因为工作需要研究了一下钉钉的接入,发现其接入文档、SDK都是基于java编写的,而我们的企业网站使用Asp.Net MVC(C#)开发,所以接入只能从头自己做SDK。
接入主要包括免登、获取数据、修改数据等接口。
免登流程
首先需要理解一下钉钉的免登流程,借用官方文档的图片:
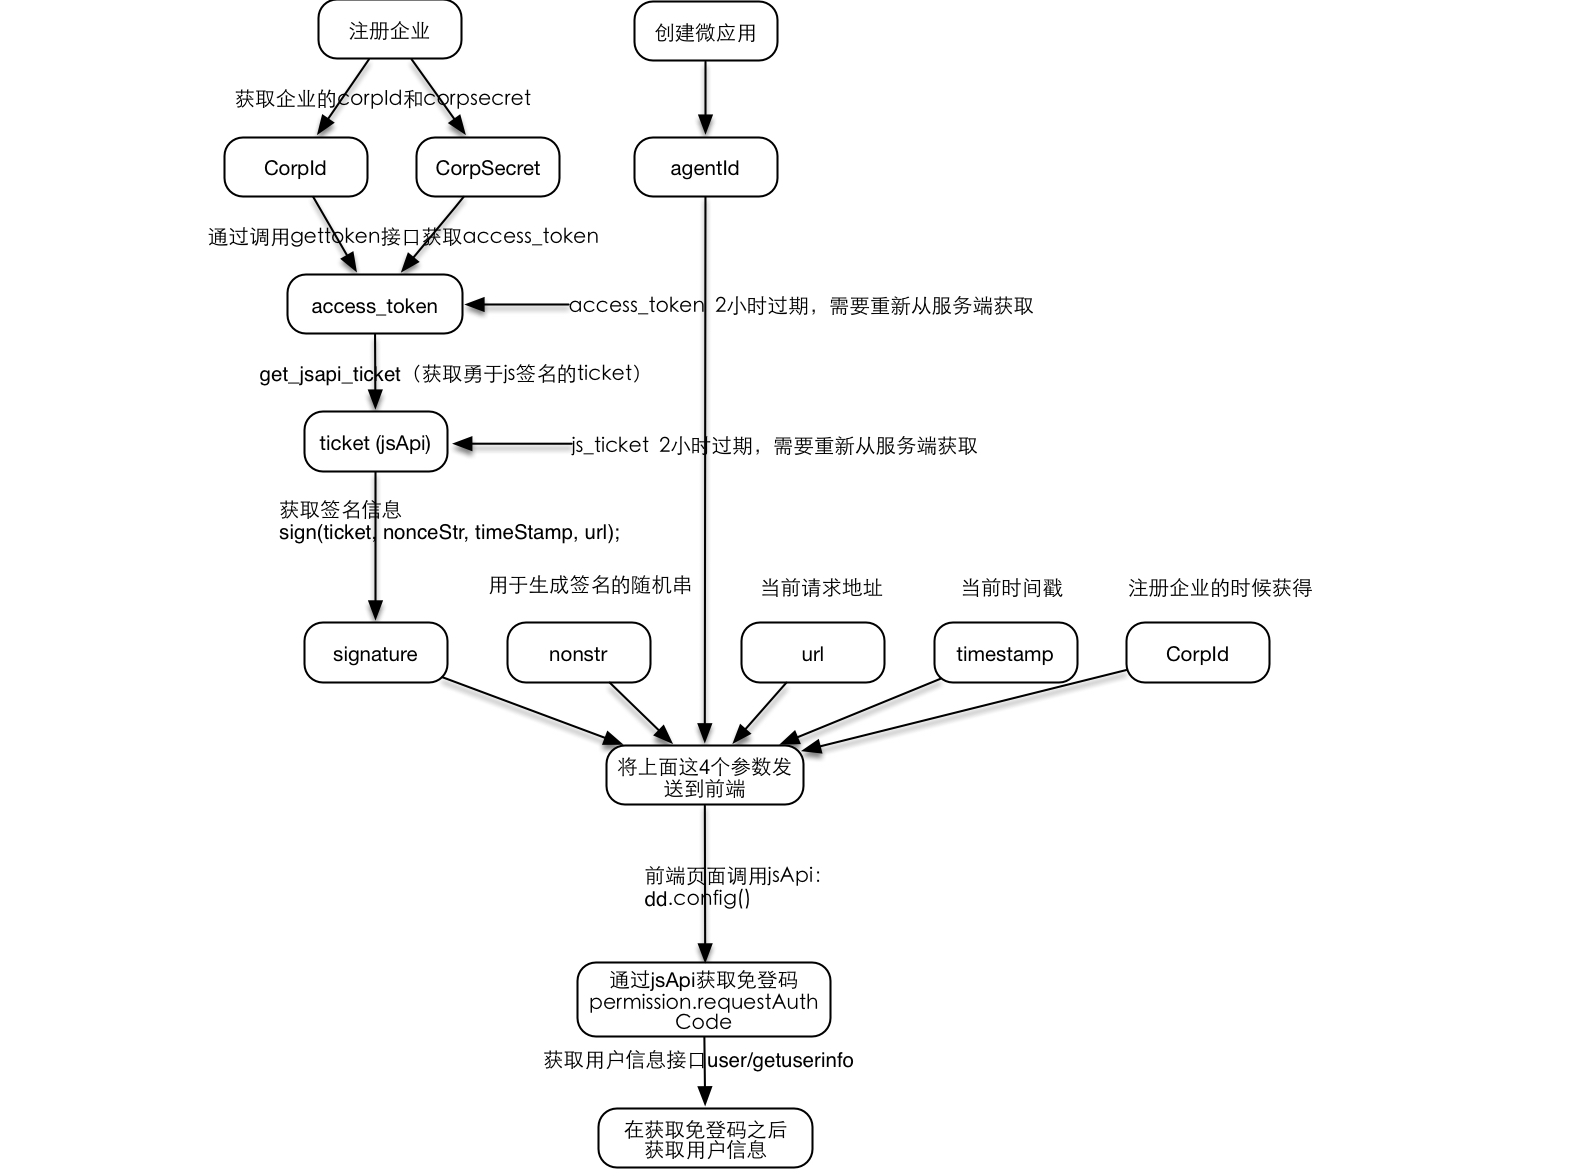
是不是很熟悉?是的,基本是按照OAUTH的原理来的,版本嘛,里面有计算签名的部分,我觉得应该是OAUTH1.0。
有的读者会问,那第一步是不是应该跳转到第三方认证页面啊。我觉得“魔法”就藏在用来打开页面的钉钉内置浏览器里,在dd.config()这一步里,“魔法”就生效了。
其实简单来说,主要分为五步:
- 在你的Web服务器端调用api,传入CorpId和CorpSecret,获取accessToken,即访问令牌。
- 在服务器端调用api,传入accessToken,获取JsApiTicket,即JsApi的访问许可(门票)。
- 按照既定规则,在后台由JsApiTicket、NonceStr、Timestamp、本页面Url生成字符串,计算SHA1消息摘要,即签名Signature。
- 将AgentId、CorpId、Timestamp、NonceStr、Signature等参数传递到前台,在前台调用api,得到authCode,即授权码。
- 根据授权码,在前台或后台调用api,获得userId,进而再根据userId,调用api获取用户详细信息。
PS:为什么需要在后台完成一些api的调用呢?应该是因为js跨域调用的问题,我具体没有深究。
实践方法
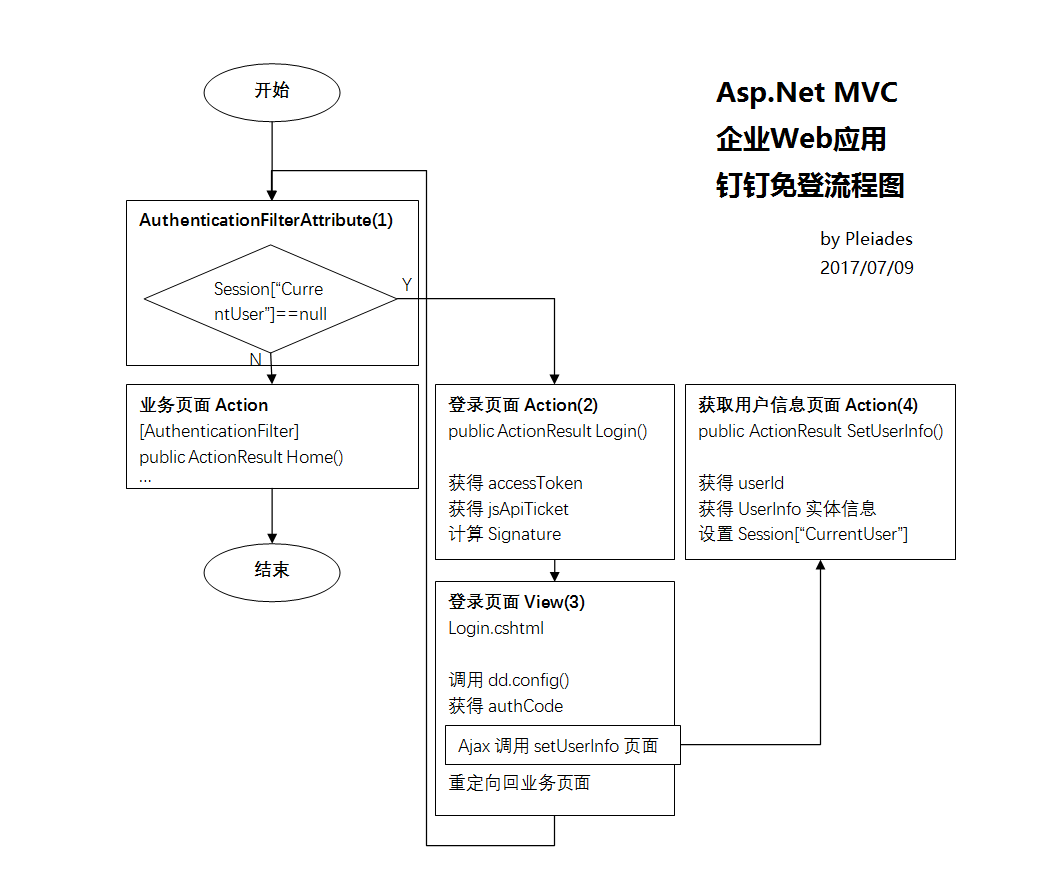
理解了上述步骤,我对登陆过程的实现也大致有了一个设想,既然免登需要前后端一起来完成,那就添加一个专门的登陆页面,将登陆过程都在里面实现,将登陆结果写入到Session,并重定向回业务页面,即算完成。图示如下:
其中每个api的调用方式,在官方文档中都有说明。同时,我在阿里云开发者论坛找到了网友提供的SDK,有兴趣可以下载:钉钉非官方.Net SDK
另外,GitHub上还有官方的JQuery版免登开发Demo,可以参考:GitHub JQuery免登。
我参考的是.Net SDK,将其中的代码,提取出了我所需要的部分,做了简化处理。基本原理就是每次调用API都是发起HttpRequest,将结果做JSON反序列化。
核心代码如下:
 using System;

 using System.Collections.Generic;

 using System.Linq;

 using System.Web;

 using System.IO;

 using Newtonsoft.Json;

 using Newtonsoft.Json.Linq;

 using DDApi.Model;

 namespace DDApi

 {

     public static class DDHelper

     {

         public static string GetAccessToken(string corpId, string corpSecret)

         {

             string url = string.Format("https://oapi.dingtalk.com/gettoken?corpid={0}&corpsecret={1}", corpId, corpSecret);

             try

             {

                 string response = HttpRequestHelper.Get(url);

                 AccessTokenModel oat = Newtonsoft.Json.JsonConvert.DeserializeObject<AccessTokenModel>(response);

                 if (oat != null)

                 {

                     if (oat.errcode == )

                     {

                         return oat.access_token;

                     }

                 }

             }

             catch (Exception ex)

             {

                 throw;

             }

             return string.Empty;

         }

         /* https://oapi.dingtalk.com/get_jsapi_ticket?access_token=79721ed2fc46317197e27d9bedec0425

          *

          * errmsg    "ok"

          * ticket    "KJWkoWOZ0BMYaQzWFDF5AUclJOHgO6WvzmNNJTswpAMPh3S2Z98PaaJkRzkjsmT5HaYFfNkMdg8lFkvxSy9X01"

          * expires_in    7200

          * errcode    0

          */

         public static string GetJsApiTicket(string accessToken)

         {

             string url = string.Format("https://oapi.dingtalk.com/get_jsapi_ticket?access_token={0}", accessToken);

             try

             {

                 string response = HttpRequestHelper.Get(url);

                 JsApiTicketModel model = Newtonsoft.Json.JsonConvert.DeserializeObject<JsApiTicketModel>(response);

                 if (model != null)

                 {

                     if (model.errcode == )

                     {

                         return model.ticket;

                     }

                 }

             }

             catch (Exception ex)

             {

                 throw;

             }

             return string.Empty;

         }

         public static long GetTimeStamp()

         {

             TimeSpan ts = DateTime.UtcNow - new DateTime(, , , , , , );

             return Convert.ToInt64(ts.TotalSeconds);

         }

         public static string GetUserId(string accessToken, string code)

         {

             string url = string.Format("https://oapi.dingtalk.com/user/getuserinfo?access_token={0}&code={1}", accessToken, code);

             try

             {

                 string response = HttpRequestHelper.Get(url);

                 GetUserInfoModel model = Newtonsoft.Json.JsonConvert.DeserializeObject<GetUserInfoModel>(response);

                 if (model != null)

                 {

                     if (model.errcode == )

                     {

                         return model.userid;

                     }

                     else

                     {

                         throw new Exception(model.errmsg);

                     }

                 }

             }

             catch (Exception ex)

             {

                 throw;

             }

             return string.Empty;

         }

         public static string GetUserDetailJson(string accessToken, string userId)

         {

             string url = string.Format("https://oapi.dingtalk.com/user/get?access_token={0}&userid={1}", accessToken, userId);

             try

             {

                 string response = HttpRequestHelper.Get(url);

                 return response;

             }

             catch (Exception ex)

             {

                 throw;

             }

             return null;

         }

         public static UserDetailInfo GetUserDetail(string accessToken, string userId)

         {

             string url = string.Format("https://oapi.dingtalk.com/user/get?access_token={0}&userid={1}", accessToken, userId);

             try

             {

                 string response = HttpRequestHelper.Get(url);

                 UserDetailInfo model = Newtonsoft.Json.JsonConvert.DeserializeObject<UserDetailInfo>(response);

                 if (model != null)

                 {

                     if (model.errcode == )

                     {

                         return model;

                     }

                 }

             }

             catch (Exception ex)

             {

                 throw;

             }

             return null;

         }

         public static List<DepartmentInfo> GetDepartmentList(string accessToken, int parentId = )

         {

             string url = string.Format("https://oapi.dingtalk.com/department/list?access_token={0}", accessToken);

             if (parentId >= )

             {

                 url += string.Format("&id={0}", parentId);

             }

             try

             {

                 string response = HttpRequestHelper.Get(url);

                 GetDepartmentListModel model = Newtonsoft.Json.JsonConvert.DeserializeObject<GetDepartmentListModel>(response);

                 if (model != null)

                 {

                     if (model.errcode == )

                     {

                         return model.department.ToList();

                     }

                 }

             }

             catch (Exception ex)

             {

                 throw;

             }

             return null;

         }

     }

 }
 using System.IO;

 using System.Net;

 namespace DDApi

 {

     public class HttpRequestHelper

     {

         public static string Get(string url)

         {

             WebRequest request = HttpWebRequest.Create(url);

             WebResponse response = request.GetResponse();

             Stream stream = response.GetResponseStream();

             StreamReader reader = new StreamReader(stream);

             string content = reader.ReadToEnd();

             return content;

         }

         public static string Post(string url)

         {

             WebRequest request = HttpWebRequest.Create(url);

             request.Method = "POST";

             WebResponse response = request.GetResponse();

             Stream stream = response.GetResponseStream();

             StreamReader reader = new StreamReader(stream);

             string content = reader.ReadToEnd();

             return content;

         }

     }

 }
HttpRequestHelper
其中的Model,就不再一一贴出来了,大家可以根据官方文档自己建立,这里只举一个例子,即GetAccessToken的返回结果:
    public class AccessTokenModel

    {

        public string access_token { get; set; }

        public int errcode { get; set; }

        public string errmsg { get; set; }

    }
我创建了一个类DDApiService,将上述方法做了封装:
using DDApi.Model;
using System;
using System.Collections.Generic;
using System.Configuration;
using System.Security.Cryptography;
using System.Text; namespace DDApi
{
/// <summary>
///
/// </summary>
public class DDApiService
{
public static readonly DDApiService Instance = new DDApiService(); public string CorpId { get; private set; }
public string CorpSecret { get; private set; }
public string AgentId { get; private set; } private DDApiService()
{
CorpId = ConfigurationManager.AppSettings["corpId"];
CorpSecret = ConfigurationManager.AppSettings["corpSecret"];
AgentId = ConfigurationManager.AppSettings["agentId"];
} /// <summary>
/// 获取AccessToken
/// 开发者在调用开放平台接口前需要通过CorpID和CorpSecret获取AccessToken。
/// </summary>
/// <returns></returns>
public string GetAccessToken()
{
return DDHelper.GetAccessToken(CorpId, CorpSecret);
} public string GetJsApiTicket(string accessToken)
{
return DDHelper.GetJsApiTicket(accessToken);
} public string GetUserId(string accessToken, string code)
{
return DDHelper.GetUserId(accessToken, code);
} public UserDetailInfo GetUserDetail(string accessToken, string userId)
{
return DDHelper.GetUserDetail(accessToken, userId);
} public string GetUserDetailJson(string accessToken, string userId)
{
return DDHelper.GetUserDetailJson(accessToken, userId);
} public UserDetailInfo GetUserDetailFromJson(string jsonString)
{
UserDetailInfo model = Newtonsoft.Json.JsonConvert.DeserializeObject<UserDetailInfo>(jsonString); if (model != null)
{
if (model.errcode == )
{
return model;
}
}
return null;
} public string GetSign(string ticket, string nonceStr, long timeStamp, string url)
{
String plain = string.Format("jsapi_ticket={0}&noncestr={1}×tamp={2}&url={3}", ticket, nonceStr, timeStamp, url); try
{
byte[] bytes = Encoding.UTF8.GetBytes(plain);
byte[] digest = SHA1.Create().ComputeHash(bytes);
string digestBytesString = BitConverter.ToString(digest).Replace("-", "");
return digestBytesString.ToLower();
}
catch (Exception e)
{
throw;
}
} public List<DepartmentInfo> GetDepartmentList(string accessToken, int parentId = )
{
return DDHelper.GetDepartmentList(accessToken, parentId);
}
}
}
DDApiService
以上是底层核心部分。登录页面的实现在控制器DDController中,代码如下:
using DDApi;

using DDApi.Model;

using System;

using System.Web.Mvc;

namespace AppointmentWebApp.Controllers

{

    public class DDController : Controller

    {

        //

        // GET: /DD/

        public ActionResult GetUserInfo(string accessToken, string code, bool setCurrentUser = true)

        {

            try

            {

                string userId = DDApiService.Instance.GetUserId(accessToken, code);

                string jsonString = DDApiService.Instance.GetUserDetailJson(accessToken, userId);

                UserDetailInfo userInfo = DDApiService.Instance.GetUserDetailFromJson(jsonString);

                if (setCurrentUser)

                {

                    Session["AccessToken"] = accessToken;

                    Session["CurrentUser"] = userInfo;

                }

                return Content(jsonString);

            }

            catch (Exception ex)

            {

                return Content(string.Format("{{'errcode': -1, 'errmsg':'{0}'}}", ex.Message));

            }

        }

        public ActionResult Login()

        {

            BeginDDAutoLogin();

            return View();

        }

        private void BeginDDAutoLogin()

        {

            string nonceStr = "helloDD";//todo:随机

            ViewBag.NonceStr = nonceStr;

            string accessToken = DDApiService.Instance.GetAccessToken();

            ViewBag.AccessToken = accessToken;

            string ticket = DDApiService.Instance.GetJsApiTicket(accessToken);

            long timeStamp = DDHelper.GetTimeStamp();

            string url = Request.Url.ToString();

            string signature = DDApiService.Instance.GetSign(ticket, nonceStr, timeStamp, url);

            ViewBag.JsApiTicket = ticket;

            ViewBag.Signature = signature;

            ViewBag.NonceStr = nonceStr;

            ViewBag.TimeStamp = timeStamp;

            ViewBag.CorpId = DDApiService.Instance.CorpId;

            ViewBag.CorpSecret = DDApiService.Instance.CorpSecret;

            ViewBag.AgentId = DDApiService.Instance.AgentId;

        }

    }

}
DDController
视图View的代码:
@{

    ViewBag.Title = "Login";

}

<!DOCTYPE html>

<html>

<head>

    <meta charset="utf-8" />

    <meta name="viewport" content="width=device-width" />

    <title>@ViewBag.Title</title>

</head>

<body>

    <h2 id="notice">正在登录...</h2>

    <script src="//cdn.bootcss.com/jquery/1.12.4/jquery.min.js"></script>

    <script type="text/javascript" src="http://g.alicdn.com/dingding/open-develop/1.5.1/dingtalk.js"></script>

    <script type="text/javascript">

        var _config = [];

        _config.agentId = "@ViewBag.AgentId";

        _config.corpId = "@ViewBag.CorpId";

        _config.timeStamp = "@ViewBag.TimeStamp";

        _config.nonceStr = "@ViewBag.NonceStr";

        _config.signature = "@ViewBag.Signature";

        dd.config({

            agentId: _config.agentId,

            corpId: _config.corpId,

            timeStamp: _config.timeStamp,

            nonceStr: _config.nonceStr,

            signature: _config.signature,

            jsApiList: ['runtime.info', 'biz.contact.choose',

                    'device.notification.confirm', 'device.notification.alert',

                    'device.notification.prompt', 'biz.ding.post',

                    'biz.util.openLink']

        });

        dd.ready(function () {

            dd.runtime.info({

                onSuccess: function (info) {

                    logger.e('runtime info: ' + JSON.stringify(info));

                },

                onFail: function (err) {

                    logger.e('fail: ' + JSON.stringify(err));

                }

            });

            dd.runtime.permission.requestAuthCode({

                corpId: _config.corpId,

                onSuccess: function (info) {//成功获得code值,code值在info中

                    //alert('authcode: ' + info.code);

                    //alert('token: @ViewBag.AccessToken');

                    /*

                    *$.ajax的是用来使得当前js页面和后台服务器交互的方法

                    *参数url:是需要交互的后台服务器处理代码,这里的userinfo对应WEB-INF -> classes文件中的UserInfoServlet处理程序

                    *参数type:指定和后台交互的方法,因为后台servlet代码中处理Get和post的doGet和doPost

                    *原本需要传输的参数可以用data来存储的,格式为data:{"code":info.code,"corpid":_config.corpid}

                    *其中success方法和error方法是回调函数,分别表示成功交互后和交互失败情况下处理的方法

                    */

                    $.ajax({

                        url: '@Url.Action("GetUserInfo", "DD")?code=' + info.code + '&accessToken=@ViewBag.AccessToken',//userinfo为本企业应用服务器后台处理程序

                        type: 'GET',

                        /*

                        *ajax中的success为请求得到相应后的回调函数,function(response,status,xhr)

                        *response为响应的数据,status为请求状态,xhr包含XMLHttpRequest对象

                        */

                        success: function (data, status, xhr) {

                            alert(data);

                            var info = JSON.parse(data);

                            if (info.errcode != 0) {

                                alert(data);

                            } else {

                                //alert("当前用户:" + info.name);

                                $('#notice').text("欢迎您:" + info.name + "。浏览器正在自动跳转...");

                                location.href = "@Url.Action("Index", "Home")";

                            }

                        },

                        error: function (xhr, errorType, error) {

                            logger.e("尝试获取用户信息失败:" + info.code);

                            alert(errorType + ', ' + error);

                        }

                    });

                },

                onFail: function (err) {//获得code值失败

                    alert('fail: ' + JSON.stringify(err));

                }

            });

        });

        dd.error(function (err) {

            alert('dd error: ' + JSON.stringify(err));

        });

    </script>

</body>

</html>
Login.cshtml
其中nonstr理论上最好应该每次都随机,留待读者去完成吧:-)
钉钉免登就是这样,只要弄懂了就会觉得其实不难,还顺便理解了OAUTH。
后续改进
这个流程没有考虑到AccessToken、JsApiTicket的有效期时间(2小时),因为整个过程就在一个页面中都完成了。如果想要进一步扩展,多次调用api的话,需要考虑到上述有效期。
如果为了图简便每都去获取AccessToken也是可以的,但是会增加服务器负担,而且api的调用频率是有限制的(1500次/s好像),所以应当采取措施控制。例如可以将AccessToken、JsApiTicket存放在this.HttpContext.Application["accessToken"]中,每次判断有效期是否过期,如果过期就调用api重新申请一个。
以上就是这样,感谢阅读。
20170710编辑,更新mvc免登流程图片,修正一处错误。
钉钉企业应用C#开发笔记之一(免登)的更多相关文章
- 开发笔记—钉钉服务商应用isv开发,从应用配置,到获取客户企业通讯录
以第三方企业微应用为例 在第三方企业微应用应用时,比较底层的需求,就是应用需要获取客户企业的通讯录,即部门/员工的数据.本人整理以下几个关键数据,供大家开发参考. 新建第三方微应用时,能拿到这些初始数 ...
- 钉钉企业内部H5微应用开发
企业内部H5微应用开发 分为 服务端API和前端API的开发,主要涉及到进入应用免登流程和JSAPI鉴权. JSAPI鉴权开发步骤: 1.创建H5微应用 登入钉钉开放平台(https://open-d ...
- CabloyJS一站式助力微信、企业微信、钉钉开发 - 钉钉篇
前言 现在软件开发不仅要面对前端碎片化,还要面对后端碎片化.针对前端碎片化,CabloyJS提供了pc=mobile+pad的跨端自适应方案,参见:自适应布局:pc = mobile + pad 在这 ...
- CabloyJS一站式助力微信、企业微信、钉钉开发 - 企业微信篇
前言 现在软件开发不仅要面对前端碎片化,还要面对后端碎片化.针对前端碎片化,CabloyJS提供了pc=mobile+pad的跨端自适应方案,参见:自适应布局:pc = mobile + pad 在这 ...
- CabloyJS一站式助力微信、企业微信、钉钉开发 - 微信篇
前言 现在软件开发不仅要面对前端碎片化,还要面对后端碎片化.针对前端碎片化,CabloyJS提供了pc=mobile+pad的跨端自适应方案,参见:自适应布局:pc = mobile + pad 在这 ...
- C#如何在钉钉开发平台中创建部门
钉钉是阿里巴巴专为中小企业和团队打造的沟通.协同的多端平台,钉钉开放平台旨在为企业提供更为丰富的办公协同解决方案.通过钉钉开放平台,企业或第三方合作伙伴可以帮助企业快速.低成本的实现高质量的移动微应用 ...
- C#如何在钉钉开发平台
C#如何在钉钉开发平台中创建部门 钉钉是阿里巴巴专为中小企业和团队打造的沟通.协同的多端平台,钉钉开放平台旨在为企业提供更为丰富的办公协同解决方案.通过钉钉开放平台,企业或第三方合作伙伴可以帮助企 ...
- 钉钉开发获取APPKEY, APPSECRET, CorpId和SSOSecret
首先用自己的钉钉账号注册一个企业: https://oa.dingtalk.com/index.htm 一.获取应用APPKEY及APPSECRET方法: 1.登录钉钉开放平台创建应用: https: ...
- Asp.Net Core&钉钉开发系列
阿里钉钉在商业领域的规模越来越大,基于钉钉办公的企业越来越多,将一个企业内现有用到的工具(如钉钉)能够更融入到他们的工作中,提高工作效率,那便需要开发者不断的学习.应用了,同时,个人也有一个预感,未来 ...
随机推荐
- DOM4J介绍与代码示例(2)-XPath 详解
XPath 详解,总结 XPath简介 XPath是W3C的一个标准.它最主要的目的是为了在XML1.0或XML1.1文档节点树中定位节点所设计.目前有XPath1.0和 XPath2.0两个版本.其 ...
- 一个gif远程crash你的微信!
测试了一下iPhone6,iPhone7不同版本的 iOS上,收到某个天线宝宝的gif,最新版本的微信都会挂. demo视频:演示视频 通过 crash log可以看到微信最新的6.5.8版本在打开 ...
- 为什么说上ERP找死?
长期以来,管理软件领域流行着这样一句话“不上ERP等死,上了ERP找死”.根据为十九年管理软件开发的经验来看,“不上ERP等死”这句话不敢苟同,但“上了ERP找死”这句话倒有些同感.上ERP虽然不一定 ...
- 错误处理1: D:\a1-C++\C++作业\第五次1.cpp undefined reference to `vtable for Shape'
在编译程序的时候遇到此误,在google上查,很多地方都说是因为虚基类里面的虚拟析构函数没有提供实现导致的.但是我的已经提供了实现,也不行.最后发现是其他没有提供实现的虚函数造成的.所以,在一个虚基类 ...
- stat命令
- C语言错题小本子
int a; ; a = ! x< //a的值是多少 我的答案:0, 正确答案:1 错误原因:没有熟练掌握运算符的优先级 // 找出下面无效的C语言变量名 A. _a B. main C. pr ...
- php笔记一
一.Login登陆验证步骤: 1.赋值,用$_POST将id和password传递给loginProcess.php登陆验证页面. 2.建立数据库连接 $conn=mysql_connect($hos ...
- 从零开始的JS生活(二)——BOM、DOM与JS中的事件
上回书说道,JS中变量.运算符.分支结构.循环和嵌套循环等内容.本回就由本K给大伙唠唠JS中的BOM.DOM和事件. 一."花心大萝卜"--BOM 1.震惊,FFF团为何对BOM举 ...
- 50几个photoshop快捷键
一.常用的热键组合 1.图层混合模式快捷键:正常(Shift + Option + N),正片叠底(Shift + Option + M),滤色(Shift + Option + S),叠加(Shif ...
- BOM(2)
Window 子对象 (1)Location 对象 Location 对象包含有关当前 URL(统一资源定位符) 的信息.(Uniform Resource Location) Location 对象 ...