
Nexus centos 安装
搭建nexus服务的意义
作为内网的统一代理,团队合作开发时不用每人都去外网下载一次;
解决部分变态公司内网管制无法访问外网的问题,选一台有外网权限的机器搭建服务器,其余人直接内网访问此服务;
团队合作开发时解决maven项目依赖问题;
大家nexus之后使用情形如下图

1、安装nexus
在安装之前 兄弟们要搞清楚是环境的jdk版本,兄弟我2018/8/20直接下了最新的版本,结果悲剧,配置到一半,报错,如下:
#高版本要求jdk8以上

[root@227 nexus]# ./bin/nexus console

No suitable Java Virtual Machine could be found on your system.

The version of the JVM must be at least 1.8 and at most 1.8.

Please define INSTALL4J_JAVA_HOME to point to a suitable JVM.
退而求其次nexus-2.11.4-01-bundle.tar.gz
- 云下载
wget http://sonatype-download.global.ssl.fastly.net/nexus/oss/nexus-2.11.4-01-bundle.tar.gz
wget http://mirrors.cnnic.cn/apache/maven/maven-3/3.0.5/binaries/apache-maven-3.0.5-bin.tar.gz
[root@227 ~]# wget http://sonatype-download.global.ssl.fastly.net/nexus/oss/nexus-2.11.4-01-bundle.tar.gz

--2018-08-20 15:55:29--  http://sonatype-download.global.ssl.fastly.net/nexus/oss/nexus-2.11.4-01-bundle.tar.gz

Resolving sonatype-download.global.ssl.fastly.net... 151.101.73.194

Connecting to sonatype-download.global.ssl.fastly.net|151.101.73.194|:80... connected.

HTTP request sent, awaiting response... 200 OK

Length: 70938260 (68M) [application/x-gzip]

Saving to: “nexus-2.11.4-01-bundle.tar.gz”

100%[============================================================================>] 70,938,260   121K/s   in 9m 14s

Last-modified header invalid -- time-stamp ignored.

2018-08-20 16:04:44 (125 KB/s) - “nexus-2.11.4-01-bundle.tar.gz” saved [70938260/70938260]
- 解压到/usr/local
[root@227 ~]# ll

total 69396

-rw-------. 1 root root     2362 Feb 28 18:39 anaconda-ks.cfg

drwxr-xr-x. 2 root root     4096 Feb 28 10:46 Desktop

drwxr-xr-x. 2 root root     4096 Feb 28 10:46 Documents

drwxr-xr-x. 2 root root     4096 Aug 20 15:41 Downloads

-rw-r--r--. 1 root root    68509 Feb 28 18:39 install.log

-rw-r--r--. 1 root root    11969 Feb 28 18:37 install.log.syslog

drwxr-xr-x. 2 root root     4096 Feb 28 10:46 Music

-rw-r--r--. 1 root root 70938260 Aug 20 16:04 nexus-2.11.4-01-bundle.tar.gz

drwxr-xr-x. 2 root root     4096 Feb 28 10:46 Pictures

drwxr-xr-x. 2 root root     4096 Feb 28 10:46 Public

drwxr-xr-x. 2 root root     4096 Feb 28 10:46 Templates

drwxr-xr-x. 2 root root     4096 Feb 28 10:46 Videos

[root@227 ~]# tar -zxvf nexus-2.11.4-01-bundle.tar.gz -C /usr/local/
注意:
一定要解压到这个目录下,具体原因我也不知道,文档里是这么做的,我们也没必要自己找麻烦。
建立软链接
查看/usr/local目录,结果如下:
[root@227 ~]# cd /usr/local/

[root@227 local]# ln -s nexus-2.11.4-01 nexus

[root@227 local]# ll

total 92

drwxr-xr-x.  2 root root  4096 Sep 23  2011 bin

drwxr-xr-x.  2 root root  4096 Sep 23  2011 etc

drwxr-xr-x.  2 root root  4096 Sep 23  2011 games

drwxr-xr-x.  2 root root  4096 Sep 23  2011 include

drwxr-xr-x.  2 root root  4096 Apr 11 15:43 key

drwxr-xr-x.  2 root root  4096 Sep 23  2011 lib

drwxr-xr-x.  2 root root  4096 Sep 23  2011 lib64

drwxr-xr-x.  2 root root  4096 Sep 23  2011 libexec

drwxr-xr-x.  2 root root 32768 Aug 20 00:10 logs

lrwxrwxrwx.  1 root root    15 Aug 20 16:09 nexus -> nexus-2.11.4-01

drwxr-xr-x.  8 root root  4096 Jul 10  2015 nexus-2.11.4-01

drwxr-xr-x. 11 root root  4096 May 21 17:15 nginx

drwxr-xr-x.  2 root root  4096 Apr  4 16:30 RSA-KeyPair

drwxr-xr-x.  2 root root  4096 Sep 23  2011 sbin

drwxr-xr-x.  5 root root  4096 Feb 28 18:29 share

drwxr-xr-x.  4 root root  4096 Jul 10  2015 sonatype-work

drwxr-xr-x.  2 root root  4096 Sep 23  2011 src
- 设置环境变量(按官网文档的说法是可选,不过还是配上吧)
[root@227 local]# vim /etc/profile

unset i

unset -f pathmunge

JAVA_HOME=/usr/jdk1.7.0_79

JRE_HOME=$JAVA_HOME/jre

CLASSPATH=.:$JAVA_HOME/lib/tools.jar:$JAVA_HOME/lib/dt.jar

PATH=$JAVA_HOME/bin:$PATH

export JAVA_HOME JRE_HOME CLASSPATH PATH

export NEXUS_HOME=/usr/local/nexus-2.11.4-01

[root@227 local]#
[root@227 local]# source /etc/profile

[root@227 local]# echo $NEXUS_HOME

/usr/local/nexus-2.11.4-01
2、启动nexus
2.1启动服务器
前台启动:好了,我们来前台启动一下。咦,没起来,提示:
[root@227 local]# cd /usr/local/nexus

[root@227 nexus]# ./bin/nexus console

****************************************

WARNING - NOT RECOMMENDED TO RUN AS ROOT

****************************************

If you insist running as root, then set the environment variable RUN_AS_USER=root before running this script.

[root@227 nexus]# vim /etc/profile

#结尾加上 export RUN_AS_USER=root

[root@227 nexus]# source /etc/profile
[root@227 nexus]# ./bin/nexus console

#运行结果如下

wrapper  | Launching a JVM...

jvm 1    | Wrapper (Version 3.2.3) http://wrapper.tanukisoftware.org

jvm 1    |   Copyright 1999-2006 Tanuki Software, Inc.  All Rights Reserved.

jvm 1    |

jvm 1    | 2018-08-20 16:15:57,678+0800 INFO  [WrapperListener_start_runner] *SYSTEM org.sonatype.nexus.bootstrap.jsw.JswLauncher - Starting with arguments: [./conf/jetty.xml, ./conf/jetty-requestlog.xml]

jvm 1    | 2018-08-20 16:15:57,682+0800 INFO  [WrapperListener_start_runner] *SYSTEM org.sonatype.nexus.bootstrap.jsw.JswLauncher - JVM ID: 1, JVM PID: 16148, Wrapper PID: 16146, User: root

jvm 1    | 2018-08-20 16:15:57,699+0800 INFO  [WrapperListener_start_runner] *SYSTEM org.sonatype.nexus.bootstrap.ConfigurationBuilder - Properties:

jvm 1    | 2018-08-20 16:15:57,700+0800 INFO  [WrapperListener_start_runner] *SYSTEM org.sonatype.nexus.bootstrap.ConfigurationBuilder -   application-conf='/usr/local/nexus-2.11.4-01/../sonatype-work/nexus/conf'

jvm 1    | 2018-08-20 16:15:57,700+0800 INFO  [WrapperListener_start_runner] *SYSTEM org.sonatype.nexus.bootstrap.ConfigurationBuilder -   application-host='0.0.0.0'

jvm 1    | 2018-08-20 16:15:57,700+0800 INFO  [WrapperListener_start_runner] *SYSTEM org.sonatype.nexus.bootstrap.ConfigurationBuilder -   application-port='8081'

jvm 1    | 2018-08-20 16:15:57,700+0800 INFO  [WrapperListener_start_runner] *SYSTEM org.sonatype.nexus.bootstrap.ConfigurationBuilder -   bundleBasedir='/usr/local/nexus-2.11.4-01'

jvm 1    | 2018-08-20 16:15:57,700+0800 INFO  [WrapperListener_start_runner] *SYSTEM org.sonatype.nexus.bootstrap.ConfigurationBuilder -   java.awt.headless='true'

jvm 1    | 2018-08-20 16:15:57,700+0800 INFO  [WrapperListener_start_runner] *SYSTEM org.sonatype.nexus.bootstrap.ConfigurationBuilder -   networkaddress.cache.ttl='3600'

jvm 1    | 2018-08-20 16:15:57,700+0800 INFO  [WrapperListener_start_runner] *SYSTEM org.sonatype.nexus.bootstrap.ConfigurationBuilder -   nexus-app='/usr/local/nexus-2.11.4-01/nexus/WEB-INF'

jvm 1    | 2018-08-20 16:15:57,700+0800 INFO  [WrapperListener_start_runner] *SYSTEM org.sonatype.nexus.bootstrap.ConfigurationBuilder -   nexus-webapp='/usr/local/nexus-2.11.4-01/nexus'

jvm 1    | 2018-08-20 16:15:57,700+0800 INFO  [WrapperListener_start_runner] *SYSTEM org.sonatype.nexus.bootstrap.ConfigurationBuilder -   nexus-webapp-context-path='/nexus'

jvm 1    | 2018-08-20 16:15:57,700+0800 INFO  [WrapperListener_start_runner] *SYSTEM org.sonatype.nexus.bootstrap.ConfigurationBuilder -   nexus-work='/usr/local/sonatype-work/nexus'

jvm 1    | 2018-08-20 16:15:57,700+0800 INFO  [WrapperListener_start_runner] *SYSTEM org.sonatype.nexus.bootstrap.ConfigurationBuilder -   org.eclipse.ecf.provider.filetransfer.retrieve.readTimeout='30000'

jvm 1    | 2018-08-20 16:15:57,700+0800 INFO  [WrapperListener_start_runner] *SYSTEM org.sonatype.nexus.bootstrap.ConfigurationBuilder -   runtime='/usr/local/nexus-2.11.4-01/nexus/WEB-INF'

jvm 1    | 2018-08-20 16:15:57,700+0800 INFO  [WrapperListener_start_runner] *SYSTEM org.sonatype.nexus.bootstrap.ConfigurationBuilder -   security-xml-file='/usr/local/nexus-2.11.4-01/../sonatype-work/nexus/conf/security.xml'

jvm 1    | 2018-08-20 16:15:57,701+0800 INFO  [WrapperListener_start_runner] *SYSTEM org.sonatype.nexus.bootstrap.Launcher - Java: 1.7.0_79, Java HotSpot(TM) 64-Bit Server VM, Oracle Corporation, 24.79-b02

jvm 1    | 2018-08-20 16:15:57,701+0800 INFO  [WrapperListener_start_runner] *SYSTEM org.sonatype.nexus.bootstrap.Launcher - OS: Linux, 2.6.32-431.el6.x86_64, amd64

jvm 1    | 2018-08-20 16:15:57,701+0800 INFO  [WrapperListener_start_runner] *SYSTEM org.sonatype.nexus.bootstrap.Launcher - User: root, en, /root

jvm 1    | 2018-08-20 16:15:57,701+0800 INFO  [WrapperListener_start_runner] *SYSTEM org.sonatype.nexus.bootstrap.Launcher - CWD: /usr/local/nexus-2.11.4-01

jvm 1    | 2018-08-20 16:15:57,711+0800 INFO  [WrapperListener_start_runner] *SYSTEM org.sonatype.nexus.bootstrap.Launcher - TMP: /usr/local/nexus-2.11.4-01/tmp

jvm 1    | 2018-08-20 16:15:57,713+0800 INFO  [WrapperListener_start_runner] *SYSTEM org.sonatype.nexus.bootstrap.jetty.JettyServer - Starting
2.2以后台进程启动:
[root@227 ~]# cd /usr/local/nexus

######################后台启动命令################################

[root@227 nexus]# ./bin/nexus start

****************************************

WARNING - NOT RECOMMENDED TO RUN AS ROOT

****************************************

Starting Nexus OSS...

Started Nexus OSS.

[root@227 nexus]# ./bin/nexus stop

****************************************

WARNING - NOT RECOMMENDED TO RUN AS ROOT

****************************************

Stopping Nexus OSS...

Stopped Nexus OSS.

######################查看日志################################

[root@227 nexus]# tail -f logs/wrapper.log

jvm 1    | 2018-08-21 09:10:12,782+0800 INFO  [RepositoryStatusChecker-central] *SYSTEM org.sonatype.nexus.proxy.maven.maven2.M2Repository-central - Next attempt to auto-unblock the "Central" (id=central) repository by checking its remote peer health will occur in 40 seconds.

jvm 1    | 2018-08-21 09:10:18,206+0800 INFO  [qtp1235955620-81] *SYSTEM org.apache.shiro.nexus5727.FixedDefaultWebSessionManager - Global session timeout: 1800000 ms

jvm 1    | 2018-08-21 09:10:18,207+0800 INFO  [qtp1235955620-81] *SYSTEM org.apache.shiro.session.mgt.AbstractValidatingSessionManager - Enabling session validation scheduler...

jvm 1    | 2018-08-21 09:10:18,208+0800 INFO  [qtp1235955620-81] *SYSTEM org.apache.shiro.cache.ehcache.EhCacheManager - Using existing EHCache named [shiro-activeSessionCache]

jvm 1    | 2018-08-21 09:10:18,264+0800 INFO  [qtp1235955620-81] admin org.sonatype.nexus.velocity.VelocityEngineProvider - Creating Nexus VelocityEngine

jvm 1    | 2018-08-21 09:10:18,869+0800 INFO  [qtp1235955620-81] admin /nexus - nexus: [Noelios Restlet Engine] - Attaching application: org.sonatype.nexus.rest.NexusApplication@228da80f to URI: /nexus/service/local

jvm 1    | 2018-08-21 09:10:18,894+0800 INFO  [qtp1235955620-87] admin org.sonatype.security.model.source.FileModelConfigurationSource - Loading security configuration from: /usr/local/nexus-2.11.4-01/../sonatype-work/nexus/conf/security.xml

jvm 1    | 2018-08-21 09:10:19,243+0800 INFO  [proxy-3-thread-1] admin org.sonatype.nexus.proxy.storage.remote.httpclient.HttpClientRemoteStorage - Initializing remote transport for proxy repository "Apache Snapshots" [id=apache-snapshots]...

jvm 1    | 2018-08-21 09:10:52,665+0800 INFO  [RepositoryStatusChecker-codehaus-snapshots] *SYSTEM org.sonatype.nexus.proxy.maven.maven2.M2Repository-codehaus-snapshots - Next attempt to auto-unblock the "Codehaus Snapshots" (id=codehaus-snapshots) repository by checking its remote peer health will occur in 1 minute 20 seconds.

jvm 1    | 2018-08-21 09:10:52,783+0800 INFO  [RepositoryStatusChecker-central] *SYSTEM org.sonatype.nexus.proxy.maven.maven2.M2Repository-central - Next attempt to auto-unblock the "Central" (id=central) repository by checking its remote peer health will occur in 1 minute 20 seconds.
2.3web访问
好了,我们在浏览器上看看能不能访问吧,路径:
http://192.168.1.227(换成你的ip):8081/nexus.
结果如图所示:
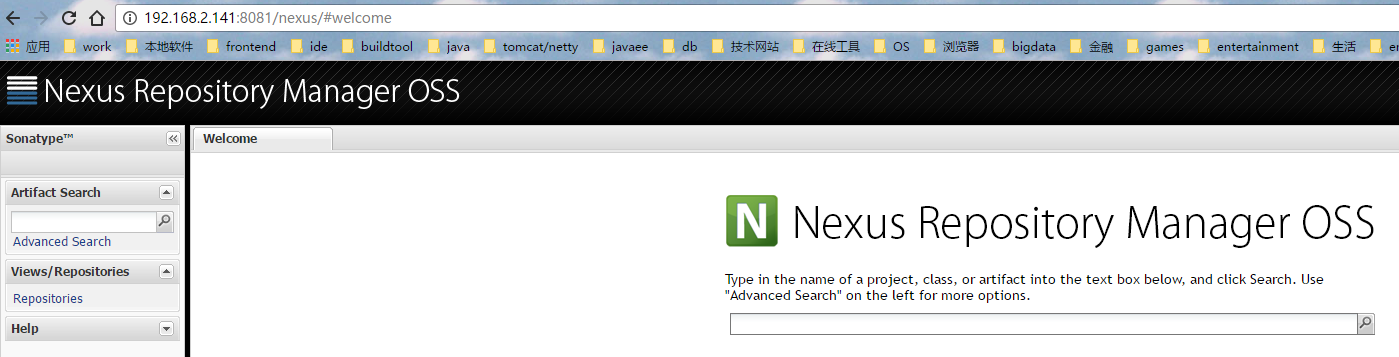
点击右上角登录:
默认用户名为admin,密码admin123
3.搭建私服
3.1 界面元素介绍

登录后,点击左侧Repositories,界面如上图所示。
右侧的列表中,可以看到nexus预设的几个仓库。
第一个public Repositories,类型为group,这个简单理解为仓库的集合,下面的仓库就是可以加入到这个集合的元素。
对外可以只提供一个单独的url,如上图显示为:http://192.168.1.227:8081/nexus/content/groups/public/
大部分的终端用户,只需要配置上面这一个单独的聚合后的url,而不用单独配置多个仓库。用户也不需要知道某个jar包具体来源于maven 中央仓库,或者是Apache Snapshots,或者是我们自己添加的其他仓库。
这样的好处在于:如果我们要新增某个仓库(如开源中国、阿里云),客户端不需要做任何更改,只需要在nexus上将要新增的仓库加入到对外提供服务的仓库 group中就可以。
第二个3rd party,与倒数第一个和第二个仓库,Releases和Snapshots一样,类型为hosted,意思是由nexus本机管理的仓库。该仓库用于商业化的,第三方提供的非开源的依赖仓库,如oracle jdbc driver。
倒数第二个Releases,用于存放开发团队内部用的正式版的依赖。
倒数第一个Snapshots,用于存放开发团队内部日常构建的频率更新较快的依赖包。
Apache Snapshots和Central类型都是proxy,意思是远端仓库的代理。前者包含了Apache Software Foundation 发布的快照版本(这么翻译不知道对不对),后者为Maven中央仓库,我们平时maven默认就是连接该仓库。
Central M1 Shadow类型为virtual,按官方文档的意思是,只是已有仓库的一个不同呈现方式的映射。有需要可以参考官方手册6.2.3节。
3.2 仓库集合的界面
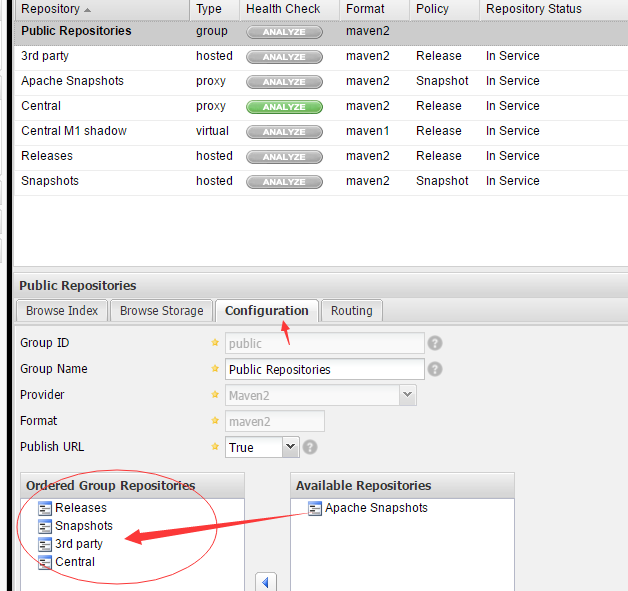
点击Configuration,可以看到当前添加到该集合的仓库列表及顺序(优先级高的在上面,可用鼠标拖拽),当我们新增了仓库,将会出现在右侧的available Repository,添加到左边即可。
如果有哪个仓库不想加入到该集合,也可以拖拽到右边来。
3.3使用本地maven客户端测试nexus是否成功部署
首先复制仓库集合的repository url,客户端配置需要用到。

配置maven客户端:
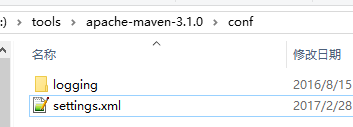
打开settings.xml,按照如下步骤修改:
<mirrors>

    <mirror>

    <!--This sends everything else to /public -->

    <id>nexus</id>

    <mirrorOf>*</mirrorOf>

    <url>http://192.168.1.227:8081/nexus/content/groups/public</url>

    </mirror>

</mirrors>
<profiles>

    <profile>

      <id>nexus</id>

      <!--Enable snapshots for the built in central repo to direct -->

      <!--all requests to nexus via the mirror -->

      <repositories>

        <repository>

          <id>central</id>

          <url>http://central</url>

          <releases><enabled>true</enabled></releases>

          <snapshots><enabled>true</enabled></snapshots>

        </repository>

      </repositories>

      <pluginRepositories>

        <pluginRepository>

          <id>central</id>

          <url>http://central</url>

          <releases><enabled>true</enabled></releases>

          <snapshots><enabled>true</enabled></snapshots>

        </pluginRepository>

      </pluginRepositories>

    </profile>

  </profiles>

  <activeProfiles>

    <activeProfile>nexus</activeProfile>

  </activeProfiles>
接下来在ide中测试下(我个人用maven命令行不多,不熟悉,还是用intelj idea演示吧)
在idea中依次打开File--Settings--搜索Maven--出现如下界面:
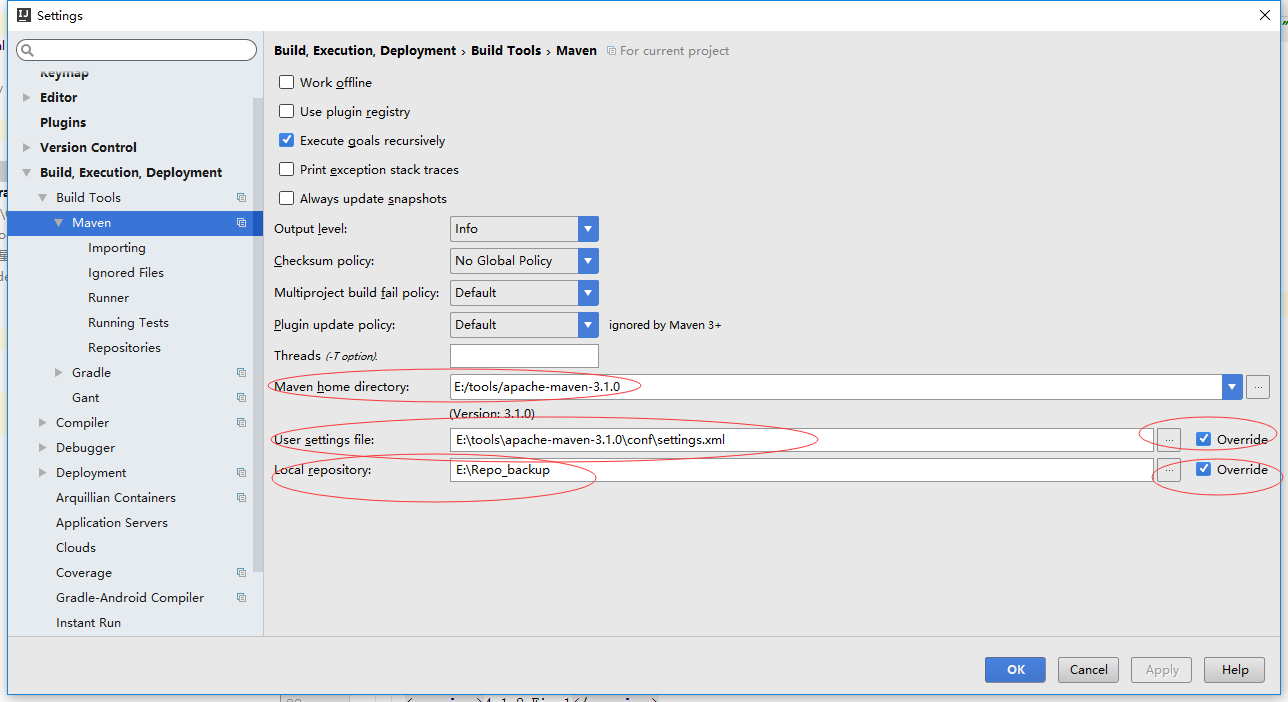
保证上述几项指向正在用的maven目录和配置文件即可。点击ok,退出。
打开Maven Projects窗口,勾选Profiles中的nexus。

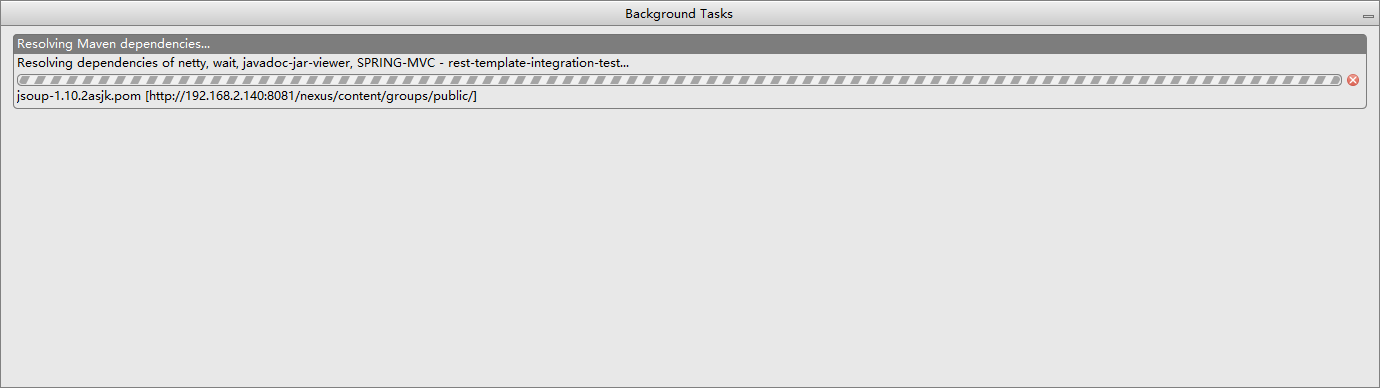
随便新建一个maven工程,在pom中添加一项本地仓库中没有的依赖,应该出现如下图示:(下图可以看出,正在去我们配置的私服下载maven依赖)
至此。大体配置完成。
3.3 通过网页方式将jar包上传到nexus
在使用Maven管理项目时,如何将jar包上传到私有仓库,下面简单介绍一下上传方法。
环境:nexus私有库
步骤如下:
1.登陆已经安装好的nexus私有仓库,如图:

2.点击左边菜单“Repositories”,选择右边列表“3rd party“

3.点击“3rd party”,选择artifact Upload,如下图:

4.在artifact Upload界面显示的有GAV Parameter,groupId,artifactId,Version,Packaging等等参数,界面如图:

5.将以上参数填之后,选择要上传的jar包,点击”add artifact“,最后点击”save“保存按钮即可,如下图所示:


说:这种方法只是上传了jar包。通过maven引用当前jar,不能取得jar的依赖
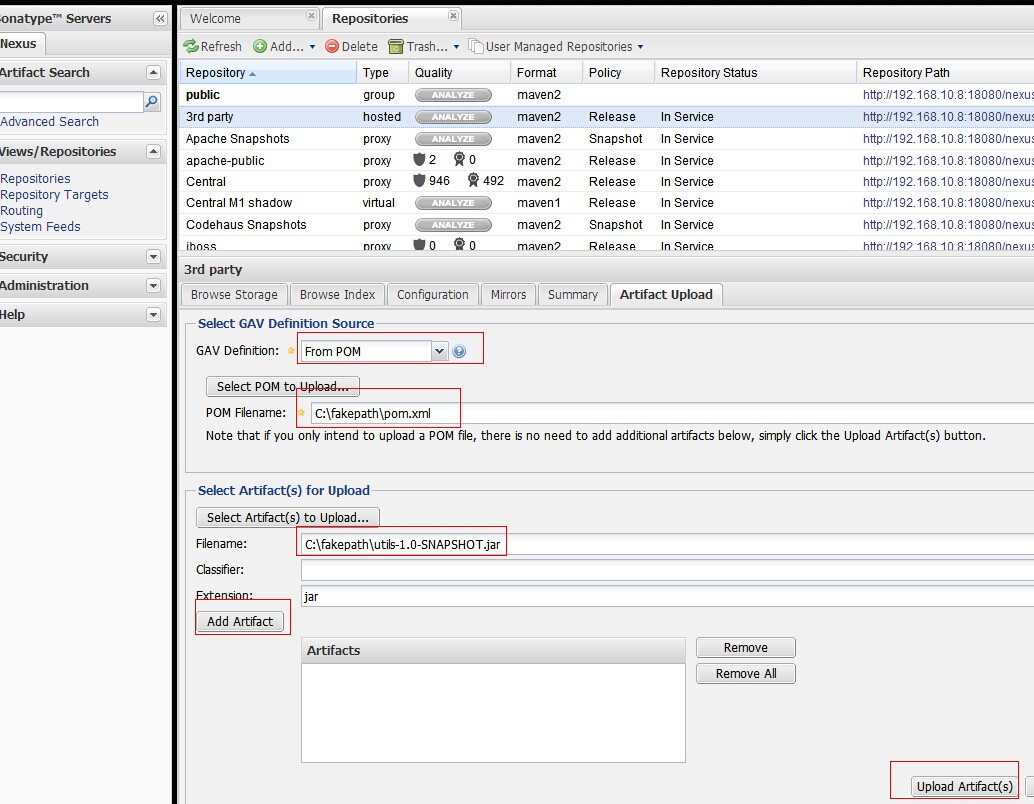
通过 from pom的方式,选择pom文件,以及jar。通过maven引入jar时,会自动加载jar的依赖
Nexus centos 安装的更多相关文章
- CentOS安装Nexus(Maven私有库)详细配置及上传本地jar到私服
Nexus原理 Maven的原理就是将jar从远程中央仓库下载到PC磁盘的本地仓库,当本地仓库没有发现需要的jar就会去Maven默认的远程中央仓库Maven Central(由Apache维护)中寻 ...
- centos安装配置和使用 Nexus
Nexus安装配置和使用 第一步安装jdk yum install java-1.8.0-openjdk-devel 第二步下载nexus-3.12.1-01-unix.tar.gzjdk 下载地址: ...
- CentOS安装gitlab,gerrit,jenkins并配置ci流程
CentOS安装gitlab,gerrit,jenkins并配置ci流程 By Wenbin juandx@163.com 2016/4/9 这是我参考了网上很多的文档,配置了这三个软件在一个机器上, ...
- 【推荐】CentOS安装Subversion-1.8.11+HTTP协议支持配置
注:以下所有操作均在CentOS 6.5 x86_64位系统下完成. 我们需要搭建一个自己的SVN服务器. 此外,搭建好的SVN服务器除了需要支持svn协议外,最好还需要支持HTTP协议和HTTPS协 ...
- 【推荐】CentOS安装PHP-5.6.4+扩展安装+安全配置+性能配置
注:以下所有操作均在CentOS 6.5 x86_64位系统下完成. #准备工作# 前段时间PHP官方发布了一个重要的安全升级公告,修复了两个unserialize函数的严重漏洞,目前受影响的版本有: ...
- CentOS安装Apache-2.4.10+安全配置
注:以下所有操作均在CentOS 6.5 x86_64位系统下完成. #准备工作# 在安装Nginx之前,请确保已经使用yum安装了各基础组件,并且配置了www用户和用户组,具体见<CentOS ...
- CentOS安装Nginx-1.6.2+安全配置
注:以下所有操作均在CentOS 6.5 x86_64位系统下完成. #准备工作# 在安装Nginx之前,请确保已经使用yum安装了pcre等基础组件,具体见<CentOS安装LNMP环境的基础 ...
- CentOS安装MySQL-5.6.10+安全配置
注:以下所有操作均在CentOS 6.5 x86_64位系统下完成. #准备工作# 在安装MySQL之前,请确保已经使用yum安装了各类基础组件,具体见<CentOS安装LNMP环境的基础组件& ...
- 转: CentOS 安装 SVN1.8 客户端
from: http://blog.csdn.net/clementad/article/details/46898091 CentOS 安装SVN客户端 标签: subversionrpmcent ...
随机推荐
- kvm虚拟化之convirt集中管理平台搭建
情况说明: (1)本文采用OEL6.3x64操作系统,需要有KVM安装环境.(2)convirt2.1.1采用源码方式安装,convirt环境分别两部分,一部分是cms,用于管理kvm/xen虚拟主机 ...
- PHP中count()和sizeof()
php中获取数组长度函数有两个count()和sizeof(),如果传递给这个函数的数组是一个空数组,或者是一个没有经过设定的变量,返回的数组元素个数就是0.两函数功能一样,手册上讲,sizeof() ...
- git命令合集及github的克隆推送
安装git 初始化仓库 提交相关 撤销相关 远程推送 分支相关 其他 遇到的错误 github的克隆上传 此文章只是对命令的一个统计,起备忘和复习git只是的作用,不建议从没接触过git的同学通过它来 ...
- 空行会影响 Java 编译吗?
简评:往往越简单的问题越容易被人们忽略. 问题 这个月的 Stack Overflow 有篇热门文章是国外有位开发者提出: 当我仅仅对 Java 类增加了一行空行,为什么编译后得到了两个不同的字节码文 ...
- Java反射与自定义注解
反射,在Java常用框架中屡见不鲜.它存在于java.lang.reflact包中,就我的认识,它可以拿到类的字段和方法,及构造方法,还可以生成对象实例等.对深入的机制我暂时还不了解,本篇文章着重在使 ...
- asp.net c# 虾米音乐API
最近用到虾米音乐的功能,主要是做一个分享音乐功能,找到好多代码,但是比较杂,有用的很少,因 此在此记录下,方便以后自己使用. 对于第三方网站,只要获取了唯一标识,基本上能抓取一些信息. 虾米 音乐的I ...
- vue+ivew-admin开发项目,内存占用过大解决办法
项目用的ivew+admin ivewUI,直接从github上拉下来用的,配置也没改,我们页面比较多,大该30个页面的样子,一启用,我们的电脑就卡了,然后,看一下,内存占用 1.5G+了,我们电脑4 ...
- 1.由于测试某个功能,需要生成500W条数据的txt,python代码如下
txt内容是手机号,数量500W,采用python代码生成,用时60S,本人技能有限,看官如果有更快的写法,欢迎留言交流. import random f = open("D:\\data. ...
- ElasticSearch 系列随笔
1.ElasticSearch 常用设置 2.ElasticSearch 从2.2升级到6.2.4碰到的问题 3.ElasticSearch 因为磁盘空间不够引起的数据插入错误.(message [C ...
- Android Fragment向另一个Activity传值
1.Fragment内: Intent intent=new Intent(getActivity(),ShowDataActivity.class); //参数1:Fragment所依存的Activ ...