IOS UI-标签(Label)的高级应用
//
// BWLabel.h
// IOS_0119_label
//
// Created by ma c on 16/1/19.
// Copyright © 2016年 博文科技. All rights reserved.
// #import <UIKit/UIKit.h> typedef NS_ENUM(NSInteger, BWTextAlignment) {
BWTextAlignmentTop = ,
BWTextAlignmentBottom = ,
BWTextAlignmentCenter = ,
BWTextAlignmentLeftTop = ,//文字-左上
BWTextAlignmentLeftDown = ,//文字-左下
BWTextAlignmentRightTop = ,//文字-右上
BWTextAlignmentRightDown= //文字-右下
}; @interface BWLabel : UILabel @property (nonatomic, assign) BWTextAlignment bowenTextAlignment; @end //
// BWLabel.m
// IOS_0119_label
//
// Created by ma c on 16/1/19.
// Copyright © 2016年 博文科技. All rights reserved.
// #import "BWLabel.h" @implementation BWLabel - (instancetype)initWithFrame:(CGRect)frame
{
self = [super initWithFrame:frame];
if (self) {
_bowenTextAlignment = BWTextAlignmentCenter; }
return self;
} - (CGRect)textRectForBounds:(CGRect)bounds limitedToNumberOfLines:(NSInteger)numberOfLines
{
CGRect bowenRect = [super textRectForBounds:bounds limitedToNumberOfLines:numberOfLines]; switch (_bowenTextAlignment) {
case BWTextAlignmentTop:
bowenRect.origin.x = (bounds.size.width - bowenRect.size.width)/;
bowenRect.origin.y = bounds.origin.y;
break;
case BWTextAlignmentCenter:
bowenRect.origin.x = (bounds.size.width - bowenRect.size.width)/;
bowenRect.origin.y = bounds.origin.y + (bounds.size.height - bowenRect.size.height)/;
break;
case BWTextAlignmentBottom:
bowenRect.origin.x = (bounds.size.width - bowenRect.size.width)/;
bowenRect.origin.y = bounds.origin.y + bounds.size.height - bowenRect.size.height;
case BWTextAlignmentLeftTop:
bowenRect.origin.y = bounds.origin.y;
bowenRect.origin.x = ;
break;
case BWTextAlignmentLeftDown:
bowenRect.origin.y = bounds.origin.y + bounds.size.height - bowenRect.size.height;
bowenRect.origin.x = ;
break;
case BWTextAlignmentRightTop:
bowenRect.origin.y = bounds.origin.y;
bowenRect.origin.x = bounds.size.width - bowenRect.size.width;
break;
case BWTextAlignmentRightDown:
bowenRect.origin.y = bounds.origin.y + bounds.size.height - bowenRect.size.height;
bowenRect.origin.x = bounds.size.width - bowenRect.size.width;
break;
}
return bowenRect;
} - (void)drawTextInRect:(CGRect)rect
{
CGRect bowenRect = [self textRectForBounds:rect limitedToNumberOfLines:self.lineBreakMode]; [super drawTextInRect:bowenRect];
}
@end //
// ViewController.m
// IOS_0119_label
//
// Created by ma c on 16/1/19.
// Copyright © 2016年 博文科技. All rights reserved.
// #import "ViewController.h"
#import "BWLabel.h"
#import <CoreText/CoreText.h> @interface ViewController () @end @implementation ViewController - (void)viewDidLoad {
[super viewDidLoad]; NSMutableAttributedString *bowenAttributedString = [[NSMutableAttributedString alloc] initWithString:@"举头望明月,低头思故乡"]; //字体颜色NSForegroundColorAttributeName
//字体大小NSFontAttributeName
NSDictionary *dict = [[NSDictionary alloc] initWithObjectsAndKeys:
[UIColor redColor], NSForegroundColorAttributeName,
[UIFont systemFontOfSize:], NSFontAttributeName, nil]; [bowenAttributedString setAttributes:dict range:NSMakeRange(, )]; //kCTUnderlineStyleAttributeName设置下划线
[bowenAttributedString addAttribute:(NSString *)kCTUnderlineStyleAttributeName value:(id)[NSNumber numberWithInt:kCTUnderlineStyleSingle] range:NSMakeRange(, )];
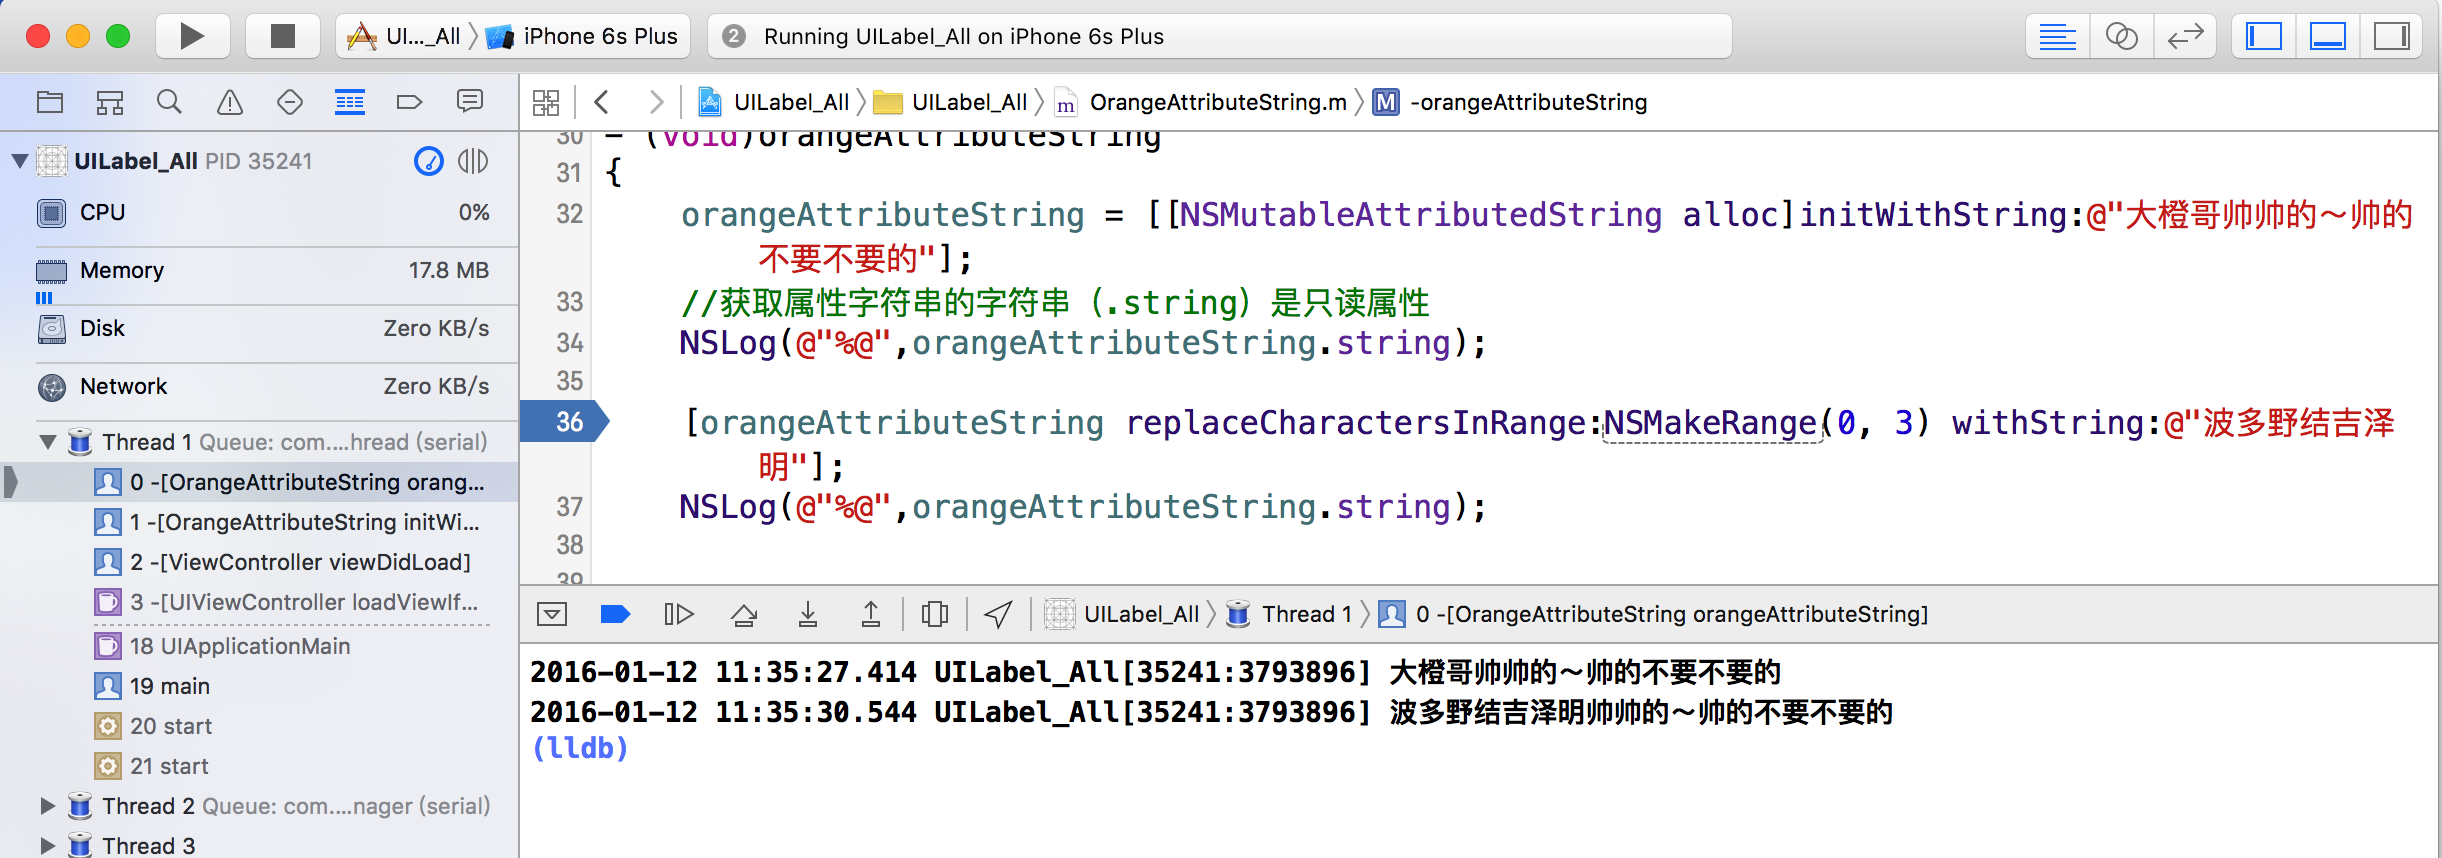
NSLog(@"%@",bowenAttributedString); //进行替换属性字符串通过NSRange
[bowenAttributedString replaceCharactersInRange:NSMakeRange(, ) withString:@"伤"]; BWLabel *label = [[BWLabel alloc] initWithFrame:CGRectMake(, , , )];
//label.text = @"123666";
label.attributedText = bowenAttributedString;
label.backgroundColor = [UIColor groupTableViewBackgroundColor];
label.bowenTextAlignment = BWTextAlignmentTop;
[self.view addSubview:label];
}
- (void)touchesBegan:(NSSet<UITouch *> *)touches withEvent:(UIEvent *)event
{
NSLog(@"%@",[touches valueForKey:@"view"]);
}
@end
//(1)通过给出的range替换属性字符串
- (void)replaceCharactersInRange:(NSRange)range withString:(NSString *)str;
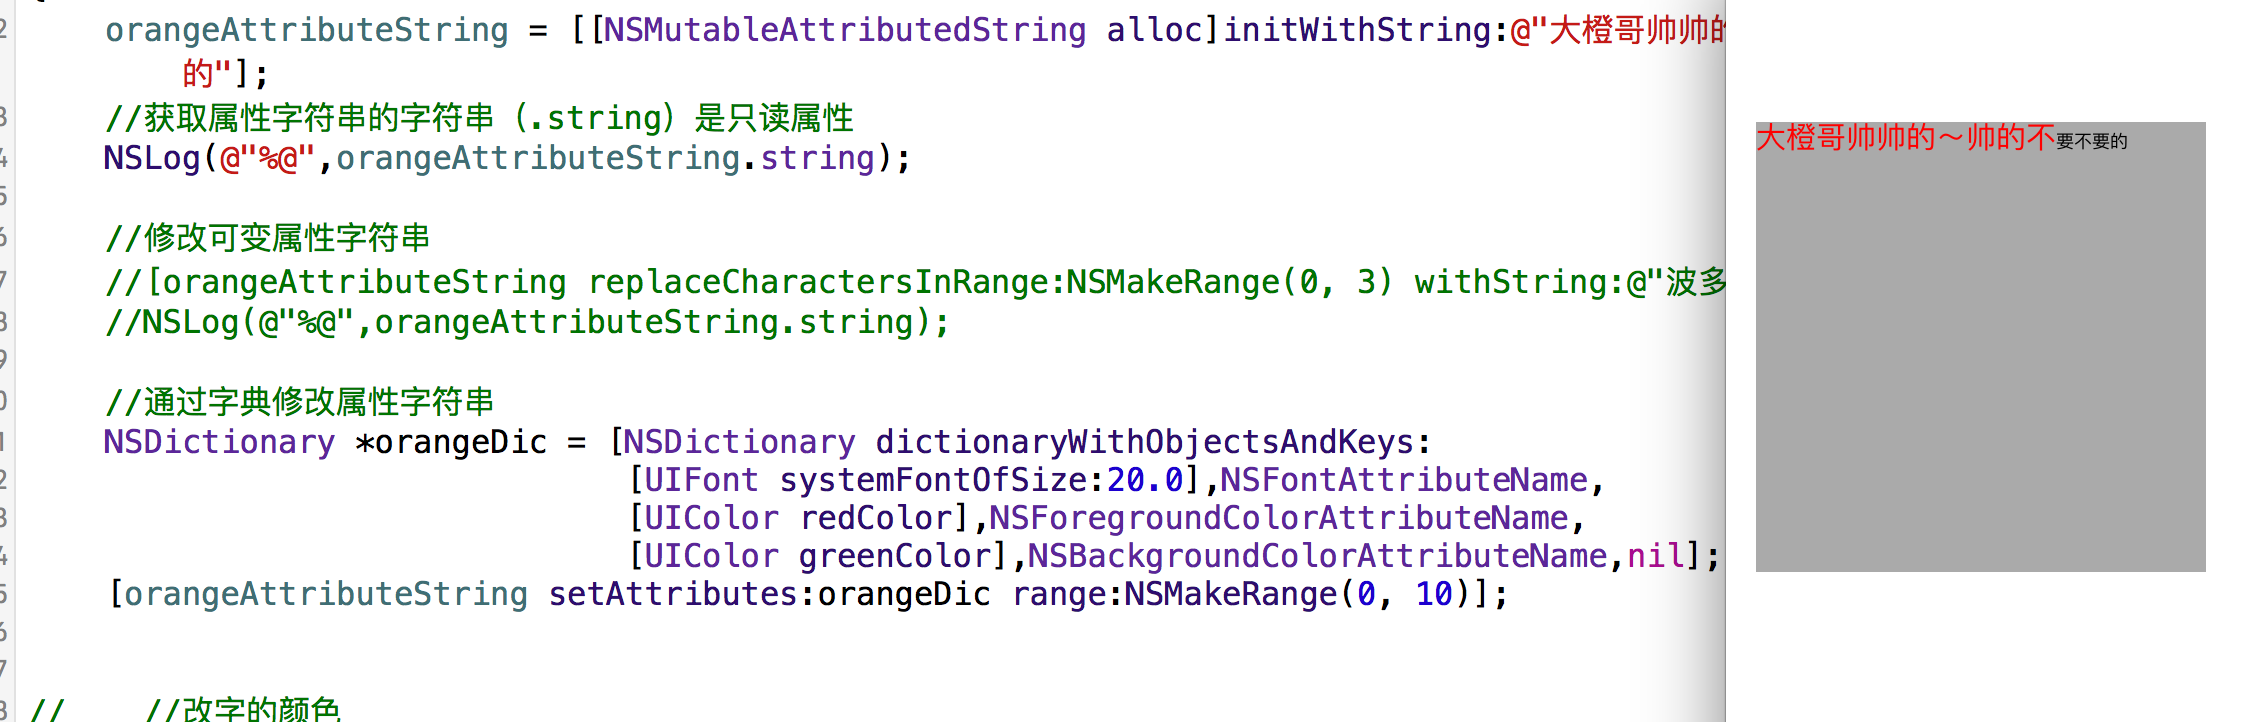
//(2)通过给出的NSDictionary(设置属性字符串)
- (void)setAttributes:(nullable NSDictionary<NSString *, id> *)attrs range:(NSRange)range;
我们看一下属性字符串可以设置的Keys
//
// NSAttributedString.h
// UIKit
//
// Copyright (c) 2011-2015, Apple Inc. All rights reserved.
//
#import <Foundation/NSAttributedString.h>
#import <UIKit/UIKitDefines.h>
@class NSFileWrapper;
@class NSURL;
NS_ASSUME_NONNULL_BEGIN
//字体
UIKIT_EXTERN NSString * const NSFontAttributeName NS_AVAILABLE(10_0, 6_0);
//段落样式
UIKIT_EXTERN NSString * const NSParagraphStyleAttributeName NS_AVAILABLE(10_0, 6_0);
//文字颜色
UIKIT_EXTERN NSString * const NSForegroundColorAttributeName NS_AVAILABLE(10_0, 6_0);
//文字颜色背景
UIKIT_EXTERN NSString * const NSBackgroundColorAttributeName NS_AVAILABLE(10_0, 6_0);
//设置连体属性,取之味NSNumber对象(整数),0表示没有连体字符串,1表示使用默认连体字符串
UIKIT_EXTERN NSString * const NSLigatureAttributeName NS_AVAILABLE(10_0, 6_0);
//设置字符间距
UIKIT_EXTERN NSString * const NSKernAttributeName NS_AVAILABLE(10_0, 6_0);
//设置删除线
UIKIT_EXTERN NSString * const NSStrikethroughStyleAttributeName NS_AVAILABLE(10_0, 6_0);
//下划线
UIKIT_EXTERN NSString * const NSUnderlineStyleAttributeName NS_AVAILABLE(10_0, 6_0);
//填充部分颜色
UIKIT_EXTERN NSString * const NSStrokeColorAttributeName NS_AVAILABLE(10_0, 6_0);
//设置笔画宽度
UIKIT_EXTERN NSString * const NSStrokeWidthAttributeName NS_AVAILABLE(10_0, 6_0);
//阴影属性
UIKIT_EXTERN NSString * const NSShadowAttributeName NS_AVAILABLE(10_0, 6_0);
//文本特殊效果
UIKIT_EXTERN NSString *const NSTextEffectAttributeName NS_AVAILABLE(10_10, 7_0);
//文本附件,取值为NSTextAttachment对象,用于图文混排CoreText
UIKIT_EXTERN NSString * const NSAttachmentAttributeName NS_AVAILABLE(10_0, 7_0);
//设置链接属性,点击后调用浏览器打开指定URL地址
UIKIT_EXTERN NSString * const NSLinkAttributeName NS_AVAILABLE(10_0, 7_0);
//设置基线偏移值,正,上偏,负下偏
UIKIT_EXTERN NSString * const NSBaselineOffsetAttributeName NS_AVAILABLE(10_0, 7_0);
//设置下划线
UIKIT_EXTERN NSString * const NSUnderlineColorAttributeName NS_AVAILABLE(10_0, 7_0);
//设置删除线的颜色
UIKIT_EXTERN NSString * const NSStrikethroughColorAttributeName NS_AVAILABLE(10_0, 7_0);
//设置字形倾斜度,取值为NSNumber(float),正,向右倾斜,负,向左倾斜
UIKIT_EXTERN NSString * const NSObliquenessAttributeName NS_AVAILABLE(10_0, 7_0);
//设置文本横向拉伸属性,取之为NSnumber(float)正值,横向拉伸文本,负值,横向压缩文本
UIKIT_EXTERN NSString * const NSExpansionAttributeName NS_AVAILABLE(10_0, 7_0);
//设置蚊子书写方向,从左向右书写或者从右向左书写
UIKIT_EXTERN NSString * const NSWritingDirectionAttributeName NS_AVAILABLE(10_6, 7_0);
//设置蚊子拍版方向,取值为NSNumber对象(整数),0横排文本,1竖排文本
UIKIT_EXTERN NSString * const NSVerticalGlyphFormAttributeName NS_AVAILABLE(10_7, 6_0);
或者,刚才的操作~在初始化的时候setAttributes也是可以的

//---------------然后我们看看类蔟中的内容---------------
//(1)设置属性字符串的属性
- (void)addAttribute:(NSString *)name value:(id)value range:(NSRange)range;
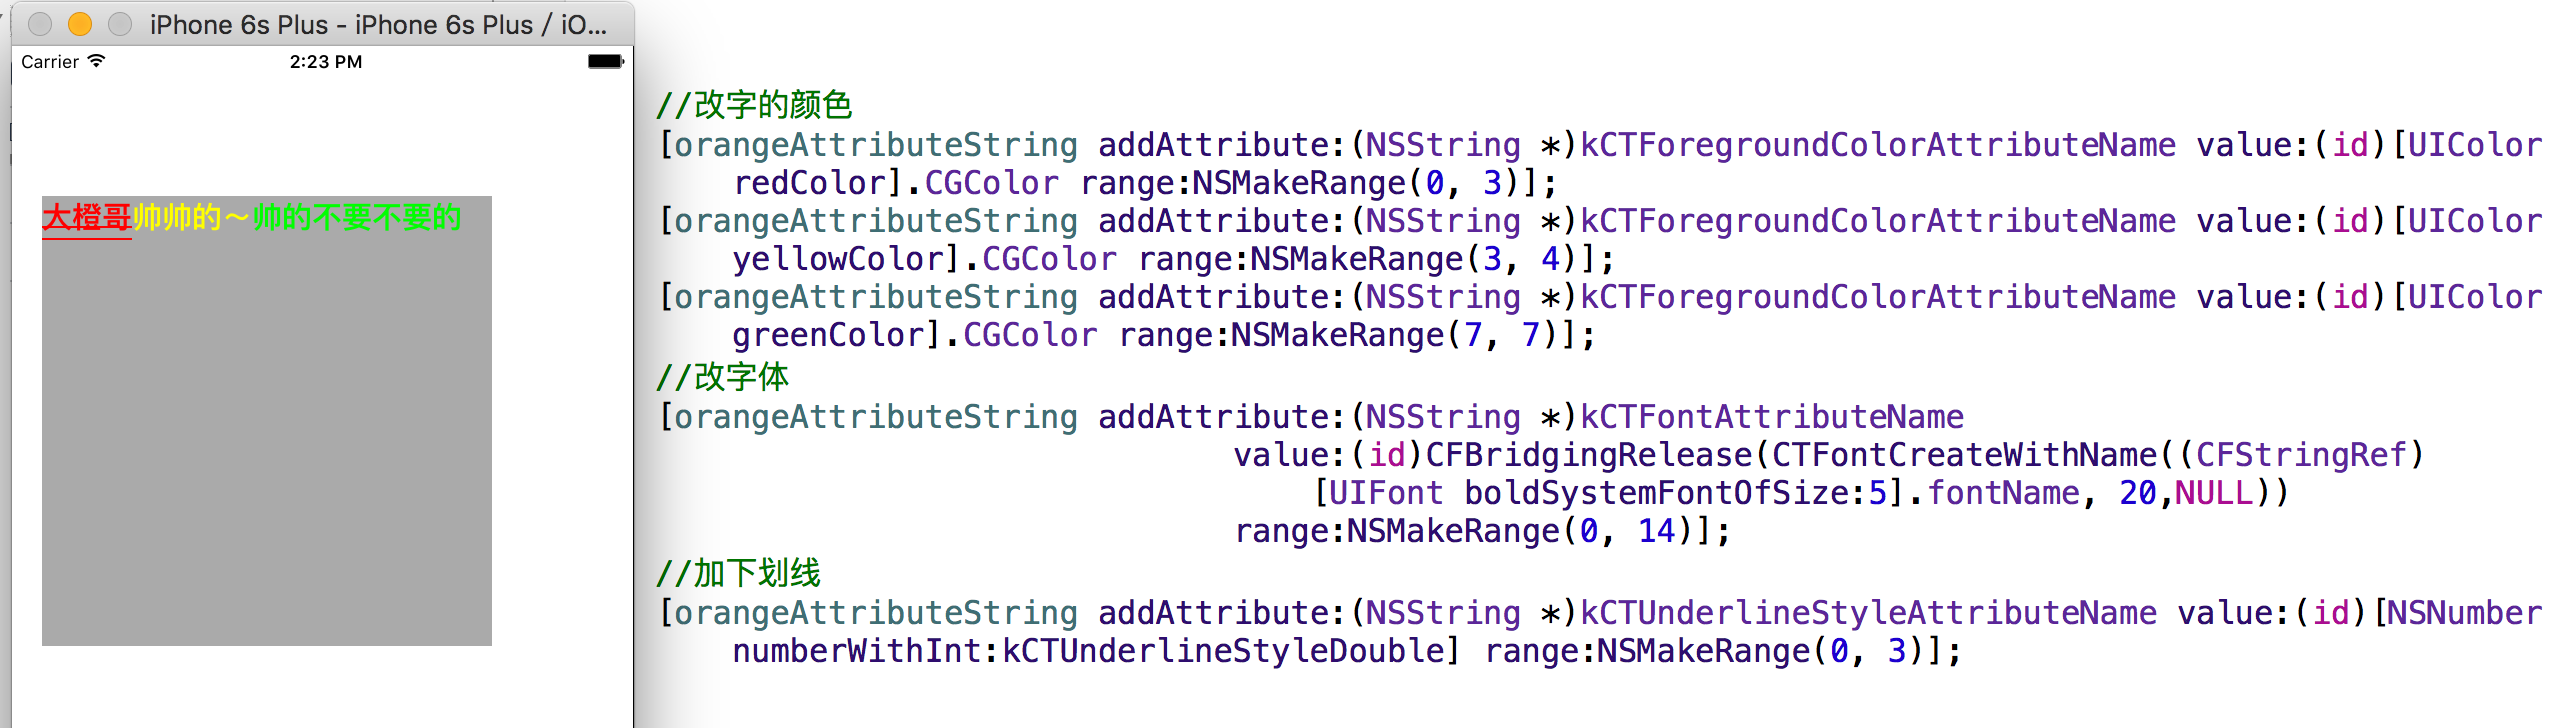
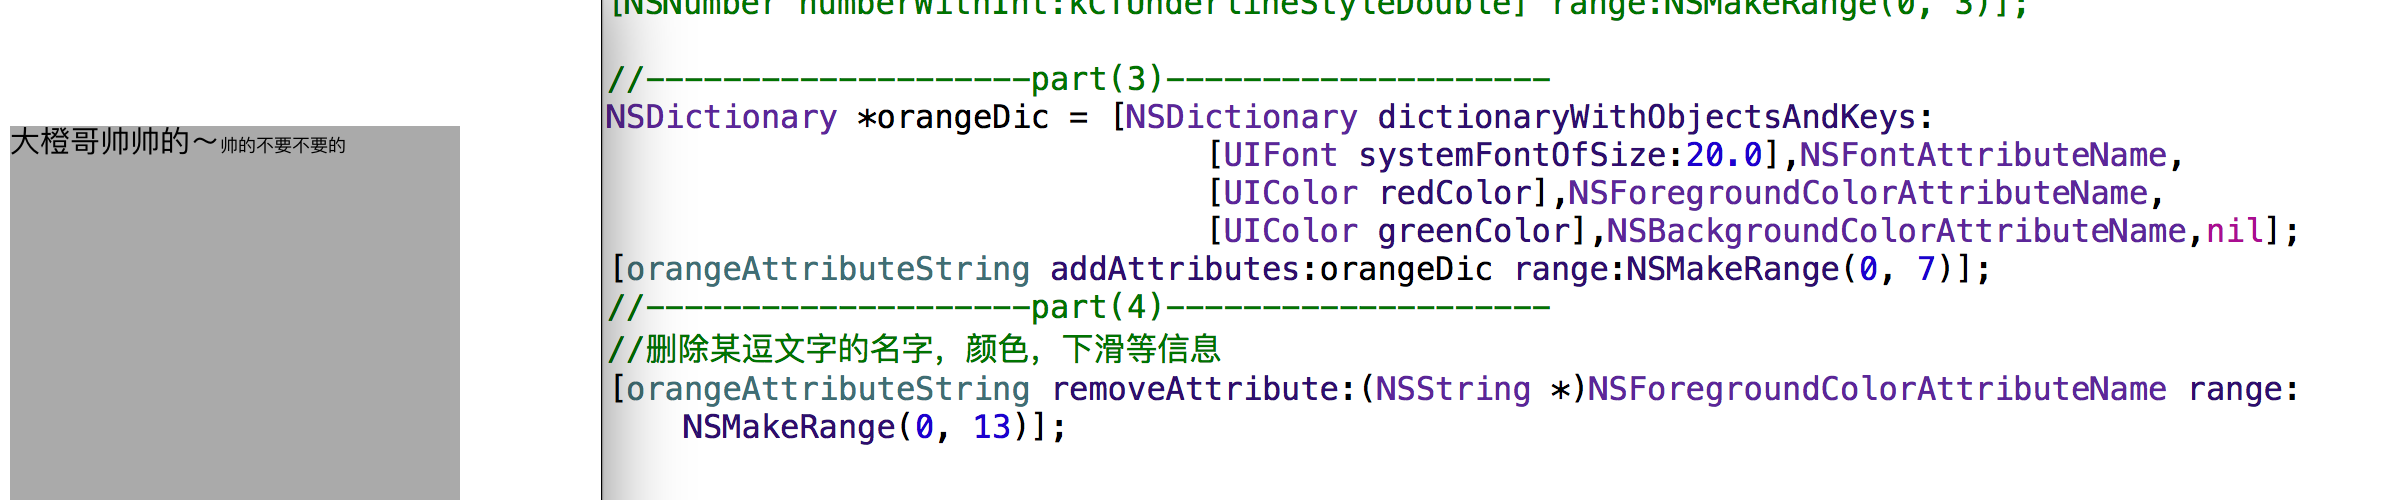
- (void)addAttributes:(NSDictionary<NSString *, id> *)attrs range:(NSRange)range;
- (void)removeAttribute:(NSString *)name range:(NSRange)range;
- (void)replaceCharactersInRange:(NSRange)range withAttributedString:(NSAttributedString*)attrString;

//(5)插入属性字符串
- (void)insertAttributedString:(NSAttributedString *)attrString atIndex:(NSUInteger)loc;
//(7)拼接属性字符串
- (void)appendAttributedString:(NSAttributedString *)attrString;
//(8)删除属性字符串

- (void)deleteCharactersInRange:(NSRange)range;
//(9)设置属性字符串

- (void)setAttributedString:(NSAttributedString *)attrString;
- (void)beginEditing;
- (void)endEditing;
有人会问了为什么我的属性字符串加载不出来,是因为,我加了如下的代码
这就涉及到了CoreText和CoreGray还有,OpenGLES了,先看代码,听我逐一讲解
#import <CoreText/CoreText.h>
- (void)drawRect:(CGRect)rect
{
[super drawRect:rect];
NSAttributedString *attriString = orangeAttributeString;
CGContextRef ctx = UIGraphicsGetCurrentContext();
CGContextConcatCTM(ctx, CGAffineTransformScale(CGAffineTransformMakeTranslation(0, rect.size.height), 1.f, -1.f));
CTFramesetterRef framesetter = CTFramesetterCreateWithAttributedString((CFAttributedStringRef)attriString);
CGMutablePathRef path = CGPathCreateMutable();
CGPathAddRect(path, NULL, rect);
CTFrameRef frame = CTFramesetterCreateFrame(framesetter, CFRangeMake(0, 0), path, NULL);
CFRelease(path);
CFRelease(framesetter);
CTFrameDraw(frame, ctx);
CFRelease(frame);
}
今天继续更新(关于CGContextRef)的介绍


相当于重写了UIView的drawRect方法(CoreGraphics)
UIKIT_EXTERN CGContextRef __nullable UIGraphicsGetCurrentContext(void) CF_RETURNS_NOT_RETAINED;
这是CGContextRef的定义
#define UIKIT_EXTERN extern __attribute__((visibility ("default")))
这是UIKIT_EXTERN的定义
偏向C的语言方法
CGContextRef是CoreFoundation框架的对象
释放的时候ARC控制不了,所以内存管理使用CFRelease来释放CoreFoundation对象
转自:http://user.qzone.qq.com/282187892?ptlang=2052
IOS UI-标签(Label)的高级应用的更多相关文章
- 【Java EE 学习 36】【struts2】【struts2系统验证】【struts2 ognl值栈】【struts2 ongl标签】【struts2 UI标签】【struts2模型驱动和令牌机制】
一.struts2系统验证 1.基于struts2系统验证的方式实际上就是通过配置xml文件的方式达到验证的目的. 2.实际上系统校验的方法和手工校验的方法在底层的基本实现是相同的.但是使用系统校验的 ...
- Struts2 UI标签
表单标签的共同属性(该属性只在没有使用 simple 主题时才可以使用) form 标签 用来呈现 HTML 语言中的表单元素 默认情况下, form 标签将被呈现为一个表格形式的 HTML 表单. ...
- OGNL逻辑标签,UI标签
逻辑标签 public class IndexAction extends BasicAction{ private static final long serialVersionUID = 1L; ...
- IOS UI 第八篇:基本UI
实现图片的滚动,并且自动停止在每张图片上 - (void)viewDidLoad{ [super viewDidLoad]; UIScrollView *scrollView = [[U ...
- Struts2第十一篇【简单UI标签、数据回显】
Struts2UI标签 Sturts2为了简化我们的开发,也为我们提供了UI标签-也就是显示页面的标签-.. 但是呢,Struts2是服务端的框架,因此使用页面的标签是需要在服务器端解析然后再被浏览器 ...
- Struts2【UI标签、数据回显、资源国际化】
Struts2UI标签 Sturts2为了简化我们的开发,也为我们提供了UI标签...也就是显示页面的标签..... 但是呢,Struts2是服务端的框架,因此使用页面的标签是需要在服务器端解析然后再 ...
- 【转】JSF中的三大核心组件 UI标签的详细介绍和使用举例
JSF提供了大量的UI标签来简化创建视图.这些UI标签类似于ASP.NET中的服务器组件.使用这些标签,可以通过其value,binding,action,actionListener等属性直接绑定到 ...
- struts2 UI标签 和 主题
四.Struts2的UI标签和主题 1.Struts2中UI标签的优势 自动的数据回显和错误提示功能 自带的简单样式和排版 2.表单标签的通用属性 说明:UI标签中value的取值一般都是字符串. 2 ...
- 《IT蓝豹》高仿花田ios版标签移动效果
高仿花田ios版标签移动效果,长按每一个item拖动到自己想要位置后,后面位置移动补全效果 . 本项目适合研究gridview拖拽效果的朋友下载. 学习android动画特效. 本项目主要靠DragG ...
- [IOS]IOS UI指南
[IOS]IOS UI指南 众所周知,IOS的界面设计,越来越流行,可以说都形成了一个标准,搜集了一些资料,供自己以后学习使用! iOS Human Interface Guidelines (中文翻 ...
随机推荐
- 为linux扩展swap分区
1.查看当前swap分区使用情况 [root@localhost ~]# swapon -s Filename Type Size Used Priority /dev/sda2 ...
- 设计模式之——Memento模式
Memento模式即快照模式,就是在某一时刻,设定一个状态,在后面随时可以返回到当前状态的模式. 我们拿一个闯关游戏作为举例,一共有十关,每闯一关,玩家所持金额增加一百,而闯关失败就扣一百.初始时,给 ...
- 11.Git分支管理
分支就是科幻电影里面的平行宇宙,当你正在电脑前努力学习Git的时候,另一个你正在另一个平行宇宙里努力学习SVN. 如果两个平行宇宙互不干扰,那对现在的你也没啥影响.不过,在某个时间点,两个平行宇宙合并 ...
- springboot中的常用注解
springboot中的常用注解个人觉得springboor中常用的注解主要可以分为三种:放入容器型注解.从容器中取出型注解和功能型注解.其中的放入容器型和从容器中取出型就是我们平时所说的控制反转和依 ...
- gcc报错 can not be used when making a shared object; recompile with -fPIC
使用google protobuf时,出现错误 /usr/bin/ld: /usr/local/lib/libprotobuf.a(message_lite.o): relocation R_X86_ ...
- 如何使用科大 mirrors 加速 pip?
编辑 ~/.pip/pip.conf 文件(如果没有则创建之),将 index-url 开头的一行修改为下面一行: index-url = https://pypi.mirrors.ustc.edu. ...
- linux在线安装telnet
平常在调试机器网络互通的时候使用到telnet,新机器一般没安装相应命令,需要我们手工安装. 下面是在线安装的方法,使用以下命令即可完成安装: yum install telnet
- lombok常见注解
一.使用lombok简化代码 lombok提供了很多注解,在编译时候生成java代码,代替了手工编写一些简单的代码,使程序员可以关注更重要的实现. 二.常用注解 以model为例 public cla ...
- c++第二十六天
p131~p135: 1.除非必要否则不使用后缀加加(减减),会有额外的性能开销. 2.混用解引用和递增运算符.*pointer++,后缀运算符优先于解引用运算符. 3.运算对象可按任意顺序求值,即使 ...
- 20145302张薇《网络对抗技术》PC平台逆向破解
20145302张薇<网络对抗技术>PC平台逆向破解 实验任务 1.简单shellcode注入实验 2.Return-to-libc 攻击实验 实验相关原理 Bof攻击防御技术 从防止注入 ...