Selenium之TestNG安装
一、在Eclipse中安装TestNG
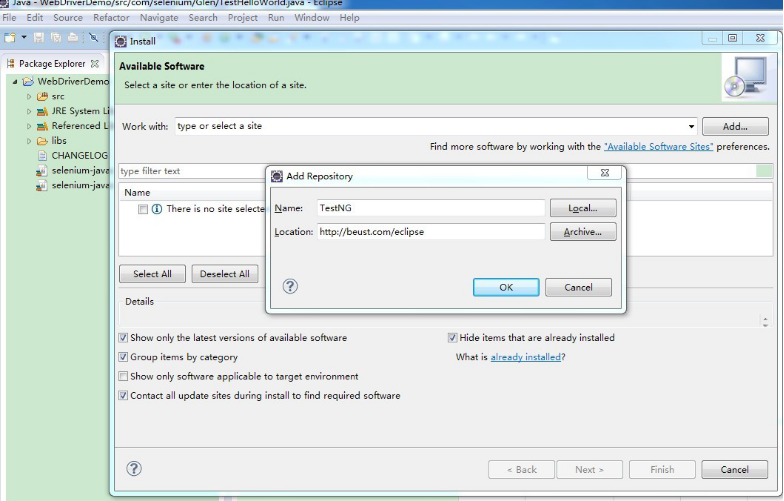
1、打开eclipse-->help-->Install New Software-->Add,输入Name和Location后,点击OK。
2、然后选中TestNG,单击Next安装

3、安装好TestNG后重启eclipse查看是否安装好,Help-->About Eclipse-->Installation Details,如图:

二、使用TestNG来运行单个测试案例:
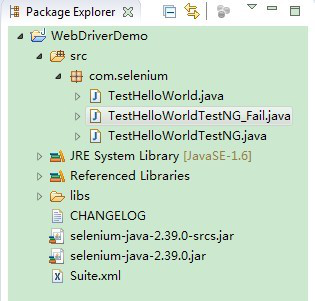
1、新建TestHelloWorldTestNG.java类,目录结构如下:

2、测试代码:
package com.selenium;
import org.openqa.selenium.By;
import org.openqa.selenium.WebDriver;
import org.openqa.selenium.WebElement;
import org.openqa.selenium.chrome.*;
import org.testng.annotations.*;
import org.testng.Assert;
public class TestHelloWorldTestNG {
WebDriver driver;
@Test
public void helloWorld() throws Exception {
//如果火狐浏览器没有默认安装在C盘,需要制定其路径
//System.setProperty("webdriver.firefox.bin", "C:/Program Files(x86)/Mozilla Firefox/firefox.exe");
System.setProperty("webdriver.chrome.driver", "D:\\chromedriver.exe");
driver = new ChromeDriver();
driver.get("http://www.baidu.com/");
driver.manage().window().maximize();
WebElement txtbox = driver.findElement(By.name("wd"));
txtbox.sendKeys("Glen");
WebElement btn = driver.findElement(By.id("su"));
btn.click();
String expectedTitle = "百度一下,你就知道";
String actualTitle = driver.getTitle();
Assert.assertEquals(actualTitle,expectedTitle);
}
@AfterTest
public void tearDown(){
driver.quit();
}
}
3、然后右键Run As-->TestNG Test,运行结果如下:

三、使用TestNG来运行多个测试案例:
1、增加一个失败的测试类TestHelloWorldTestNG_Fail.java:
package com.selenium;
import org.openqa.selenium.By;
import org.openqa.selenium.WebDriver;
import org.openqa.selenium.WebElement;
import org.openqa.selenium.chrome.*;
import org.testng.annotations.*;
import org.testng.Assert;
public class TestHelloWorldTestNG_Fail {
WebDriver driver;
@Test
public void helloWorld() throws Exception {
//如果火狐浏览器没有默认安装在C盘,需要制定其路径
//System.setProperty("webdriver.firefox.bin", "D:/Program Files/Mozilla firefox/firefox.exe");
System.setProperty("webdriver.chrome.driver", "D:\\chromedriver.exe");
driver = new ChromeDriver();
driver.get("http://www.baidu.com/");
driver.manage().window().maximize();
WebElement txtbox = driver.findElement(By.name("wd"));
txtbox.sendKeys("Glen");
WebElement btn = driver.findElement(By.id("su"));
btn.click();
String expectedTitle = "百度一下";
String actualTitle = driver.getTitle();
Assert.assertEquals(actualTitle,expectedTitle);
}
@AfterTest
public void tearDown(){
driver.quit();
}
}
2、在项目下新建一个Suite.xml文件:
<suite name="seleniumcn.cn.demo">
<test name="test_seleniumcn" >
<classes>
<class name="com.selenium.TestHelloWorldTestNG"/>
<class name="com.selenium.TestHelloWorldTestNG_Fail"/>
</classes>
</test>
</suite>
3、目录结构:
4、右键Suite.xml文件,Run As->TestNG Suite,如此就会运行suite.xml文件中所有的案例。

5、右键WebDriverDemo刷新项目,目录中会新增加一个test.output文件夹,打开 index.html可以看一个简单的报告。
目录:

报告:

Selenium之TestNG安装的更多相关文章
- Selenium+Java+TestNG环境配置
1. JDK 2.eclipse+TestNG >TestNG安装. Name:testng Location:http://beust.com/eclipse.如图: 3.seleniu ...
- IDEA+Java:Selenium+Maven+TestNG基本WebUI自动化测试环境搭建
IDEA+java:Selenium+Maven+TestNG 本文介绍的测试环境,应该是最基本的测试环境了,也是很多文章都有写,这里做一个完整的图文配置整理,方便阅读理解! 使用maven的好处,由 ...
- selenium webdriver testng自动化测试数据驱动
selenium webdriver testng自动化测试数据驱动 selenium webdriver testng自动化测试数据驱动 一.数据驱动测试概念 数据驱动测试是相同的测试脚本使用不同的 ...
- 自动化测试框架selenium+java+TestNG——配置篇
最近来总结下自动化测试 selenium的一些常用框架测试搭配,由简入繁,最简单的就是selenium+java+TestNG了,因为我用的是java,就只是总结下java了. TestNG在线安装: ...
- Selenium IDE和Selenium RC的安装
1 安装FireBug和FirePath 1.在火狐浏览器中,点击”添加附件”按钮,弹出”附加组件管理器”页面 2.在弹出页面中,输入“fireBug”,点击“搜索”按钮,弹出fireBu ...
- 【转】selenium简介及安装方法
转自:http://www.cnblogs.com/fnng/p/3157639.html 1. selenium 介绍 selenium 是一个web 的自动化测试工具,不少学习功能自动化的同学开始 ...
- python selenium 自动化测试环境安装
注意:2.7和3.0版本的语法有些不一样 安装自动化测试软件 selenium(地址http://www.seleniumhq.org/download/) 安装步骤: 1.安装pythone运行环境 ...
- maven+selenium+java+testng+jenkins自动化测试
最近在公司搭建了一套基于maven+selenium+java+testng+jenkins的自动化测试框架,免得以后重写记录下 工程目录 pom.xml <project xmlns=&quo ...
- 【selenium】- selenium IDE的安装以及使用
本文由小编根据慕课网视频亲自整理,转载请注明出处和作者. 1. 自动化测试工程师的任务 一个合格的自动化测试工程师,需要把框架搭建起来.让不是自动化测试的人,一个普通功能化测试的人,可以完成自动化测试 ...
随机推荐
- python-cgi-demo
简单的Python CGI 在linux平台实现注意:路径是以当前路径为根目录 ,Python文件一般放在/cgi-bin/目录下在linux命令行运行:python -m CGIHTTPServ ...
- python-thread多线程
#!/usr/bin/python import threading,time def Music(): print "music is playing" time.sleep(3 ...
- 解决SSH连接linux时长时间不操作自动断开
最近重装Linux系统,但是这次ssh连接云服务区Linux系统时,经常出现一段时间不操作,连接自动中断,表现为光标还在闪动,但是却无法操作.只好关闭终端,重新连接,很是麻烦. 为此,通过网络查找,找 ...
- Window10安装Django,并创建第一个Django项目
1.在cmd中输入pip install Django==1.11.7,安装的版本为:1.11.7. 2.安装完成后输入: >>> import django >>> ...
- WPF DataTemplate與ControlTemplate
一. 前言 什麼是DataTemplate? 什麼是ControlTemplate? 在stackoverflow有句簡短的解釋 "A DataTemplate, therefore ...
- 一头扎进Spring之---------Spring七大核心模块
Spring七大核心模块 核心容器(Spring Core) 核心容器提供Spring框架的基本功能.Spring以bean的方式组织和管理Java应用中的各个组件及其关系.Spring使用BeanF ...
- 手动添加Git Bash到右键菜单
1. 打开注册表. 2. 找到[HKEY_CLASSES_ROOT\Directory\Background]. 3. 在[Background]下如果没有[shell],则右键-新建项[shell] ...
- 我的“MIT Challenge”
前言 在学习之余看到了一个有趣的挑战,名叫"MIT Challenge",这个挑战的目标是在一年365天之内学习 MIT 计算机系本科本科学生四年的课程.自己大二学习算法时也曾学习 ...
- 八段代码彻底掌握 Promise
1.Promise的立即执行性 var p = new Promise(function(resolve, reject){ console.log("create a promise&qu ...
- 【很重要】优秀的常用的js库
http://lodashjs.com/docs/ 常用的各种工具库 sprintf 字符串格式 占位符替换等处理 devices.min.js