Flume(4)-监控模型
一. 监控端口数据
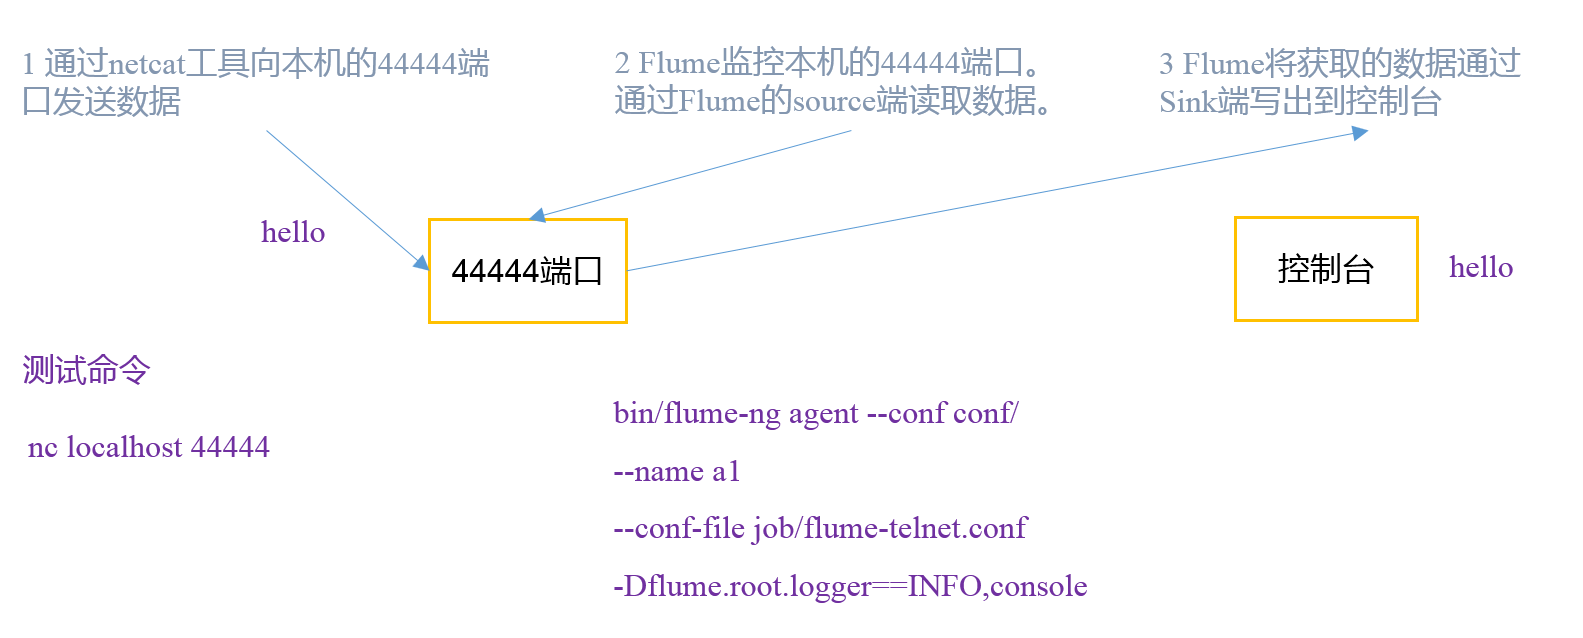
首先启动Flume任务,监控本机44444端口,服务端;
然后通过netcat工具向本机44444端口发送消息,客户端;
最后Flume将监听的数据实时显示在控制台。
1. 安装netcat
sudo yum install -y nc
功能描述:netstat命令是一个监控TCP/IP网络的非常有用的工具,它可以显示路由表、实际的网络连接以及每一个网络接口设备的状态信息。
基本语法:netstat [选项]
选项参数:
-t或--tcp:显示TCP传输协议的连线状况;
-u或--udp:显示UDP传输协议的连线状况;
-n或--numeric:直接使用ip地址,而不通过域名服务器;
-l或--listening:显示监控中的服务器的Socket;
-p或--programs:显示正在使用Socket的程序识别码(PID)和程序名称;
2. 判断端口是否被占用
sudo netstat -tunlp | grep
3. 创建Flume Agent配置文件flume-netcat-logger.conf
#在flume目录下创建job文件夹并进入job文件夹。

mkdir job

cd job/

#在job文件夹下创建Flume Agent配置文件flume-netcat-logger.conf

touch flume-netcat-logger.conf
在flume-netcat-logger.conf文件中添加如下内容。
# Name the components on this agent
#a1表示agent的名称

a1.sources = r1    #r1表示a1的输入源source

a1.sinks = k1      #k1表示a1的输出目的地sink

a1.channels = c1   #c1表示a1的缓冲区channel

# Describe/configure the source

a1.sources.r1.type = netcat       #表示a1的输入源为netcat端口类型

a1.sources.r1.bind = localhost    #表示a1监听的主机地址

a1.sources.r1.port = 44444        #表示a1监听的端口

# Describe the sink

a1.sinks.k1.type = logger         #表示a1的输出目的地是控制台的logger类型

# Use a channel which buffers events in memory

a1.channels.c1.type = memory                #表示a1的channel类型为memory类型

a1.channels.c1.capacity = 1000              #表示a1的channel总容量是1000个event

a1.channels.c1.transactionCapacity = 100    #表示a1的channel传输时收集到100条event后再去提交事务

# Bind the source and sink to the channel

a1.sources.r1.channels = c1                 #表示将r1和c1连接起来

a1.sinks.k1.channel = c1                    #表示将k1和c1连接起来
其他参数或参数详解,请参阅官方手册http://flume.apache.org/FlumeUserGuide.html
4. 开启Flume监听端口
#第一种写法:

 bin/flume-ng agent --conf conf/ --name a1 --conf-file job/flume-netcat-logger.conf -Dflume.root.logger=INFO,console

#第二种写法:

bin/flume-ng agent -c conf/ -n a1 –f job/flume-netcat-logger.conf -Dflume.root.logger=INFO,console
开启后会阻塞
参数说明:
--conf conf/ :表示配置文件存储在conf/目录
--name a1 :表示给agent起名为a1
--conf-file job/flume-netcat.conf :flume本次启动读取的配置文件是在job文件夹下的flume-telnet.conf文件。
-Dflume.root.logger==INFO,console :-D表示flume运行时动态修改flume.root.logger参数属性值,并将控制台日志打印级别设置为INFO级别。日志级别包括:log、info、warn、error。
5. 使用netcat工具向本机的44444端口发送内容

6. 在Flume监听页查看接收数据

二. 实时读取本地文件到HDFS
1. 让Flume持有Hadoop相关jar包
将commons-configuration-1.6.jar、
hadoop-auth-2.7.2.jar、
hadoop-common-2.7.2.jar、
hadoop-hdfs-2.7.2.jar、
commons-io-2.4.jar、
htrace-core-3.1.0-incubating.jar
拷贝到/opt/module/flume/lib文件夹下(如果已经持有的话,略过)。
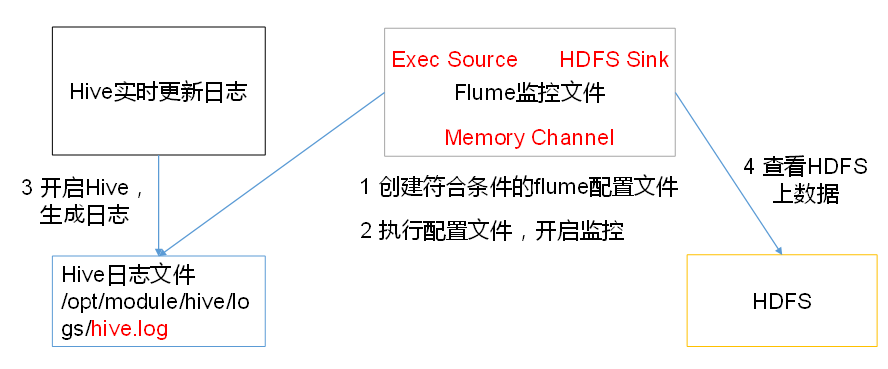
2. 创建flume-file-hdfs.conf文件
#在hob目录下创建文件

touch flume-file-hdfs.conf
要想读取Linux系统中的文件,就得按照Linux命令的规则执行命令。由于Hive日志在Linux系统中所以读取文件的类型选择:exec即execute执行的意思。表示执行Linux命令来读取文件
在flume-file-hdfs.conf中添加如下内容
# Name the components on this agent

a2.sources = r2

a2.sinks = k2

a2.channels = c2

# Describe/configure the source

a2.sources.r2.type = exec                                         #定义source类型为exec可执行文件

a2.sources.r2.command = tail -F /opt/module/hive/logs/hive.log    #要执行的linux命令

a2.sources.r2.shell = /bin/bash -c                                #执行shell脚本的绝对路径

# Describe the sink

a2.sinks.k2.type = hdfs                                            #sink类型为hdfs

a2.sinks.k2.hdfs.path = hdfs://hadoop100:9000/flume/%Y%m%d/%H      #上传文件再hdfs上的路径 转义序列的详解见下表
#上传文件的前缀

a2.sinks.k2.hdfs.filePrefix = logs-

#是否按照时间滚动文件夹

a2.sinks.k2.hdfs.round = true

#多少时间单位创建一个新的文件夹

a2.sinks.k2.hdfs.roundValue =

#重新定义时间单位

a2.sinks.k2.hdfs.roundUnit = hour

#是否使用本地时间戳

a2.sinks.k2.hdfs.useLocalTimeStamp = true

#积攒多少个Event才flush到HDFS一次

a2.sinks.k2.hdfs.batchSize =

#设置文件类型,可支持压缩

a2.sinks.k2.hdfs.fileType = DataStream

#多久生成一个新的文件

a2.sinks.k2.hdfs.rollInterval =

#设置每个文件的滚动大小

a2.sinks.k2.hdfs.rollSize =

#文件的滚动与Event数量无关

a2.sinks.k2.hdfs.rollCount =

# Use a channel which buffers events in memory

a2.channels.c2.type = memory

a2.channels.c2.capacity =

a2.channels.c2.transactionCapacity =

# Bind the source and sink to the channel

a2.sources.r2.channels = c2

a2.sinks.k2.channel = c2
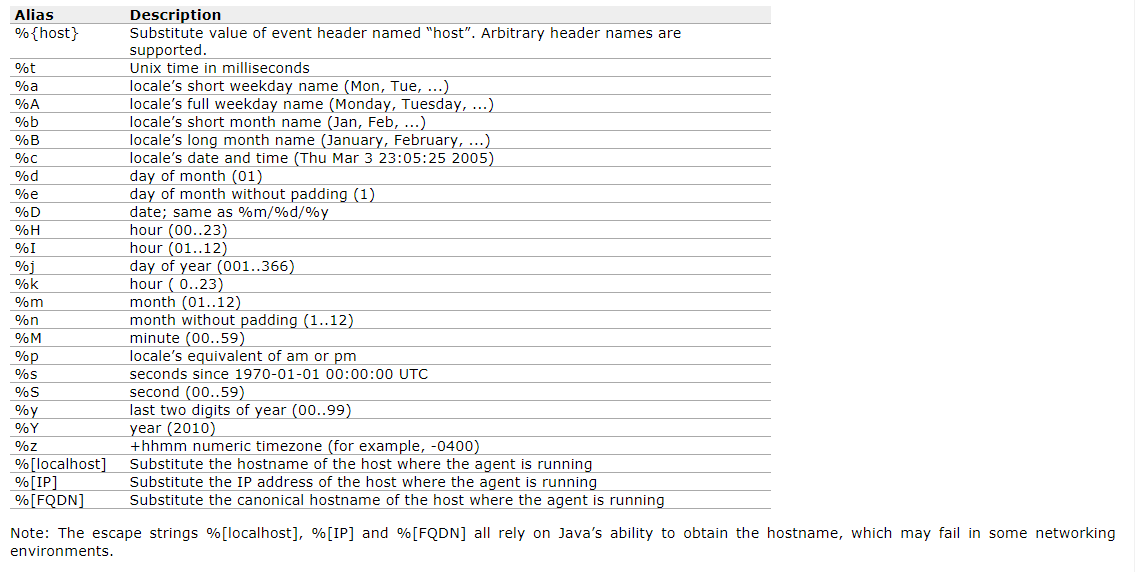
注意 : 对于所有与时间相关的转义序列,Event Header中必须存在以 “timestamp”的key(除非hdfs.useLocalTimeStamp设置为true,此方法会使用TimestampInterceptor自动添加timestamp)。
3. 开启Flume监控
bin/flume-ng agent --conf conf/ --name a2 --conf-file job/flume-file-hdfs.conf
4. 开启hdfs和hive,操作hive产生日志
#开启hdfs

sbin/start-dfs.sh

#开启hive产生日志

bin/hive
5. 在HDFS上查看文件

三. 实时读取目录文件到HDFS

1. 创建配置文件flume-dir-hdfs.conf
#再job目录下创建文件

touch flume-dir-hdfs.conf
添加以下内容
a3.sources = r3

a3.sinks = k3

a3.channels = c3

# Describe/configure the source

#source类型为spooldir

a3.sources.r3.type = spooldir

#监控的目录

a3.sources.r3.spoolDir = /opt/module/flume/upload

#文件上传完后的文件后缀

a3.sources.r3.fileSuffix = .COMPLETED

#是否有文件头

a3.sources.r3.fileHeader = true

#忽略所有以.tmp结尾的文件,不上传

a3.sources.r3.ignorePattern = ([^ ]*\.tmp)

# Describe the sink

a3.sinks.k3.type = hdfs

a3.sinks.k3.hdfs.path = hdfs://hadoop100:9000/flume/upload/%Y%m%d/%H

#上传文件的前缀

a3.sinks.k3.hdfs.filePrefix = upload-

#是否按照时间滚动文件夹

a3.sinks.k3.hdfs.round = true

#多少时间单位创建一个新的文件夹

a3.sinks.k3.hdfs.roundValue =

#重新定义时间单位

a3.sinks.k3.hdfs.roundUnit = hour

#是否使用本地时间戳

a3.sinks.k3.hdfs.useLocalTimeStamp = true

#积攒多少个Event才flush到HDFS一次

a3.sinks.k3.hdfs.batchSize =

#设置文件类型,可支持压缩

a3.sinks.k3.hdfs.fileType = DataStream

#多久生成一个新的文件

a3.sinks.k3.hdfs.rollInterval =

#设置每个文件的滚动大小大概是128M

a3.sinks.k3.hdfs.rollSize =

#文件的滚动与Event数量无关

a3.sinks.k3.hdfs.rollCount =

# Use a channel which buffers events in memory

a3.channels.c3.type = memory

a3.channels.c3.capacity =

a3.channels.c3.transactionCapacity =

# Bind the source and sink to the channel

a3.sources.r3.channels = c3

a3.sinks.k3.channel = c3
2. 启动监控
bin/flume-ng agent --conf conf/ --name a3 --conf-file job/flume-dir-hdfs.conf
说明: 在使用Spooling Directory Source时,不要在监控目录中创建并持续修改文件;上传完成的文件会以.COMPLETED结尾;被监控文件夹每500毫秒扫描一次文件变动
3. 向upload文件夹中添加文件

4. 查看HDFS

5. 查看upload文件夹

四. 单数据源多出口(选择器)
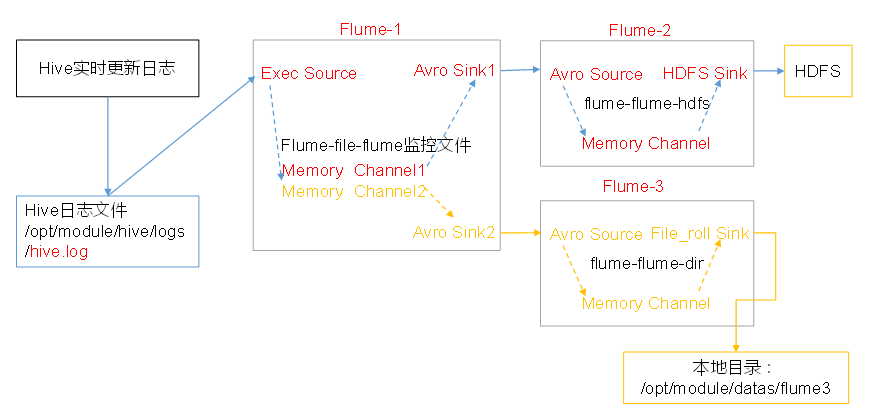
使用Flume-1监控文件变动,Flume-1将变动内容传递给Flume-2,Flume-2负责存储到HDFS。
同时Flume-1将变动内容传递给Flume-3,Flume-3负责输出到Local FileSystem。
1. 准备工作
#在/opt/module/flume/job目录下创建group1文件夹

mkdir group1

#在/opt/module/datas/目录下创建flume3文件夹

mkdir flume3
2.创建flume-file-flume.conf
配置1个接收日志文件的source和两个channel、两个sink,分别输送给flume-flume-hdfs和flume-flume-dir。
进入group1文件夹,创建flume-file-flume.conf,添加如下内容
# Name the components on this agent

a1.sources = r1

a1.sinks = k1 k2

a1.channels = c1 c2

# 将数据流复制给所有channel

a1.sources.r1.selector.type = replicating

# Describe/configure the source

a1.sources.r1.type = exec

a1.sources.r1.command = tail -F /opt/module/hive-1.2.1/logs/hive.log

a1.sources.r1.shell = /bin/bash -c

# Describe the sink

# sink端的avro是一个数据发送者

a1.sinks.k1.type = avro

a1.sinks.k1.hostname = hadoop100

a1.sinks.k1.port =

a1.sinks.k2.type = avro

a1.sinks.k2.hostname = hadoop100

a1.sinks.k2.port =

# Describe the channel

a1.channels.c1.type = memory

a1.channels.c1.capacity =

a1.channels.c1.transactionCapacity =

a1.channels.c2.type = memory

a1.channels.c2.capacity =

a1.channels.c2.transactionCapacity =

# Bind the source and sink to the channel

a1.sources.r1.channels = c1 c2

a1.sinks.k1.channel = c1

a1.sinks.k2.channel = c2
3. 创建flume-flume-hdfs.conf
配置上级Flume输出的Source,输出是到HDFS的Sink.在group1目录下创建flume-flume-hdfs.conf,添加以下内容
# Name the components on this agent

a2.sources = r1

a2.sinks = k1

a2.channels = c1

# Describe/configure the source

# source端的avro是一个数据接收服务

a2.sources.r1.type = avro

a2.sources.r1.bind = hadoop100

a2.sources.r1.port =

# Describe the sink

a2.sinks.k1.type = hdfs

a2.sinks.k1.hdfs.path = hdfs://hadoop100:9000/flume2/%Y%m%d/%H

#上传文件的前缀

a2.sinks.k1.hdfs.filePrefix = flume2-

#是否按照时间滚动文件夹

a2.sinks.k1.hdfs.round = true

#多少时间单位创建一个新的文件夹

a2.sinks.k1.hdfs.roundValue =

#重新定义时间单位

a2.sinks.k1.hdfs.roundUnit = hour

#是否使用本地时间戳

a2.sinks.k1.hdfs.useLocalTimeStamp = true

#积攒多少个Event才flush到HDFS一次

a2.sinks.k1.hdfs.batchSize =

#设置文件类型,可支持压缩

a2.sinks.k1.hdfs.fileType = DataStream

#多久生成一个新的文件

a2.sinks.k1.hdfs.rollInterval =

#设置每个文件的滚动大小大概是128M

a2.sinks.k1.hdfs.rollSize =

#文件的滚动与Event数量无关

a2.sinks.k1.hdfs.rollCount =

# Describe the channel

a2.channels.c1.type = memory

a2.channels.c1.capacity =

a2.channels.c1.transactionCapacity =

# Bind the source and sink to the channel

a2.sources.r1.channels = c1

a2.sinks.k1.channel = c1
4. 创建flume-flume-dir.conf
配置上级Flume输出的Source,输出是到本地目录的Sink。在group1目录下,创建flume-flume-dir.conf,添加以下内容
# Name the components on this agent

a3.sources = r1

a3.sinks = k1

a3.channels = c2

# Describe/configure the source

a3.sources.r1.type = avro

a3.sources.r1.bind = hadoop100

a3.sources.r1.port =

# Describe the sink

a3.sinks.k1.type = file_roll

a3.sinks.k1.sink.directory = /opt/module/datas/flume3

# Describe the channel

a3.channels.c2.type = memory

a3.channels.c2.capacity =

a3.channels.c2.transactionCapacity =

# Bind the source and sink to the channel

a3.sources.r1.channels = c2

a3.sinks.k1.channel = c2
注: 输出的本地目录必须是已经存在的目录,如果该目录不存在,并不会创建新的目录。
5. 执行配置文件
分别开启对应配置文件:flume-flume-dir,flume-flume-hdfs,flume-file-flume。
bin/flume-ng agent --conf conf/ --name a3 --conf-file jobs/group1/flume-flume-dir.conf

bin/flume-ng agent --conf conf/ --name a2 --conf-file jobs/group1/flume-flume-hdfs.conf

bin/flume-ng agent --conf conf/ --name a1 --conf-file jobs/group1/flume-file-flume.conf
6. 启动Hadoop和Hive
#启动hdfs

start-dfs.sh

#进入到hive目录下,启动hive

 bin/hive
7. 检查HDFS上数据和/opt/module/datas/flume3目录中数据

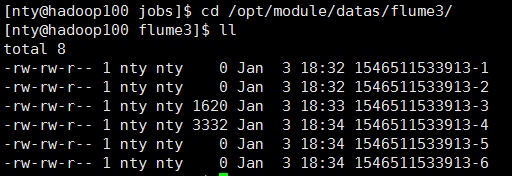
为什么会有6个文件?
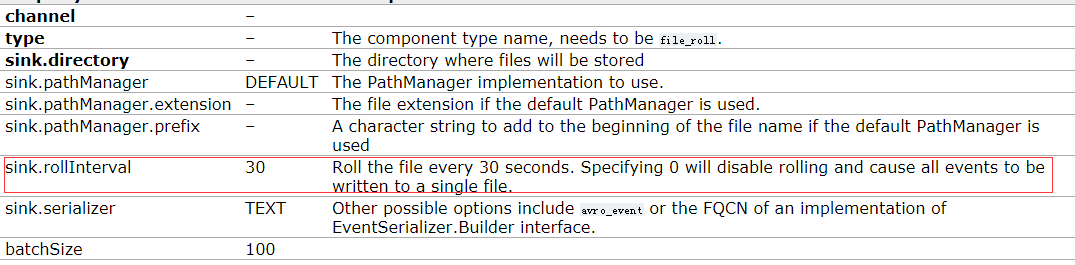
file_roll的默认配置是每30秒滚动一次文件.只要没有停止监控,隔30秒去ll一下,就会看到文件又多了
五. 单数据源多出口(Sink组)
使用Flume-1监控文件变动,Flume-1将变动内容传递给Flume-2,Flume-2负责存储到HDFS。同时Flume-1将变动内容传递给Flume-3,Flume-3也负责存储到HDFS
1. 准备工作
#在/opt/module/flume/jobs目录下创建group2文件夹

mkdir group2
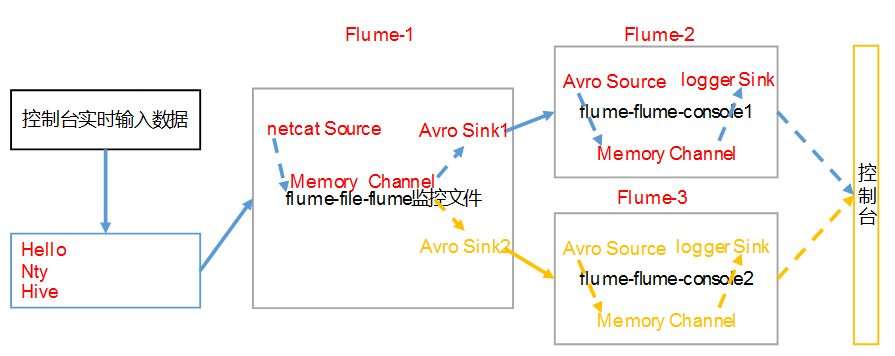
2. 创建flume-netcat-flume.conf
配置1个接收日志文件的source和1个channel、两个sink,分别输送给flume-flume-console1和flume-flume-console2。
进入group2文件夹,创建flume-netcat-flume.conf,添加以下内容
# Name the components on this agent

a1.sources = r1

a1.channels = c1

a1.sinkgroups = g1

a1.sinks = k1 k2

# Describe/configure the source

a1.sources.r1.type = netcat

a1.sources.r1.bind = localhost

a1.sources.r1.port =

#The component type name, needs to be default, failover or load_balance
a1.sinkgroups.g1.processor.type = load_balance

a1.sinkgroups.g1.processor.backoff = true

# Must be either round_robin, random or FQCN of custom class that inherits from AbstractSinkSelector
a1.sinkgroups.g1.processor.selector = round_robin

a1.sinkgroups.g1.processor.selector.maxTimeOut=

# Describe the sink

a1.sinks.k1.type = avro

a1.sinks.k1.hostname = hadoop100

a1.sinks.k1.port =

a1.sinks.k2.type = avro

a1.sinks.k2.hostname = hadoop100

a1.sinks.k2.port =

# Describe the channel

a1.channels.c1.type = memory

a1.channels.c1.capacity =

a1.channels.c1.transactionCapacity =

# Bind the source and sink to the channel

a1.sources.r1.channels = c1

a1.sinkgroups.g1.sinks = k1 k2

a1.sinks.k1.channel = c1

a1.sinks.k2.channel = c1
3. 创建flume-flume-console1.conf
配置上级Flume输出的Source,输出是到本地控制台。
在group2目录下,创建flume-flume-console1.conf,添加以下内容
# Name the components on this agent

a2.sources = r1

a2.sinks = k1

a2.channels = c1

# Describe/configure the source

a2.sources.r1.type = avro

a2.sources.r1.bind = hadoop100

a2.sources.r1.port =

# Describe the sink

a2.sinks.k1.type = logger

# Describe the channel

a2.channels.c1.type = memory

a2.channels.c1.capacity =

a2.channels.c1.transactionCapacity =

# Bind the source and sink to the channel

a2.sources.r1.channels = c1

a2.sinks.k1.channel = c1
4. 创建flume-flume-console2.conf
配置上级Flume输出的Source,输出是到本地控制台。
在group2目录下.创建flume-flume-console2.conf,添加以下内容
# Name the components on this agent

a3.sources = r1

a3.sinks = k1

a3.channels = c2

# Describe/configure the source

a3.sources.r1.type = avro

a3.sources.r1.bind = hadoop100

a3.sources.r1.port =

# Describe the sink

a3.sinks.k1.type = logger

# Describe the channel

a3.channels.c2.type = memory

a3.channels.c2.capacity =

a3.channels.c2.transactionCapacity =

# Bind the source and sink to the channel

a3.sources.r1.channels = c2

a3.sinks.k1.channel = c2
5. 执行配置文件
分别开启对应配置文件:flume-flume-console2,flume-flume-console1,flume-netcat-flume。
bin/flume-ng agent --conf conf/ --name a3 --conf-file jobs/group2/flume-flume-console2.conf -Dflume.root.logger=INFO,console

bin/flume-ng agent --conf conf/ --name a2 --conf-file jobs/group2/flume-flume-console1.conf -Dflume.root.logger=INFO,console

bin/flume-ng agent --conf conf/ --name a1 --conf-file jobs/group2/flume-netcat-flume.conf
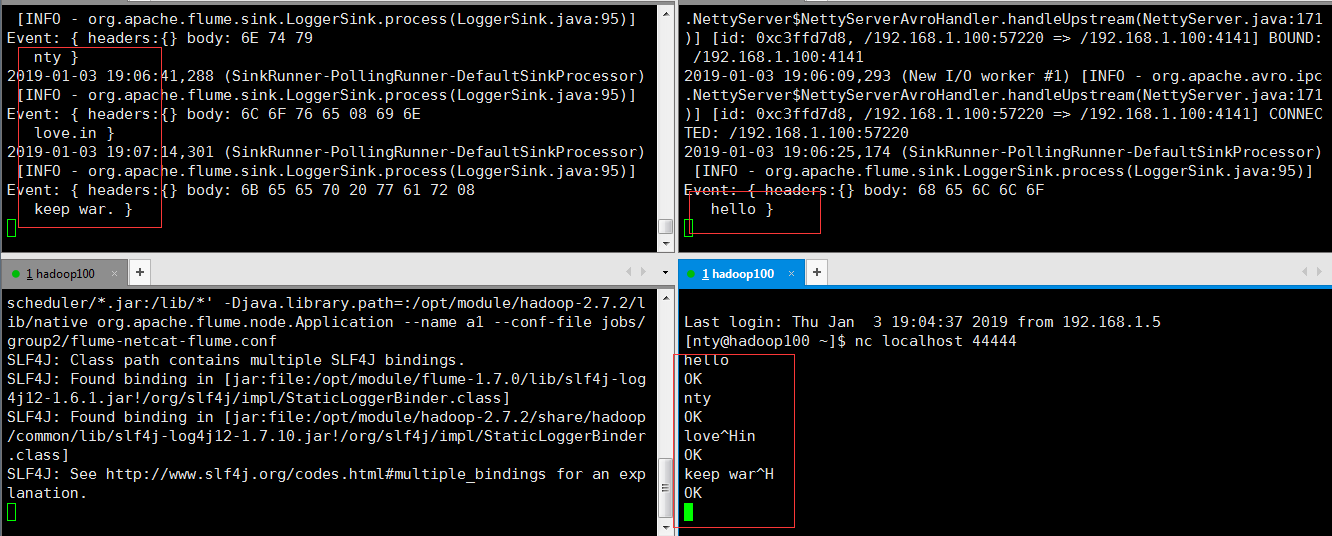
6. 使用netcat工具向本机的44444端口发送内容
nc localhost
7. 查看Flume2及Flume3的控制台打印日志
六. 多数据源汇总(常用)
hadoop101上的Flume-1监控文件/opt/module/group.log,
hadoop100上的Flume-2监控某一个端口的数据流,
Flume-1与Flume-2将数据发送给hadoop102上的Flume-3,Flume-3将最终数据打印到控制台

1. 准备工作
如果hadoop101和hadoop102没有安装flume,用分发脚本将flume分发一下
xsync flume-1.7./
在hadoop100、hadoop101以及hadoop102的/opt/module/flume/jobs目录下创建一个group3文件夹。
2. 创建flume1-logger-flume.conf
配置Source用于监控hive.log文件,配置Sink输出数据到下一级Flume。
在hadoop101上创建配置文件flume1-logger-flume.conf,并添加以下内容
# Name the components on this agent

a1.sources = r1

a1.sinks = k1

a1.channels = c1

# Describe/configure the source

a1.sources.r1.type = exec

a1.sources.r1.command = tail -F /opt/module/group.log

a1.sources.r1.shell = /bin/bash -c

# Describe the sink

a1.sinks.k1.type = avro

a1.sinks.k1.hostname = hadoop102

a1.sinks.k1.port =

# Describe the channel

a1.channels.c1.type = memory

a1.channels.c1.capacity =

a1.channels.c1.transactionCapacity =

# Bind the source and sink to the channel

a1.sources.r1.channels = c1

a1.sinks.k1.channel = c1
3. 创建创建flume2-netcat-flume.conf
配置Source监控端口44444数据流,配置Sink数据到下一级Flume:
在hadoop100上创建配置文件flume2-netcat-flume.conf,并添加以下内容
# Name the components on this agent

a2.sources = r1

a2.sinks = k1

a2.channels = c1

# Describe/configure the source

a2.sources.r1.type = netcat

a2.sources.r1.bind = hadoop100

a2.sources.r1.port =

# Describe the sink

a2.sinks.k1.type = avro

a2.sinks.k1.hostname = hadoop102

a2.sinks.k1.port =

# Use a channel which buffers events in memory

a2.channels.c1.type = memory

a2.channels.c1.capacity =

a2.channels.c1.transactionCapacity =

# Bind the source and sink to the channel

a2.sources.r1.channels = c1

a2.sinks.k1.channel = c1
4. 创建flume3-flume-logger.conf
配置source用于接收flume1与flume2发送过来的数据流,最终合并后sink到控制台。
在hadoop102上创建配置文件flume3-flume-logger.conf,并添加以下内容
# Name the components on this agent

a3.sources = r1

a3.sinks = k1

a3.channels = c1

# Describe/configure the source

a3.sources.r1.type = avro

a3.sources.r1.bind = hadoop102

a3.sources.r1.port =

# Describe the sink

# Describe the sink

a3.sinks.k1.type = logger

# Describe the channel

a3.channels.c1.type = memory

a3.channels.c1.capacity =

a3.channels.c1.transactionCapacity =

# Bind the source and sink to the channel

a3.sources.r1.channels = c1

a3.sinks.k1.channel = c1
5. 执行配置文件
分别开启对应配置文件:flume3-flume-logger.conf,flume2-netcat-flume.conf,flume1-logger-flume.conf。
#hadoop102

bin/flume-ng agent --conf conf/ --name a3 --conf-file jobs/group3/flume3-flume-logger.conf -Dflume.root.logger=INFO,console

#hadoop100

bin/flume-ng agent --conf conf/ --name a2 --conf-file jobs/group3/flume2-netcat-flume.conf

#hadoop101

bin/flume-ng agent --conf conf/ --name a1 --conf-file jobs/group3/flume1-logger-flume.conf
6. 在hadoop101上向/opt/module目录下的group.log追加内容

7. 在hadoop100上向44444端口发送数据

8. 观察hadoop102上的数据

Flume(4)-监控模型的更多相关文章
- 使用WebGL 自定义 3D 摄像头监控模型
前言 随着视频监控联网系统的不断普及和发展, 网络摄像机更多的应用于监控系统中,尤其是高清时代的来临,更加快了网络摄像机的发展和应用. 在监控摄像机数量的不断庞大的同时,在监控系统中面临着严峻的现状问 ...
- 基于 HTML5 的 WebGL 自定义 3D 摄像头监控模型
前言 随着视频监控联网系统的不断普及和发展, 网络摄像机更多的应用于监控系统中,尤其是高清时代的来临,更加快了网络摄像机的发展和应用. 在监控摄像机数量的不断庞大的同时,在监控系统中面临着严峻的现状问 ...
- Flume实时监控目录sink到hdfs,再用sparkStreaming监控hdfs的这个目录,对数据进行计算
目标:Flume实时监控目录sink到hdfs,再用sparkStreaming监控hdfs的这个目录,对数据进行计算 1.flume的配置,配置spoolDirSource_hdfsSink.pro ...
- Flume的监控参数
参考 flume的http监控参数说明 普通的flume启动命令 bin/flume-ng agent -c conf -f conf/flume-conf.properties -n agent - ...
- 第1节 flume:7、flume的监控文件夹,实现数据收集到hdfs上
1.2.2 采集案例 1.采集目录到HDFS 需求分析 结构示意图: 采集需求:某服务器的某特定目录下,会不断产生新的文件,每当有新文件出现,就需要把文件采集到HDFS中去 根据需求,首先定义以下3大 ...
- Flume 知识点(六)Flume 的监控
简述 使用 Flume 实时收集日志的过程中,尽管有事务机制保证数据不丢失,但仍然需要时刻关注 Source.Channel.Sink 之间的消息传输是否正常. 比如,SouceChannel 传输了 ...
- Flume 概念、模型和特点
Flume Event - Flume 事件 - 被定义为一个具有有效荷载的字节数据流和可选的字符串属性集. Flume Agent- Flume - 代理 - 是一个进程承载从外部源事件流到下一个目 ...
- flume监控之ganglia
对于日志来说,我觉得监控意义不大,因为写的速度一般不会特别快,但是如果是spooldir source,里面一小时放入十几G的数据让flume解析,特别是在结合kafka或者其他框架的话,监控就显得重 ...
- open-falcon监控Flume
1.首先你需要知道flume的http监控端口是否启动 请参考博文 Flume的监控参数 即在 http://localhost:3000/metrics 可以访问到如下内容 2.在open-falc ...
随机推荐
- Ubuntu下Visual Studio Code的配置
最近在Ubuntu系统里用Visual Studio Code编写vue代码时,在build的时候老是报错,后来发现原来Visual Studio Code里默认Tab是4个空格,而vue代码要求ta ...
- 什么是TTL值?(简单明了的解释)
什么是TTL值? TTL值全称是“生存时间(Time To Live)”,简单的说它表示DNS记录在DNS服务器上的缓存时间. 要理解TTL值,请先看下面的一个例子:假设,有这样一个域名myhost. ...
- openresty及lua的随机函数
我们都知道,所谓的随机都是伪随机,随机的结果是由随机算法和随机种子决定的. 所以,当我们没有初始化的时候,如果直接使用math.random(),那么出来的值肯定是每次都一样,因为种子等于0. 因此, ...
- java查找字符串里与指定字符串相同的个数
public class EmployeeDemo { //方法一: public int search(String str,String strRes) {//查找字符串里与指定字符串相同的个数 ...
- CF219D Choosing Capital for Treeland
嘟嘟嘟 树形dp. 首先一个很常规的想法就是如果u到v有一条边,那么建立cost(u, v) = 0, cost(v, u) = 1的两条边. 可以两遍dfs. 先任选一个点作为根节点,第一遍从下往上 ...
- Linux学习总结(十五)文件查找 which whereis locate find
which命令 用于查找并显示给定命令的绝对路径,环境变量PATH中保存了查找命令时需要遍历的目录.which指令会在环境变量$PATH设置的目录里查找符合条件的文件.也就是说,使用which命令,就 ...
- [Java123] Java中的System.exit
参考:http://www.cnblogs.com/xwdreamer/archive/2011/01/07/2297045.html System.exit(int status) 方法 java ...
- StackExchange.Redis学习笔记(二) Redis查询 五种数据类型的应用
ConnectionMultiplexer ConnectionMultiplexer 是StackExchange.Redis的核心对象,用这个类的实例来进行Redis的一系列操作,对于一个整个应用 ...
- HDU 1213(裸并查集)(无变形)
题目链接: http://acm.hdu.edu.cn/showproblem.php?pid=1213 How Many Tables Time Limit: 2000/1000 MS (Java/ ...
- Angular动态表单生成(二)
ng-dynamic-forms源码分析 在两个开源项目中,ng-dynamic-forms的源码相较于form.io,比较简单,所以我还勉强能看懂,下面就我自己的理解进行简单分析,若有不对的地方,请 ...