MSMQ .NET下的应用
Message
Message是MSMQ的数据存储单元,我们的用户数据一般也被填充在Message的body当中,因此很重要,让我们来看一看其在.net中的体现,如图:

在图上我们可以看见,Message提供了三个构造函数,参数body表示我们的用户数据,当我们在构造函数中传入,数据最终会被赋值给其同名属性body,参数formatter对应同名属性Formatter,它是一个序列化器,当我们的用户数据是一个复杂类型,比如类的时候Message会自动采用该序列化器将我们的复杂类型序列化。message支持3种序列化对象:
-- XMLMessageFormatter对象----MessageQueue组件的默认格式化程序设置。
-- BinaryMessageFormatter对象;
-- ActiveXMessageFormatter对象;
由于后两者格式化后的消息通常不能为人阅读,所以我们经常用到的是XMLMessageFormatter对象。该对象构造方法有三种重载:
public XmlMessageFormatter();

public XmlMessageFormatter(string[] targetTypeNames);

public XmlMessageFormatter(Type[] targetTypes);
MSMQ队列
消息(Message)需要保存在msmq队列中,.net中采用System.Messaging.MessageQueue来管理MSMQ队列,它提供能操作MSMQ的绝大多数API,比如
1.判断指定路径的队列是否存在。其中path代表队列的路径,表示形式为"主机名\队列名称",例如:".\private$\myQueue",其中"."代表本地主机,"\private$\myQueue"则代表队列的名称,"private$"表示我们创建的是专用队列,在网络上我们可以通过路径来唯一确定一个队列。
public static bool Exists(string path);
2.创建队列。path代表队列的路径,transactional表示是否创建事务队列,默认为fasle。关于事务队列我在上一篇做了详细的论述,这里不在重复。
public static MessageQueue Create(string path);

public static MessageQueue Create(string path, bool transactional);
3.删除队列
public static void Delete(string path);
4.发送消息到MSMQ。obj代表我们的用户数据,transation表示将我们的发送操作纳入事务当中。在前面我们说过MSMQ接收的是Message,但是在这里我们看到Send操作并未强制要求我们采用Message类型参数。这是因为当我传入一个Object参数数据时,在Send操作的内部自动的给我们创建了一个Message消息对象,并且将我们的传入的Object参数采用默认的序列化器序列化,然后装入Message的body属性当中,如果我们在Send方法中指定label属性,它将被赋值给Message的同名Label属性。当然我们完全可以自定义一个message对象传入Send方法中
public void Send(object obj);

public void Send(object obj, MessageQueueTransaction transaction);

public void Send(object obj, string label);
5.接收消息。同理接收消息也可以被纳入事务当中,采用Receive方法在取MSMQ的消息时,如果成功,会把MSMQ的对应消息给删除掉,并且只能取到消息队里中的排队头的消息。
public Message Receive();

public Message Receive(MessageQueueTransaction transaction);

public Message Receive(TimeSpan timeout);
如果我们想取指定标识的消息,就的采用如下的方法了,id代表消息的唯一标示。
public Message ReceiveById(string id);

public Message ReceiveById(string id, MessageQueueTransaction transaction);
如果我们在接收消息的后,不想把MSMQ队列中的消息删除怎么办呢?那么采用下面的方法吧,因为这两个方法接收MSMQ的消息,不会删除MSMQ中对应的消息,所以他们不支持事务,即没有提供事务的参数。
public Message Peek();

public Message PeekById(string id);
我们也可以一次性吧队列里面的所有消息取出来
public Message[] GetAllMessages();
实例
说了这么多,下面让我们来代码实战一下,我们采用控制台程序做测试,我把MSMQ队列做了简单的封装,如下
using System;

using System.Collections.Generic;

using System.Linq;

using System.Messaging;

using System.Text;

using System.Threading.Tasks;

namespace Test

{

    public class QueueManger

    {

        /// <summary>

        /// 创建MSMQ队列

        /// </summary>

        /// <param name="queuePath">队列路径</param>

        /// <param name="transactional">是否事务队列</param>

        public static void Createqueue(string queuePath, bool transactional = false)

        {

            try

            {

                //判断队列是否存在

                if (!MessageQueue.Exists(queuePath))

                {

                    MessageQueue.Create(queuePath);

                    Console.WriteLine(queuePath + "已成功创建!");

                }

                else

                {

                    Console.WriteLine(queuePath + "已经存在!");

                }

            }

            catch (MessageQueueException e)

            {

                Console.WriteLine(e.Message);

            }

        }

        /// <summary>

        /// 删除队列

        /// </summary>

        /// <param name="queuePath"></param>

        public static void Deletequeue(string queuePath)

        {

            try

            {

                //判断队列是否存在

                if (MessageQueue.Exists(queuePath))

                {

                    MessageQueue.Delete(@".\private$\myQueue");

                    Console.WriteLine(queuePath + "已删除!");

                }

                else

                {

                    Console.WriteLine(queuePath + "不存在!");

                }

            }

            catch (MessageQueueException e)

            {

                Console.WriteLine(e.Message);

            }

        }

        /// <summary>

        /// 发送消息

        /// </summary>

        /// <typeparam name="T">用户数据类型</typeparam>

        /// <param name="target">用户数据</param>

        /// <param name="queuePath">队列名称</param>

        /// <param name="tran"></param>

        /// <returns></returns>

        public static bool SendMessage<T>(T target, string queuePath, MessageQueueTransaction tran = null)

        {

            try

            {

                //连接到本地的队列

                MessageQueue myQueue = new MessageQueue(queuePath);

                System.Messaging.Message myMessage = new System.Messaging.Message();

                myMessage.Body = target;

                myMessage.Formatter = new XmlMessageFormatter(new Type[] { typeof(T) });

                //发送消息到队列中

                if (tran == null)

                {

                    myQueue.Send(myMessage);

                }

                else

                {

                    myQueue.Send(myMessage, tran);

                }

                Console.WriteLine("消息已成功发送到"+queuePath + "队列!");

                return true;

            }

            catch (ArgumentException e)

            {

                Console.WriteLine(e.Message);

                return false;

            }

        }

        /// <summary>

        /// 接收消息

        /// </summary>

        /// <typeparam name="T">用户的数据类型</typeparam>

        /// <param name="queuePath">消息路径</param>

        /// <returns>用户填充在消息当中的数据</returns>

        public static T ReceiveMessage<T>(string queuePath,MessageQueueTransaction tran=null)

        {

            //连接到本地队列

            MessageQueue myQueue = new MessageQueue(queuePath);

            myQueue.Formatter = new XmlMessageFormatter(new Type[] { typeof(T) });

            try

            {

                //从队列中接收消息

                System.Messaging.Message myMessage = tran == null ? myQueue.Receive() : myQueue.Receive(tran);

                return (T)myMessage.Body; //获取消息的内容

            }

            catch (MessageQueueException e)

            {

                Console.WriteLine(e.Message);

            }

            catch (InvalidCastException e)

            {

                Console.WriteLine(e.Message);

            }

            return default(T);

        }

        /// <summary>

        /// 采用Peek方法接收消息

        /// </summary>

        /// <typeparam name="T">用户数据类型</typeparam>

        /// <param name="queuePath">队列路径</param>

        /// <returns>用户数据</returns>

        public static T ReceiveMessageByPeek<T>(string queuePath)

        {

            //连接到本地队列

            MessageQueue myQueue = new MessageQueue(queuePath);

            myQueue.Formatter = new XmlMessageFormatter(new Type[] { typeof(T) });

            try

            {

                //从队列中接收消息

                System.Messaging.Message myMessage = myQueue.Peek();

                return (T)myMessage.Body; //获取消息的内容

            }

            catch (MessageQueueException e)

            {

                Console.WriteLine(e.Message);

            }

            catch (InvalidCastException e)

            {

                Console.WriteLine(e.Message);

            }

            return default(T);

        }

        /// <summary>

        /// 获取队列中的所有消息

        /// </summary>

        /// <typeparam name="T">用户数据类型</typeparam>

        /// <param name="queuePath">队列路径</param>

        /// <returns>用户数据集合</returns>

        public static List<T> GetAllMessage<T>(string queuePath)

        {

            MessageQueue myQueue = new MessageQueue(queuePath);

            myQueue.Formatter = new XmlMessageFormatter(new Type[] { typeof(T) });

            try

            {

                Message[] msgArr=  myQueue.GetAllMessages();

                List<T> list=new List<T>();

                msgArr.ToList().ForEach((o) =>

                {

                    list.Add((T)o.Body);

                });

                return list;

            }

            catch(Exception e)

            {

                Console.WriteLine(e.Message);

            }

            return null;

        }

    }

}
我们的用户实体也很简单,如下
using System;

using System.Collections.Generic;

using System.Linq;

using System.Text;

using System.Threading.Tasks;

namespace Test

{

    public class Student

    {

        /// <summary>

        /// 年龄

        /// </summary>

        public int Age { get; set; }

        /// <summary>

        /// 姓名

        /// </summary>

        public string Name { get; set; }

    }

}
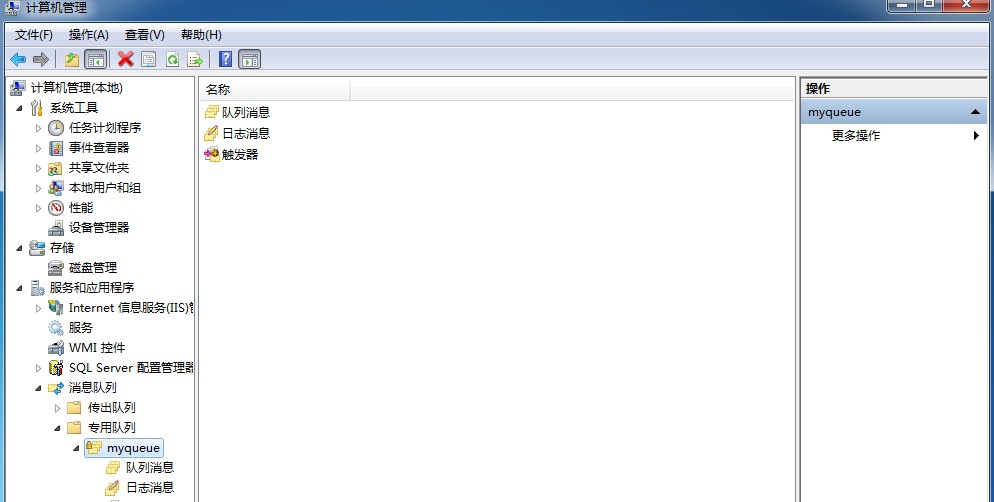
下面我们来创建一个队列,如图我们成功的创建了"myqueue"队列
using System;

using System.Collections.Generic;

using System.Linq;

using System.Messaging;

using System.Text;

using System.Threading.Tasks;

namespace Test

{

    class Program

    {

        static void Main(string[] args)

        {

            string queuepath = @".\private$\myQueue";

            QueueManger.Createqueue(queuepath);

            Console.ReadKey();

        }

    }

}
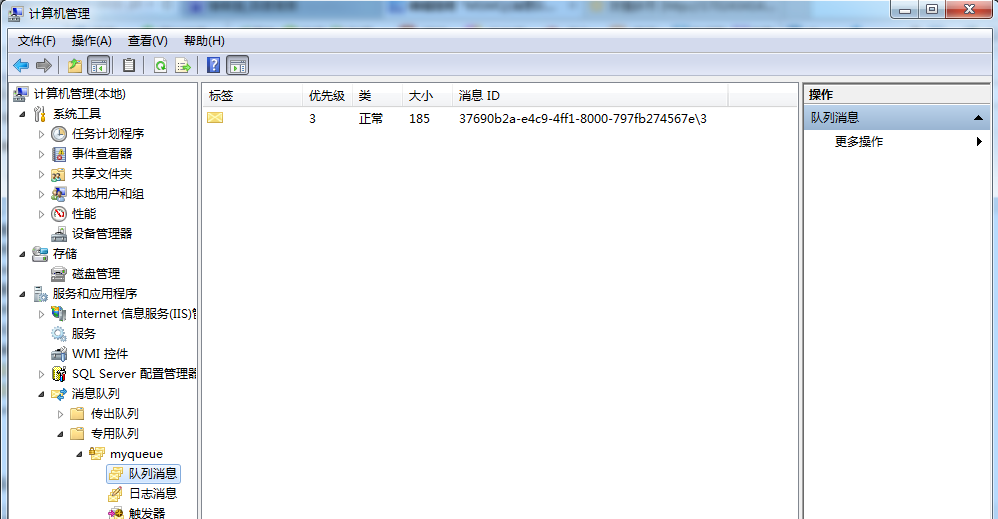
下面我们向队列中发送消息。如图,从图右边可以看到消息成功被加入到队列中
using System;

using System.Collections.Generic;

using System.Linq;

using System.Messaging;

using System.Text;

using System.Threading.Tasks;

namespace Test

{

    class Program

    {

        static void Main(string[] args)

        {

            string queuepath = @".\private$\myQueue";

            //QueueManger.Createqueue(queuepath);

            Student stu = new Student() { Name="shaoshun",Age=};

            QueueManger.SendMessage<Student>(stu, queuepath);

            Console.ReadKey();

        }

    }

}
接着我们采用Peek方法接收消息(即不移除MSMQ的对应消息),很显然图中的Message依然存在MSMQ队列中
using System;

using System.Collections.Generic;

using System.Linq;

using System.Messaging;

using System.Text;

using System.Threading.Tasks;

namespace Test

{

    class Program

    {

        static void Main(string[] args)

        {

            string queuepath = @".\private$\myQueue";

            //QueueManger.Createqueue(queuepath);

            //Student stu = new Student() { Name="shaoshun",Age=18};

            //QueueManger.SendMessage<Student>(stu, queuepath);

            Student stu=  QueueManger.ReceiveMessageByPeek<Student>(queuepath);

            Console.WriteLine(stu.Name);

            Console.ReadKey();

        }

    }

}


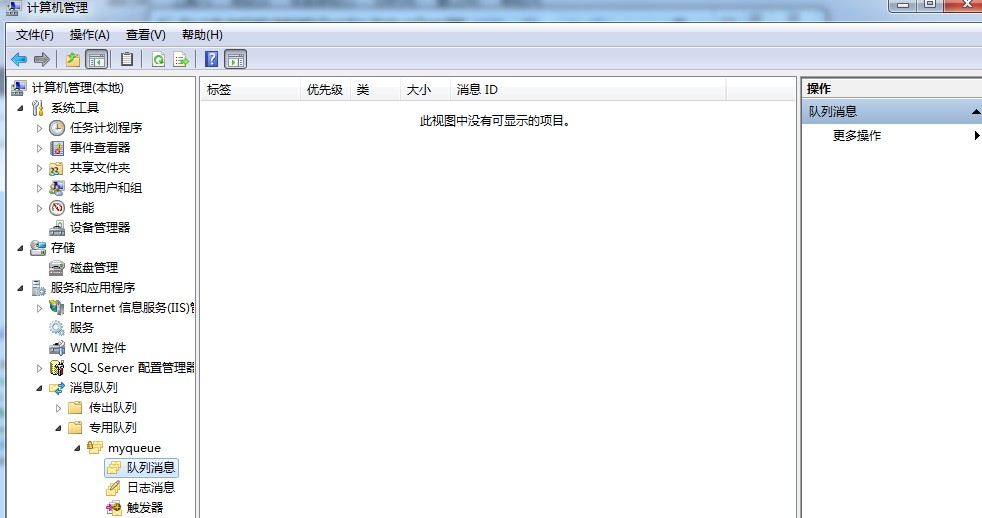
接着我们采用Receive方法来接收消息。这个时候我们可以很明显的看见MSMQ原来对应的消息被删除了
using System;

using System.Collections.Generic;

using System.Linq;

using System.Messaging;

using System.Text;

using System.Threading.Tasks;

namespace Test

{

    class Program

    {

        static void Main(string[] args)

        {

            string queuepath = @".\private$\myQueue";

            //QueueManger.Createqueue(queuepath);

            //Student stu = new Student() { Name="shaoshun",Age=18};

            //QueueManger.SendMessage<Student>(stu, queuepath);

            //Student stu=  QueueManger.ReceiveMessageByPeek<Student>(queuepath);

            Student stu = QueueManger.ReceiveMessage<Student>(queuepath);

            Console.WriteLine(stu.Name);

            Console.ReadKey();

        }

    }

}
最后让我来测试,MSMQ的事务性。我们先删除我们的队列,在重新创建。我们连续向队列中插入5个消息,但是在插入第5个消息的时候我们抛出异常,如果MSMQ支持事务的话那么前面发送的4个Message将被回滚掉,MSMQ队列中应该为0个消息
using System;

using System.Collections.Generic;

using System.Linq;

using System.Messaging;

using System.Text;

using System.Threading.Tasks;

namespace Test

{

    class Program

    {

        static void Main(string[] args)

        {

            string queuepath = @".\private$\myQueue";

            //QueueManger.Createqueue(queuepath);

            //Student stu = new Student() { Name="shaoshun",Age=18};

            //QueueManger.SendMessage<Student>(stu, queuepath);

            //Student stu=  QueueManger.ReceiveMessageByPeek<Student>(queuepath);

            //Student stu = QueueManger.ReceiveMessage<Student>(queuepath);

            //Console.WriteLine(stu.Name);

            QueueManger.Deletequeue(queuepath);

            QueueManger.Createqueue(queuepath);

            MessageQueueTransaction tran = new MessageQueueTransaction();

            tran.Begin();

            try

            {

                Student stu;

                for (int i = ; i < ; i++)

                {

                    stu=new Student(){Name="shaoshun"+i,Age=i};

                    QueueManger.SendMessage<Student>(stu, queuepath, tran);

                    if (i == )

                    {

                        throw new Exception();

                    }

                }

                tran.Commit();

            }

            catch

            {

                tran.Abort();

            }

            Console.ReadKey();

        }

    }

}


另外值得注意的是,MSMQ的消息发送与接收,采用的是同步的方式。这样假如我们的消息队列中一个消息都没有,我们调用Receive()去接收该队列的消息会怎么样呢? 程序会被阻塞在这里,直到消息队列中有消息,程序才会接着往下走。碰到这种情况是很要命的,但是不怕MSMQ支持异步消息,由于篇幅有限我就不在多少,这里我给出一个异步操作的链接有兴趣的朋友可以去研究下,
MSMQ .NET下的应用的更多相关文章
- 分布式消息总线,基于.NET Socket Tcp的发布-订阅框架之离线支持,附代码下载
一.分布式消息总线以及基于Socket的实现 在前面的分享一个分布式消息总线,基于.NET Socket Tcp的发布-订阅框架,附代码下载一文之中给大家分享和介绍了一个极其简单也非常容易上的基于.N ...
- WCF全面解析学习(1)
SOA的基本概念和设计思想 SOA并不是仅仅采用Web服务的架构,Web服务只是一种实现SOA的理想技术手段.SOA依赖于开放的标准.SOA的一个目标是让不同的厂商开发的服务能够相互操作. SOA支持 ...
- C++程序结构---1
C++ 基础教程Beta 版 原作:Juan Soulié 翻译:Jing Xu (aqua) 英文原版 本教程根据Juan Soulie的英文版C++教程翻译并改编. 本版为最新校对版,尚未定稿.如 ...
- .Net下的MSMQ(微软消息队列)的同步异步调用
一.MSMQ简介 MSMQ(微软消息队列)是Windows操作系统中消息应用程序的基础,是用于创建分布式.松散连接的消息通讯应用程序的开发工具.消息队列 和电子邮件有着很多相似处,他们都包含多个属性, ...
- .NET分布式事务处理总结【下】 - 包含MSMQ的分布式事务处理
转自:http://www.cnblogs.com/daxnet/archive/2011/03/15/1984995.html .NET直接提供对MSMQ的访问支持,只需要添加System.Mess ...
- Delphi下MSMQ(Mircosoft Message Queue)实例(私有队列)
网上关于消息队列技术原理说明的详细文档很多,但涉及到Delphi的具体实现很少,这是我从网上找了一上午的资料,自己整合和尝试的能运行的程序. 打开控制面板->程序->添加组件,添加消息队列 ...
- 已经过事务处理的 MSMQ 绑定(转载)
https://msdn.microsoft.com/zh-cn/biztalk/ms751493 本示例演示如何使用消息队列 (MSMQ) 执行已经过事务处理的排队通信. 注意 本主题的末尾介绍了此 ...
- 基于WCF MSMQ 的企业应用解决方案
最近研究了一下基于MSMQ的WCF应用,从书上.网上查了很多资料,但始终没能彻底理解WCF-MSMQ的工作原理,也没能得到一个合理的应用解决方案.索性还是自己做个实验,探索一下吧.经过反复试验,颇有收 ...
- Redis学习笔记~实现消息队列比MSMQ更方便
什么是队列:简单的说就是数据存储到一个空间里(可以是内存,也可以是物理文件),先存储的数据对象,先被取出来,这与堆栈正好相反,消息队列也是这样,将可能出现高并发的数据进行队列存储,并按着入队的顺序依次 ...
随机推荐
- struts2的文件配置以及注释代码
<?xml version="1.0" encoding="UTF-8" ?><!DOCTYPE struts PUBLIC "-/ ...
- c++中sort()函数的用法
用法: 1.sort函数可以三个参数也可以两个参数,必须的头文件#include < algorithm>和using namespace std; 2.它使用的排序方法是类似于快排的方法 ...
- Traceur
直接插入网页 <!-- 加载Traceur编译器 --> <script src="http://google.github.io/traceur-compiler/bin ...
- Linux系统上安装、卸载JAVA、TOMCAT的方法
一. 安装JAVA 安装方法1:手工上传 创建安装目录上传JAVA安装包 Normal 0 7.8 磅 0 2 false false false EN-US ZH-CN X-NONE /* Styl ...
- javaEE练习(商城练习)
今天写一个商城的练习,综合之前学习过的servlet和el表达式,来一个综合的练习: 需要用到的数据库有: /* Navicat MySQL Data Transfer Source Server : ...
- xshell连不上虚拟机
一般都是下边这种情况 查看 虚拟机的ip ip a 看看是否有IP地址 如果没有的话,win+r 输入services.msc 把这三个服务设为正在运行状态 #虚拟机连不上网 前戏: 查看xshe ...
- 监控网络带宽 使用speedtest-cli命令
1.监控网络带宽 使用speedtest-cli命令 l 安装命令: yum install python-pip –y pip install speedtest-cli l 运行命令: speed ...
- 前端使用Mock服务Json-server
前言 由于Jaguar服务目前还没有任何的API输出,一边写前端功能,一边写后端API显然不利于整体的项目进展.所以我计划先定义好接口,然后将所有的API都先部署在一个Mock服务器上,等前端界面和功 ...
- iOS TabelViewCell 删除 编辑 插入
/** TableView 进入或退出编辑状态(TableView 方法). */ - (void)setEditing:(BOOL)editing animated:(BOOL)animate{ / ...
- 【EMV L2】数据元格式 & 对齐方式
[数据元格式] [对齐方式] 摘录:<中国金融集成电路(IC)卡规范 第6部分:借记贷记应用终端规范.pdf>- 8 终端数据