input(type='file')上传多张照片并显示,传到后台
以下内容为网络摘抄和实践修改所得,如有雷同,请谅解!!!!
1、首先是前端页面代码:
其中,<input type="file" id="file_input" name="filePath" multiple="multiple"/> ,需要设置multiple属性
<style type="text/css">
.float{
float:left;
width : 100px;
height: 100px;
overflow: hidden;
border: 1px solid #CCCCCC;
border-radius: 10px;
padding: 5px;
margin: 5px;
}
img{
position: relative;
}
.result{
width: 100px;
height: 100px;
text-align: center;
box-sizing: border-box;
}
#file_input{
display: none;
}
.delete{
width: 100px;
height:100px;
position: absolute;
text-align: center;
line-height: 100px;
z-index: 10;
font-size: 30px;
background-color: rgba(255,255,255,0.8);
color: #777;
opacity: 0;
transition-duration: 0.7s;
-webkit-transition-duration: 0.7s;
}
.delete:hover{
cursor: pointer;
opacity: 1;
}
button {
border-color: #4898d5;
/*background-color: #2e8ded;*/
background-color:#62BF00;
color: #fff;
height: 28px;
line-height: 28px;
margin: 0 6px;
padding: 0 15px;
border: 1px solid #dedede;
border-radius: 2px;
font-weight: 400;
cursor: pointer;
text-decoration: none;
}
#submit {
background-color: #2e8ded;
}
#clear {
background-color: #FAAC58;
}
</style>
<body>

    <table style="width:100%;">

        <tr>

            <td style="width:80%">

                <label>请选择图像文件:</label>

                <button id="select">选择图片</button>

                @*<button id="add">追加图片</button>*@

                <button id="clear">清空图片</button>

                @*<button id="submit" onclick="submitPhoto()" >上传</button>*@

            </td>

            <td style="width:20%">

                <form id="form1" method="post" enctype="multipart/form-data" style="width:95%;text-align:right;">

                <input type="file" id="file_input" name="filePath" multiple="multiple"/>

                </form>

            </td>

        </tr>

    </table>

        <div id="append" style="width:100%;height:5px;"></div>

    </body>
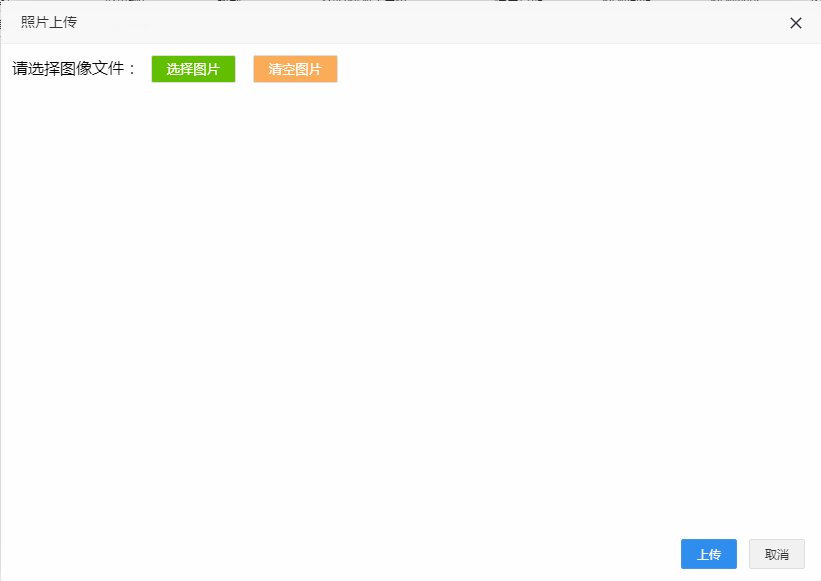
如图:
2、写选择图片(<button id="select">选择图片</button>)和清空图片(<button id="clear">清空图片</button>)的事件,图片显示和删除的方法
 var input = document.getElementById("file_input");

     var result;

     var dataArr = []; // 储存所选图片的结果(文件名和base64数据)

     var fd;  //FormData方式发送请求

     var oSelect = document.getElementById("select");

     var oAdd = document.getElementById("add");

     var oSubmit = document.getElementById("submit");

     var oInput = document.getElementById("file_input");

     var oClear = document.getElementById("clear");

     if(typeof FileReader==='undefined'){

         alert("抱歉,你的浏览器不支持 FileReader");

         input.setAttribute('disabled','disabled');

     } else {

         input.addEventListener('change',readFile,false);

     }

     oSelect.onclick=function(){

         oInput.value = "";

         //清空已选图片

         $('.float').remove();

         dataArr = [];

         index = ;

         oInput.click();

     }

     oClear.onclick = function () {

         oInput.value = "";

         //清空已选图片

         $('.float').remove();

         dataArr = [];

         index = ;

     }

     function readFile() {

     fd = new FormData();

     var iLen = this.files.length;

     var index = ;

     for (var i = ; i < iLen; i++) {

         //if (!(input['value'].match(/.jpg|.gif|.png|.jpeg|.bmp/i))) {  //判断上传文件格式

         if (!this.files[i].name.match(/.jpg|.gif|.png|.jpeg|.bmp/i)) {  //判断上传文件格式

             return alert("上传的图片中含有格式不正确的图片,请重新选择!请选择.jpg|.gif|.png|.jpeg|.bmp格式的图片");

         }

         var filereader = new FileReader();

         filereader.index = i;

         fd.append(i, this.files[i]);

         filereader.readAsDataURL(this.files[i]);  //转成base64

         filereader.fileName = this.files[i].name;

         filereader.onload = function (e) {

             var imgMsg = {

                 name: this.fileName,//获取文件名

                 base64: this.result   //filereader.readAsDataURL方法执行完后,filereader.result里

             }

             dataArr.push(imgMsg);

             result = '<div class="delete">delete</div><div class="result"><img src="' + this.result + '" alt=""/><br><span style="margin:0 auto;font-size:9px">' + imgMsg.name + '</span></div>';

             var div = document.createElement('div');

             div.innerHTML = result;

             div['className'] = 'float ';

             div['index'] = index;

             document.getElementsByTagName('body')[].appendChild(div);    //插入dom树

             //document.getElementById('append').appendChild(div);

             var imgpic = div.getElementsByTagName('img')[];

             imgpic.onload = function () {

                 var nowHeight = ReSizePic(this); //设置图片大小

                 this.parentNode.style.display = 'block';

                 var oParent = this.parentNode;

                 if (nowHeight) {

                     oParent.style.paddingTop = (oParent.offsetHeight - nowHeight) /  + 'px';

                 }

             }

             div.onclick = function () {

                 this.remove();                  // 在页面中删除该图片元素

                 delete dataArr[this.index];  // 删除dataArr对应的数据

             }

             index++;

         }

     }

 }

   function ReSizePic(ThisPic) {

     var RePicWidth = ; //这里修改为您想显示的宽度值

     var TrueWidth = ThisPic.width; //图片实际宽度

     var TrueHeight = ThisPic.height; //图片实际高度

     if (TrueWidth > TrueHeight) {

         //宽大于高

         var reWidth = RePicWidth;

         ThisPic.width = reWidth;

         //垂直居中

         var nowHeight = TrueHeight * (reWidth / TrueWidth);

         return nowHeight;  //将图片修改后的高度返回,供垂直居中用

     } else {

         //宽小于高

         var reHeight = RePicWidth;

         ThisPic.height = reHeight;

     }

 }

     function submitPhoto() {

         SubmitPhoto("ControllerName");

     }
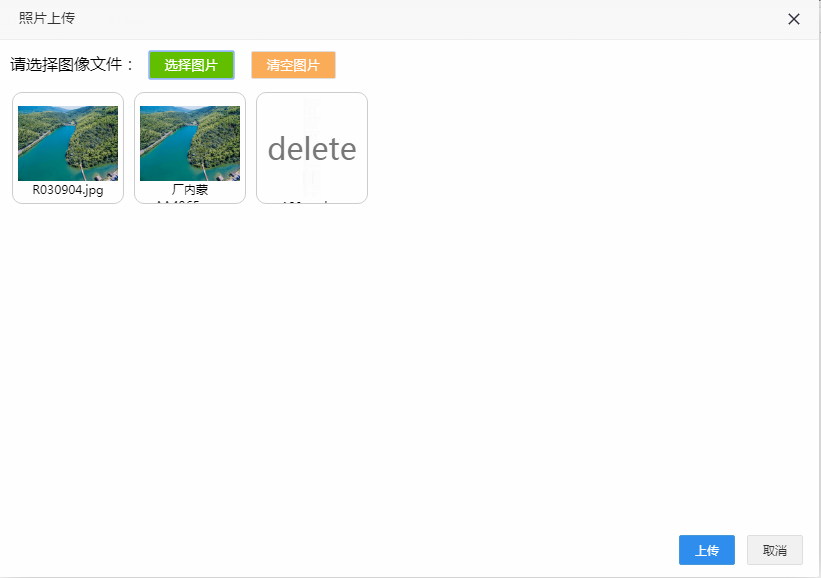
如图:
3、提交到后台的方法
 function SubmitPhoto(controller) {

     if (!dataArr.length) {

         tipDialog("请选择文件", , );

         return;

     }

     Loading(true, "正在提交数据...");

     $("#form1").ajaxSubmit({

         url: "/" + controller + "/SubmitPhoto",

         type: 'POST',

         //data : JSON.stringify(submitArr),

         dataType: 'json',

         //processData: false,   用FormData传fd时需有这两项

         //contentType: false,

         success: function (data) {

             Loading(false);

             layer.alert(data.Message, {

                 skin: 'layui-layer-lan'

                 , closeBtn:

                 , anim:  //动画类型

                 , end: function () {

                     var index = parent.layer.getFrameIndex(window.name); //获取窗口索引

                     parent.layer.close(index);  // 关闭layer

                 }

             });

         }

     })

 }
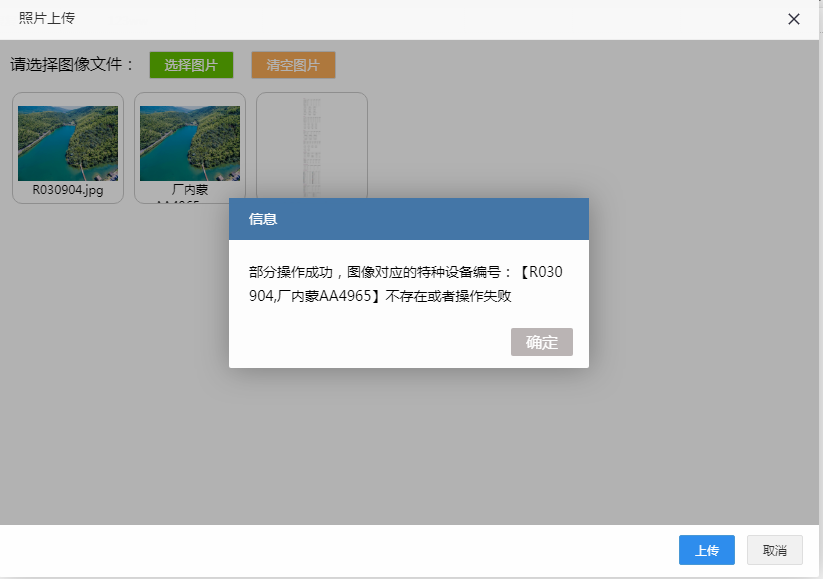
如图:
4、后台接收前台传过来的图片数据进行处理
public ActionResult SubmitPhoto()

        {

            //如果上传文件为空则返回

            if (Request.Files.Count > )

            {

                //文件名

                string fileName = "";

                string code = "";

                List<string> noCodes = new List<string>();

                for (int i = ; i < Request.Files.Count; i++)

                {

                    fileName = Request.Files[i].FileName;

                    code = fileName.Substring(, fileName.LastIndexOf('.'));

                    User_EP_Boiler bolier = OperateContext.Current.BllContext.IUser_EP_BoilerBll.GetModel(c => c.No == code && c.DeleteMark ==  && c.CompId == userContext.User.CompId);

                    if (bolier == null)

                    {

                        noCodes.Add(code);

                        continue;

                    }

                    string ext = Path.GetExtension(fileName).ToLower();

                    string filename = Guid.NewGuid().ToString() + ext;

                    string pathServer = "../Upload/" + userContext.Company.BranchStr + "/User_EPPhotos/" + filename;

                    bool result = false;

                    bolier.Photos = filename;

                    result = OperateContext.Current.BllContext.IUser_EP_BoilerBll.Modify(bolier);

                    if (result)

                    {

                        Request.Files[i].SaveAs(IOHelper.GetMapPath(pathServer));

                    }

                    else

                    {

                        noCodes.Add(code);

                        continue;

                    }

                }

                if (noCodes.Count <= )

                {

                    return Json(new MsgModel() { Message = "全部操作成功", State = , Code =  }, "text/html");

                }

                else

                {

                    string result = "【";

                    foreach (string codestr in noCodes)

                    {

                        result += codestr + ",";

                    }

                    result = result.Substring(, result.Length - );

                    result += "】";

                    string message = "";

                    if (noCodes.Count == Request.Files.Count)

                    {

                        message = "图像对应的特种设备编号不存在或者操作失败";

                    }

                    else

                    {

                        message = "部分操作成功,图像对应的特种设备编号:" + result + "不存在或者操作失败";

                    }

                    return Json(new MsgModel() { Message = message, State = , Code =  }, "text/html");

                }

            }

            else

            { return Json(new MsgModel() { Message = "请上传文件", State =  }); }

        }
页面有些地方使用了easyui和bootstrap的一些内容。。。没有显示出来。
记录下来,以免忘记,以后方便使用。
input(type='file')上传多张照片并显示,传到后台的更多相关文章
- input type=file 上传文件样式美化(转载)
input type=file 上传文件样式美化 来源:https://www.jianshu.com/p/6390595e5a36 在做input文本上传时,由于html原生的上传按钮比较丑,需要对 ...
- input type=file上传控件老问题
// 1.用INPUT控制上传文件时,点击INPUT控件出现文件选择框. // 2.如果在手机上使用时,一般不会出现这种较丑的 // 3.于是就自然想到将控件隐藏,然后用一个按钮代替,点击按钮时在函数 ...
- input type='file'上传控件假样式
采用bootstrap框架样式 <!DOCTYPE html> <html xmlns="http://www.w3.org/1999/xhtml"> &l ...
- HTML <input type="file">上传文件——结合asp.net的一个文件上传示例
HTML的代码:(关键是要在form里设置enctype="multipart/form-data",这样才能在提交表单时,将文件以二进制流的形式传输到服务器) 一. <fo ...
- 判断input[type=file]上传文件格式
input type="file" 在js中判断文件上传类型 function onSubmit(){ var form1 = document.forms[0]; var fil ...
- <input type=file>上传唯一控件
值得注意的是:当一个表单里面包含这个上传元素的时候,表单的enctype必须指定为multipart/form-data,method必须指定为post,浏览器才会认识并正确执行.但是还有一点,浏览器 ...
- jquery判断 input type="file"上传文件是否为空
要想获取type="file"的input内容,用var file = $("id").val();肯定是不行的,下面是代码: html上传按钮为: <i ...
- <input type="file">上传文件并添加路径到数据库
注:这里是用的mvc所以没法用控件 html代码 <form method="post" enctype="multipart/form-data"> ...
- 将通过<input type="file">上传的txt文件存储在localStorage,提取并构建File对象
参考博文: JS 之Blob 对象类型 在本地存储localStorage中保存图片和文件 <input type="file" id="jobData" ...
随机推荐
- Java-SSM框架页面时间格式转换
在JSP中,列表查询绑定时间时,会出现以下的时间格式,那样看起来的话,感觉... 那如何转换成“yyyy-MM-dd HH:mm:ss”格式呢?--很简单,在JSP头顶加上 <%@ taglib ...
- djang-异步——定时操作
django本身是一个同步框架,flask也是,所以要把它变成异步操作的话还得专门设置一下 我的这个系统呢是windows系统,python3.7的 所以有的库是不可以兼容的 ,然后到时候会稍微修改一 ...
- Python爬虫入门教程 29-100 手机APP数据抓取 pyspider
1. 手机APP数据----写在前面 继续练习pyspider的使用,最近搜索了一些这个框架的一些使用技巧,发现文档竟然挺难理解的,不过使用起来暂时没有障碍,估摸着,要在写个5篇左右关于这个框架的教程 ...
- 带着萌新看springboot源码05
上一节走了一遍从浏览器发出请求到得到向页面的流程,基本的功能是已经实现了.但是现在啊,我想自定义一个拦截器(拦截器可以做用户登录验证,如果登录了,就让你通过,如果没有登录,就重定向登录页面),这里就不 ...
- 【WCF学习大全】
我的WCF之旅(1):创建一个简单的WCF程序 我的WCF之旅(2):Endpoint Overview 我的WCF之旅(3):在WCF中实现双向通信(Bi-directional Communica ...
- log4j2 使用纪要
简介 Apache Log4j 2 是Log4j 的升级版,在该版本实现中,日志的处理流程及效率有了显著提升. 此外新版本也合入了一些logback日志框架体系的一些改进点. 关键特性 API分离,接 ...
- docker 常用命令和使用
首先安装Docker CE 在ubantu上,参照https://docs.docker.com/install/linux/docker-ce/ubuntu/#set-up-the-reposito ...
- 我和Session的不解之“缘”(故事型技术长文)
本文讲述了一路走来对Session的认知.文章有点长,不过是故事型的,应该不枯燥.相信读完也一定会有所收获. (一) “当你登陆系统后,服务器会创建一个Session,保存你的登陆信息,下次再访问时就 ...
- 阿里云ACE共创空间——MQ消息队列产品测试
一.产品背景消息队列是阿里巴巴集团自主研发的专业消息中间件. 产品基于高可用分布式集群技术,提供消息订阅和发布.消息轨迹查询.定时(延时)消息.资源统计.监控报警等一系列消息云服务,是企业级互联网架构 ...
- [51nod1355] 斐波那契的最小公倍数
Description 给定 \(n\) 个正整数 \(a_1,a_2,...,a_n\),求 \(\text{lcm}(f_{a_1},f_{a_2},...,f_{a_n})\).其中 \(f_i ...