
【学员管理系统】0x02 学生信息管理功能
【学员管理系统】0x02 学生信息管理功能
写在前面
项目详细需求参见:Django项目之【学员管理系统】
Django框架大致处理流程
捋一下Django框架相关的内容:
浏览器输入URL到页面展示结果的过程,可以简单参考下图:
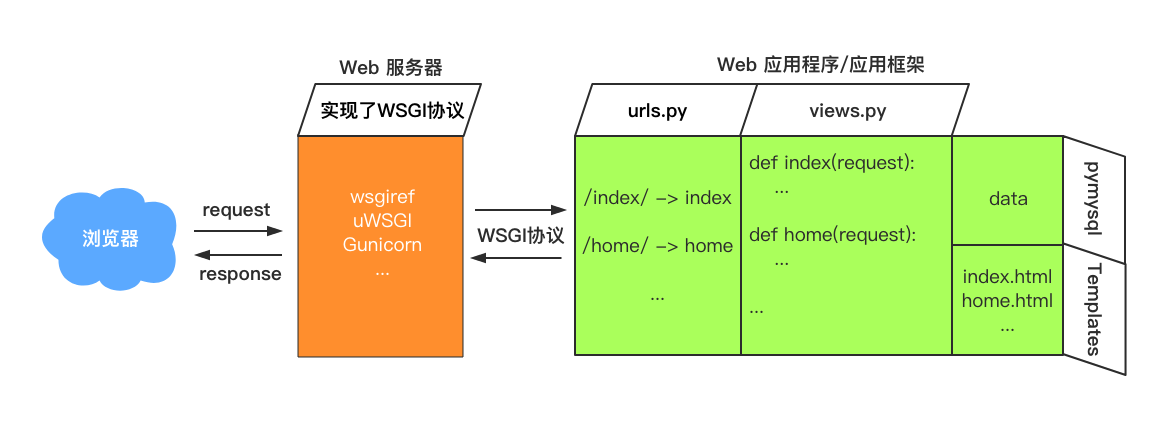
上图中,绿色部分就是我们实际需要开发的那部分。
在上一篇博客实现了班级信息的增删改查,现在继续开发学生信息管理的功能。
学生信息管理相比于班级信息管理稍微难一点,因为数据库的表结构中学生表通过外键关联了班级表。
所以增删改查的操作需要注意外键部分的相关操作。
学生信息展示(查)
区别于班级信息管理,学生信息因为通过外键关联了班级信息,所以除了要展示学生的姓名还要展示出学生所属班级的名称。
后端部分
def student_list(request):

    conn = pymysql.connect(host="127.0.0.1", port=3306, user="root", passwd="root1234", db="mysite", charset="utf8")

    cursor = conn.cursor(cursor=pymysql.cursors.DictCursor)

    cursor.execute("SELECT student.id, student.name, class.name AS class_name from student LEFT JOIN class ON student.class_id = class.id;")

    student_list = cursor.fetchall()

    cursor.close()

    conn.close()

    return render(request, "student_list.html", {"students": student_list})
后端部分
前端部分
<table class="table table-bordered table-striped">

  <thead>

  <tr>

    <th>#</th>

    <th>学生姓名</th>

    <th>班级</th>

    <th>操作</th>

  </tr>

  </thead>

  <tbody>

  {% for student in students %}

  <tr>

    <th scope="row">{{ student.id }}</th>

    <td>{{ student.name }}</td>

    <td>{{ student.class_name }}</td>

    <td class="text-center">

      <a type="button" class="btn btn-sm btn-success" aria-label="Left Align">

        <span class="glyphicon glyphicon-pencil" aria-hidden="true"></span>编辑

      </a>

      |

      <a href="/edit_student/?student_id={{ student.id }}/" type="button" class="btn btn-sm btn-success" aria-label="Left Align">

        <span class="glyphicon glyphicon-pencil" aria-hidden="true"></span>新页面编辑

      </a>

      |

      <a href="/delete_student/?student_id={{ student.id }}" type="button" class="btn btn-sm btn-danger" aria-label="Left Align">

        <span class="glyphicon glyphicon-remove" aria-hidden="true"></span>删除

      </a>

    </td>

  </tr>

  {% endfor %}

  </tbody>

</table>
前端部分
删除学生信息(删)
后端部分
def delete_student(request):

    # 从GET请求的URL中取到要删除的学生ID

    student_id = request.GET.get("student_id")

    # 连接数据库

    conn = pymysql.connect(host="127.0.0.1", port=3306, user="root", passwd="root1234", db="mysite", charset="utf8")

    cursor = conn.cursor(cursor=pymysql.cursors.DictCursor)

    # 删除指定的学生

    sql = "delete from student WHERE id=%s;"

    # 执行SQL语句

    cursor.execute(sql, [student_id, ])

    conn.commit()

    conn.close()

    # 删除成功,跳转到学生列表页

    return redirect("/student_list/")
后端部分
前端部分
注意在学生信息的页面删除按钮上用模板语言的方式拼接student_id。
<a href="/delete_student/?student_id={{ student.id }}" type="button" class="btn btn-sm btn-danger" aria-label="Left Align">

  <span class="glyphicon glyphicon-remove" aria-hidden="true"></span>删除

</a>
前端部分
添加学生信息(增)
后端部分
def add_student(request):

    # 如果是POST请求表示前端提交数据过来

    if request.method == "POST":

        student_name = request.POST.get("student_name")

        class_id = request.POST.get("class_id")

        conn = pymysql.connect(host="127.0.0.1", port=3306, user="root", passwd="root1234", db="mysite", charset="utf8")

        cursor = conn.cursor(cursor=pymysql.cursors.DictCursor)

        cursor.execute("insert into student(name, class_id) VALUES (%s, %s)", [student_name, class_id])

        conn.commit()

        cursor.close()

        conn.close()

        return redirect("/student_list/")

    # 前端不发送POST请求情况下默认返回新增学生信息页面

    else:

        # 因为我们新添加学生信息的时候需要指定所属的班级

        # 所以需要先查询出所有的班级信息,填充到页面上

        conn = pymysql.connect(host="127.0.0.1", port=3306, user="root", passwd="root1234", db="mysite", charset="utf8")

        cursor = conn.cursor(cursor=pymysql.cursors.DictCursor)

        cursor.execute("select id, name from class")

        class_list = cursor.fetchall()

        cursor.close()

        conn.close()

        return render(request, "add_student.html", {"class_list": class_list})
后端部分
前端部分
前端页面需要将已经有的班级信息做成可以选择的select框。
<form class="form-horizontal" action="/add_student/" method="post">

  <div class="form-group">

    <label for="inputclassname" class="col-sm-2 control-label">学生姓名</label>

    <div class="col-sm-10">

      <input type="text" class="form-control" name="student_name" id="inputclassname" placeholder="学生姓名">

    </div>

  </div>

  <div class="form-group">

    <label for="selectclass" class="col-sm-2 control-label">班级</label>

    <div class="col-sm-10">

      <select class="form-control" name="class_id">

        {% for class in class_list %}

          <option value="{{ class.id }}">{{ class.name }}</option>

        {% endfor %}

      </select>

    </div>

  </div>

  <div class="form-group">

    <div class="col-sm-offset-2 col-sm-10">

      <button type="submit" class="btn btn-default">提交</button>

    </div>

  </div>

</form>
前端部分
编辑学生信息(改)
后端部分
def edit_student(request):

    if request.method == "POST":

        student_id = request.POST.get("student_id")

        student_name = request.POST.get("student_name")

        class_id = request.POST.get("class_id")

        # 更新学生表的SQL

        sql = "update student set name=%s, class_id= %s WHERE id=%s;"

        # 连接数据库

        conn = pymysql.connect(host="127.0.0.1", port=3306, user="root", passwd="root1234", db="mysite", charset="utf8")

        cursor = conn.cursor(cursor=pymysql.cursors.DictCursor)

        cursor.execute(sql, [student_name, class_id, student_id])

        cursor.close()

        conn.close()

        # 更新完学生信息之后跳转到学生列表页面

        return redirect("/student_list/")

    else:

        # 要编辑学生信息就需要在页面上把当前学生的信息以及所有的班级信息都展示出来

        # 取到要编辑的学生的ID

        student_id = request.GET.get("student_id")

        # 连接数据库

        conn = pymysql.connect(host="127.0.0.1", port=3306, user="root", passwd="root1234", db="mysite", charset="utf8")

        cursor = conn.cursor(cursor=pymysql.cursors.DictCursor)

        # 取到所有的班级信息

        get_class_sql = "select id, name from class;"

        cursor.execute(get_class_sql)

        class_list = cursor.fetchall()

        get_student_sql = "select id, name, class_id from student where id=%s;"

        cursor.execute(get_student_sql, [student_id, ])

        student = cursor.fetchone()

        cursor.close()

        conn.close()

        return render(request, "edit_student.html", {"class_list": class_list, "student": student})
后端部分
前端部分
<form class="form-horizontal" action="/edit_student/" method="post">

  <input type="text" name="student_id" value="{{ student.id }}" style="display: none">

  <div class="form-group">

    <label for="inputclassname" class="col-sm-2 control-label">学生姓名</label>

    <div class="col-sm-10">

      <input type="text" class="form-control" name="student_name" id="inputclassname" placeholder="班级名称" value="{{ student.name }}">

    </div>

    <span id="helpBlock2" class="help-block">{{ error }}</span>

  </div>

  <div class="form-group">

      <label for="selectclass" class="col-sm-2 control-label">班级</label>

      <div class="col-sm-10">

        <select class="form-control" name="class_id">

          {% for class in class_list %}

            {% if class.id == student.class_id %}

            <option selected value="{{ class.id }}">{{ class.name }}</option>

            {% else %}

            <option value="{{ class.id }}">{{ class.name }}</option>

            {% endif %}

          {% endfor %}

        </select>

      </div>

    </div>

  <div class="form-group">

    <div class="col-sm-offset-2 col-sm-10">

      <button type="submit" class="btn btn-default">提交</button>

    </div>

  </div>

</form>
前端部分
【学员管理系统】0x02 学生信息管理功能的更多相关文章
- 使用Struts2+Hibernate开发学生信息管理功能1
第一章:Struts2与Hibernate整合 1.课程简介 2.界面原型演示 3.Struts2与Hibernate整合 4.创建实体类 5.生成实体映射文件 6.生成表结构 1.课程简介 Stru ...
- 学员管理系统(简单的Django设计)
学员管理系统(简单的Django设计) 学员管理系统 项目规划阶段 项目背景 近年来老男孩教育的入学学员数量稳步快速增长,传统的excel统计管理学员信息的方式已经无法满足日渐增长的业务需求.因此公司 ...
- Django pymysql学员管理系统
学员管理系统 项目规划阶段 项目背景 近年来老男孩教育的入学学员数量稳步快速增长,传统的excel统计管理学员信息的方式已经无法满足日渐增长的业务需求.因此公司急需一套方便易用的“学员管理系统”,来提 ...
- 【学员管理系统】0x03 老师信息管理功能
[学员管理系统]0x03 老师信息管理功能 老师信息管理相比于学生信息管理又多了一点,因为我们的数据结构中老师表和班级表是通过teacher2class表进行多对多关联的. 写在前面 项目详细需求参见 ...
- 【学员管理系统】0x01 班级信息管理功能
[学员管理系统]0x01 班级信息管理功能 写在前面 项目详细需求参见:Django项目之[学员管理系统] 视图函数: 我们把所有的处理请求相关的函数从 urls.py中拿出来,统一放在一个叫view ...
- 一个低级shell简易学生信息管理系统-新增登陆注册功能
还有bug 不修改了 小声bb一下 这玩意真的要控制版本 随手保存 本来有个超完整的版本 一开心被我rm - f 了 后续还出现了 更多的bug 仔细仔细 源码如下: record=stu.db if ...
- Python开发程序:学员管理系统(mysql)
主题:学员管理系统 需求: 用户角色,讲师\学员, 用户登陆后根据角色不同,能做的事情不同,分别如下 讲师视图: 管理班级,可创建班级,根据学员qq号把学员加入班级 可创建指定班级的上课纪录,注意一节 ...
- Python学习(二十七)—— Django和pymysql搭建学员管理系统
转载自http://www.cnblogs.com/liwenzhou/p/8270250.html 一.学员管理系统 1.项目规划阶段 项目背景 近年来老男孩教育的入学学员数量稳步快速增长,传统的e ...
- Django和pymysql搭建学员管理系统
学员管理系统 项目规划阶段 项目背景 近年来老男孩教育的入学学员数量稳步快速增长,传统的excel统计管理学员信息的方式已经无法满足日渐增长的业务需求.因此公司急需一套方便易用的“学员管理系统”,来提 ...
随机推荐
- [WCF菜鸟]什么是WCF
一.概述 Windows Communication Foundation(WCF)是由微软发展的一组数据通信的应用程序开发接口,可以翻译为Windows通讯接口,它是.NET框架的一部分.由 .NE ...
- JAVA Eclipse Incorrect line ending found carriage return 怎么办
点击项目-清理即可
- python-mysql-replication
python处理mysql binlog增量日志 http://python-mysql-replication.readthedocs.io/en/latest/examples.html 同样的项 ...
- JDBC性能优化方案
最近用到了利用JDBC查询Oracle数据库.可是查询效率不尽人意.研究了一下JDBC方面能够优化的地方,在这里跟大家分享一下. 1.设置最优的预取值 defaultRowP ...
- Git简明操作
我每天使用 Git ,但是很多命令记不住. 一般来说,日常使用只要记住下图6个命令,就可以了.但是熟练使用,恐怕要记住60-100个命令. 下面是我整理的常用 Git 命令清单.几个专用名词的译名如下 ...
- http://m2eclipse.sonatype.org/sites/m2e地址更换了
http://m2eclipse.sonatype.org/sites/m2e 更换为 https://repository.sonatype.org/content/sites/forge-site ...
- libpointmatcher的filter
Maximum Density Filter Points are only considered for rejection if they exceed a density threshold, ...
- 链表的艺术——Linux内核链表分析
引言: 链表是数据结构中的重要成员之中的一个.因为其结构简单且动态插入.删除节点用时少的长处,链表在开发中的应用场景许多.仅次于数组(越简单应用越广). 可是.正如其长处一样,链表的缺点也是显而易见的 ...
- java大批量数据导入(MySQL)
© 版权声明:本文为博主原创文章,转载请注明出处 最近同事碰到大批量数据导入问题,因此也关注了一下.大批量数据导入主要存在两点问题:内存溢出和导入速率慢. 内存溢出:将文件中的数据全部取出放在集合中, ...
- Maven环境下搭建SSH框架之Spring整合Hibernate
© 版权声明:本文为博主原创文章,转载请注明出处 1.搭建环境 Spring:4.3.8.RELEASE Hibernate:5.1.7.Final MySQL:5.7.17 注意:其他版本在某些特性 ...