
sqlalchemy - day2
Relationship Configuration
一、one to many
直接上代码
 from sqlalchemy import create_engine

 engine = create_engine("mysql+pymysql://root:max123@127.0.0.1/test?charset=utf8", echo=False)

 from sqlalchemy import *

 from sqlalchemy.ext.declarative import declarative_base

 from datetime import datetime, date

 Base = declarative_base()

 class Parent(Base):

     __tablename__ = 'perent'

     id = Column(Integer(), primary_key=True)

     name = Column(String(50))

     children = relationship('Child')

 class Child(Base):

     __tablename__ = 'child'

     id = Column(Integer(), primary_key=True)

     name = Column(String(50))

     parent_id = Column(Integer(), ForeignKey('parent.id'))
现在Parent类就定义了one to many 的relationship, Child类没有定义任何relationship. backref一般用于单边的relationship,下图是官方文档的说明。

 child_one = Child(name='purk')

 parent = Parent(name='Wu', children=[child_one])

 db.add(parent)

 db.commit()
结果如下,在add parent时,关联的child 也 add 到数据库了。

现在分开操作,先add child,在add parent
 child_one =  Child(name='purk')

 db.add(child_one)

 db.commit()
结果如下,parent_id是null值

在执行如下代码
 parent = Parent(name='Wu', children=[child_one])

 db.add(parent)

 db.commit()
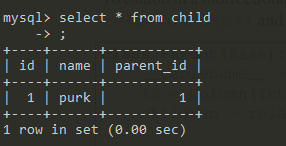
结果如下,打开echo,可以看到SQL是先insert parent,然后update child.
二、many to one
直接上代码,现在Child对Parent就是many to one的关系
 class Parent(Base):

     __tablename__ = 'parent'

     id = Column(Integer(), primary_key=True)

     name = Column(String(50))

     children = relationship('Child', back_populates='parent')

 class Child(Base):

     __tablename__ = 'child'

     id = Column(Integer(), primary_key=True)

     name = Column(String(50))

     parent_id = Column(Integer(), ForeignKey('parent.id'), nullable=True)

     parent = relationship('Parent', back_populates='children')
通过relationship处理的类,可以直接用属性的方式访问到关联的父级或子级
 from sqlalchemy.orm import sessionmaker

 Session = sessionmaker(bind=engine)

 db = Session()

 child_one = Child(name='purk')

 parent = Parent(name='Wu', children=[child_one])

 db.add(parent)

 db.commit()

 child = db.query(Child).get(1)

 print(child.parent.name)
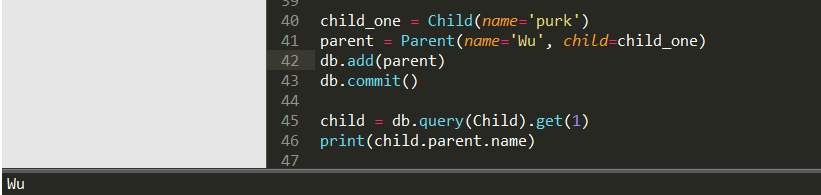
结果如下

三、one to one
只需给relationship的uselist赋值为False, parent 对child就成了one to one的关系,只要保证many 的那一方加上uselist=False就可以了。
 class Parent(Base):

     __tablename__ = 'parent'

     id = Column(Integer(), primary_key=True)

     name = Column(String(50))

     child = relationship('Child', back_populates='parent', uselist=False)

 class Child(Base):

     __tablename__ = 'child'

     id = Column(Integer(), primary_key=True)

     name = Column(String(50))

     parent_id = Column(Integer(), ForeignKey('parent.id'), nullable=True)

     parent = relationship('Parent', back_populates='child')
之前的方式把child继续当成一个list就会报错了

不当成list,
四、many to many
方式一: 可以看出many to many 会有一个中间表,通过secondary指定,这个中间表是不需要维护的,做增删改时自动维护了,但是此中间表就没有有价值的字段,如果中间表需要增加一些除了外键的字段,就是下面的方 式二
 from sqlalchemy import create_engine

 engine = create_engine("mysql+pymysql://root:max123@127.0.0.1/test?charset=utf8", echo=False)

 from sqlalchemy import *

 from sqlalchemy.orm import relationship

 from sqlalchemy.ext.declarative import declarative_base

 from datetime import datetime, date

 Base = declarative_base()

 class ParentChild(Base):

     __tablename__ = 'parent_child'

     id = Column(Integer(), primary_key=True)

     child_id = Column(Integer(), ForeignKey('child.id'), nullable=False)

     parent_id = Column(Integer(), ForeignKey('parent.id'), nullable=False)

 class Parent(Base):

     __tablename__ = 'parent'

     id = Column(Integer(), primary_key=True)

     name = Column(String(50))

     children = relationship('Child', back_populates='parents', secondary=ParentChild.__table__)

 class Child(Base):

     __tablename__ = 'child'

     id = Column(Integer(), primary_key=True)

     name = Column(String(50))

     parents = relationship('Parent', back_populates='children', secondary=ParentChild.__table__)

 Base.metadata.drop_all(engine)

 Base.metadata.create_all(engine)

 from sqlalchemy.orm import sessionmaker

 Session = sessionmaker(bind=engine)

 db = Session()

 child_one = Child(name='purk1')

 child_two = Child(name='purk2')

 child_three = Child(name='purk3')

 child_four = Child(name='purk4')

 parent_one = Parent(name='Wu1')

 parent_two = Parent(name='Wu2')

 parent_one.children.extend([child_one, child_two])

 parent_two.children.extend([child_two, child_three])

 child_four.parents.extend([parent_one, parent_two])

 db.add_all([parent_one, parent_two, child_four])

 db.commit()
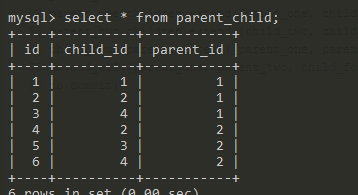
结果如下
加上如下的delete操作代码
 parent_one.children.remove(child_one)

 db.merge(parent_one)

 db.commit()

 db.delete(child_three)

 db.commit()
结果如下

方式二:many to one 然后 one to many,这样就可以把中间表利用起来了
 from sqlalchemy import create_engine

 engine = create_engine("mysql+pymysql://root:max123@127.0.0.1/test?charset=utf8", echo=False)

 from sqlalchemy import *

 from sqlalchemy.orm import relationship

 from sqlalchemy.ext.declarative import declarative_base

 from datetime import datetime, date

 Base = declarative_base()

 class Parent(Base):

     __tablename__ = 'parent'

     id = Column(Integer(), primary_key=True)

     name = Column(String(50))

     children = relationship('ParentChild', back_populates='parent')

 class Child(Base):

     __tablename__ = 'child'

     id = Column(Integer(), primary_key=True)

     name = Column(String(50))

     parents = relationship('ParentChild', back_populates='child')

 class ParentChild(Base):

     __tablename__ = 'parent_child'

     id = Column(Integer(), primary_key=True)

     child_id = Column(Integer(), ForeignKey('child.id'), nullable=False)

     parent_id = Column(Integer(), ForeignKey('parent.id'), nullable=False)

     description = Column(String(100))

     parent = relationship('Parent',back_populates='children')

     child = relationship('Child',back_populates='parents')

 Base.metadata.drop_all(engine)

 Base.metadata.create_all(engine)

 from sqlalchemy.orm import sessionmaker

 Session = sessionmaker(bind=engine)

 db = Session()

 child_one = Child(name='purk1')

 child_two = Child(name='purk2')

 child_three = Child(name='purk3')

 child_four = Child(name='purk4')

 parent_one = Parent(name='Wu1')

 parent_two = Parent(name='Wu2')

 parent_child_one = ParentChild(description='association one')

 parent_child_two = ParentChild(description='association two')

 parent_child_one.child = child_one

 parent_child_two.child = child_two

 parent_one.children.extend([parent_child_one, parent_child_two])

 db.add_all([parent_one, parent_two, child_four])

 db.commit()
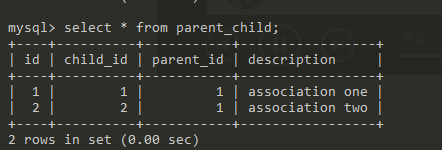
结果如下
加入如下代码
 parent_one.children.pop(0)

 # parent_one.children[1].append(child_three)

 db.merge(parent_one)

 db.commit()
报错了如下,当然前面定义中间表的时候定义了nullable= False, 可是SQL要强行把起更新为Null,肯定报错咯。虽然去掉nullable=False的限制,但是这可能也不是我想要的,我想要的是直接删掉这条记录的。


想到就去做,给relationship加上cascade='all,delete-orphan', cascade官方解释如下
2.5.3 Cascades
Mappers support the concept of configurable cascade behavior on relationship() constructs. This refers to how
operations performed on a “parent” object relative to a particular Session should be propagated to items referred to
by that relationship (e.g. “child” objects), and is affected by the relationship.cascade option.
The default behavior of cascade is limited to cascades of the so-called save-update and merge settings. The typical
“alternative” setting for cascade is to add thedeleteand delete-orphanoptions; these settings are appropriate for related
objects which only exist as long as they are attached to their parent, and are otherwise deleted.
Cascade behavior is configured using the by changing the cascade option on relationship():
 class Order(Base):

 __tablename__ = 'order'

 items = relationship("Item", cascade="all, delete-orphan")

 customer = relationship("User", cascade="save-update")
To set cascades on a backref, the same flag can be used with the backref() function, which ultimately feeds its
arguments back into relationship():
class Item(Base):
 __tablename__ = 'item'

 order = relationship("Order",

 backref=backref("items", cascade="all, delete-orphan")

 )
加上cascade以后,在删除children时,就会把parent_child表里面的记录删掉了。
 class Parent(Base):

     __tablename__ = 'parent'

     id = Column(Integer(), primary_key=True)

     name = Column(String(50))

     children = relationship('ParentChild', back_populates='parent',cascade='all,delete-orphan')
结果如下

backref与relationship同功能的属性有 uselist和cascade。
lazy ='select' :
1) select: lazy加载模式,只在真正调用这个属性时才会去访问数据库
 class Parent(Base):

     __tablename__ = 'parent'

     id = Column(Integer(), primary_key=True)

     name = Column(String(50))

     children = relationship('ParentChild', back_populates='parent', cascade='all,delete-orphan', lazy='select')

 parent = db.query(Parent).get(1)

 db.close()
结果是没有去请求parent_child的数据

 parent = db.query(Parent).get(1)

 parent.children

 db.close()
结果如下,对比这两个结果,可以看出,parent.children在执行的时候才去请求的数据。

2) immediate: 直接加载,随父级以子查询的方式一同访问数据库。
 parent = db.query(Parent).get(1)

 # parent.children

 db.close()
结果是,在parent加载的时候就已经加载数据了。

3) joined: 直接加载,随父级以join的方式一同访问数据库,具体是 inner join还是outer join(left join)就看relationship的innerjoin属性时True还是False了。
class Parent(Base):

    __tablename__ = 'parent'

    id = Column(Integer(), primary_key=True)

    name = Column(String(50))

    children = relationship('ParentChild', back_populates='parent', cascade='all,delete-orphan', lazy='joined')

parent = db.query(Parent).get(1)

# parent.children

db.close()
结果可以看出parent加载数据的时候就join出了children的数据

 class Parent(Base):

     __tablename__ = 'parent'

     id = Column(Integer(), primary_key=True)

     name = Column(String(50))

     children = relationship('ParentChild', back_populates='parent', cascade='all,delete-orphan', lazy='joined', innerjoin=True)

 parent = db.query(Parent).get(1)

 # parent.children

 db.close()
innerjoin参数的作用

4) subquery: 结果集连接查询的方式跟随parent一起加载出数据
 children = relationship('ParentChild', back_populates='parent', cascade='all,delete-orphan', lazy='subquery')

 parent = db.query(Parent).get(1)

 # parent.children

 db.close()
5) noload:no loading should occur at any time. This is to support “write-only” attributes,
or attributes which are populated in some manner specific to the application. 官方文档解释,感觉没有什么实际意思。
6) dynamic: 返回query对象,可一直使用filter等条件过滤。
 children = relationship('ParentChild', back_populates='parent', cascade='all,delete-orphan', lazy='dynamic')

 parent = db.query(Parent).get(1)

 parent.children.all()

 db.close()
结果如下,看代码就明白其意义了。

sqlalchemy - day2的更多相关文章
- Python之路:Python操作 RabbitMQ、Redis、Memcache、SQLAlchemy
Memcached Memcached 是一个高性能的分布式内存对象缓存系统,用于动态Web应用以减轻数据库负载.它通过在内存中缓存数据和对象来减少读取数据库的次数,从而提高动态.数据库驱动网站的速度 ...
- 【从零开始学BPM,Day2】默认表单开发
[课程主题]主题:5天,一起从零开始学习BPM[课程形式]1.为期5天的短任务学习2.每天观看一个视频,视频学习时间自由安排. [第二天课程] Step 1 软件下载:H3 BPM10.0全开放免费下 ...
- sqlalchemy学习
sqlalchemy官网API参考 原文作为一个Pythoner,不会SQLAlchemy都不好意思跟同行打招呼! #作者:笑虎 #链接:https://zhuanlan.zhihu.com/p/23 ...
- tornado+sqlalchemy+celery,数据库连接消耗在哪里
随着公司业务的发展,网站的日活数也逐渐增多,以前只需要考虑将所需要的功能实现就行了,当日活越来越大的时候,就需要考虑对服务器的资源使用消耗情况有一个清楚的认知. 最近老是发现数据库的连接数如果 ...
- 冰冻三尺非一日之寒-mysql(orm/sqlalchemy)
第十二章 mysql ORM介绍 2.sqlalchemy基本使用 ORM介绍: orm英文全称object relational mapping,就是对象映射关系程序,简单来说我们类似pyt ...
- Python 【第六章】:Python操作 RabbitMQ、Redis、Memcache、SQLAlchemy
Memcached Memcached 是一个高性能的分布式内存对象缓存系统,用于动态Web应用以减轻数据库负载.它通过在内存中缓存数据和对象来减少读取数据库的次数,从而提高动态.数据库驱动网站的速度 ...
- SQLAlchemy(一)
说明 SQLAlchemy只是一个翻译的过程,我们通过类来操作数据库,他会将我们的对应数据转换成SQL语句. 运用ORM创建表 #!/usr/bin/env python #! -*- coding: ...
- NOIp2016 Day1&Day2 解题报告
Day1 T1 toy 本题考查你会不会编程. //toy //by Cydiater //2016.11.19 #include <iostream> #include <cstd ...
- sqlalchemy(二)高级用法
sqlalchemy(二)高级用法 本文将介绍sqlalchemy的高级用法. 外键以及relationship 首先创建数据库,在这里一个user对应多个address,因此需要在address上增 ...
随机推荐
- Flexigrid例子二: 原位编辑器
有时候,我们想要编辑flexigrid里的数据.一个原位编辑器是需要的,现在不需要再弹出一个对话框了.这里我会展示如何做到这点. 我使用了jquery-in-place-editor库.请参考官方站点 ...
- Android 媒体键监听以及模拟媒体键盘的实现 demo
有时我们需要程序模拟按钮或点击,而手机本身又没有,哪么可以采取其它方式 模拟实现,最后再去实际设备去测试(前期一般都拿不到设备): 如上一首,下一首,暂停等,手机上是没有的,但有些设备上是有的,所以我 ...
- 一点点seo
Search Engine Optimization(搜索引擎优化 ),是较为流行的网络营销方式. 主要目的是增加特定关键字的曝光率.有站外SEO和站内SEO.通过了解各类搜索引擎如何抓取互联网页面. ...
- yii中rights安装
具体安装程序可参考:http://www.focalhot.com/blog/5.html 我在安装过程中一直存在问题,提示表auth_assignment不存在 由于我是将项目中已有的代码复制过来, ...
- 学习记录 java泛型资料
java泛型资料: 1. 概述在引入范型之前,Java类型分为原始类型.复杂类型,其中复杂类型分为数组和类.引入范型后,一个复杂类型就可以在细分成更多的类型.例如原先的类型List,现在在细分成Lis ...
- jQuery右键菜单ContextMenu使用笔记
插件下载地址:http://www.trendskitchens.co.nz/jquery/contextmenu/jquery.contextmenu.r2.packed.js 和http://ww ...
- MongoDB 3: 使用中的问题,及其应用场景
导读:用MongoDB去存储非关系型的数据,是一个比较正确的选择.但是,如果只是用MongoDB,那么也会出现一些问题.MongoDB,尤其使用的最佳场景,更多的时候,需要结合关系型数据库共同解决问题 ...
- CSS现代字体栈
CSS字体栈是一系列的字体,它包含了能在不同操作系统和平台上战士的字体,以尽可能的使排版保持一致性.浏览器会在font-family规定的所有字体中从前往后一次查找,如果找不到当前字体就查找下一个字体 ...
- WF4.0 Activities<第一篇>
一.基元工具 1.Delay Delay用于延迟一段时间执行下面的流程.在WF中实例是单线程运行的,Delay并不是Thread.Sleep方法实现的. Delay有一个Duration属性,用于设置 ...
- JS产生四位随机数的方法
<script>var charactors="1234567890"; var value='',i; for(j=1;j<=4;j++){ i = parse ...