
k8s入坑之路(15)kubernetes共享存储与StatefulSet有状态
共享存储
docker默认是无状态,当有状态服务时需要用到共享存储
- 为什么需要共享存储:
- 1.最常见有状态服务,本地存储有些程序会把文件保存在服务器目录中,如果容器重新启停则会丢失。
- 2.如果使用volume将目录挂载到容器中,涉及到备份及高可用问题。如果宿主机出现问题则会造成不可用状态。
kubernetes中提供了共享存储
1.pv(PresistentVolume持久卷)
2.pvc (PresistentVolumeClaim持久卷声明)
PV
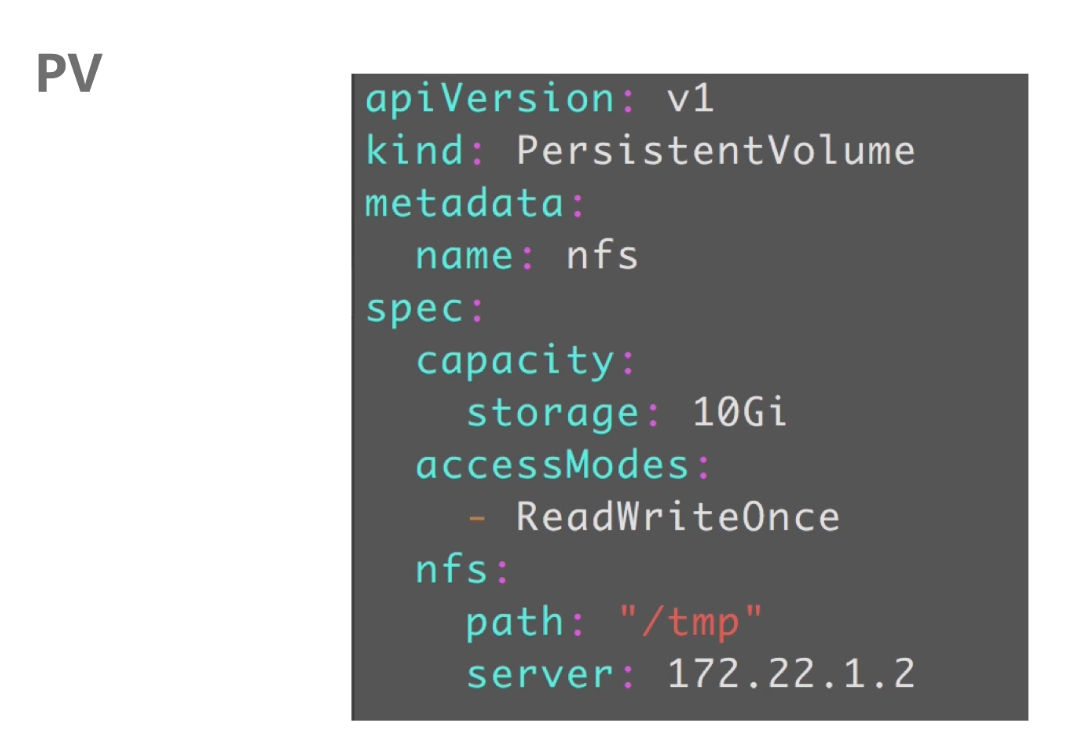
pv中定义了:

pv的容量

pv的访问模式(readWriteOnce:可读可写,但支持被单个pod挂载,replicas为1


readOnlyMany:表示以只读的方式被多个pod挂载,就是replicas可以大于1


readWriteMany:这种存储可以以读写方式被多个pod共享,就是replicas可以大于1)

pv连接的存储后端地址
pv使用nfs类型:
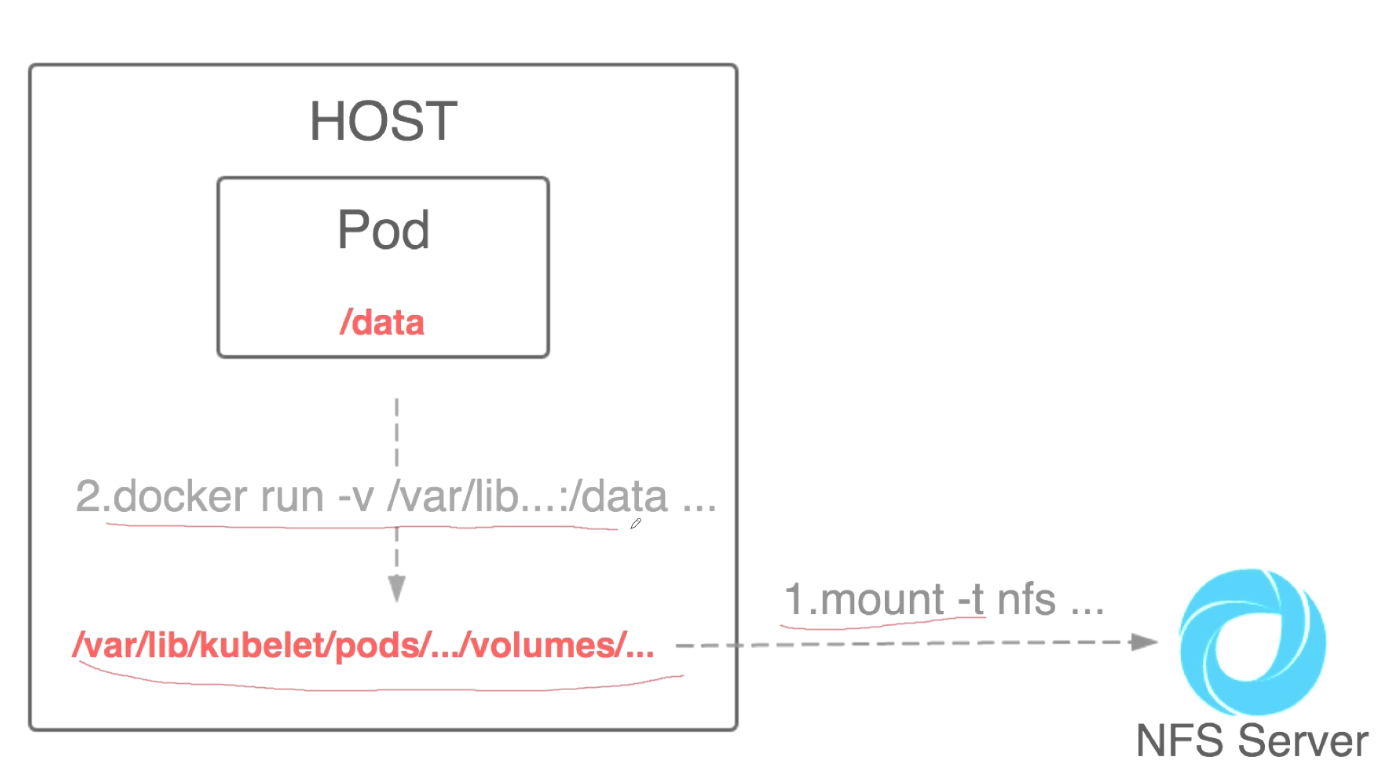
###将nfs mount到本地目录中,然后挂载到pod里。
StorageClass管理pv与pvc
StorageClass管理GFS pv例子:
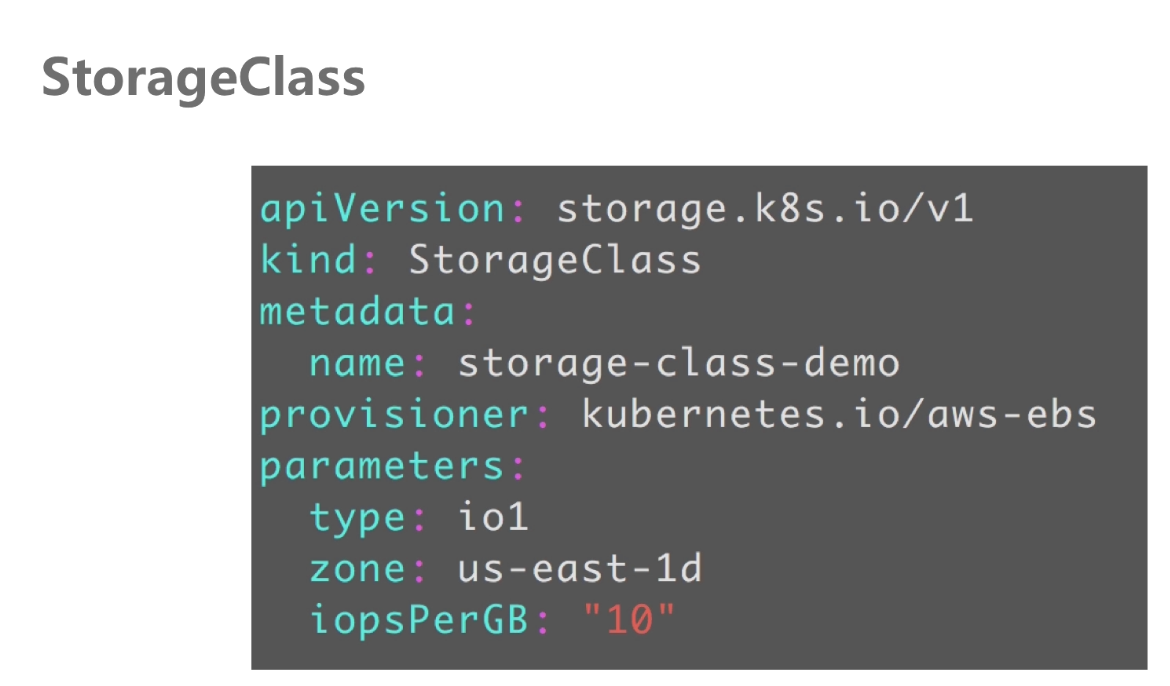
kubernetes中自动管理共享存储pv api,当pod数量过多共享存储需求量大,所以对应的有了storage-class,能够帮助我们自动的去创建pv。省去了pv的创建与回收。
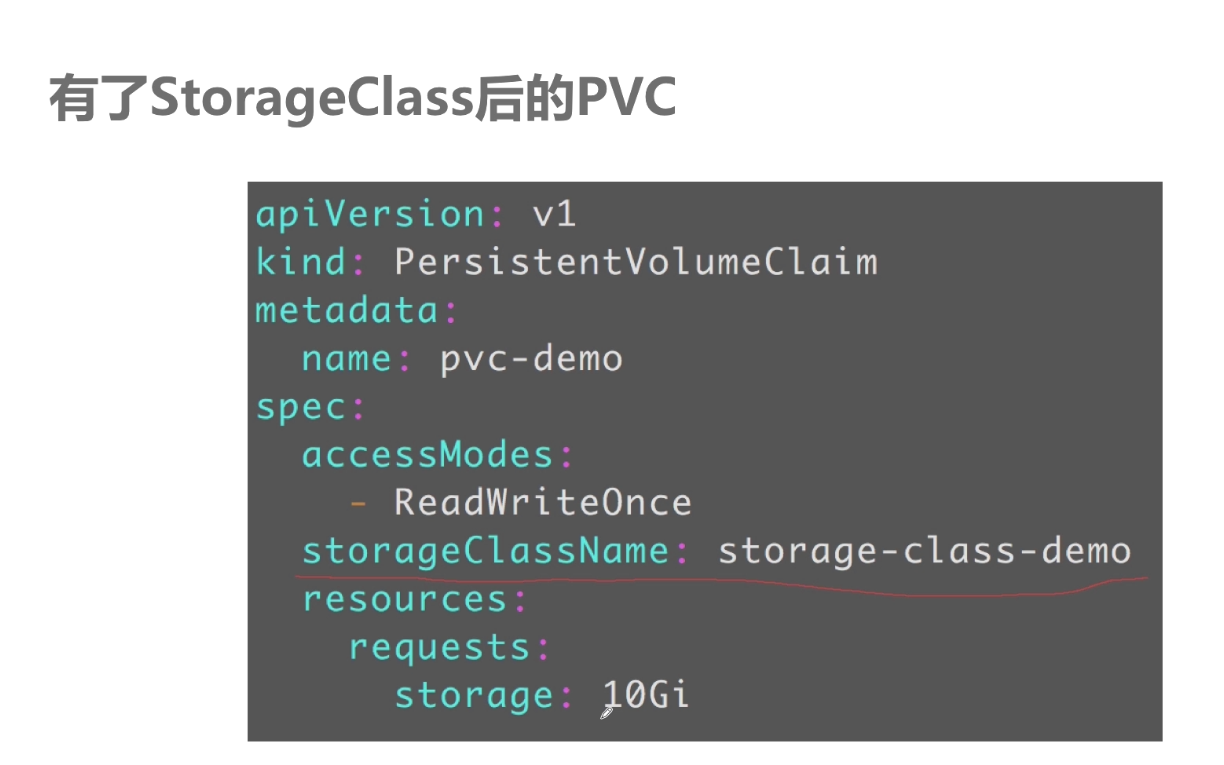
##pvc通过pv StorageClass-name去绑定pv
架构图如下:
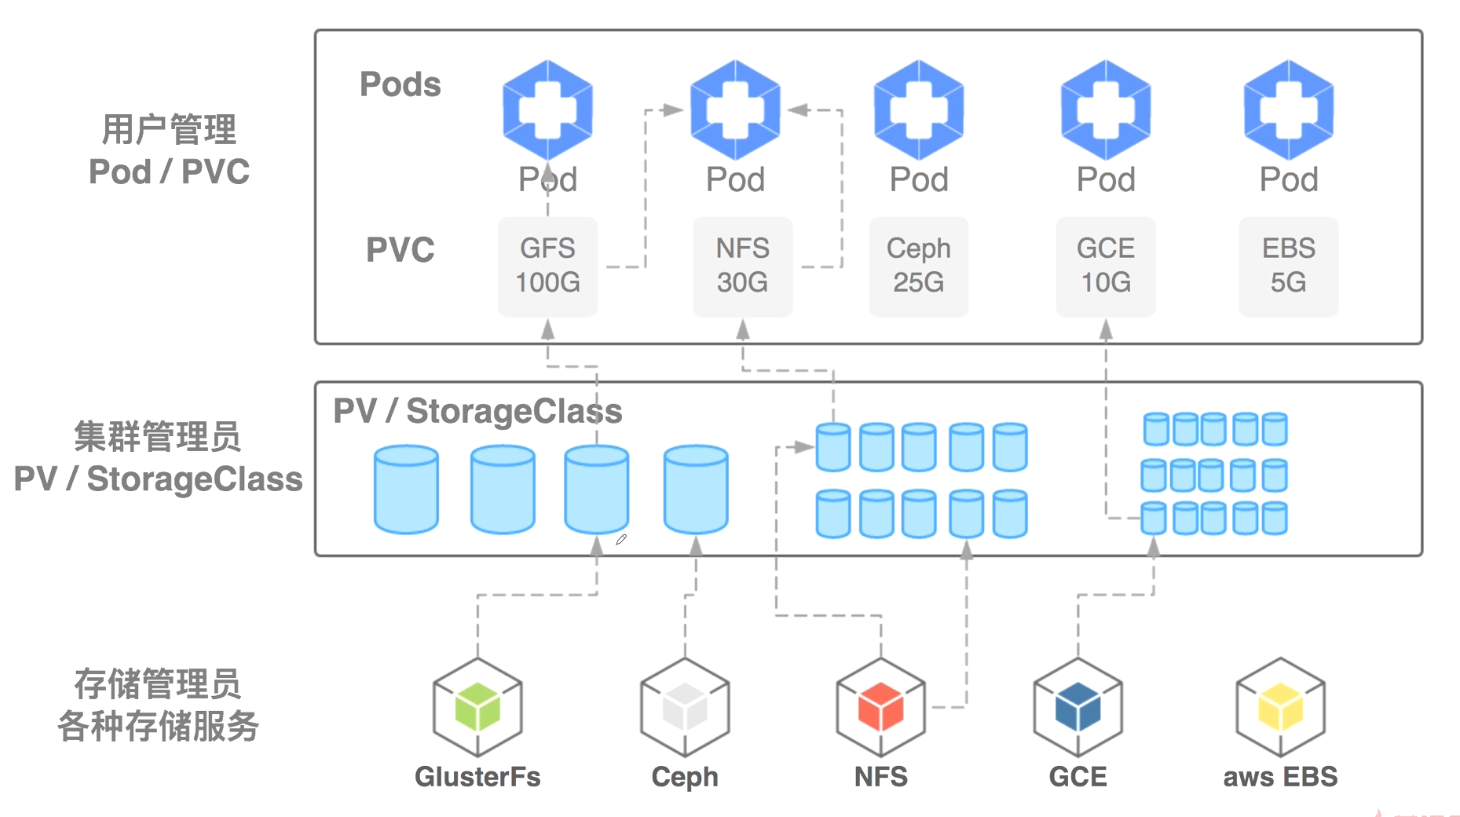
##手动pv事先创建好,一个pv只能绑定一个后端。当pvc使用时进行绑定。
##自动的后端对应一个StorageClass,pvc根据StorageClass去创建相应大小的pv。pvc与pod是由用户去负责,用户创建了pvc匹配不到的话 pod及pvc会处于pendding状态。如果匹配到k8s就会为他们自动建立起绑定关系。
##一个pv可以给多个pvc使用,一个pvc只能绑定一个pv,一个pv只能绑定一个后端存储。
storageclass创建pv


apiVersion: storage.k8s.io/v1

kind: StorageClass

metadata:

  name: glusterfs-storage-class

provisioner: kubernetes.io/glusterfs

parameters:

  resturl: "http://10.155.20.120:30001"

  restauthenabled: "false"
glusterfs-storage-class.yaml
##指定了后端存储地址以及storageclass name
storageclass创建pv
kind: PersistentVolumeClaim

apiVersion: v1

metadata:

  name: glusterfs-pvc

spec:

  storageClassName: glusterfs-storage-class

  accessModes:

    - ReadWriteOnce

  resources:

    requests:

      storage: 1Gi
glusterfs-pvc.yaml
###指定了storageclass name以及权限和大小
验证pvc
kubectl apply -f gluster-pvc.yaml

kubetctl get pvc

kubectl get pv 查看是否绑定 查看yaml中是否互相绑定了volumeName
pod使用pvc
apiVersion: apps/v1

kind: Deployment

metadata:

  name: web-deploy

spec:

  strategy:

    rollingUpdate:

      maxSurge: 25%

      maxUnavailable: 25%

    type: RollingUpdate

  selector:

    matchLabels:

      app: web-deploy

  replicas: 2

  template:

    metadata:

      labels:

        app: web-deploy

    spec:

      containers:

      - name: web-deploy

        image: hub.mooc.com/kubernetes/springboot-web:v1

        ports:

        - containerPort: 8080

        volumeMounts:

          - name: gluster-volume

            mountPath: "/mooc-data"

            readOnly: false

      volumes:

      - name: gluster-volume

        persistentVolumeClaim:

          claimName: glusterfs-pvc
pod-pvc.yaml
glusterFS部署
glusterfs部署要求:
- 至少需要3个节点(保证数据存在三个副本)
- 每个节点要有一块裸磁盘没有经过分区
1、各个节点运行

yum -y install glusterfs glusterfs-fuse

2、查看api-server和kubelet是否支持

ps -ef |grep apiserver |grep allow-pri 需要--allow-privileged=true
glusterfs安装
运行glusterfs以deamonset方式运行
kind: DaemonSet

apiVersion: extensions/v1beta1

metadata:

  name: glusterfs

  labels:

    glusterfs: daemonset

  annotations:

    description: GlusterFS DaemonSet

    tags: glusterfs

spec:

  template:

    metadata:

      name: glusterfs

      labels:

        glusterfs: pod

        glusterfs-node: pod

    spec:

      nodeSelector:

        storagenode: glusterfs

      hostNetwork: true

      containers:

      - image: gluster/gluster-centos:latest

        imagePullPolicy: IfNotPresent

        name: glusterfs

        env:

        # alternative for /dev volumeMount to enable access to *all* devices

        - name: HOST_DEV_DIR

          value: "/mnt/host-dev"

        # set GLUSTER_BLOCKD_STATUS_PROBE_ENABLE to "1" so the

        # readiness/liveness probe validate gluster-blockd as well

        - name: GLUSTER_BLOCKD_STATUS_PROBE_ENABLE

          value: "1"

        - name: GB_GLFS_LRU_COUNT

          value: "15"

        - name: TCMU_LOGDIR

          value: "/var/log/glusterfs/gluster-block"

        resources:

          requests:

            memory: 100Mi

            cpu: 100m

        volumeMounts:

---

kind: DaemonSet

apiVersion: extensions/v1beta1

metadata:

  name: glusterfs

  labels:

    glusterfs: daemonset

  annotations:

    description: GlusterFS DaemonSet

    tags: glusterfs

spec:

  template:

    metadata:

      name: glusterfs

      labels:

        glusterfs: pod

        glusterfs-node: pod

    spec:

      nodeSelector:

        storagenode: glusterfs #在要部署的node上打上标签

      hostNetwork: true

      containers:

      - image: gluster/gluster-centos:latest

        imagePullPolicy: IfNotPresent

        name: glusterfs

        env:

        # alternative for /dev volumeMount to enable access to *all* devices

        - name: HOST_DEV_DIR

          value: "/mnt/host-dev"

        # set GLUSTER_BLOCKD_STATUS_PROBE_ENABLE to "1" so the

        # readiness/liveness probe validate gluster-blockd as well

        - name: GLUSTER_BLOCKD_STATUS_PROBE_ENABLE

          value: "1"

        - name: GB_GLFS_LRU_COUNT

          value: "15"

        - name: TCMU_LOGDIR

          value: "/var/log/glusterfs/gluster-block"

        resources:

          requests:

            memory: 100Mi

            cpu: 100m

        volumeMounts:

        - name: glusterfs-heketi

          mountPath: "/var/lib/heketi"

        - name: glusterfs-run

          mountPath: "/run"

        - name: glusterfs-lvm

          mountPath: "/run/lvm"

        - name: glusterfs-etc

          mountPath: "/etc/glusterfs"

        - name: glusterfs-logs

          mountPath: "/var/log/glusterfs"

        - name: glusterfs-config

          mountPath: "/var/lib/glusterd"

        - name: glusterfs-host-dev

          mountPath: "/mnt/host-dev"

        - name: glusterfs-misc

          mountPath: "/var/lib/misc/glusterfsd"

        - name: glusterfs-block-sys-class

          mountPath: "/sys/class"

        - name: glusterfs-block-sys-module

          mountPath: "/sys/module"

        - name: glusterfs-cgroup

          mountPath: "/sys/fs/cgroup"

          readOnly: true

        - name: glusterfs-ssl

          mountPath: "/etc/ssl"

          readOnly: true

        - name: kernel-modules

          mountPath: "/usr/lib/modules"

          readOnly: true

        securityContext:

          capabilities: {}

          privileged: true

        readinessProbe:

          timeoutSeconds: 3

          initialDelaySeconds: 40

          exec:

            command:

            - "/bin/bash"

            - "-c"

            - "if command -v /usr/local/bin/status-probe.sh; then /usr/local/bin/status-probe.sh readiness; else systemctl status glusterd.service; fi"

          periodSeconds: 25

          successThreshold: 1

          failureThreshold: 50

        livenessProbe:

          timeoutSeconds: 3

          initialDelaySeconds: 40

          exec:

            command:

            - "/bin/bash"

            - "-c"

            - "if command -v /usr/local/bin/status-probe.sh; then /usr/local/bin/status-probe.sh liveness; else systemctl status glusterd.service; fi"

          periodSeconds: 25

          successThreshold: 1

          failureThreshold: 50

      volumes:

      - name: glusterfs-heketi

        hostPath:

          path: "/var/lib/heketi"

      - name: glusterfs-run

      - name: glusterfs-lvm

        hostPath:

          path: "/run/lvm"

      - name: glusterfs-etc

        hostPath:

          path: "/etc/glusterfs"

      - name: glusterfs-logs

        hostPath:

          path: "/var/log/glusterfs"

      - name: glusterfs-config

        hostPath:

          path: "/var/lib/glusterd"

      - name: glusterfs-host-dev

        hostPath:

          path: "/dev"

      - name: glusterfs-misc

        hostPath:

          path: "/var/lib/misc/glusterfsd"

      - name: glusterfs-block-sys-class

        hostPath:

          path: "/sys/class"

      - name: glusterfs-block-sys-module

        hostPath:

          path: "/sys/module"

      - name: glusterfs-cgroup

        hostPath:

          path: "/sys/fs/cgroup"

      - name: glusterfs-ssl

        hostPath:

          path: "/etc/ssl"

      - name: kernel-modules

        hostPath:

          path: "/usr/lib/modules"
glusterfs-deamonset.yaml
为glusterfs节点打上标签并部署
kubectl label node node-2 storagenode=glusterfs

kubectl apply -f glusterfs-deamonset.yaml

kubectl get pods -o wide
为了方便操作引用heketi服务
heketi部署
apiVersion: rbac.authorization.k8s.io/v1

kind: ClusterRoleBinding

metadata:

  name: heketi-clusterrolebinding

roleRef:

  apiGroup: rbac.authorization.k8s.io

  kind: ClusterRole

  name: heketi-clusterrole

subjects:

- kind: ServiceAccount

  name: heketi-service-account

  namespace: default

---

apiVersion: v1

kind: ServiceAccount

metadata:

  name: heketi-service-account

  namespace: default

---

apiVersion: rbac.authorization.k8s.io/v1

kind: ClusterRole

metadata:

  name: heketi-clusterrole

rules:

- apiGroups:

  - ""

  resources:

  - pods

  - pods/status

  - pods/exec

  verbs:

  - get

  - list

  - watch

  - create
创建heketi service-account
kind: Service

apiVersion: v1

metadata:

  name: heketi

  labels:

    glusterfs: heketi-service

    deploy-heketi: support

  annotations:

kind: Service

apiVersion: v1

metadata:

  name: heketi

  labels:

    glusterfs: heketi-service

    deploy-heketi: support

  annotations:

    description: Exposes Heketi Service

spec:

  selector:

    name: heketi

  ports:

  - name: heketi

    port: 80

    targetPort: 8080

---

apiVersion: v1

kind: ConfigMap

metadata:

  name: tcp-services

  namespace: ingress-nginx

data:

  "30001": default/heketi:80

---

kind: Deployment

apiVersion: extensions/v1beta1

metadata:

  name: heketi

  labels:

    glusterfs: heketi-deployment

  annotations:

    description: Defines how to deploy Heketi

spec:

  replicas: 1

  template:

    metadata:

      name: heketi

      labels:

        name: heketi

        glusterfs: heketi-pod

    spec:

      serviceAccountName: heketi-service-account

      containers:

      - image: heketi/heketi:dev

        imagePullPolicy: Always

        name: heketi

        env:

        - name: HEKETI_EXECUTOR

          value: "kubernetes"

        - name: HEKETI_DB_PATH

          value: "/var/lib/heketi/heketi.db"

        - name: HEKETI_FSTAB

          value: "/var/lib/heketi/fstab"

        - name: HEKETI_SNAPSHOT_LIMIT

          value: "14"

        - name: HEKETI_KUBE_GLUSTER_DAEMONSET

          value: "y"

        ports:

        - containerPort: 8080

        volumeMounts:

        - name: db

          mountPath: /var/lib/heketi

        readinessProbe:

          timeoutSeconds: 3

          initialDelaySeconds: 3

          httpGet:

            path: /hello

            port: 8080

        livenessProbe:

          timeoutSeconds: 3

          initialDelaySeconds: 30

          httpGet:

            path: /hello

            port: 8080

      volumes:

      - name: db

        hostPath:

          path: "/heketi-data"
部署heketi deployment
进入heketi容器中环境变量
export HEKETI_CLI_SERVER=http://localhost:8080
修改clusterfs配置文件指明clusterfs node ip以及裸磁盘路径
{

  "clusters": [

    {

{

    {

{

    {

      "nodes": [

        {

          "node": {

            "hostnames": {

              "manage": [

                "gluster-01"

              ],

              "storage": [

                "10.155.56.56"

              ]

            },

            "zone": 1

          },

          "devices": [

            {

              "name": "/dev/sdb",

              "destroydata": false

            }

          ]

        },

        {

          "node": {

            "hostnames": {

              "manage": [

                "gluster-02"

              ],

              "storage": [

                "10.155.56.57"

              ]

            },

            "zone": 1

          },

          "devices": [

            {

              "name": "/dev/sdb",

              "destroydata": false

            }

          ]

        },

        {

          "node": {

            "hostnames": {

              "manage": [

                "gluster-03"

              ],

              "storage": [

                "10.155.56.102"

              ]

            },

            "zone": 1

          },

          "devices": [

            {

              "name": "/dev/sdb",

              "destroydata": false

            }

          ]

        }

      ]

    }

  ]

}
topology.json
把配置文件写入heketi容器中
heketi-cli topology load --json topology.json#heketi根据配置文件找到glusterfs node对glusterfs做初始化操作

heketi-cli topology info #查看当前clusterfs集群拓扑

进入clusterfs node中验证是否成功

gluster peer status #查看信息
pvc

pvc中定义了对所需的资源的一个描述,以及需要的权限
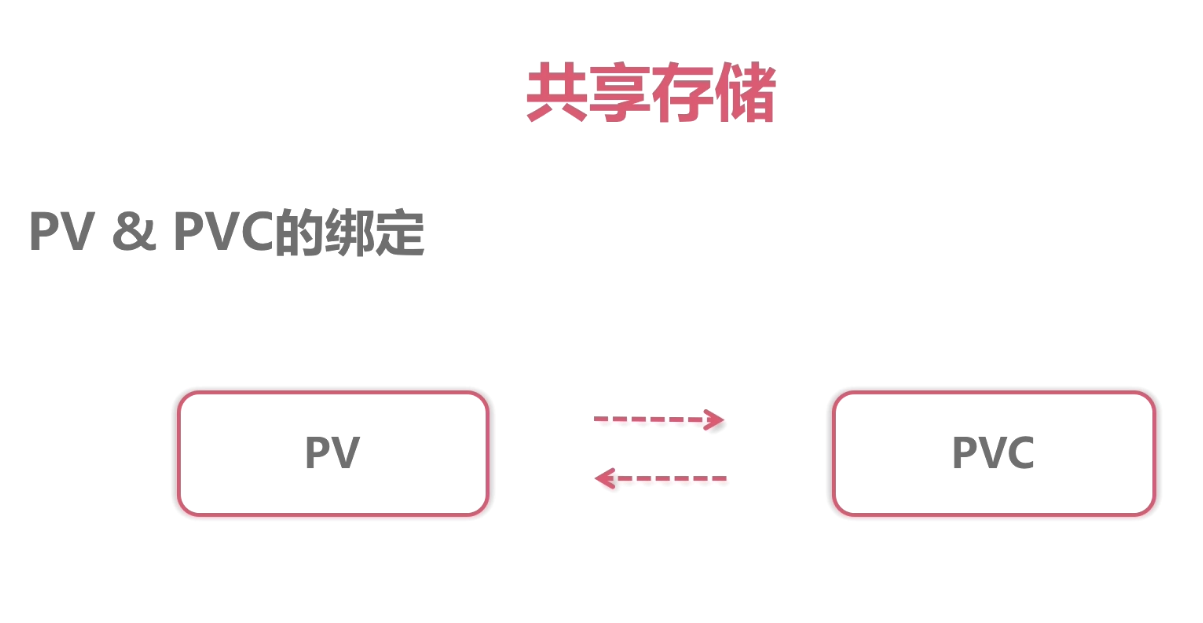
pv与pvc进行绑定

1.pv要满足pvc的需求(存储大小,读写权限)

2.pv要与pvc storage-classname要相同

3.描述中根据字段storageclassname去自动的绑定互相绑定对方volumeName
#本质上在pvc资源描述对象中把pv的名字添加进去
pvc的使用
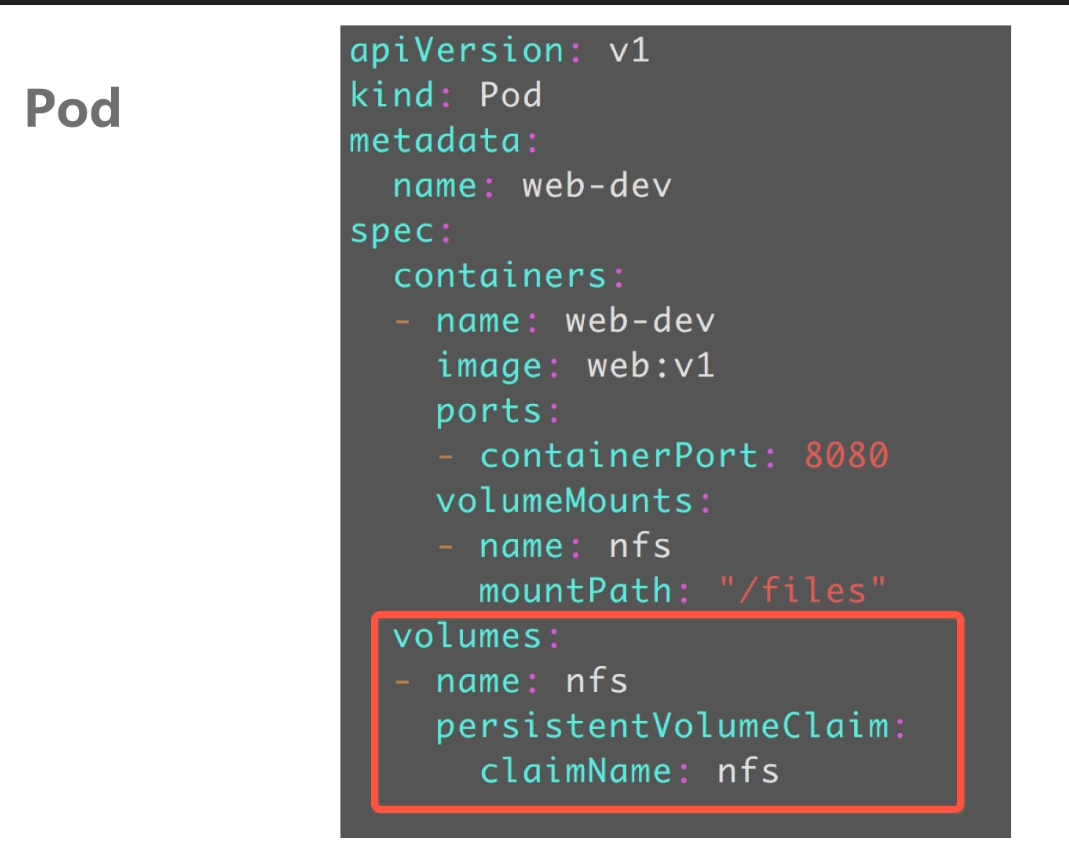
#原理:通过pv及pvc的两层抽象,pod在使用共享存储时非常的简单。pod中声明了pvc的名字,pvc中描述了pod的需求。pvc绑定了pv,pv中描述了具体存储后端,如何访问,具体参数。
简单总结:
1.pv独立于pod存在

2.pv可以创建动态pv或者静态pv。动态pv不需要手动去创建。静态pv需要手动创建

3.访问模式:ReadWriteOnce:可读可写只能mount到一个节点. ReadOnlyMany:PV能模式挂载到多个节点

4.回收规则:PV 支持的回收策略有: Retain. Recycle.delete

Retain 管理员回收:kubectl delete pv pv-name 创建:kubectl apply -f pv-name.yaml ;Retain策略 在删除pvc后PV变为Released不可用状态, 若想重新被使用,需要管理员删除pv,重新创建pv,删除pv并不会删除存储的资源,只是删除pv对象而已;若想保留数据,请使用该Retain,

Recycle策略 – 删除pvc自动清除PV中的数据,效果相当于执行 rm -rf /thevolume/*. 删除pvc时.pv的状态由Bound变为Available.此时可重新被pvc申请绑定

Delete – 删除存储上的对应存储资源,例如 AWS EBS、GCE PD、Azure Disk、OpenStack Cinder Volume 等,NFS不支持delete策略

5.storageClassName :在pvc的请求存储大小和访问权限与创建的pv一致的情况下 根据storageClassName进行与pv绑定。常用在pvc需要和特定pv进行绑定的情况下。举例:当有创建多个pv设置存储的大小和访问权限一致时,且pv,pvc没有配置storageClassName时,pvc会根据存储大小和访问权限去随机匹配。如果配置了storageClassName会根据这三个条件进行匹配。当然也可以用其他方法实现pvc与特定pv的绑定如标签.标签方法上一篇就是,这里就不再赘述。
StatefulSet --- 有状态应用的守护者
解决多实例不对等pod的问题
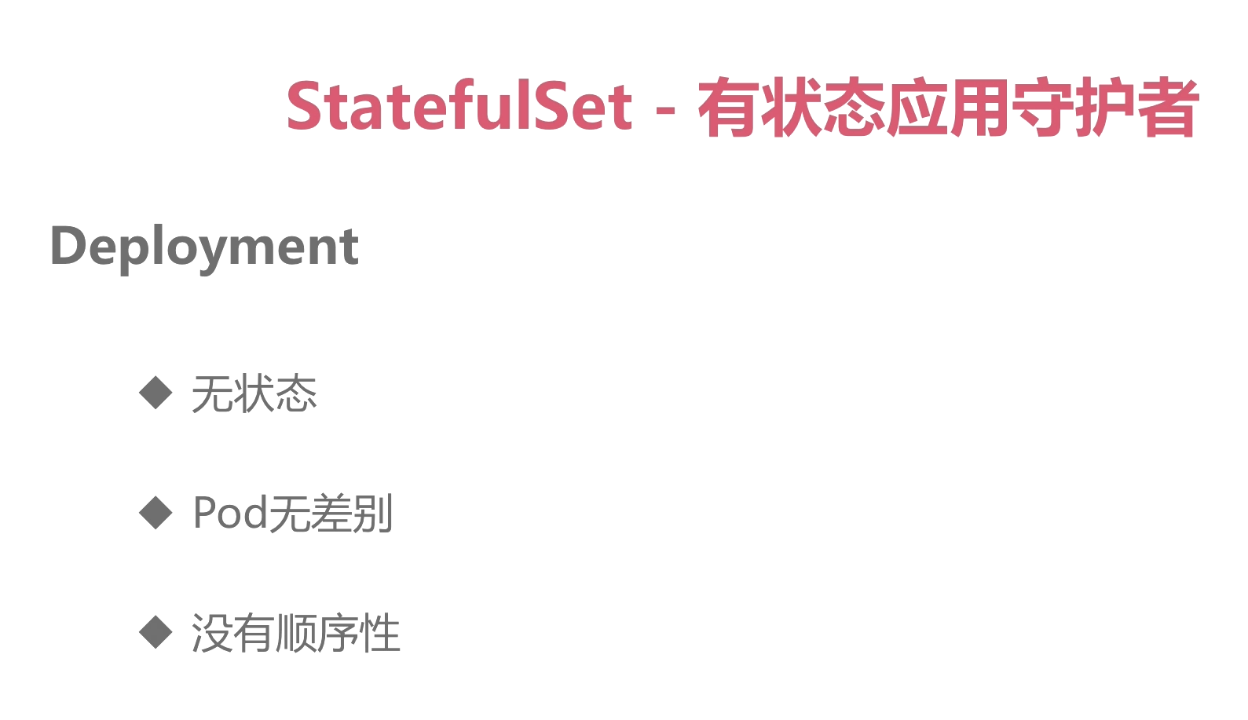

创建无头服务(不分配ip,service对应后端pod-ip,通过dns svr记录解析)
apiVersion: v1

kind: Service

metadata:

  name: springboot-web-svc

spec:

  ports:

  - port: 80

    targetPort: 8080

    protocol: TCP

  clusterIP: None

  selector:

    app: springboot-web
headless-service.yaml
创建StatefulSet
apiVersion: apps/v1

kind: StatefulSet

metadata:

  name: springboot-web

  namespace: dev

spec:

  serviceName: springboot-web-svc #声明使用哪个headless service来解析pod

  replicas: 2

  selector:

    matchLabels:

      app: springboot-web

  template:

    metadata:

      labels:

        app: springboot-web

    spec:

      containers:

      - name: springboot-web

        image: 172.17.166.217/kubenetes/springboot-web:v1

        ports:

        - containerPort: 8080

        livenessProbe:

          tcpSocket:

            port: 8080

          initialDelaySeconds: 20

          periodSeconds: 10

          failureThreshold: 3

          successThreshold: 1

          timeoutSeconds: 5

        readinessProbe:

          httpGet:

            path: /hello?name=test

            port: 8080

            scheme: HTTP

          initialDelaySeconds: 20

          periodSeconds: 10

          failureThreshold: 1

          successThreshold: 1

          timeoutSeconds: 5
statefulset.yaml
监控创建过程
kubectl get pod -l app=spring-boot-web -w
#statefulset创建pod名称相对固定,前边为pod name后端为相固定的数字编号 例如spring-boot-web-01,只有第一个启动处于READY状态才会去启动第二个。pod之间可通过hostname访问对方,ping spring-boot-web-01.springboot-web-svc.default。
StatefulSet 创建volume pod
apiVersion: apps/v1

kind: StatefulSet

metadata:

  name: springboot-web

spec:

  serviceName: springboot-web-svc

  replicas: 2

  selector:

    matchLabels:

      app: springboot-web

  template:

    metadata:

      labels:

        app: springboot-web

    spec:

      containers:

      - name: springboot-web

        image: hub.mooc.com/kubernetes/springboot-web:v1

        ports:

        - containerPort: 8080

        livenessProbe:

          tcpSocket:

            port: 8080

          initialDelaySeconds: 20

          periodSeconds: 10

          failureThreshold: 3

          successThreshold: 1

          timeoutSeconds: 5

        readinessProbe:

          httpGet:

            path: /hello?name=test

            port: 8080

            scheme: HTTP

          initialDelaySeconds: 20

          periodSeconds: 10

          failureThreshold: 1

          successThreshold: 1

          timeoutSeconds: 5

        volumeMounts:

        - name: data

          mountPath: /mooc-data

  volumeClaimTemplates:

  - metadata:

      name: data

    spec:

      accessModes:

      - ReadWriteOnce

      storageClassName: glusterfs-storage-class

      resources:

        requests:

          storage: 1Gi
statefulset-volume.yaml
#自动创建不同编号pvc,对应pod名称。为每个pod绑定不同的pvc,本质上是通过StatefulSet创建pod相固定的数字编号。
KubernetesAPI ---如何开发一个基于kubernetes的容器管理平台
apiserver 路径规范:
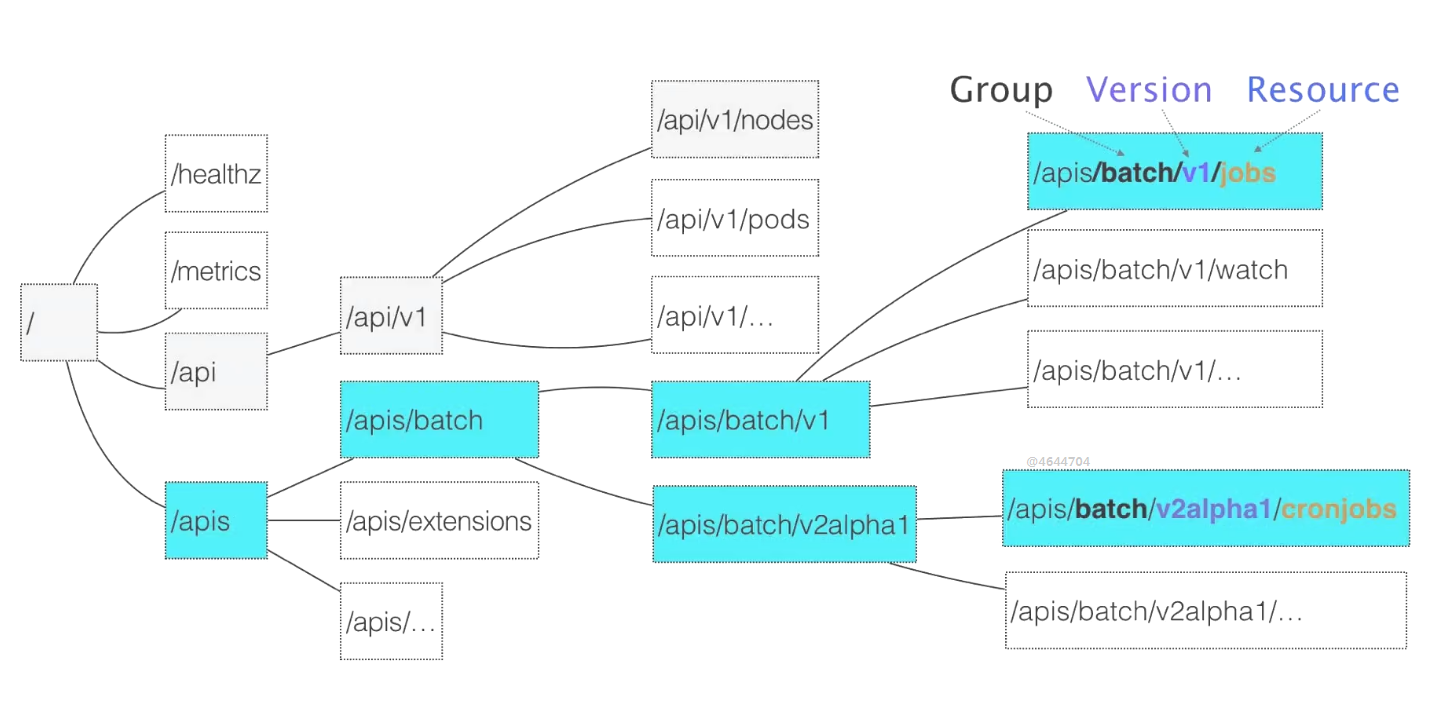
api之下都是核心的api,是没有api分组的。核心组只有两级,一级是版本一级是核心的资源。
apis非核心的api,每个api资源都用三级来表示,第一级分组,第二组版本信息,第三级是具体的资源。
分组可以更清晰整洁,使用户能够很容易的区分来源结构。
#资料https://kubermetes.io/docs/reference/generated/kubernetes-api/
常用客户端:https://github.com/kubernetes-client 基于各种语言
官方客户端:https://github.com/kubernetes/client-go
k8s入坑之路(15)kubernetes共享存储与StatefulSet有状态的更多相关文章
- k8s入坑之路(7)kubernetes设计精髓List/Watch机制和Informer模块详解
1.list-watch是什么 List-watch 是 K8S 统一的异步消息处理机制,保证了消息的实时性,可靠性,顺序性,性能等等,为声明式风格的API 奠定了良好的基础,它是优雅的通信方式,是 ...
- k8s入坑之路(13)kubernetes重要资源(namespace隔离 resources资源管理 label)
Namespace --- 集群的共享与隔离 语言中namespace概念 namespace核心作用隔离 以上是隔离的代码.namespace隔离的是: 1.资源对象的隔离:Service.Depl ...
- k8s入坑之路(16)kubernetes中CICD/基于宿主机jenkins
cicd的结合组件 需要代码仓库如gitlab.github.包构建工具Maven等,持续集成工具如jenkins,github/cicd.结合自己脚本实现重复式任务自动化. 传统服务发布流程: 提交 ...
- k8s入坑之路(10)kubernetes coredns详解
概述 作为服务发现机制的基本功能,在集群内需要能够通过服务名对服务进行访问,那么就需要一个集群范围内的DNS服务来完成从服务名到ClusterIP的解析. DNS服务在kubernetes中经历了三个 ...
- k8s入坑之路(2)kubernetes架构详解
每个微服务通过 Docker 进行发布,随着业务的发展,系统中遍布着各种各样的容器.于是,容器的资源调度,部署运行,扩容缩容就是我们要面临的问题. 基于 Kubernetes 作为容器集群的管理平 ...
- k8s入坑之路(11)kubernetes服务发现
kubernetes访问场景 1.集群内部访问 2.集群内部访问外部 3.集群外部访问内部 1.集群内部访问 1.pod之间直接ip通讯(利用calico通过路由表经过三层将ip流量转发)由于容器之间 ...
- 【转载】k8s入坑之路(2)kubernetes架构详解
每个微服务通过 Docker 进行发布,随着业务的发展,系统中遍布着各种各样的容器.于是,容器的资源调度,部署运行,扩容缩容就是我们要面临的问题. 基于 Kubernetes 作为容器集群的管理平台被 ...
- k8s入坑之路(4)kubenetes安装
三种安装方法: 1.kubeadm 2.kubespray 3.二进制安装 kubespray安装kubernetes集群 优点: 1.kuberspray对比kubeadm更加简洁内部集成了kube ...
- k8s入坑之路(14)scheduler调度 kubelet管理及健康检查 更新策略
kubelet 主要功能 Pod 管理 在 kubernetes 的设计中,最基本的管理单位是 pod,而不是 container.pod 是 kubernetes 在容器上的一层封装,由一组运行在同 ...
随机推荐
- Centos7.6安装python3.6.8
yum -y install bzip2-devel expat-devel gdbm-devel readline-devel sqlite-devel libffi-devel tk-devel ...
- VUE页面跳转方式
一.to +跳转路径 <router-link to="/">跳转到主页</router-link> <router-link :to="{ ...
- CF280D-k-Maximum Subsequence Sum【模拟费用流,线段树】
正题 题目链接:https://www.luogu.com.cn/problem/CF280D 题目大意 一个长度为\(n\)的序列,\(m\)次操作 修改一个数 询问一个区间中选出\(k\)段不交子 ...
- P3643-[APIO2016]划艇【dp】
正题 题目链接:https://www.luogu.com.cn/problem/P3643 题目大意 求有多少个\(n\)个数的序列\(x\)满足,\(x_i\in \{0\}\cup[a_i,b_ ...
- 深入浅出WPF-12.绘图与动画
绘图 1)Brush(画刷) SolidColorBrush实心画刷,直接使用颜色赋值 LinearGradientBrush线性渐变画刷,色彩沿设定的直线方向.按设定的变化点进行渐变 RadialG ...
- 技术与艺术的结合,HMS Core让手机主题趣味丛生
在9月23日晚举办的华为nova9系列新品发布会上,华为在发布nova9系列新机之外,还为观众展示了多款Harmony OS趣味主题.其中一款名为"翻滚吧牛奶"的应用主题看起来十分 ...
- Go变量与基础数据类型
一.基础介绍 Go 是静态(编译型)语言,是区别于解释型语言的弱类型语言(静态:类型固定,强类型:不同类型不允许直接运算) 例如 python 就是动态强类型语言 1.Go 的特性: 跨平台的编译型语 ...
- Winform配置文件读写操作
前言 在项目当中为了增加软件的灵活性及可配置性,配置文件在程序当中起着不可替代的作用.下面介绍一下最近用的比较多的方式. config文件的操作 数据库连接字符串 1.获取连接字符串 public s ...
- 从零入门 Serverless | 函数计算如何粘合云服务,提供端到端解决方案
作者 | 西流 阿里云技术专家 导读:阿里云 Serverless 产品函数计算可以作为粘合剂,串联其他云服务提供端到端解决方案,从而简化编程模型,快速实现最上层的业务目标. 传统单体应用的拆解 首先 ...
- FFT&原根&NTT&MTT
FFT bilibili 3b1b视频讲解 核心过程: 原根 Definition 若 \(a\) 模 \(m\) 的阶等于 \(\varphi(m)\),则称 \(a\) 为模 \(m\) 的一个原 ...