安装配置ingress-nginx支持https访问
说明:
1.k8s版本:v1.23;
2.内网测试环境1台master,2台node节点,使用 DaemonSet+HostNetwork+nodeSelector 方式部署 ingress-nginx 到 node02 节点,node02打标签作为边缘节点;
3.测试了https配置;
Ingress简介:
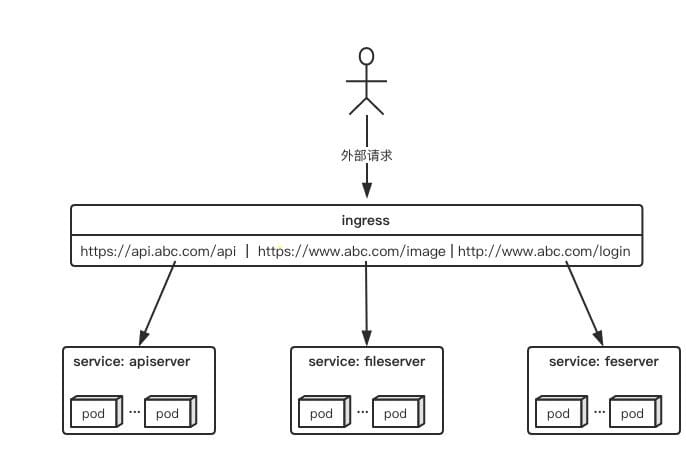
Ingress 是Kubernetes 1.1 版本新增的资源对象,用于将不用URL的访问请求转发到后端不同的Service,以实现HTTP 层(7层)的业务路由机制。简单点说:Ingress 是 HTTP 层的服务暴露规则。也可以理解为Service的Service。对于Ingress来说,必须要绑定一个域名。
它由两部分组成:
Ingress Controller:
Ingress Controller:是Service的入口网关,有很多种,最常见的就是Ingress-Nginx;- 以
pod形式运行的;
Ingress策略设置(k8s中的ingress资源):
- 以
yaml形式为载体的一组声明式的策略;(可使用 kubectl get ingress -n namespaces 查看)
- 以
Ingress部署的几种方式:
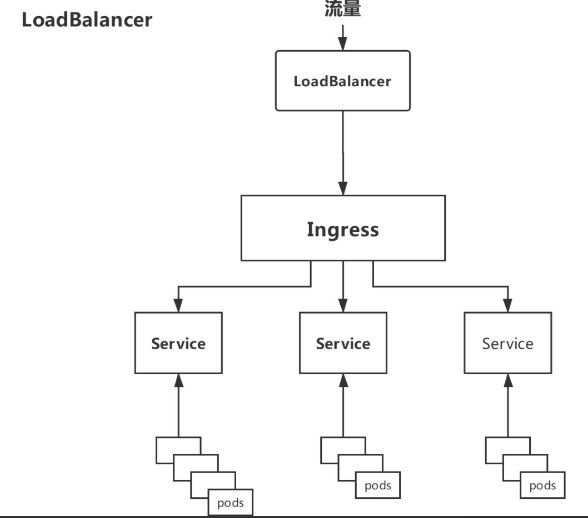
Deployment+LoadBalancer模式的Service
如果要把
ingress部署在公有云,那可以选择这种方式。用Deployment部署ingress-controller,创建一个type为LoadBalancer的service关联这组pod。大部分公有云,都会为LoadBalancer的service自动创建一个负载均衡器,通常还绑定了公网地址。只要把域名解析指向该地址,就实现了集群服务的对外暴露。缺点:需要额外购买公有云的负载均衡服务,不适用于没有负载均衡器的非公有云服务;
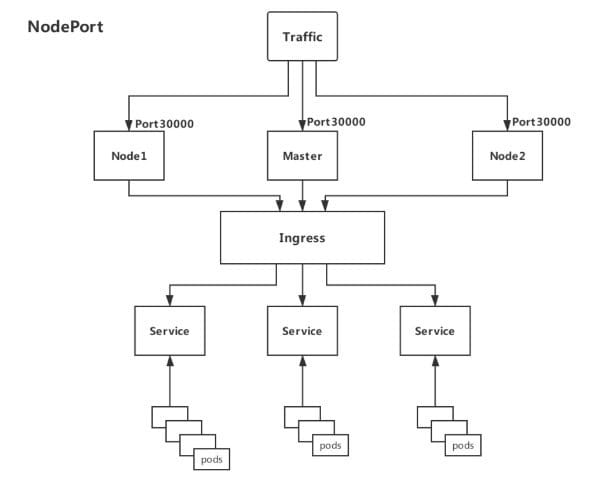
Deployment+NodePort模式的Service
同样用
deployment模式部署ingress-controller,并创建对应的服务,但是type为NodePort。这样,ingress就会暴露在集群节点ip的特定端口上。由于nodeport暴露的端口是随机端口(端口数会大于30000),一般会在前面再搭建一套负载均衡器来转发请求。该方式一般用于宿主机是相对固定的环境ip地址不变的场景。缺点:
NodePort方式暴露ingress虽然简单方便,但是NodePort多了一层NAT,在请求量级很大时可能对性能会有一定影响。- 请求节点会是类似
https://www.xx.com:30076,其中30076是kubectl get svc -n ingress-nginx的svc暴露出来的nodeport端口。
DaemonSet+HostNetwork+nodeSelector(推荐)
用
DaemonSet结合nodeselector来部署ingress-controller到特定的node上(边缘节点),然后使用HostNetwork直接把该pod与宿主机node的网络打通,直接使用宿主机的80/433端口就能访问服务。这时,ingress-controller所在的node机器就很类似传统架构的边缘节点,比如机房入口的nginx服务器。优点:
- 该方式整个请求链路最简单,性能相对
NodePort模式更好。
缺点:
- 由于直接利用宿主机节点的网络和端口,一个
node只能部署一个ingress-controller pod。
因为此次是内网测试环境,所以使用第3中方法部署测试
- 该方式整个请求链路最简单,性能相对
使用Helm以DaemonSet+HostNetwork+nodeSelector的方式部署ingress-nginx
nginx-ingress-controall官网:https://kubernetes.github.io/ingress-nginx/
现有的测试环境是1台master+2台node,我们选择node02做为边缘节点,给他打上边缘节点的标签,这样部署的ingress-controall的pod会只跑在node02这个节点上。(如果是生产环境,可以选择2台node作为边缘节点,为了避免单点故障,可使用keepalive提高高可用)
#给node02节点打上边缘节点的标签

kubectl label nodes node02 edgenode=true

#查看各节点的标签

kubectl get node --show-labels
拉取helm源:
#添加helm源

helm repo add ingress-nginx https://kubernetes.github.io/ingress-nginx

#更新源

helm repo update

#拉取相关配置修改values.yaml

helm pull ingress-nginx/ingress-nginx
修改values.yaml:
commonLabels: {}

controller:

  name: controller

  image:

    registry: k8s.gcr.io		#如果怕墙此处可换为阿里镜像源

    image: ingress-nginx/controller

    tag: "v1.1.1"

    digest: sha256:0bc88eb15f9e7f84e8e56c14fa5735aaa488b840983f87bd79b1054190e660de

    pullPolicy: IfNotPresent

    runAsUser: 101

    allowPrivilegeEscalation: true

  existingPsp: ""

  containerName: controller

  containerPort:

    http: 80

    https: 443

  config: {}

  configAnnotations: {}

  proxySetHeaders: {}

  addHeaders: {}

  dnsConfig: {}

  hostname: {}

  dnsPolicy: ClusterFirst

  reportNodeInternalIp: false

  watchIngressWithoutClass: false

  ingressClassByName: false

  allowSnippetAnnotations: true

  hostNetwork: true			#此处改为true

  hostPort:

    enabled: false

    ports:

      http: 80

      https: 443

  electionID: ingress-controller-leader

  ingressClassResource:

    name: nginx

    enabled: true

    default: false

    controllerValue: "k8s.io/ingress-nginx"

    parameters: {}

  ingressClass: nginx

  podLabels: {}

  podSecurityContext: {}

  sysctls: {}

  publishService:

    enabled: true

    pathOverride: ""

  scope:

    enabled: false

    namespace: ""

    namespaceSelector: ""

  configMapNamespace: ""

  tcp:

    configMapNamespace: ""

    annotations: {}

  udp:

    configMapNamespace: ""

    annotations: {}

  maxmindLicenseKey: ""

  extraArgs: {}

  extraEnvs: []

  kind: DaemonSet			#此处改为DaemonSet,控制器将以DaemonSet方式运行在特定node

  annotations: {}

  labels: {}

  updateStrategy: {}

  minReadySeconds: 0

  tolerations: []

  affinity: {}

  topologySpreadConstraints: []

  terminationGracePeriodSeconds: 300

  nodeSelector:

    kubernetes.io/os: linux

    edgenode: 'true'			#此处加上刚才给node02打的标签,控制器将运行在node02上

  livenessProbe:

    httpGet:

      path: "/healthz"

      port: 10254

      scheme: HTTP

    initialDelaySeconds: 10

    periodSeconds: 10

    timeoutSeconds: 1

    successThreshold: 1

    failureThreshold: 5

  readinessProbe:

    httpGet:

      path: "/healthz"

      port: 10254

      scheme: HTTP

    initialDelaySeconds: 10

    periodSeconds: 10

    timeoutSeconds: 1

    successThreshold: 1

    failureThreshold: 3

  healthCheckPath: "/healthz"

  healthCheckHost: ""

  podAnnotations: {}

  replicaCount: 1

  minAvailable: 1

  resources:

    requests:

      cpu: 100m

      memory: 90Mi

  autoscaling:

    enabled: false

    minReplicas: 1

    maxReplicas: 11

    targetCPUUtilizationPercentage: 50

    targetMemoryUtilizationPercentage: 50

    behavior: {}

  autoscalingTemplate: []

  keda:

    apiVersion: "keda.sh/v1alpha1"

    enabled: false

    minReplicas: 1

    maxReplicas: 11

    pollingInterval: 30

    cooldownPeriod: 300

    restoreToOriginalReplicaCount: false

    scaledObject:

      annotations: {}

    triggers: []

    behavior: {}

  enableMimalloc: true

  customTemplate:

    configMapName: ""

    configMapKey: ""

  service:

    enabled: true

    appProtocol: true

    annotations: {}

    labels: {}

    externalIPs: []

    loadBalancerSourceRanges: []

    enableHttp: true

    enableHttps: true

    ipFamilyPolicy: "SingleStack"

    ipFamilies:

      - IPv4

    ports:

      http: 80

      https: 443

    targetPorts:

      http: http

      https: https

    type: ClusterIP			#此处改为ClusterIP,默认为LoadBalancer

    nodePorts:

      http: ""

      https: ""

      tcp: {}

      udp: {}

    external:

      enabled: true

    internal:

      enabled: false

      annotations: {}

      loadBalancerSourceRanges: []

  extraContainers: []

  extraVolumeMounts: []

  extraVolumes: []

  extraInitContainers: []

  extraModules: []

  admissionWebhooks:

    annotations: {}

    enabled: true

    failurePolicy: Fail

    port: 8443

    certificate: "/usr/local/certificates/cert"

    key: "/usr/local/certificates/key"

    namespaceSelector: {}

    objectSelector: {}

    labels: {}

    existingPsp: ""

    service:

      annotations: {}

      externalIPs: []

      loadBalancerSourceRanges: []

      servicePort: 443

      type: ClusterIP

    createSecretJob:

      resources: {}

    patchWebhookJob:

      resources: {}

    patch:

      enabled: true

      image:

        registry: k8s.gcr.io

        image: ingress-nginx/kube-webhook-certgen

        tag: v1.1.1

        digest: sha256:64d8c73dca984af206adf9d6d7e46aa550362b1d7a01f3a0a91b20cc67868660

        pullPolicy: IfNotPresent

      priorityClassName: ""

      podAnnotations: {}

      nodeSelector:

        kubernetes.io/os: linux

      tolerations: []

      labels: {}

      runAsUser: 2000

  metrics:

    port: 10254

    enabled: false

    service:

      annotations: {}

      externalIPs: []

      loadBalancerSourceRanges: []

      servicePort: 10254

      type: ClusterIP

    serviceMonitor:

      enabled: false

      additionalLabels: {}

      namespace: ""

      namespaceSelector: {}

      scrapeInterval: 30s

      targetLabels: []

      relabelings: []

      metricRelabelings: []

    prometheusRule:

      enabled: false

      additionalLabels: {}

      rules: []

  lifecycle:

    preStop:

      exec:

        command:

          - /wait-shutdown

  priorityClassName: ""

revisionHistoryLimit: 10

defaultBackend:

  enabled: true			#此处改为true,说明创建个默认的页面,如果有不匹配的请求将返回这个页面

  name: defaultbackend

  image:

    registry: k8s.gcr.io

    image: defaultbackend-amd64

    tag: "1.5"

    pullPolicy: IfNotPresent

    runAsUser: 65534

    runAsNonRoot: true

    readOnlyRootFilesystem: true

    allowPrivilegeEscalation: false

  existingPsp: ""

  extraArgs: {}

  serviceAccount:

    create: true

    name: ""

    automountServiceAccountToken: true

  extraEnvs: []

  port: 8080

  livenessProbe:

    failureThreshold: 3

    initialDelaySeconds: 30

    periodSeconds: 10

    successThreshold: 1

    timeoutSeconds: 5

  readinessProbe:

    failureThreshold: 6

    initialDelaySeconds: 0

    periodSeconds: 5

    successThreshold: 1

    timeoutSeconds: 5

  tolerations: []

  affinity: {}

  podSecurityContext: {}

  containerSecurityContext: {}

  podLabels: {}

  nodeSelector:

    kubernetes.io/os: linux

  podAnnotations: {}

  replicaCount: 1

  minAvailable: 1

  resources: {}

  extraVolumeMounts: []

  extraVolumes: []

  autoscaling:

    annotations: {}

    enabled: false

    minReplicas: 1

    maxReplicas: 2

    targetCPUUtilizationPercentage: 50

    targetMemoryUtilizationPercentage: 50

  service:

    annotations: {}

    externalIPs: []

    loadBalancerSourceRanges: []

    servicePort: 80

    type: ClusterIP

  priorityClassName: ""

  labels: {}

rbac:

  create: true

  scope: false

podSecurityPolicy:

  enabled: false

serviceAccount:

  create: true

  name: ""

  automountServiceAccountToken: true

  annotations: {}

imagePullSecrets: []

tcp: {}

udp: {}

dhParam:
使用helm安装:
#创建个ingress-nginx的命名空间

kubectl create ns ingress-nginx

#使用helm执行安装

helm install ingress-nginx ingress-nginx/ingress-nginx -f values.yaml -n ingress-nginx
查看创建的资源:
kubectl get all -n ingress-nginx
可以看到启动了2个pod,一个为ingress-controller,一个为默认的后端defaultbackend
NAME                                                READY   STATUS    RESTARTS   AGE

pod/ingress-nginx-controller-kqqgj                  1/1     Running   0          21m

pod/ingress-nginx-defaultbackend-7df596dbc9-9c6ws   1/1     Running   0          21m

NAME                                         TYPE        CLUSTER-IP      EXTERNAL-IP   PORT(S)          AGE

service/ingress-nginx-controller             ClusterIP   10.106.80.36    <none>        80/TCP,443/TCP   21m

service/ingress-nginx-controller-admission   ClusterIP   10.111.63.107   <none>        443/TCP          21m

service/ingress-nginx-defaultbackend         ClusterIP   10.96.124.173   <none>        80/TCP           21m

NAME                                      DESIRED   CURRENT   READY   UP-TO-DATE   AVAILABLE   NODE SELECTOR                          AGE

daemonset.apps/ingress-nginx-controller   1         1         1       1            1           edgenode=true,kubernetes.io/os=linux   21m

NAME                                           READY   UP-TO-DATE   AVAILABLE   AGE

deployment.apps/ingress-nginx-defaultbackend   1/1     1            1           21m

NAME                                                      DESIRED   CURRENT   READY   AGE

replicaset.apps/ingress-nginx-defaultbackend-7df596dbc9   1         1         1       21m
ingress-controall部署好之后,我们使用nginx镜像部署个测试后端,之后再部署个ingress资源把后测试后端的server通过ingress暴露出去。
我们创建个test-nginx.yaml,定义了个nginx的pod和他对应的service,service使用ClusterIP方式暴露80端口。
#test-nginx.yaml

apiVersion: v1

kind: Service

metadata:

  name: nginx-test-service

  namespace: nginx-test

spec:

  selector:

    app: nginx-test

  ports:

  - name: http

    port: 81	# 后端Pod的端口

    targetPort: 80	# svc暴露的端口

---

apiVersion: apps/v1

kind: Deployment

metadata:

  name: nginx-test-deployment

  namespace: nginx-test

spec:

  replicas: 1

  selector:

    matchLabels:

      app: nginx-test

  template:

    metadata:

      labels:

        app: nginx-test

    spec:

      containers:

      - name: nginx-test

        image: nginx:1.15-alpine

        imagePullPolicy: IfNotPresent

        lifecycle:

          postStart:

            exec:

              command: ["/bin/sh","-c","echo nginx-test.wdyxgames.com > /usr/share/nginx/html/index.html"]

        ports:

        - name: httpd

          containerPort: 81		#pod暴露出来的端口
创建测试后端pod和service:
#创建nginx-test命名空间

kubectl create ns nginx-test

#使用yaml创建pod和svc

kubectl apply -f test-nginx.yaml

#查看创建的资源

kubectl get all -n nginx-test

#####

NAME                                       READY   STATUS    RESTARTS   AGE

pod/nginx-test-deployment-fdf785bb-k6xxl   1/1     Running   0          24s

NAME                         TYPE        CLUSTER-IP      EXTERNAL-IP   PORT(S)   AGE

service/nginx-test-service   ClusterIP   10.97.180.229   <none>        80/TCP    24s

NAME                                    READY   UP-TO-DATE   AVAILABLE   AGE

deployment.apps/nginx-test-deployment   1/1     1            1           24s

NAME                                             DESIRED   CURRENT   READY   AGE

replicaset.apps/nginx-test-deployment-fdf785bb   1         1         1       24s
至此,我们创建好了后端测试资源和ingress-controall,我们再创建ingress资源,把后端测试的service暴露到公网中去
#test-nginx-ingress.yaml

apiVersion: networking.k8s.io/v1

kind: Ingress

metadata:

  annotations:

    kubernetes.io/ingress.class: "nginx"

  name: example

spec:

  rules: # 一个ingress可以配置多个rules

  - host: nginx-test.wdyxgames.com # 域名配置,可以不写,匹配*,此域名就是浏览器里访问的URL

    http:

      paths: # 相当于nginx的location,同一个host可以配置多个path,此处我们写所有

      - backend:

          service:

            name: nginx-test-service  # 代理到哪个svc,与上面创建的测试后端svc对应

            port:

              number: 80 # svc暴露出来的端口,与上面创建的测试后端svc对应

        path: /

        pathType: Prefix
#执行文件安装

kubectl apply -f  test-nginx-ingress.yaml  -n nginx-test
绑定host测试,此处我们绑到了2个host到node02边缘节点的ip上去,一个是在ingress中定义了的nginx-test.wdyxgames.com,一个是没有定义了的nginx-test1.wdyxgames.com,使用浏览器访问:

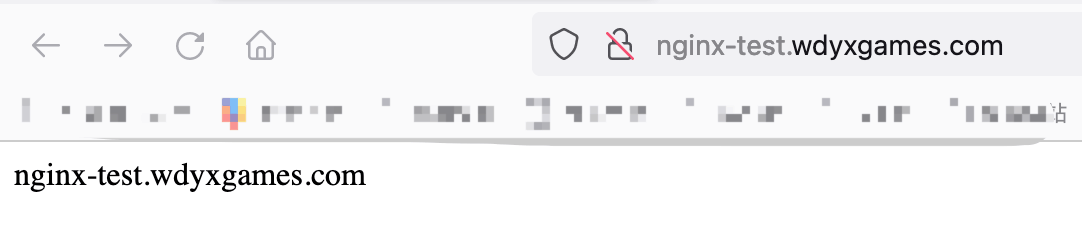
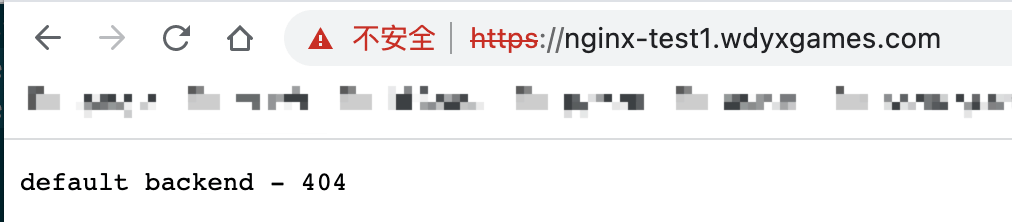
可以看见http://nginx-test.wdyxgames.com访问成功,http://nginx-test1.wdyxgames.com因为没有在ingress中定义返回的是defaultbakend中的nginx返回的页面
ingress-nginx配置使用证书支持https
首先把证书导入到
k8s的secret中去:kubectl create secret tls wdyxgames-tls --key _.wdyxgames.com.key --cert _.wdyxgames.com.crt -n nginx-test
再创建个
ingress资源文件指定使用https:#test-nginx-ingress-https.yaml
apiVersion: networking.k8s.io/v1
kind: Ingress
metadata:
annotations:
kubernetes.io/ingress.class: "nginx"
name: example
spec:
rules: # 一个ingress可以配置多个rules
- host: nginx-test.wdyxgames.com # 域名配置,可以不写,匹配*,此域名就是浏览器里访问的URL
http:
paths: # 相当于nginx的location,同一个host可以配置多个path,此处我们写所有
- backend:
service:
name: nginx-test-service # 代理到哪个svc,与上面创建的测试后端svc对应
port:
number: 80 # svc暴露出来的端口,与上面创建的测试后端svc对应
path: /
pathType: Prefix
tls:
- hosts:
- nginx-test.wdyxgames.com
secretName: wdyxgames-tls
对比上面,只是添加了
tls处的内容:#使用命令创建
kubectl apply -f test-nginx-ingress-https.yaml -n nginx-test #####
Error from server (BadRequest): error when creating "test-nginx-ingress-https.yaml": admission webhook "validate.nginx.ingress.kubernetes.io" denied the request: host "nginx-test.wdyxgames.com" and path "/" is already defined in ingress nginx-test/example
#会有报错,是因为的http的ingress已经创建对应的转发关系,不可再创建 #删掉之前http的ingress,再创建
kubectl delete -f test-nginx-ingress.yaml -n nginx-test
使用浏览器访问,可见已经支持
https访问了: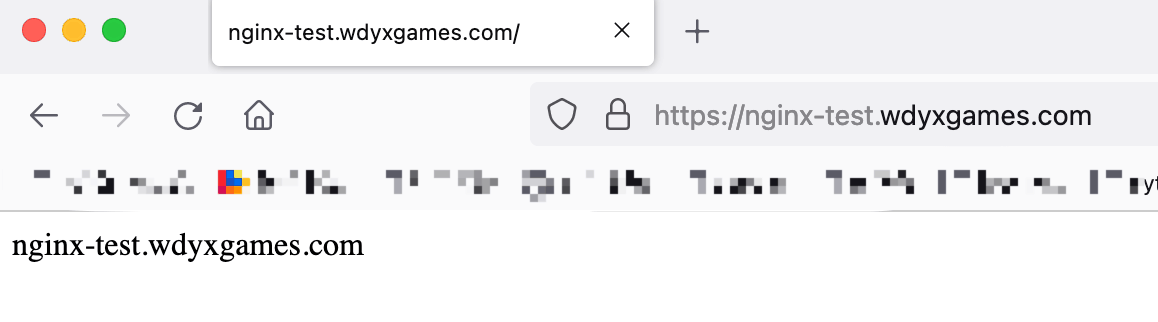
安装配置ingress-nginx支持https访问的更多相关文章
- 独立版Jexus配置SSL,支持https访问
一.申请证书[腾讯免费证书] 二.验证DNS,即解析域名.记录类型选择 TXT ,主机记录与证书上的主机记录保持一致,记录值也与证书上的记录值保持一致 三.等待DNS验证与CA轮询,轮询成功后即可下载 ...
- nginx 支持https访问
1,先确认nginx安装时已编译http_ssl模块. 就是执行nginx -V命令查看是否存在--with-http_ssl_module.如果没有,则需要重新编译nginx将该模块加入.yum安装 ...
- Ubuntu Nginx下配置网站ssl实现https访问
最近在看 HTTP权威指南 看到介绍了HTTPS的ssl,自己就动手测试了下,将步骤记录下 HTTPS简介 什么是HTTPS?百科是这样解释的.HTTPS(全称:Hyper Text Trans ...
- nginx配置ssl证书实现https访问
一,环境说明 服务器系统:ubuntu16.04LTS 服务器IP地址:47.89.12.99 域名:bjubi.com 二,域名解析到服务器 在阿里云控制台-产品与服务-云解析DNS-找到需要解析的 ...
- 阿里云 nginx配置ssl证书实现https访问
一,环境说明 服务器系统:ubuntu16.04LTS 服务器IP地址:47.89.12.99 域名:bjubi.com 二,域名解析到服务器 在阿里云控制台-产品与服务-云解析DNS-找到需要解析的 ...
- 配置nginx支持Https
配置nginx支持Https一定要先使用stop停止nginx然后重新代开不能使用reload 一:安装letsencrypt 1.从git上克隆下来git clone https://github. ...
- [转帖]nginx配置ssl证书实现https访问
https://www.cnblogs.com/tianhei/p/7726505.html 今天就是如此处理的 感觉挺不错的. 一,环境说明 服务器系统:ubuntu16.04LTS 服务器IP地址 ...
- Windows 10下安装配置Caffe并支持GPU加速(修改版)
基本环境 建议严格按照版本来 - Windows 10 - Visual Studio 2013 - Matlab R2016b - Anaconda - CUDA 8.0.44 - cuDNN v4 ...
- 微信小程序如何提交审核并发布?发布问题:小程序只支持https访问
http://www.jisuapp.cn/news/305.html 发布问题:1.小程序只支持https访问 2.要配置服务域名
随机推荐
- 【刷题-LeetCode】304. Range Sum Query 2D - Immutable
Range Sum Query 2D - Immutable Given a 2D matrix matrix, find the sum of the elements inside the rec ...
- manjaro20配置matebook fn驱动
安装fn驱动 https://github.com/aymanbagabas/Huawei-WMI Latest release中下载并安装 matebook-applet_2.4.8_amd64.d ...
- golang中的原子操作atomic包
1. 概念 原子操作 atomic 包 加锁操作涉及到内核态的上下文切换,比较耗时,代价高, 针对基本数据类型我们还可以使用原子操作来保证并发的安全, 因为原子操作是go语言提供的方法,我们在用户态就 ...
- GoLang设计模式20 - 组合模式
定义 组合模式是一种结构型设计模式. 当我们想把一组对象当做一个整体来处理时就可以考虑使用组合模式. 组合模式被视为是接口型设计模式是因为它将一组对象组装为一个树状结构.这个树状结构中的每个独立组件都 ...
- Linux身份鉴别机制原理
传统的UNIX身份鉴别机制原理 传统的UNIX身份鉴别即口令认证方式,它主要通过识别用户的用户名或者UID号获取在/etc/shadow中存放的对应用户密码密文等信息,然后获取用户输入密码并采用cry ...
- C++/WinUI 3 技术笔记(一)
微软在 Windows 10 Version 1809 上正式发布了新的 UI 框架,命名为 WinUI 3. 这已经是微软发布的第不知道多少个 UI 框架了,但是微软宣称它将支持原生 C++ 和 W ...
- Swift循环的介绍
循环的介绍 在开发中经常会需要循环 常见的循环有:for/while/do while. 这里我们只介绍for/while,因为for/while最常见 for循环的写法 最常规写法 // 传统写法 ...
- CABasicAnimation基础核心动画
核心动画之作用在层上面. 动画的本质是改图层的某一个属性. CABasicAnimation *anim = [CABasicAnimation animation]; 图层有 ...
- Ubuntu安装 php + apache + mysql
转载请注明来源:https://www.cnblogs.com/hookjc/ 1.安装SSH(必须) sudo apt-get install ssh 2.安装MySQL(虽然现在最新版为5.1,但 ...
- centOS 强制卸载PHP
centOS上的php过低是需要重新安装时,不得不卸载自定义安装,如下操作 查看php版本命令: #php -v 这个命令是删除不干净的 #yum remove php 因为使用这个命令以后再用 #p ...