安装配置ingress-nginx支持https访问
说明:
1.k8s版本:v1.23;
2.内网测试环境1台master,2台node节点,使用 DaemonSet+HostNetwork+nodeSelector 方式部署 ingress-nginx 到 node02 节点,node02打标签作为边缘节点;
3.测试了https配置;
Ingress简介:
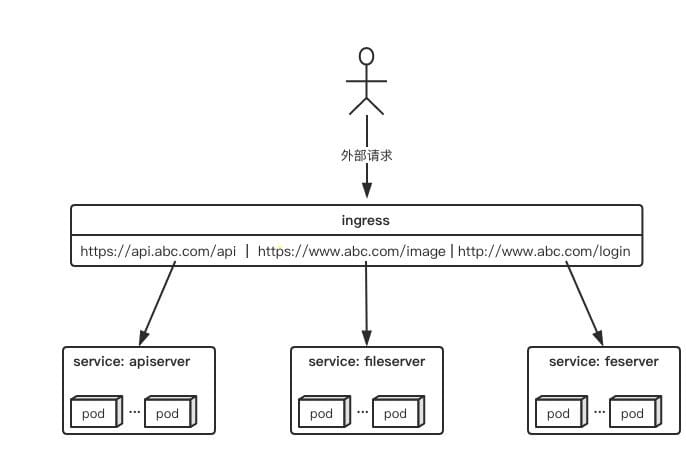
Ingress 是Kubernetes 1.1 版本新增的资源对象,用于将不用URL的访问请求转发到后端不同的Service,以实现HTTP 层(7层)的业务路由机制。简单点说:Ingress 是 HTTP 层的服务暴露规则。也可以理解为Service的Service。对于Ingress来说,必须要绑定一个域名。
它由两部分组成:
Ingress Controller:
Ingress Controller:是Service的入口网关,有很多种,最常见的就是Ingress-Nginx;- 以
pod形式运行的;
Ingress策略设置(k8s中的ingress资源):
- 以
yaml形式为载体的一组声明式的策略;(可使用 kubectl get ingress -n namespaces 查看)
- 以
Ingress部署的几种方式:
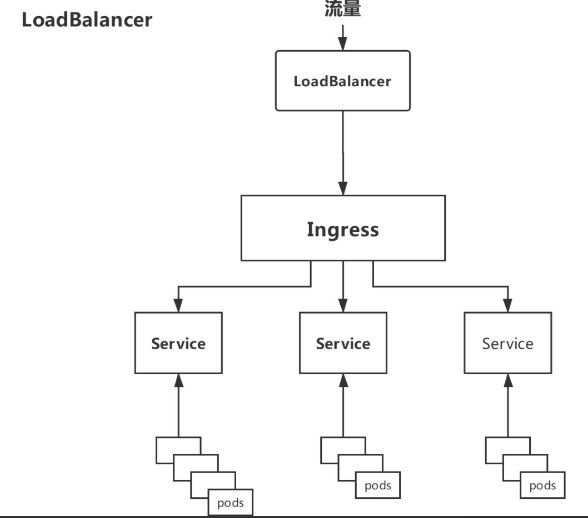
Deployment+LoadBalancer模式的Service
如果要把
ingress部署在公有云,那可以选择这种方式。用Deployment部署ingress-controller,创建一个type为LoadBalancer的service关联这组pod。大部分公有云,都会为LoadBalancer的service自动创建一个负载均衡器,通常还绑定了公网地址。只要把域名解析指向该地址,就实现了集群服务的对外暴露。缺点:需要额外购买公有云的负载均衡服务,不适用于没有负载均衡器的非公有云服务;
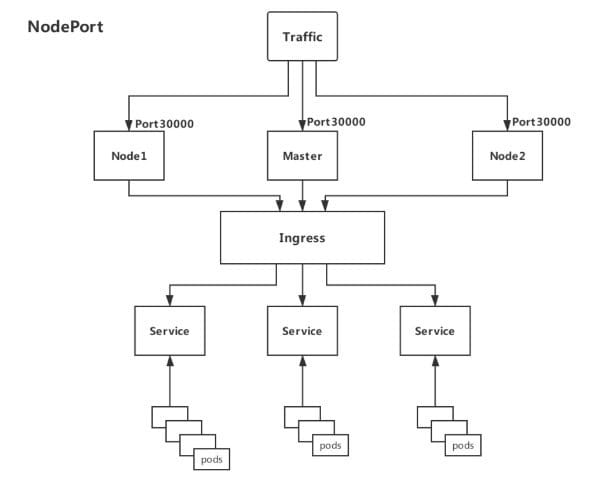
Deployment+NodePort模式的Service
同样用
deployment模式部署ingress-controller,并创建对应的服务,但是type为NodePort。这样,ingress就会暴露在集群节点ip的特定端口上。由于nodeport暴露的端口是随机端口(端口数会大于30000),一般会在前面再搭建一套负载均衡器来转发请求。该方式一般用于宿主机是相对固定的环境ip地址不变的场景。缺点:
NodePort方式暴露ingress虽然简单方便,但是NodePort多了一层NAT,在请求量级很大时可能对性能会有一定影响。- 请求节点会是类似
https://www.xx.com:30076,其中30076是kubectl get svc -n ingress-nginx的svc暴露出来的nodeport端口。
DaemonSet+HostNetwork+nodeSelector(推荐)
用
DaemonSet结合nodeselector来部署ingress-controller到特定的node上(边缘节点),然后使用HostNetwork直接把该pod与宿主机node的网络打通,直接使用宿主机的80/433端口就能访问服务。这时,ingress-controller所在的node机器就很类似传统架构的边缘节点,比如机房入口的nginx服务器。优点:
- 该方式整个请求链路最简单,性能相对
NodePort模式更好。
缺点:
- 由于直接利用宿主机节点的网络和端口,一个
node只能部署一个ingress-controller pod。
因为此次是内网测试环境,所以使用第3中方法部署测试
- 该方式整个请求链路最简单,性能相对
使用Helm以DaemonSet+HostNetwork+nodeSelector的方式部署ingress-nginx
nginx-ingress-controall官网:https://kubernetes.github.io/ingress-nginx/
现有的测试环境是1台master+2台node,我们选择node02做为边缘节点,给他打上边缘节点的标签,这样部署的ingress-controall的pod会只跑在node02这个节点上。(如果是生产环境,可以选择2台node作为边缘节点,为了避免单点故障,可使用keepalive提高高可用)
#给node02节点打上边缘节点的标签

kubectl label nodes node02 edgenode=true

#查看各节点的标签

kubectl get node --show-labels
拉取helm源:
#添加helm源

helm repo add ingress-nginx https://kubernetes.github.io/ingress-nginx

#更新源

helm repo update

#拉取相关配置修改values.yaml

helm pull ingress-nginx/ingress-nginx
修改values.yaml:
commonLabels: {}

controller:

  name: controller

  image:

    registry: k8s.gcr.io		#如果怕墙此处可换为阿里镜像源

    image: ingress-nginx/controller

    tag: "v1.1.1"

    digest: sha256:0bc88eb15f9e7f84e8e56c14fa5735aaa488b840983f87bd79b1054190e660de

    pullPolicy: IfNotPresent

    runAsUser: 101

    allowPrivilegeEscalation: true

  existingPsp: ""

  containerName: controller

  containerPort:

    http: 80

    https: 443

  config: {}

  configAnnotations: {}

  proxySetHeaders: {}

  addHeaders: {}

  dnsConfig: {}

  hostname: {}

  dnsPolicy: ClusterFirst

  reportNodeInternalIp: false

  watchIngressWithoutClass: false

  ingressClassByName: false

  allowSnippetAnnotations: true

  hostNetwork: true			#此处改为true

  hostPort:

    enabled: false

    ports:

      http: 80

      https: 443

  electionID: ingress-controller-leader

  ingressClassResource:

    name: nginx

    enabled: true

    default: false

    controllerValue: "k8s.io/ingress-nginx"

    parameters: {}

  ingressClass: nginx

  podLabels: {}

  podSecurityContext: {}

  sysctls: {}

  publishService:

    enabled: true

    pathOverride: ""

  scope:

    enabled: false

    namespace: ""

    namespaceSelector: ""

  configMapNamespace: ""

  tcp:

    configMapNamespace: ""

    annotations: {}

  udp:

    configMapNamespace: ""

    annotations: {}

  maxmindLicenseKey: ""

  extraArgs: {}

  extraEnvs: []

  kind: DaemonSet			#此处改为DaemonSet,控制器将以DaemonSet方式运行在特定node

  annotations: {}

  labels: {}

  updateStrategy: {}

  minReadySeconds: 0

  tolerations: []

  affinity: {}

  topologySpreadConstraints: []

  terminationGracePeriodSeconds: 300

  nodeSelector:

    kubernetes.io/os: linux

    edgenode: 'true'			#此处加上刚才给node02打的标签,控制器将运行在node02上

  livenessProbe:

    httpGet:

      path: "/healthz"

      port: 10254

      scheme: HTTP

    initialDelaySeconds: 10

    periodSeconds: 10

    timeoutSeconds: 1

    successThreshold: 1

    failureThreshold: 5

  readinessProbe:

    httpGet:

      path: "/healthz"

      port: 10254

      scheme: HTTP

    initialDelaySeconds: 10

    periodSeconds: 10

    timeoutSeconds: 1

    successThreshold: 1

    failureThreshold: 3

  healthCheckPath: "/healthz"

  healthCheckHost: ""

  podAnnotations: {}

  replicaCount: 1

  minAvailable: 1

  resources:

    requests:

      cpu: 100m

      memory: 90Mi

  autoscaling:

    enabled: false

    minReplicas: 1

    maxReplicas: 11

    targetCPUUtilizationPercentage: 50

    targetMemoryUtilizationPercentage: 50

    behavior: {}

  autoscalingTemplate: []

  keda:

    apiVersion: "keda.sh/v1alpha1"

    enabled: false

    minReplicas: 1

    maxReplicas: 11

    pollingInterval: 30

    cooldownPeriod: 300

    restoreToOriginalReplicaCount: false

    scaledObject:

      annotations: {}

    triggers: []

    behavior: {}

  enableMimalloc: true

  customTemplate:

    configMapName: ""

    configMapKey: ""

  service:

    enabled: true

    appProtocol: true

    annotations: {}

    labels: {}

    externalIPs: []

    loadBalancerSourceRanges: []

    enableHttp: true

    enableHttps: true

    ipFamilyPolicy: "SingleStack"

    ipFamilies:

      - IPv4

    ports:

      http: 80

      https: 443

    targetPorts:

      http: http

      https: https

    type: ClusterIP			#此处改为ClusterIP,默认为LoadBalancer

    nodePorts:

      http: ""

      https: ""

      tcp: {}

      udp: {}

    external:

      enabled: true

    internal:

      enabled: false

      annotations: {}

      loadBalancerSourceRanges: []

  extraContainers: []

  extraVolumeMounts: []

  extraVolumes: []

  extraInitContainers: []

  extraModules: []

  admissionWebhooks:

    annotations: {}

    enabled: true

    failurePolicy: Fail

    port: 8443

    certificate: "/usr/local/certificates/cert"

    key: "/usr/local/certificates/key"

    namespaceSelector: {}

    objectSelector: {}

    labels: {}

    existingPsp: ""

    service:

      annotations: {}

      externalIPs: []

      loadBalancerSourceRanges: []

      servicePort: 443

      type: ClusterIP

    createSecretJob:

      resources: {}

    patchWebhookJob:

      resources: {}

    patch:

      enabled: true

      image:

        registry: k8s.gcr.io

        image: ingress-nginx/kube-webhook-certgen

        tag: v1.1.1

        digest: sha256:64d8c73dca984af206adf9d6d7e46aa550362b1d7a01f3a0a91b20cc67868660

        pullPolicy: IfNotPresent

      priorityClassName: ""

      podAnnotations: {}

      nodeSelector:

        kubernetes.io/os: linux

      tolerations: []

      labels: {}

      runAsUser: 2000

  metrics:

    port: 10254

    enabled: false

    service:

      annotations: {}

      externalIPs: []

      loadBalancerSourceRanges: []

      servicePort: 10254

      type: ClusterIP

    serviceMonitor:

      enabled: false

      additionalLabels: {}

      namespace: ""

      namespaceSelector: {}

      scrapeInterval: 30s

      targetLabels: []

      relabelings: []

      metricRelabelings: []

    prometheusRule:

      enabled: false

      additionalLabels: {}

      rules: []

  lifecycle:

    preStop:

      exec:

        command:

          - /wait-shutdown

  priorityClassName: ""

revisionHistoryLimit: 10

defaultBackend:

  enabled: true			#此处改为true,说明创建个默认的页面,如果有不匹配的请求将返回这个页面

  name: defaultbackend

  image:

    registry: k8s.gcr.io

    image: defaultbackend-amd64

    tag: "1.5"

    pullPolicy: IfNotPresent

    runAsUser: 65534

    runAsNonRoot: true

    readOnlyRootFilesystem: true

    allowPrivilegeEscalation: false

  existingPsp: ""

  extraArgs: {}

  serviceAccount:

    create: true

    name: ""

    automountServiceAccountToken: true

  extraEnvs: []

  port: 8080

  livenessProbe:

    failureThreshold: 3

    initialDelaySeconds: 30

    periodSeconds: 10

    successThreshold: 1

    timeoutSeconds: 5

  readinessProbe:

    failureThreshold: 6

    initialDelaySeconds: 0

    periodSeconds: 5

    successThreshold: 1

    timeoutSeconds: 5

  tolerations: []

  affinity: {}

  podSecurityContext: {}

  containerSecurityContext: {}

  podLabels: {}

  nodeSelector:

    kubernetes.io/os: linux

  podAnnotations: {}

  replicaCount: 1

  minAvailable: 1

  resources: {}

  extraVolumeMounts: []

  extraVolumes: []

  autoscaling:

    annotations: {}

    enabled: false

    minReplicas: 1

    maxReplicas: 2

    targetCPUUtilizationPercentage: 50

    targetMemoryUtilizationPercentage: 50

  service:

    annotations: {}

    externalIPs: []

    loadBalancerSourceRanges: []

    servicePort: 80

    type: ClusterIP

  priorityClassName: ""

  labels: {}

rbac:

  create: true

  scope: false

podSecurityPolicy:

  enabled: false

serviceAccount:

  create: true

  name: ""

  automountServiceAccountToken: true

  annotations: {}

imagePullSecrets: []

tcp: {}

udp: {}

dhParam:
使用helm安装:
#创建个ingress-nginx的命名空间

kubectl create ns ingress-nginx

#使用helm执行安装

helm install ingress-nginx ingress-nginx/ingress-nginx -f values.yaml -n ingress-nginx
查看创建的资源:
kubectl get all -n ingress-nginx
可以看到启动了2个pod,一个为ingress-controller,一个为默认的后端defaultbackend
NAME                                                READY   STATUS    RESTARTS   AGE

pod/ingress-nginx-controller-kqqgj                  1/1     Running   0          21m

pod/ingress-nginx-defaultbackend-7df596dbc9-9c6ws   1/1     Running   0          21m

NAME                                         TYPE        CLUSTER-IP      EXTERNAL-IP   PORT(S)          AGE

service/ingress-nginx-controller             ClusterIP   10.106.80.36    <none>        80/TCP,443/TCP   21m

service/ingress-nginx-controller-admission   ClusterIP   10.111.63.107   <none>        443/TCP          21m

service/ingress-nginx-defaultbackend         ClusterIP   10.96.124.173   <none>        80/TCP           21m

NAME                                      DESIRED   CURRENT   READY   UP-TO-DATE   AVAILABLE   NODE SELECTOR                          AGE

daemonset.apps/ingress-nginx-controller   1         1         1       1            1           edgenode=true,kubernetes.io/os=linux   21m

NAME                                           READY   UP-TO-DATE   AVAILABLE   AGE

deployment.apps/ingress-nginx-defaultbackend   1/1     1            1           21m

NAME                                                      DESIRED   CURRENT   READY   AGE

replicaset.apps/ingress-nginx-defaultbackend-7df596dbc9   1         1         1       21m
ingress-controall部署好之后,我们使用nginx镜像部署个测试后端,之后再部署个ingress资源把后测试后端的server通过ingress暴露出去。
我们创建个test-nginx.yaml,定义了个nginx的pod和他对应的service,service使用ClusterIP方式暴露80端口。
#test-nginx.yaml

apiVersion: v1

kind: Service

metadata:

  name: nginx-test-service

  namespace: nginx-test

spec:

  selector:

    app: nginx-test

  ports:

  - name: http

    port: 81	# 后端Pod的端口

    targetPort: 80	# svc暴露的端口

---

apiVersion: apps/v1

kind: Deployment

metadata:

  name: nginx-test-deployment

  namespace: nginx-test

spec:

  replicas: 1

  selector:

    matchLabels:

      app: nginx-test

  template:

    metadata:

      labels:

        app: nginx-test

    spec:

      containers:

      - name: nginx-test

        image: nginx:1.15-alpine

        imagePullPolicy: IfNotPresent

        lifecycle:

          postStart:

            exec:

              command: ["/bin/sh","-c","echo nginx-test.wdyxgames.com > /usr/share/nginx/html/index.html"]

        ports:

        - name: httpd

          containerPort: 81		#pod暴露出来的端口
创建测试后端pod和service:
#创建nginx-test命名空间

kubectl create ns nginx-test

#使用yaml创建pod和svc

kubectl apply -f test-nginx.yaml

#查看创建的资源

kubectl get all -n nginx-test

#####

NAME                                       READY   STATUS    RESTARTS   AGE

pod/nginx-test-deployment-fdf785bb-k6xxl   1/1     Running   0          24s

NAME                         TYPE        CLUSTER-IP      EXTERNAL-IP   PORT(S)   AGE

service/nginx-test-service   ClusterIP   10.97.180.229   <none>        80/TCP    24s

NAME                                    READY   UP-TO-DATE   AVAILABLE   AGE

deployment.apps/nginx-test-deployment   1/1     1            1           24s

NAME                                             DESIRED   CURRENT   READY   AGE

replicaset.apps/nginx-test-deployment-fdf785bb   1         1         1       24s
至此,我们创建好了后端测试资源和ingress-controall,我们再创建ingress资源,把后端测试的service暴露到公网中去
#test-nginx-ingress.yaml

apiVersion: networking.k8s.io/v1

kind: Ingress

metadata:

  annotations:

    kubernetes.io/ingress.class: "nginx"

  name: example

spec:

  rules: # 一个ingress可以配置多个rules

  - host: nginx-test.wdyxgames.com # 域名配置,可以不写,匹配*,此域名就是浏览器里访问的URL

    http:

      paths: # 相当于nginx的location,同一个host可以配置多个path,此处我们写所有

      - backend:

          service:

            name: nginx-test-service  # 代理到哪个svc,与上面创建的测试后端svc对应

            port:

              number: 80 # svc暴露出来的端口,与上面创建的测试后端svc对应

        path: /

        pathType: Prefix
#执行文件安装

kubectl apply -f  test-nginx-ingress.yaml  -n nginx-test
绑定host测试,此处我们绑到了2个host到node02边缘节点的ip上去,一个是在ingress中定义了的nginx-test.wdyxgames.com,一个是没有定义了的nginx-test1.wdyxgames.com,使用浏览器访问:

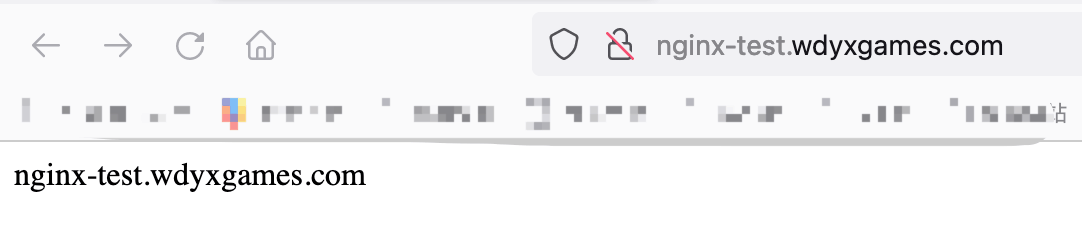
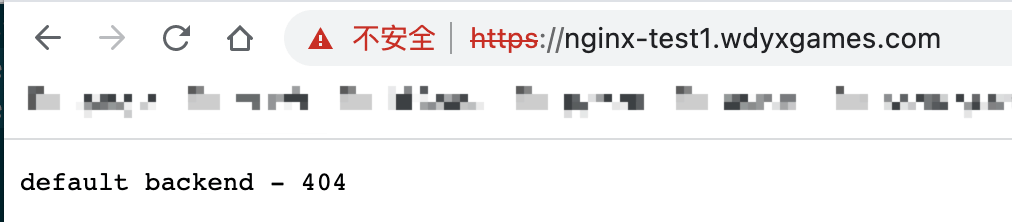
可以看见http://nginx-test.wdyxgames.com访问成功,http://nginx-test1.wdyxgames.com因为没有在ingress中定义返回的是defaultbakend中的nginx返回的页面
ingress-nginx配置使用证书支持https
首先把证书导入到
k8s的secret中去:kubectl create secret tls wdyxgames-tls --key _.wdyxgames.com.key --cert _.wdyxgames.com.crt -n nginx-test
再创建个
ingress资源文件指定使用https:#test-nginx-ingress-https.yaml
apiVersion: networking.k8s.io/v1
kind: Ingress
metadata:
annotations:
kubernetes.io/ingress.class: "nginx"
name: example
spec:
rules: # 一个ingress可以配置多个rules
- host: nginx-test.wdyxgames.com # 域名配置,可以不写,匹配*,此域名就是浏览器里访问的URL
http:
paths: # 相当于nginx的location,同一个host可以配置多个path,此处我们写所有
- backend:
service:
name: nginx-test-service # 代理到哪个svc,与上面创建的测试后端svc对应
port:
number: 80 # svc暴露出来的端口,与上面创建的测试后端svc对应
path: /
pathType: Prefix
tls:
- hosts:
- nginx-test.wdyxgames.com
secretName: wdyxgames-tls
对比上面,只是添加了
tls处的内容:#使用命令创建
kubectl apply -f test-nginx-ingress-https.yaml -n nginx-test #####
Error from server (BadRequest): error when creating "test-nginx-ingress-https.yaml": admission webhook "validate.nginx.ingress.kubernetes.io" denied the request: host "nginx-test.wdyxgames.com" and path "/" is already defined in ingress nginx-test/example
#会有报错,是因为的http的ingress已经创建对应的转发关系,不可再创建 #删掉之前http的ingress,再创建
kubectl delete -f test-nginx-ingress.yaml -n nginx-test
使用浏览器访问,可见已经支持
https访问了: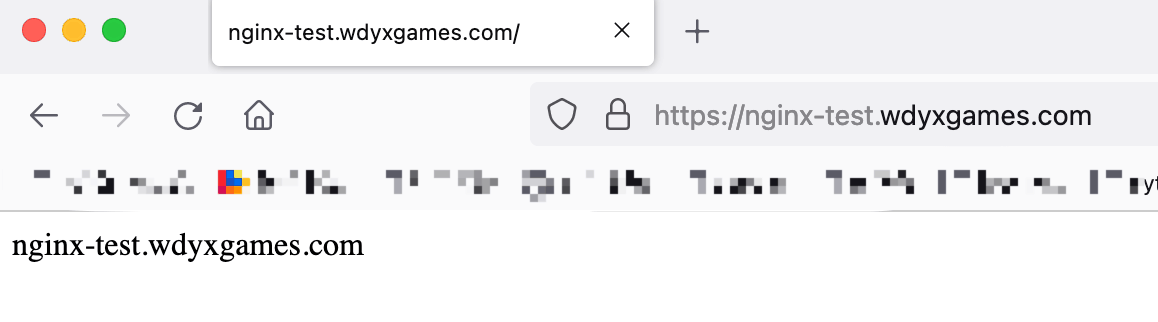
安装配置ingress-nginx支持https访问的更多相关文章
- 独立版Jexus配置SSL,支持https访问
一.申请证书[腾讯免费证书] 二.验证DNS,即解析域名.记录类型选择 TXT ,主机记录与证书上的主机记录保持一致,记录值也与证书上的记录值保持一致 三.等待DNS验证与CA轮询,轮询成功后即可下载 ...
- nginx 支持https访问
1,先确认nginx安装时已编译http_ssl模块. 就是执行nginx -V命令查看是否存在--with-http_ssl_module.如果没有,则需要重新编译nginx将该模块加入.yum安装 ...
- Ubuntu Nginx下配置网站ssl实现https访问
最近在看 HTTP权威指南 看到介绍了HTTPS的ssl,自己就动手测试了下,将步骤记录下 HTTPS简介 什么是HTTPS?百科是这样解释的.HTTPS(全称:Hyper Text Trans ...
- nginx配置ssl证书实现https访问
一,环境说明 服务器系统:ubuntu16.04LTS 服务器IP地址:47.89.12.99 域名:bjubi.com 二,域名解析到服务器 在阿里云控制台-产品与服务-云解析DNS-找到需要解析的 ...
- 阿里云 nginx配置ssl证书实现https访问
一,环境说明 服务器系统:ubuntu16.04LTS 服务器IP地址:47.89.12.99 域名:bjubi.com 二,域名解析到服务器 在阿里云控制台-产品与服务-云解析DNS-找到需要解析的 ...
- 配置nginx支持Https
配置nginx支持Https一定要先使用stop停止nginx然后重新代开不能使用reload 一:安装letsencrypt 1.从git上克隆下来git clone https://github. ...
- [转帖]nginx配置ssl证书实现https访问
https://www.cnblogs.com/tianhei/p/7726505.html 今天就是如此处理的 感觉挺不错的. 一,环境说明 服务器系统:ubuntu16.04LTS 服务器IP地址 ...
- Windows 10下安装配置Caffe并支持GPU加速(修改版)
基本环境 建议严格按照版本来 - Windows 10 - Visual Studio 2013 - Matlab R2016b - Anaconda - CUDA 8.0.44 - cuDNN v4 ...
- 微信小程序如何提交审核并发布?发布问题:小程序只支持https访问
http://www.jisuapp.cn/news/305.html 发布问题:1.小程序只支持https访问 2.要配置服务域名
随机推荐
- 游戏mod启动器原理
基本原理 游戏程序会按一定顺序读取游戏文件夹根目录的文件. 所以我们制作mod和补丁的时候需要使得我们的文件先读取,从而使得后面读取到重复内容时候,游戏运行的内存中舍弃掉原本的文件. 游戏mod启动器 ...
- Cesium中级教程8 - Introduction to Particle Systems 粒子系统入门
Cesium中文网:http://cesiumcn.org/ | 国内快速访问:http://cesium.coinidea.com/ What is a particle system? 什么是粒子 ...
- http状态码 200 304 404 503等
浏览器采用http请求时,会封装http get等信息见下图请求头,然后服务器响应后回发一些信息,包括状态码,响应头,响应信息等等,如下图. 右上图可见两种状态码,一种是200 一种是304.其中20 ...
- 巧用 Base62 解决字段太短的问题
最近银联一纸 259 号改造通知,所有支付机构开始改造支付交易,上传终端信息. 不知道其他支付机构的小伙伴针对这次改造是否开始了? 由于这次银联给的时间非常少,我们这边改动涉及到相关上游一起改造,所以 ...
- golang中的tcp编程
1. tcp server package main import ( "bufio" "fmt" "net" ) func main() ...
- 【Azure Developer】Azure Logic App 示例: 解析 Request Body 的 JSON 的表达式? triggerBody()?
问题描述 通过Azure Logic App(逻辑应用)实现无代码的处理JSON数据.但是如何获取Request Body中的一个属性值呢? 例如:如何来获取以下JSON结构中的 ObjectName ...
- Hello,find!
Hello,find! 前言 余幼时,每至除夕,爆竹声声,如雷贯耳,醒于梦中,便知春节将至.与兄长二三人,执摔炮六七只, 玩耍于廷中.出门罢,廷中白雪覆于黄土之上.二三尺之外,见犬窝,余之爱犬趴于其中 ...
- k8s基本概念,资源对象
kubernetes里的master指的是集群控制节点 master负责是整个集群的管理和控制 kubernetes3大进程 API server 增删改查操作的关键入口 controller man ...
- Java程序设计(2021春)——第五章输入输出笔记与思考
Java程序设计(2021春)--第五章输入输出笔记与思考 本章概览: 异常处理简介 程序运行时,环境.操作等可能出现各种错误.故障,我们希望程序具有容错能力,给出错误信息.面向对象的程序设计里有异常 ...
- Java 自定义窗体(标题栏、窗体背景)
感谢大佬:https://blog.csdn.net/ltx06/article/details/28996839 最近在书上看到这篇文章,觉得挺有意思.与大家分享一下,具体可以参见明日科技出版的&l ...