
maven中profiles使用详解
使用的场景
常常遇到一些项目中多环境切换的问题。比如在开发过程中用到开发环境,在测试中使用测试环境,在生产中用生产环境的情况。springboot中提供了 spring.profile.active的方式来实现多环境的切换,通过设置环境变量和启动参数的方式。但是这样做终究不能一劳永逸,要么需要修改yml文件,要么需要记得启动的时候带上参数。而利用maven的profiles,可以减少很多工作。让我们通过几个例子一步步的掌握使用maven的profiles属性。
快速上手
pom.xml文件设置
<profiles>

        <profile>

            <!--不同环境Profile的唯一id-->

            <id>dev</id>

            <properties>

                <!--profiles.active是自定义的字段(名字随便起),自定义字段可以有多个-->

                <profiles.active>dev</profiles.active>

            </properties>

        </profile>

        <profile>

            <id>prod</id>

            <properties>

                <profiles.active>prod</profiles.active>

            </properties>

            <activation>

                <activeByDefault>true</activeByDefault>

            </activation>

        </profile>

        <profile>

            <id>test</id>

            <properties>

                <profiles.active>test</profiles.active>

            </properties>

        </profile>

</profiles>
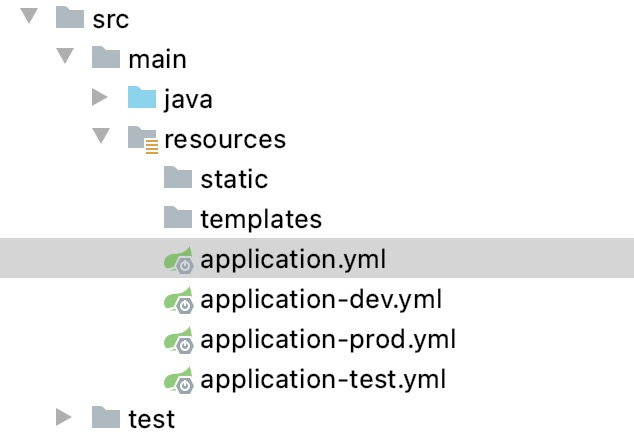
目录结构。
application.yml
spring:

  profiles:

    active: @profiles.active@
application-dev.yml中代码如下
server:

  port: 7091
其他几个文件我只是把端口号进行了修改,方便打包看不同的效果。
maven打包与激活profiles
你可以执行命令
mvn clean package -Ptest
然后启动jar包,可以看到jar包启动的是test的配置,如果换成-Pdev启动的就是dev包的端口。
默认启动方式
如果不带-Ptest,启动的是 prod的端口。因为在profiles中我们看到有配置默认的选项。
 <activation>

  <activeByDefault>true</activeByDefault>

</activation>
settings.xml中使用activeProfiles指定
<activeProfiles>

     <activeProfile>profileTest1</activeProfile>

</activeProfiles>
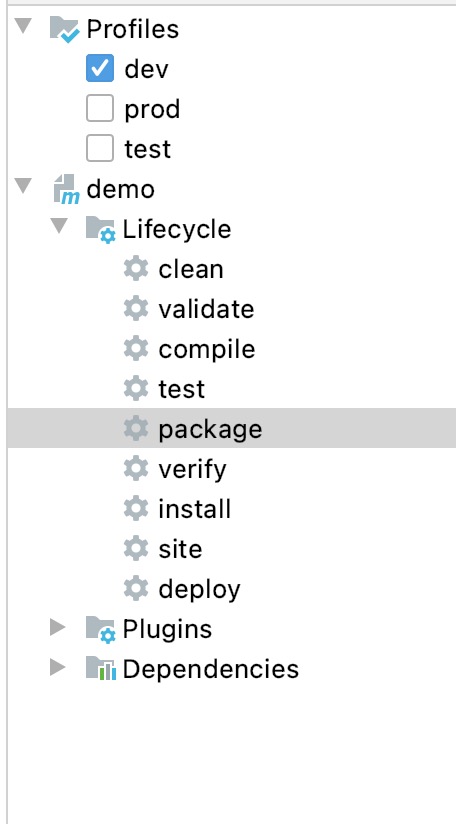
通过IDEA的可视化的方式
当然如果使用IDEA工具进行开发,还可以使用可视化的方式进行打包。
更高级的玩法
通过和pom结合的方式设置动态参数
如果我们希望通过docker-maven-plugin插件,把编译好的jar打包成docker并且传入相应的开发、测试、生产的服务器中去。这个时候,我们就需要根据不同的条件去传入不同的服务器。
在profiles中我们可以做以下定义
 <profiles>

        <profile>

            <id>dev</id>

            <properties>

                <profile.id>dev</profile.id>

                <docker.host>http://dev.demo.com:2375</docker.host>

            </properties>

            <activation>

                <activeByDefault>true</activeByDefault>

            </activation>

        </profile>

        <profile>

            <id>test</id>

            <properties>

                <profile.id>test</profile.id>

                <docker.host>http://test.demo.com375</docker.host>

            </properties>

        </profile>

        <profile>

            <id>prod</id>

            <properties>

                <profile.id>prod</profile.id>

                <docker.host>http://prod.demo.com:2375</docker.host>

            </properties>

        </profile>

    </profiles>
而在build控件中我们可以使用以下配置
<build>

  <plugins>

     <plugin>

                <groupId>com.spotify</groupId>

                <artifactId>docker-maven-plugin</artifactId>

                <version>1.1.0</version>

                <executions>

                    <execution>

                        <id>build-image</id>

                        <phase>package</phase>

                        <goals>

                            <goal>build</goal>

                        </goals>

                    </execution>

                </executions>

                <configuration>

                    <imageName>demo/${project.artifactId}</imageName>

                    <imageTags>

                        <imageTag>${project.version}-${current.time}</imageTag>

                        <imageTag>latest</imageTag>

                    </imageTags>

                    <forceTags>true</forceTags>

                    <dockerHost>${docker.host}</dockerHost>

                    <forceTags>true</forceTags>

                    <baseImage>java:8</baseImage>

                    <entryPoint>["java", "-jar", "/${project.build.finalName}.jar"]</entryPoint>

                    <resources>

                        <resource>

                            <targetPath>/</targetPath>

                            <directory>${project.build.directory}</directory>

                            <include>${project.build.finalName}.jar</include>

                        </resource>

                    </resources>

                </configuration>

            </plugin>

  </plugins>

</build>
其中 ${project.artifactId} 和${project.version}是关于节点下面和的引用。${current.time}是在build-helper-maven-plugin定义的,我们回头再研究。
${docker.host}则是我们在profiles中定义的,可以随着我们选择不同的profile,把jar包build成不同的docker镜像,并传入指定服务器。
通过和yml结合设置动态参数
除了可以在pom中设置动态参数,使得其根据profile的不同选择不同的参数。还可以通过设置不同的profile,让yml选择不同的参数。这点和快速上手的例子有点相似。具体如下:
设置profiles
<profiles>

        <profile>

            <id>dev</id>

            <properties>

                <profile.id>dev</profile.id>

                <eureka.url>http://127.0.0.1:8001/eureka</eureka.url>

            </properties>

            <activation>

                <activeByDefault>true</activeByDefault>

            </activation>

        </profile>

        <profile>

            <id>test</id>

            <properties>

                <profile.id>test</profile.id>

                <eureka.url>http://base-registry:8001/eureka</eureka.url>

            </properties>

        </profile>

        <profile>

            <id>prod</id>

            <properties>

                <profile.id>prod</profile.id>

                <eureka.url>http://base-registry:8001/eureka</eureka.url>

            </properties>

        </profile>

        <profile>

            <id>new</id>

            <properties>

                <profile.id>new</profile.id>

                <eureka.url>http://base-registry:8001/eureka</eureka.url>

            </properties>

        </profile>

    </profiles>
我们在profile中设置了一个eureka.url的属性,就可以在yml中直接调用。
eureka:

  client:

    service-url:

      defaultZone: @eureka.url@

    registry-fetch-interval-seconds: 10

  instance:

    prefer-ip-address: true
在IDEA调试和启动的时候,一般会报错如下:
org.yaml.snakeyaml.scanner.ScannerException: while scanning for the next token

found character ‘@’ that cannot start any token.
解决方法就是引入yaml.sankeyaml的jar包
<dependency>

            <groupId>org.yaml</groupId>

            <artifactId>snakeyaml</artifactId>

</dependency>
打包不同的资源
在profile打包yml文件的时候,如果我们解压了jar包,会发现还是把所有的application-profile.yml文件给打包进去了。这个可以通过设置打包参数,只打包需要的application文件。
 <profiles>

        <profile>

            <id>dev</id>

            <properties>

                <env>dev</env>

            </properties>

            <activation>

                <activeByDefault>true</activeByDefault>

            </activation>

        </profile>

        <profile>

            <id>prd</id>

            <properties>

                <env>prd</env>

            </properties>

        </profile>

    </profiles>

    <build>

        <finalName>springmvc</finalName>

        <resources>

            <resource>

                <directory>src/main/java</directory>

                <includes>

                    <include>*.xml</include>

                </includes>

            </resource>

            <resource>

                <directory>src/main/resources</directory>

                <excludes>

                    <exclude>dev/*</exclude>

                    <exclude>prd/*</exclude>

                </excludes>

            </resource>

            <resource>

                <directory>src/main/resources/${env}</directory>

            </resource>

        </resources>

    </build>
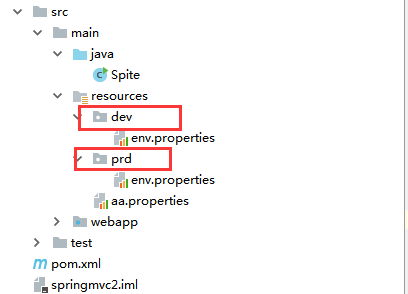
目录结构如下:
maven中profiles使用详解的更多相关文章
- maven中scope标签详解
前言 最近在做itoo的pom优化工作,发现对于maven依赖管理中的scope标签还是有不明白的地方,所以今天就来总结一下这方面的知识,scope在maven的依赖管理中主要负责项目的部署 mave ...
- Maven中POM.XML详解
转自https://blog.csdn.net/jariwsz/article/details/19554137 我们先看一个简单的例子: <project xmlns="http:/ ...
- maven 中的mirror详解
一.前言 今天同事遇到个问题,本来公司是有maven私服的,但同事觉得上面有些东西下载不到,于是在自己本地的maven配置中加了: <mirrors> <mirror> < ...
- maven中的Exclusions详解
依赖关系:Project-A>Project-B>Project-C,但是Project-A不依赖Project-C,在Project-A中的POM.xml应该进行如下配置: <de ...
- Maven中的dependency详解
<dependency> <groupId>junit</groupId> <artifactId>junit</artifactId> & ...
- Maven依赖中的scope详解,在eclipse里面用maven install可以编程成功,到服务器上用命令执行报VM crash错误
Maven依赖中的scope详解 项目中用了<scope>test</scope>在eclipse里面用maven install可以编译成功,到服务器上用命令执行报VM cr ...
- Maven pom.xml文件详解
Maven pom.xml文件详解 一.简介 POM全称是Project Object Model,即项目对象模型. pom.xml是maven的项目描述文件,它类似与antx的project.xml ...
- Maven配置文件setting.xml详解
注:本文来源于:大话JAVA的那些事 <Maven配置文件setting.xml详解> <?xml version="1.0" encoding="UT ...
- oracle中imp命令详解 .
转自http://www.cnblogs.com/songdavid/articles/2435439.html oracle中imp命令详解 Oracle的导入实用程序(Import utility ...
随机推荐
- 【剑指Offer】构建乘积数组 解题报告(Python)
[剑指Offer]构建乘积数组 解题报告(Python) 标签(空格分隔): 剑指Offer 题目地址:https://www.nowcoder.com/ta/coding-interviews 题目 ...
- python xlwt写Excel表
1 xlwt第三方库 说明:xlwt是一个用于将数据和格式化信息写入并生成Excel文件的库. 注意:xlwt不支持写xlsx表,打开表文件报错. 官方文档:https://xlwt.readthed ...
- Adversarial Self-Supervised Contrastive Learning
目录 概 主要内容 Linear Part 代码 Kim M., Tack J. & Hwang S. Adversarial Self-Supervised Contrastive Lear ...
- contos mongodb 安装
创建.repo文件,生成mongodb的源 vi /etc/yum.repos.d/mongodb-org-4.0.repo [mongodb-org-4.0] name=MongoDB Reposi ...
- Java中两个或多个byte数组合并及int类型转数组
Java中两个或多个byte数组合并及int类型转数组 // 用list好处是可以未知多个? public static byte[] test(List<byte[]> values) ...
- Swoole 中毫秒定时器(Timer)的使用
间隔定时器, tick 定时器会持续触发,直到调用 clear() 清除为止. $timer = Swoole\Timer::tick(3000, function (int $timer_id, $ ...
- python + requests发起请求,接口返回400,报错“Unexpected character encountered while parsing value: G. Path”
完整报错信息如下: {'errors': {'': ["Unexpected character encountered while parsing value: G. Path '', l ...
- ubuntu 18.04 安装mongodb并设为开机自启动
导入包管理系统使用的公钥 sudo apt-key adv --keyserver hkp://keyserver.ubuntu.com:80 --recv 9DA31620334BD75D9DCB4 ...
- 通过了解Servlet和Http之间的关系,了解web中http通信使用
注:图片如果损坏,点击文章链接:https://www.toutiao.com/i6512336761551585796/ 1.<Servlet简单实现开发部署过程> 2.<Serv ...
- [转]JS正则表达式基础
1. 正则表达式的概念 正则表达式(regular expression)描述了一种字符串匹配的模式.这种模式,我们可以理解成是一种"规则".根据这种规则再去匹配符合条件的结果,而 ...