高级UI-Palette
Google推出的Palette是用来调色的,正如其汉语意思一样,可以用来显示颜色,在显示图片的时候,会配合图片的色调来显示,这样就显得很融合,其实Palette可以分析出图片中的很多特性,例如主色调、鲜艳度、柔和度等
Palette获得的颜色
其主要的获取颜色方法如下:
获取主要颜色:getDominantColor()
获取柔和颜色:getMutedColor()
获取鲜艳颜色:getVibrantColor()
获取亮、柔和颜色:getLightMutedColor()
获取亮、鲜艳颜色:getLightVibrantColor()
获取暗、柔和颜色:getDarkMutedColor()
获取暗、鲜艳颜色:getDarkVibrantColor()
Palette实例
在一张图片中显示出获得的以上颜色,并以Google推荐的颜色显示在图片上
在手机中找到一张以前做的拍黄瓜的图片,还有煎鸡蛋的图片,这里就是用这两张图片来演示,代码没有任何变化,只是改变了ImageView里面的src源
在使用Palette要先导入依赖,25.4.0为版本号
implementation 'com.android.support:palette-v7:25.4.0'
贴出布局
<?xml version="1.0" encoding="utf-8"?>

<LinearLayout xmlns:android="http://schemas.android.com/apk/res/android"

    android:layout_width="match_parent"

    android:layout_height="match_parent"

    android:orientation="vertical">

    <RelativeLayout

        android:layout_width="match_parent"

        android:layout_height="300dp">

        <ImageView

            android:id="@+id/image_view"

            android:layout_width="300dp"

            android:layout_height="300dp"

            android:layout_centerInParent="true"

            android:src="@drawable/cuke" />

        <TextView

            android:id="@+id/text_view"

            android:layout_marginTop="5dp"

            android:layout_width="300dp"

            android:layout_height="120dp"

            android:layout_centerHorizontal="true"

            android:layout_alignBottom="@id/image_view"

            android:gravity="center"

            android:textSize="24sp"/>

    </RelativeLayout>

    <TextView

        android:id="@+id/text_view_1"

        android:layout_marginTop="5dp"

        android:layout_width="match_parent"

        android:layout_height="wrap_content"

        android:gravity="center"

        android:textSize="24sp"/>

    <TextView

        android:id="@+id/text_view_2"

        android:layout_marginTop="5dp"

        android:layout_width="match_parent"

        android:layout_height="wrap_content"

        android:gravity="center"

        android:textSize="24sp"/>

    <TextView

        android:id="@+id/text_view_3"

        android:layout_marginTop="5dp"

        android:layout_width="match_parent"

        android:layout_height="wrap_content"

        android:gravity="center"

        android:textSize="24sp"/>

    <TextView

        android:id="@+id/text_view_4"

        android:layout_marginTop="5dp"

        android:layout_width="match_parent"

        android:layout_height="wrap_content"

        android:gravity="center"

        android:textSize="24sp"/>

    <TextView

        android:id="@+id/text_view_5"

        android:layout_marginTop="5dp"

        android:layout_width="match_parent"

        android:layout_height="wrap_content"

        android:gravity="center"

        android:textSize="24sp"/>

    <TextView

        android:id="@+id/text_view_6"

        android:layout_marginTop="5dp"

        android:layout_width="match_parent"

        android:layout_height="wrap_content"

        android:gravity="center"

        android:textSize="24sp" />

    <TextView

        android:id="@+id/text_view_7"

        android:layout_marginTop="5dp"

        android:layout_width="match_parent"

        android:layout_height="wrap_content"

        android:gravity="center"

        android:textSize="24sp"/>

</LinearLayout>
然后在活动中使用
public class MainActivity extends AppCompatActivity {

    private ImageView imageView;

    private TextView textView1;

    private TextView textView2;

    private TextView textView3;

    private TextView textView4;

    private TextView textView5;

    private TextView textView6;

    private TextView textView7;

    private TextView textView;

    @Override

    protected void onCreate(final Bundle savedInstanceState) {

        super.onCreate(savedInstanceState);

        setContentView(R.layout.activity_main);

        imageView = (ImageView) findViewById(R.id.image_view);

        textView1 = (TextView) findViewById(R.id.text_view_1);

        textView2 = (TextView) findViewById(R.id.text_view_2);

        textView3 = (TextView) findViewById(R.id.text_view_3);

        textView4 = (TextView) findViewById(R.id.text_view_4);

        textView5 = (TextView) findViewById(R.id.text_view_5);

        textView6 = (TextView) findViewById(R.id.text_view_6);

        textView7 = (TextView) findViewById(R.id.text_view_7);

        textView = (TextView) findViewById(R.id.text_view);

        BitmapDrawable bitmapDrawable = (BitmapDrawable) imageView.getDrawable();

        Bitmap bitmap = bitmapDrawable.getBitmap();

        //同步方法,已弃用,可能造成线程阻塞

        //Palette palette = Palette.generate(bitmap);

        //异步

        Palette.from(bitmap).generate(new Palette.PaletteAsyncListener() {

            @Override

            public void onGenerated(Palette palette) {

                int dominantColor = palette.getDominantColor(Color.GRAY);

                textView1.setBackgroundColor(dominantColor);

                textView1.setText("DominantColor");

                int mutedColor = palette.getMutedColor(Color.GRAY);

                textView2.setBackgroundColor(mutedColor);

                textView2.setText("MutedColor");

                int vibrantColor = palette.getVibrantColor(Color.GRAY);

                textView3.setBackgroundColor(vibrantColor);

                textView3.setText("VibrantColor");

                int lightMutedColor = palette.getLightMutedColor(Color.GRAY);

                textView4.setBackgroundColor(lightMutedColor);

                textView4.setText("LightMutedColor");

                int lightVibrantColor = palette.getLightVibrantColor(Color.GRAY);

                textView5.setBackgroundColor(lightVibrantColor);

                textView5.setText("LightVibrantColor");

                int darkMutedColor = palette.getDarkMutedColor(Color.GRAY);

                textView6.setBackgroundColor(darkMutedColor);

                textView6.setText("DarkMutedColor");

                int darkVibrantColor = palette.getDarkVibrantColor(Color.GRAY);

                textView7.setBackgroundColor(darkVibrantColor);

                textView7.setText("DarkVibrantColor");

                //推荐颜色获取

                Palette.Swatch swatch = palette.getLightVibrantSwatch();

                //推荐的主色调

                int rgb = swatch.getRgb();

                //推荐的主体文字颜色

                int bodyTextColor = swatch.getBodyTextColor();

                //推荐的标题文字颜色

                int titleTextColor = swatch.getTitleTextColor();

                //颜色向量

                float[] hsl = swatch.getHsl();

                //得到该颜色在图片中的值

                int population = swatch.getPopulation();

                textView.setBackgroundColor(getTranslucentColor(0.7F, rgb));

                textView.setTextColor(bodyTextColor);

                textView.setText("这是一道我做的菜");

            }

        });

    }

    private int getTranslucentColor(float persent, int rgb) {

        //转化透明度

        int blue = rgb & 0xFF;

        int green = rgb >>> 8 & 0xFF;

        int red = rgb >>> 16 & 0xFF;

        int alpha = rgb >>> 24;

        alpha = Math.round(alpha * persent);

        return Color.argb(alpha, red, green, blue);

    }

}
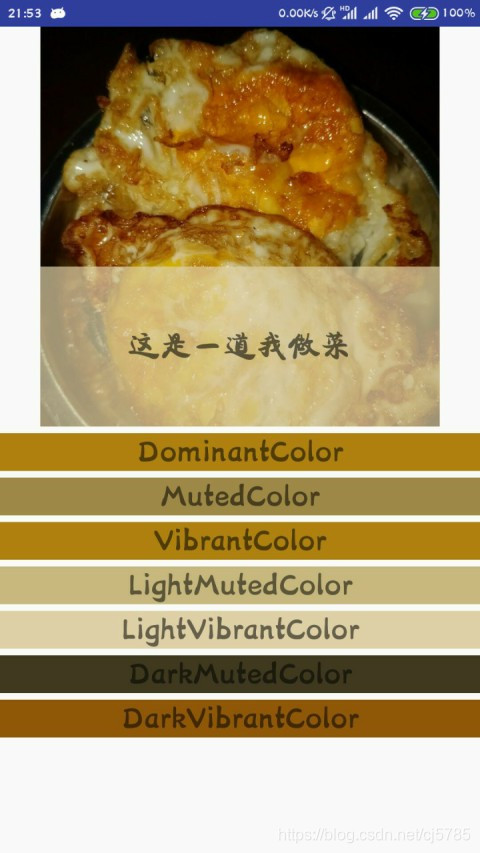
运行结果如下

高级UI-Palette的更多相关文章
- firefox 扩展开发笔记(三):高级ui交互编程
firefox 扩展开发笔记(三):高级ui交互编程 前言 前两篇链接 1:firefox 扩展开发笔记(一):jpm 使用实践以及调试 2:firefox 扩展开发笔记(二):进阶开发之移动设备模拟 ...
- Android 高级UI设计笔记07:RecyclerView 的详解
1. 使用RecyclerView 在 Android 应用程序中列表是一个非常重要的控件,适用场合非常多,如新闻列表.应用列表.消息列表等等,但是从Android 一出生到现在并没有非常 ...
- iOS开发——高级UI&带你玩转UITableView
带你玩装UITableView 在实际iOS开发中UITableView是使用最多,也是最重要的一个控件,如果你不会用它,那别说什么大神了,菜鸟都不如. 其实关于UItableView事非常简单的,实 ...
- 高级UI晋升之自定义View实战(六)
更多Android高级架构进阶视频学习请点击:https://space.bilibili.com/474380680本篇文章将从Android 自定义属性动画&Camera动画来介绍自定义V ...
- 高级UI晋升之布局ViewGroup(四)
更多Android高级架构进阶视频学习请点击:https://space.bilibili.com/474380680本篇文章将从LinearLayout.RelativeLayout.FrameLa ...
- 高级UI晋升之常用View(三)中篇
更多Android高级架构进阶视频学习请点击:https://space.bilibili.com/474380680本篇文章将从ViewPager来介绍常用View:文章目录 一.简介 二.基本使用 ...
- 高级UI晋升之View渲染机制(二)
更多Android高级架构进阶视频学习请点击:https://space.bilibili.com/474380680 优化性能一般从渲染,运算与内存,电量三个方面进行,今天开始说聊一聊Android ...
- 高级UI晋升之触摸事件分发机制(一)
更多Android高级架构进阶视频学习请点击:https://space.bilibili.com/474380680 0. 前言 鉴于安卓分发机制较为复杂,故分为多个层次进行讲解,分别为基础篇.实践 ...
- Android 高级UI设计笔记21:Android SegmentView(分段选择控件)
1. 分段控制(SegmentView) 首先我们先看看什么是SegmentView的效果,如下: 分段控制这个View控件是ios7的分段控制,和QQ消息页面顶部的效果一样,android没有这个控 ...
- Android 高级UI设计笔记17:Android在非UI线程中显示Toast
1. 子线程的Toast怎么显示不出来? 因为Toast在创建的时候会依赖于一个Handler,并且一个Handler是需要有一个Looper才能够创建,而普通的线程是不会自动去创建一个Looper对 ...
随机推荐
- springcloud系列
1.使用Spring Cloud搭建服务注册中心2.使用Spring Cloud搭建高可用服务注册中心3.Spring Cloud中服务的发现与消费4.Eureka中的核心概念5.什么是客户端负载均衡 ...
- 论自动AC机
O(∩_∩)O哈哈~第一篇原创博客.终于结束了我“无敌转载王”的称号了!!!好开心! (⊙v⊙)嗯,看到标题觉得我是神犇的人,请再次仔细看看标题,是“自动AC”,而非“AC自动”哦!这是利用lemon ...
- Django系列(四):多表操作
1.创建模型 例:我们来假定下面这些概念,字段和关系 作者模型:一个作者有姓名和年龄. 作者详细模型:把作者的详情放到详情表,包含生日,手机号,家庭住址等信息.作者详情模型和作者模型之间是一对一(on ...
- 下载安装tomcat 部署本地项目
原文地址:https://blog.csdn.net/weixin_40396459/article/details/81706543 下载地址:http://tomcat.apache.org 点击 ...
- 宏任务、微任务与Event Loop
说到宏任务和微任务,我们就不得不提 Event Loop 了 JS的本质是单线: 1. 一般来说,非阻塞性的任务采取同步的方式,直接在主线程的执行栈完成. 2. 一般来说,阻塞性的任务都会采用异步来执 ...
- docker笔记--容器之间如何互相免密?
在使用docker搭建hadoop分布式集群的时候,需要各容器之间相互免密登录,传统的方式我想或许会很麻烦,特别是当容器达到几百上千台的时候,这时就需要有一种方式来更简单实现免密登录了. 环境介绍: ...
- 关于$internalField边界条件【翻译】
翻译自:CFD-online 帖子地址:http://www.cfd-online.com/Forums/openfoam-pre-processing/122386-about-internalfi ...
- HTTP的POST提交的四种常见消息主体格式
HTTP/1.1 协议规定的 HTTP 请求方法有 OPTIONS.GET.HEAD.POST.PUT.DELETE.TRACE.CONNECT 这几种.其中 POST 一般用来向服务端提交数据,本文 ...
- GitHub OAuth 第三方登录示例教程
这组 OAuth 系列教程,第一篇介绍了基本概念,第二篇介绍了获取令牌的四种方式,今天演示一个实例,如何通过 OAuth 获取 API 数据. 很多网站登录时,允许使用第三方网站的身份,这称为&quo ...
- iframe窗口嵌套,子窗口跳转重叠在父窗口的问题
window.top //最顶层窗口 window.self //当前窗口 window.parent //父级窗口 "window.location.href"."lo ...